new posts in all blogs
Viewing: Blog Posts Tagged with: Step By Step, Most Recent at Top [Help]
Results 1 - 25 of 45
How to use this Page
You are viewing the most recent posts tagged with the words: Step By Step in the JacketFlap blog reader. What is a tag? Think of a tag as a keyword or category label. Tags can both help you find posts on JacketFlap.com as well as provide an easy way for you to "remember" and classify posts for later recall. Try adding a tag yourself by clicking "Add a tag" below a post's header. Scroll down through the list of Recent Posts in the left column and click on a post title that sounds interesting. You can view all posts from a specific blog by clicking the Blog name in the right column, or you can click a 'More Posts from this Blog' link in any individual post.
 |
How to draw a lake monster
How to draw a lake monster from Silly monsters ABC! |
.jpg?picon=572)
By:
andrea joseph,
on 10/22/2016
Blog:
andrea joseph's sketchblog
(
Login to Add to MyJacketFlap)
JacketFlap tags:
Manchester,
step by step,
Urban Sketchers,
sketcher,
urban sketching,
AJ,
andrea joseph,
#inktober,
inktober2016,
Northern Quarter,
Add a tag
How to make an Urban Sketch (in the North of England in Autumn (i.e. it's cold)) in 10 easy steps;
(Optional step; Turn up to the location and realise you've brought all your inks but no pen. No really (I told you I was a rubbish urban sketcher). Go buy pens)
Step 1. Find a coffee shop with a window seat and a view
Step 2. Have a coffee and sandwich. This is one of the more complicated steps; I'm in the Northern Quarter, of Manchester, so will have to decide between ten different coffee beans, made in fifteen different ways, then there's the bread...sour dough, brioche, rye....
Step 3. Make a mess of the table
Step 4. Ah shit. Why did I put colour on it?
Step 5. Have another coffee. And a Danish pastry. Try to hide the mess you've made of the table when they bring it over.
Step 6. Add lettering to try to take away the focus from the awful colour work
Step 7. Pigeons
Step 8. Scrub the table then go outside and take the obligatory out of focus urban sketcher photo, whilst holding your book in front of the building with one hand and trying to take photo with the other hand whilst worrying that somebody is going to snatch your phone.
Step 9. When all else fails go shopping
Step 10. Reassess at home over a cup of tea. Followed by either throwing it in the bin or feeling a little bit smug.

By:
nicole,
on 2/15/2016
Blog:
the enchanted easel
(
Login to Add to MyJacketFlap)
JacketFlap tags:
girl,
winter,
flowers,
snow,
painting,
sketch,
acrylic,
children's art,
Facebook,
pencil,
paint,
wip,
step by step,
kawaii,
canvas,
whimsical,
snowdrops,
icicles,
the enchanted easel,
silence of the snowdrops,
Add a tag
i thought it would be interetsing and fun to take a look into the creative process of my paintings...from thumbnail to sketch to paint palette(s) to the finsihed piece. i know i absolutely geek out looking at other artists WIPs so i thought i'd create a new album after each painting of the step by step process i use (and have used for YEARS) and share it with everyone. i work traditonally...pencil, paper, paint, canvas. i have much respect for the digital artists of the world yet for me, the passion and love will ALWAYS be in the traditonal tube of paint. old school...and proud.
for a look at the full album and step by step instructions, please click on over to my Facebook page...and perhaps give it a "like", if you would be so kind! :)
PRINTS of this beauty here. ORIGINAL PAINTING is AVAILABLE. contact me, if interested.
I don't understand how people get bored. It's a complete mystery to me. How is it even possible when there are so many things you can do to amuse yourself? I have a million and one projects on the go that I can dip into when I have nothing else to do. My problem is those projects too often get shelved because I never have nothing else to do.
Here's one of them. I started this a little while back when my friend, designer
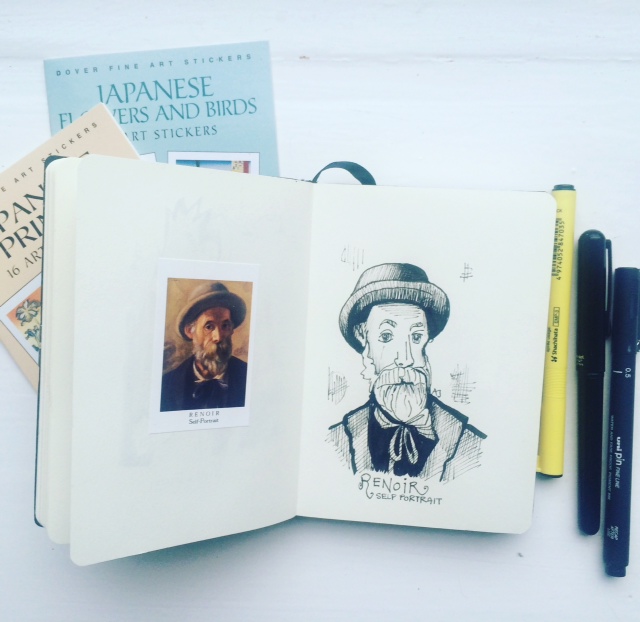
Emily Pickle, bought me a couple of Chagall and Renoir sticker books. At the same time I'd bought a couple of cheap little sketchbooks that were on a buy one get one free offer. So I dedicated one to copying the stickers. But, copying them upside down
Now, I'd heard about this technique a long time ago, when I first started drawing. I'm sure it was through
Danny Gregory but I can't be certain. I didn't really give it much of a go back then. I was too caught up in making everything look perfect, and hadn't really learnt to trust my own judgement. Anyway, I only really started playing around with the technique, properly, a few years ago. Now, I really love it and use it often. Especially with portraits.
So how does it work? Well, it's really quite simple. I'm sure many of you already know, but for those who don't (and being self taught and not having that art school background, I had never come across these techniques before hanging out with illustrators online), here's a quick demo.
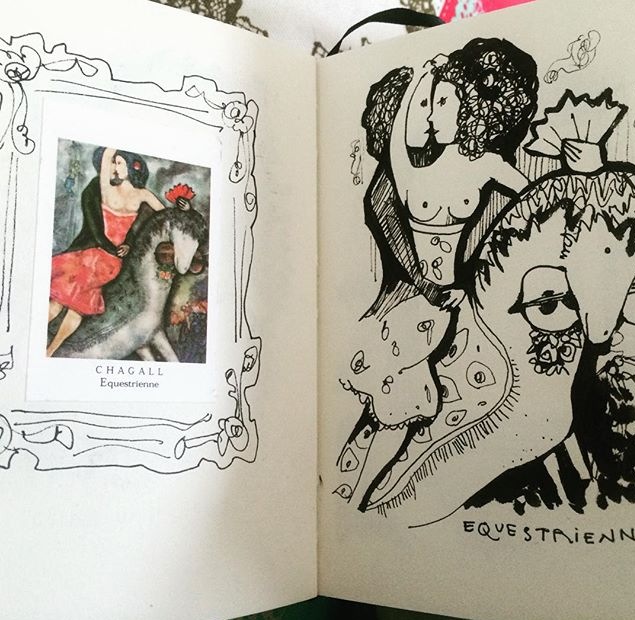
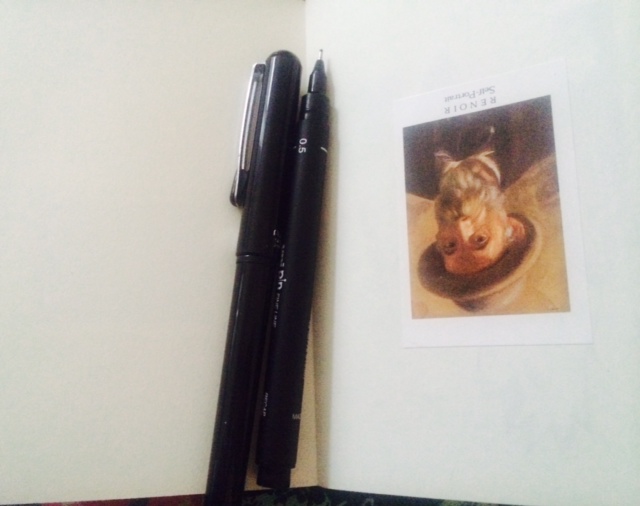
As I said, I was given these little sticker books of paintings from a series by the great painters. I'm not really a Renoir fan, but that really doesn't matter at all. And, as for Chagall, well, although I knew his work I hadn't studied it until now. And now I really am a big fan. I stuck all the stickers on the left hand pages of the sketchbook. You don't need stickers though. You can use absolutely anything as subject matter.
Then what you do is you turn the book upside down. See below.
All I have used is a fine pen and then a thicker pen; like a brush pen, a calligraphy pen or anything with a thicker nib. A marker pen will work just as well although they often bleed through the paper.
I started by making a line drawing. This exercise is all about looking. Really looking. Starting in the top left hand corner and trying to copy, as best you can, the photo or image you're working from. Stop wondering if you're getting it 'right' and just keep looking. Resist the urge to turn it the right way up until you've drawn the whole image in.
THEN you can turn it around. It's never really going to be 'perfect'. There'll always be a quirkiness about your drawing, but I think that's the joy of doing this. I always find I make the eyes huge.
When I'd completed the line drawing, and turned the book around, I shade the drawing with the thicker pen. There's no reason you can't do all that while the image is still upside down. I just like brining it together like this at the end.
I've since found some more stickers of Japanese art which should complete the sketchbook (after I've shared them out with Emily Pickle, that is).
I should add that your first attempts may look absolutely nothing like the image you are copying. Mine certainly didn't. I've done a huge amount of this stuff since getting into it. But it's amazing how quickly I got better at it and how confident the drawings became. But, I guess that's the same of anything you do.
This one above, is one of my favourites.
One warning; if you do decide to dedicate a whole book to this technique, no matter how much you try, this will at some point happen...

By: Brian Bowes,
on 11/25/2015
Blog:
Studio Bowes Art
(
Login to Add to MyJacketFlap)
JacketFlap tags:
Characters,
Process,
caricature,
Painting,
sketch,
pencil,
Watercolor,
Graphic Design,
Step By Step,
color study,
MFA,
Brian Bowes,
Add a tag
Summary: I share some of my process creating a faux Rolling Stone magazine cover of the Ramones. Giclee prints of the image are also made available! One of the assignments for my MFA program is that we are asked to create an illustration by look back into illustration history and finding an artist whom we admire, then we […]
via Studio Bowes Art Blog at http://ift.tt/1XgS0ut
Basically my working method is simple - I sketch & draw & draw & sketch until the tabletop is covered with sketches. Then the sketches are scanned into Photoshop... and when the pile of papers on my desk looks like it's becoming a fire hazard I tidy all the sketches into a corner by the cupboard, and keep on drawing. It's actually quite effective. Bridge keeps track of everything else.
I made this little movie of a rough drawing I'm working on... just for fun. The rough drawing is always so much fun, because it's all a discovery. Invention, artistry, problem solving - an excellent diversion when one finds oneself imprisoned in a quiet distant room.
https://www.youtube.com/watch?v=W71_6biMnSY&feature=youtu.beIt's not much of a movie actually, but I was in a hurry and it was fun - my two excuses. Maybe I'll make a better one some time. I think it might require 30 minutes to do an in depth drawing demonstration - so one does what one can.
I don't want to think about the file size of a 30 minute .mov file - or how long it'd take to render!

By:
John Nez,
on 4/8/2015
Blog:
John Nez
(
Login to Add to MyJacketFlap)
JacketFlap tags:
#childrensbooks,
#kidlit,
#kidlitart,
#picturebooks,
#inktober,
photosohp,
digital,
step by step,
jungle,
Add a tag
I always loved those Tarzan movies with the treehouse, vine-swings and all those elephants. It was the depth of the jungle that I found so enchanting - hidden depths, elevated trees, simplistic (non-existant) plots. It was more of an experience than a story.
I'm attracted to the same qualities of depth in my paintings on canvas. The deeper and more mysterious the elements, the better.
By:
John Nez,
on 3/22/2015
Blog:
John Nez
(
Login to Add to MyJacketFlap)
JacketFlap tags:
'balloon boy',
#childrensbooks,
#kidlit,
#kidlitart,
#picturebooks,
#pblit,
e-books,
ebooks,
step by step,
Ladybug,
Add a tag
In this day and age a little photoshop magic is always a handy thing to have. But the charm of the pencil remains - that's the main thing. And just like magic, the full moon in Taurus seems to have been the just right thing for this old illustrator.
.png.jpg?picon=3640)
By:
Sara Burrier,
on 10/31/2014
Blog:
warrior princess dream
(
Login to Add to MyJacketFlap)
JacketFlap tags:
backgrounds,
how to paint,
background painting,
watercolor tutorial,
fairy,
Tutorial,
art,
watercolor painting,
step by step,
Add a tag
Laying in a background color around a subject can be tricky, and it can be very frustrating, especially after taking the careful time to draw out all of your details. It can be approached loosely, or with a tight hand. I will demonstrate both.
Keep in mind, these are my methods, and by no means the ONLY way to go about it. Watercolor painting is a very personal in application. Trial and error are the best ways to learn the medium. The worst thing you can do for your painting is get furious and give up. Give yourself grace and have patience.
Okay, here we go.
Set Up
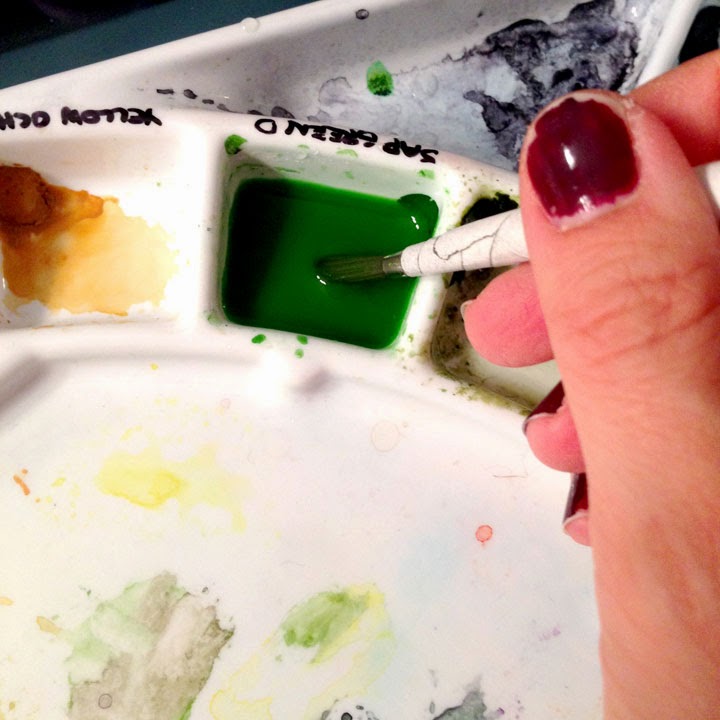
Place your water, paper towel, and paints on the side you write with, keeping your painting in the middle. Grouping your supplies will help you grab what you need more efficiently.
Choose your brushes. I usually have three different sizes on hand. They are #2, #5, and a #12 (or around that). These are not my BEST kept brushes, and are typically used for events such as this.
Prepare enough paint to fill the space you're going to cover. Choose a transparent color, like my Sap Green here. It will allow light go travel through down to the white of the paper and back. Trust me. I have also chosen a color that will work well with the other colors I'm going to lay down, such as blues, yellows, and reds.
• • • • • • • • • • • • • • • • • • • • • • • • • • • • • • • • • • • • • • • • • • • • • • • • • • • • • • • • • • • • • • • • • • •Painting Around the SubjectThe Tight Hand Approach
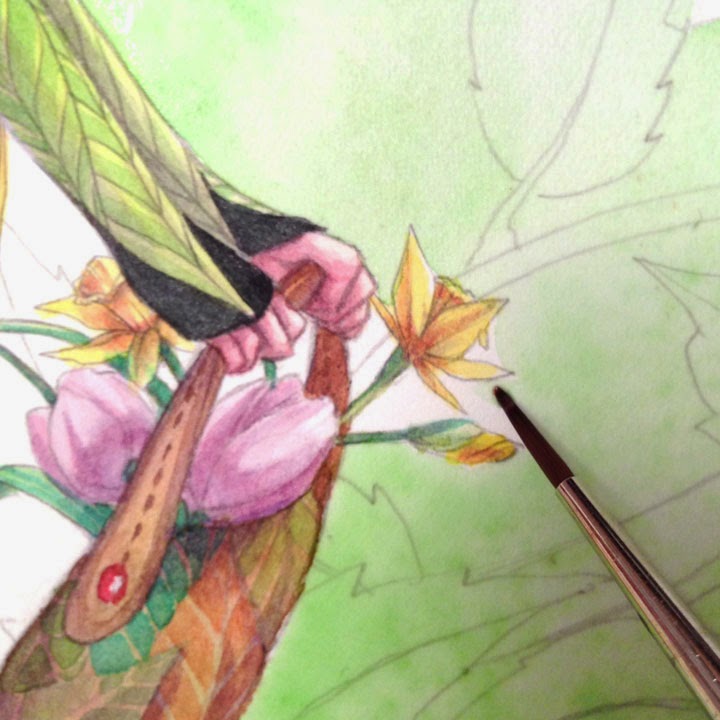
Choose the smallest of your brushes to start, but keep that medium size close by. You want it to be small enough to get into the tight spots, but large enough to hold a decent amount of paint/water mix. You can see I have placed it close to the face (most important to me) to ensure I'll be able to get in around the nose and lips with the point of the brush.
Scary part, start laying in the color. Charge (meaning fill the brush) with your color making sure it's full. Lay down next to the subject, but NOT along your line. Give yourself wiggle room. Make a little 'puddle' of paint, but don't over extend it. The idea is to keep plenty of wet paint sitting there, hence the 'puddle'.
Now pull from the puddle to your line with the color. Slow down here...it should all be wet enough to give you at least a moment to do this. It will take practice to find your sweet speed spot. Remember, give yourself grace.
To prevent unwanted lines, RIGHT after you do some of the face move to the other side of your puddle with a rinsed brush. Fade it out, this way, if it dries, you'll be able to paint and fade over it giving the illusion that you painted it all at once. ;) NOTICE I didn't do the entire face all the way down.
Work in little puddles/spots and work your way down and around, using the same method over and over again.
Again, fading out with a rinsed brush and clean water, getting rid of any unwanted crisp edges.
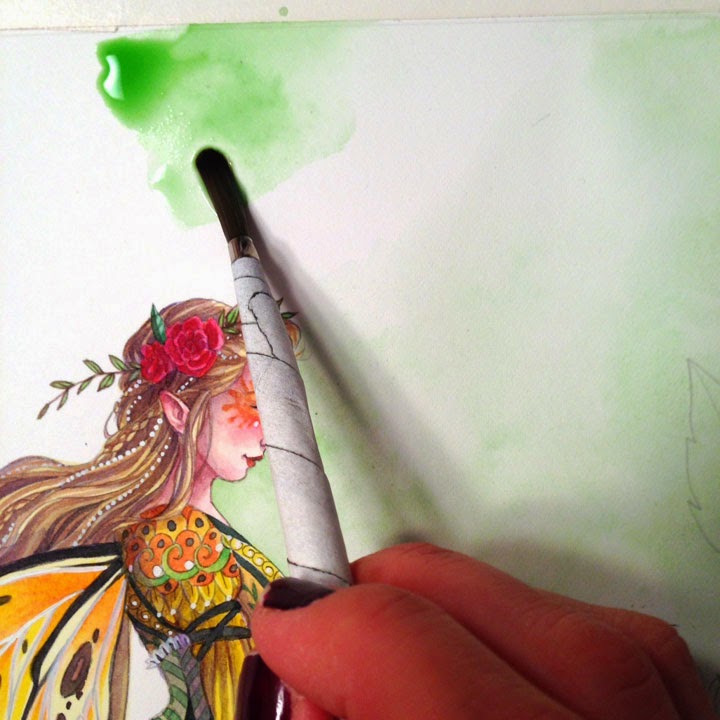
With this method I can confidently move away from my subject and begin to venture out. You may need to switch to your medium sized brush to have enough paint and water.
I will begin to add droplets of clean water in to help give my background texture, depth, and this will give the eye something to look at other than what I may have missed. Naturally, in my opinion, this is the most beautiful characteristic of watercolor, they're called blooms.
You can continue the entire painting with this approach.
• • • • • • • • • • • • • • • • • • • • • • • • • • • • • • • • • • • • • • • • • • • • • • • • • • • • • • • • • • • • • • • • • • •
Painting Around the SubjectThe Loose Approach
Grab your big brush and charge it up. Lay down a good size puddle, but small enough that you still have a puddle (remember, don't over extend your paint). Also, don't go to your lines, you need the space between.
Rinse out your brush and return to the edge of your puddle, pulling the paint towards and OVER your line art. You are fading out the color on top of your subject.
Like with the tight approach, take your rinsed brush and fade out the back end of the puddle. Repeat.
• • • • • • • • • • • • • • • • • • • • • • • • • • • • • • • • • • • • • • • • • • • • • • • • • • • • • • • • • • • • • • • • • • •
Touching UpIn the tiniest of spots, take your smallest brush and pull the wet paint in. If it's dry charge your brush, but first dab it on your paper towel so that it won't over flow or bubble in the tight space you're painting. Try to match the intensity of the color.
If there are crisp edges you don't want...
...go back in with a rinsed brush and clean water, gently scrub and fade them out.
There are tiny little white spots left around the forehead and nose...see them?
Very lightly, and very gently, with your small brush, pull the paint left in the crisp edge onto the white. Go in, lightly do this, and get out. Too much scrubbing too aggressively will leave inconsistent marks you don't want.
• • • • • • • • • • • • • • • • • • • • • • • • • • • • • • • • • • • • • • • • • • • • • • • • • • • • • • • • • • • • • • • • • • •
Fading Color on top of Faded Color
Just to show I know what I'm talking about, once your first faded section is dry, go in to a new section and start again with a puddle.
Keep making puddles and scooting/painting them over the dry faded area. Once you've overlapped start to fade out your puddle with a rinsed brush. Again, might take some practice, so use light water droplets if you need to. ;)
• • • • • • • • • • • • • • • • • • • • • • • • • • • • • • • • • • • • • • • • • • • • • • • • • • • • • • • • • • • • • • • • • • •
Finishing It Up
Good Luck!And feel free to ask me any questions or if there is something you need a tutorial in I'd be happy to help out if I can.
For
#inktober here's another experiment in line that I once did. I read about a technique that Andy Warhol used, where he'd tape two sheets of paper together and draw on one with really wet ink and then while the ink was still wet, fold it back to make the reverse print. It does give a really sloppy line quality.
Experiment, experiment and try things out. I tend to do a LOT of that in looking for new styles and techniques. So I was delighted to try this new combination of ink on watercolor and watercolor and photoshop.
I wanted the image to keep moving but I also wanted it to be bright colors - not muted monotones. (I can do a monotone version easily, but keeping bright colors is usually harder to do).
So I was pleased with how it came out.
A while back I put together a video sharing some of my watercolor techniques. There was a lot of positive feedback on that video that I wanted to create another process video.
via Studio Bowes Art Blog at
http://ift.tt/1n7CZ7B
Here is a joyous little critter living in the moment. Happiness spinning like a top.
A little animated GIF fun to shake the dust off the PBAA blog. It's funny how picky different online places are about GIFs. Twitter accepts GIFS - Facebook does not - I thought that Blogger had stopped accepting them, but it turns out they're okay again. Twitter takes a GIF and converts it into a .mov file. Whew!
John Nez
First comes the pencil, which is the most important... and next a suitable color with texture is added. What you don't see is me making about 147 changes to every combination of colors, shapes, patterns and textures.
And then it's done!
By: Brian Bowes,
on 3/18/2013
Blog:
Studio Bowes Art
(
Login to Add to MyJacketFlap)
JacketFlap tags:
processs,
Illustration,
fun,
Childrens Books,
Process,
Painting,
Watercolor,
Step By Step,
Brian Bowes,
Add a tag
An update on this commissioned drawing here. I started step-by-stepping it a little while back (you can see the first stage in
this post) but due to some urgent deadlines it has progressed very slowly.
On a personal level this really is one of the most important drawings I've ever made. Probably THE most important. The commissioner (is that even a word?) gave me free reign over everything - subject, size, materials.
Whilst that's the best kind of commission it does present you with a different kind of pressure from working to a brief. But, it also shows an amount of trust that touches me deeply. This image just came into my head as I drove home the day it was commissioned. I have no idea where from. And, I LOVE that.
I've not only been step-by-stepping it here, but also with the person who I am painting it for. I take it to show him at various stages and we talk about it and what it means to both of us. He said it reminded him of
Tennyson's The Lady of Shalott (which again touches me no end). Not only do I love that poem but my all time favourite painting is
Waterhouse's version -
SEE.
When this image popped into my head it came fully formed. I knew exactly how I wanted it to look. I wanted to create a piece of work that paid the same kind of attention to detail that the Pre Raphaelite's would have. It's a big piece too; over A2 in size. Which is why it's difficult for me to share with you - excuse the rubbish photographs.
The deadline for this piece is the 17th of September, when it needs to be finished and framed. So, basically what I'm looking at is two weeks, whilst working the day job and other illustration jobs, to create my Pre Raphaelite masterpiece.
No, need really. I'll say it to myself; good luck with that!
 I'm currently enjoying a lovely staycation, with family and friends, which has kept me from blogging. However, I've been doing loads of sketching; journaling my little holiday. I know, I'm getting so brave! Anyways, I'll post all of those drawings over the next few days. In the meantime, I am still working on this illustrated 'classified ad' piece (or pieces).
 I still have advertising space left in my next zine if you'd like to purchase some, and I have tried to simplify the buying/pricing process. The business card type ads are now available and at reduced prices. They are filling up though, so to get a spot you should buy sooner rather than later. This is all the space I have, and some of that has ads already lined up.

So, basically, these are the categories;
1) a hand written message for $5 (read more and buy
HERE)
2) a Twitter box for $5 (read more and buy
HERE)
3) a business card type box for $10 (read more and buy
HERE)
By:
andrea joseph,
on 8/15/2011
Blog:
andrea joseph's sketchblog
(
Login to Add to MyJacketFlap)
JacketFlap tags:
drawings,
zines,
Etsy,
step by step,
newspaper,
zine,
AJ,
andrea joseph,
ballpoint zine,
Add a tag
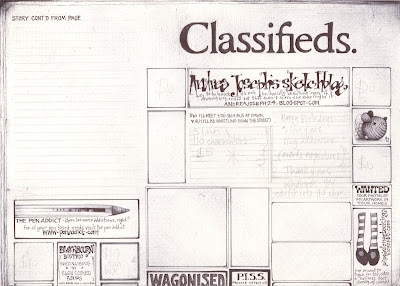 So, folks, here's my new idea. I have always wanted to do a 'classified ads' (not sure what they are called in other countries, or even if you have them?) drawing. Plus, it could raise some revenue to get my next zine printed. I have almost finished all the artwork for the new zine, it's another 'Drawing with a Ballpoint Pen' zine, and I've just a couple of pages to complete. It'll be out in early October. And, this time it has more pages.
I've decided to sell the advertising space, but of course there is a twist, I'll be writing and drawing each of the ads in with my own fair hand. I'm adding, to Etsy, the first two options which are;
An announcement or message; words not pictures, 3 lines and up to 110 characters. Ideas for this are birthday wishes (don't forget the zine ain't out 'til October so birthdays after that), thank yous, hellos, would like to meets, marriage proposals, dumpings, coming out of the closet. Whatever you like as long as it can be said in less than 11o characters (one or two over is fine).This will cost $5. View the listing HERE.
Small square ad box; these can include a small icon, maybe your Flickr or Twitter profile icon. It would need to fit into a square, and not be too complicated a design; these boxes are just over an inch squared. I can also add your name (see the Miguel Herranz ad for guidance). Or I can add your Twitter name, and you can leave the rest to me. I'll come up with the bird! This will cost $10. Buy HERE.
Of course, you will not have to pay for any postage - but the price is for the ad ONLY. Not a copy of the zine. They will be listed separately, when released, in a month or so.
If you want one of the larger boxes hang fire and I'll add them in the next day or two. The larger spaces (business card size) can hold your name an image and your web addresses.

I hope this makes sense. I really do.
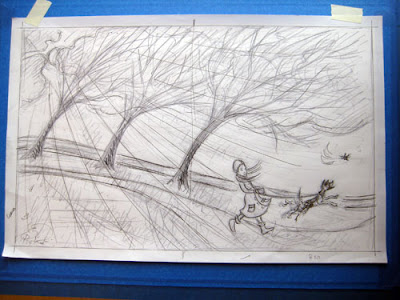
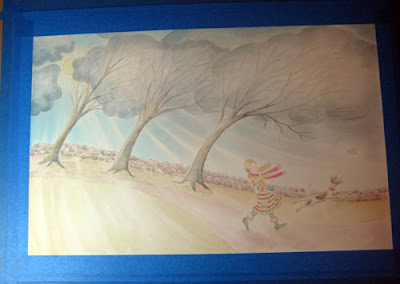
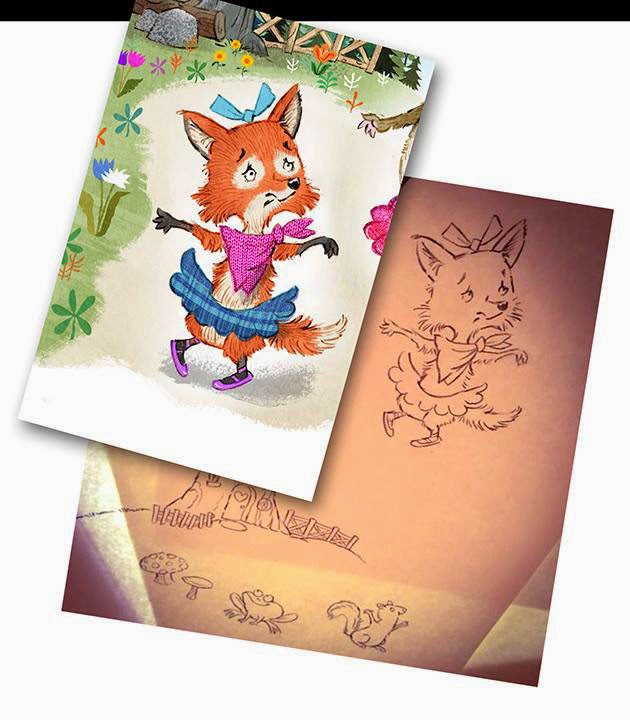
I adore when other artists do step-by-step demos of how they work. I usually forget to pick up the camera, or find that the verbal part of my brain has been temporarily suspended while painting, so it's too hard to talk about what I'm doing as I'm doing it. But I thought it was about time for a demo of my own. So, here goes...
1) Rough sketch (from my sketchbook, a few weeks ago). I was thinking about wind, and motion, and sunlight peeking through clouds, and a more muted, late-winter-into-spring color palette:
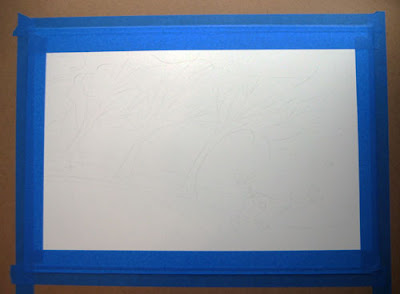
2) Sketch transferred very, very lightly in pencil via lightbox to watercolor paper. (Can you see it?):
3) Here, I've started drawing with colored pencil. I like to have the basic lines and textures on the page before starting the color:
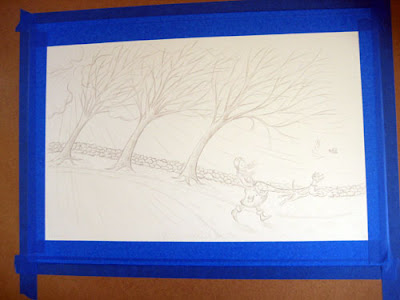
4) I work in pencil and watercolor, and go back and forth between the two, building up layers of line and color. I've tried to make a piece go faster by laying the color down darker in the beginning, but that approach always seems to backfire. Either the texture doesn't build the way I want, or I panic and think I've wrecked the piece. Slower is better, in this case! Here's the beginning of the color, in a faint wash:

5) I try to build up the color as much as I can before going back to the pencil line. There's no real formula for this. Sometimes it's just a matter of being bored with one and wanting to go back to the other for a while:
By:
andrea joseph,
on 2/16/2011
Blog:
andrea joseph's sketchblog
(
Login to Add to MyJacketFlap)
JacketFlap tags:
illustration,
collections,
travel,
drawing,
stuff,
drawings,
colour,
step by step,
colour pencil,
colour ballpoint,
souvenirs,
illo,
souvenir,
AJ,
andrea joseph,
carnet de voyage,
Add a tag
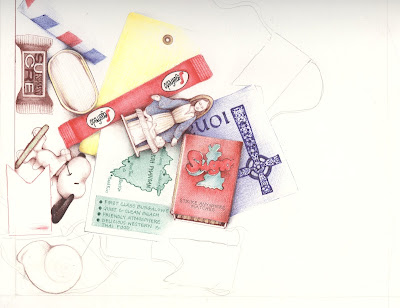
 So I started this drawing about two or three weeks ago but unfortunately it's going to have to be put on the back burner for the next few days as a new, more pressing deadline has emerged from nowhere.
This is one of the most ambitious drawings that I've undertaken yet. It's on A3 paper which is double the size I normally use. Plus it's full colour. Thus far it has taken approximately 20 hours.
Anyway, I thought I'd take this opportunity to show you how I make these big mad drawings as it is a question I'm asked often. In the past I've been asked if I set up the compositions or whether I draw from a photo. The answer to both of those questions is no. I almost always draw from life.
What I do do is start with a couple objects (in this case the tram ticket, the Mary and baby Jesus and the seahorse) and then add the rest around them. I place the other objects on the paper, mapping it out piece by piece. It's almost as though the composition works itself out. I love drawings like this. I love the way they reveal themselves to me, the way they unfold in front of my eyes.


It was Ed Emberley‘s birthday yesterday, so I think it’s time for a little celebration of my favorite step-by-step drawing master! Emberley is famous for his simple shape-drawing method, and I myself used to spend hours and hours copying every bit of his video, Squiggles Dots and Lines. His techniques are elementary, but now I have a whole new appreciation for his fascinatingly clear design sense. Plus, how much fun is it to make those little thumb-print people?

Thinking about ol’ Ed made me doodle some of my own characters in “Emberley” form:


And then doodle some more… (that’s my brain melting from the training session I was in, by the way. Oops!)

Happy Birthday, Ed Emberley! You’re my hero.
Filed under:
book reviews,
illustration sensations,
sketches Tagged:
birthday,
drawing,
ed emberley,
how to,
sketches,
step by step 

View Next 19 Posts


 By: Gerald Hawksley,
on 12/19/2016
By: Gerald Hawksley,
on 12/19/2016


 I'm currently enjoying a lovely staycation, with family and friends, which has kept me from blogging. However, I've been doing loads of sketching; journaling my little holiday. I know, I'm getting so brave! Anyways, I'll post all of those drawings over the next few days. In the meantime, I am still working on this illustrated 'classified ad' piece (or pieces).
  So, basically, these are the categories;
 So, folks, here's my new idea. I have always wanted to do a 'classified ads' (not sure what they are called in other countries, or even if you have them?) drawing. Plus, it could raise some revenue to get my next zine printed. I have almost finished all the artwork for the new zine, it's another 'Drawing with a Ballpoint Pen' zine, and I've just a couple of pages to complete. It'll be out in early October. And, this time it has more pages.
 By: Jennifer Thermes,
on 4/26/2011
By: Jennifer Thermes,
on 4/26/2011


 So I started this drawing about two or three weeks ago but unfortunately it's going to have to be put on the back burner for the next few days as a new, more pressing deadline has emerged from nowhere.
 By: Annie Beth Ericsson,
on 10/20/2010
By: Annie Beth Ericsson,
on 10/20/2010


Only four toes?
There is plenty of time. As much time as you are willing to make.
Looks amazing.
Very nice sketch, thanks for sharing.
I love that poem & painting too which introduced me at a very young age to Tennyson and the Pre-Raphaelite painters, still firm favourites.
All I have to say to you now is - sleep is for wimps and jolly good luck getting it all done. I'm sure you will!
I have a deadline for the very same day - only, it's about a boring business plan, not a piece of art, sadly. Good luck and big hugs from an Italian girl in Sweden! :)
I have a deadline for the very same day - only, it's about a boring business plan, not a piece of art, sadly. Good luck and big hugs from an Italian girl in Sweden! :)
I knew that you love Flaming June (I used to have a poster of it on my wall), but I had absolutely no idea that you were so into the pre-raphealites! Love it. Love your the progress so far. xxxx #september
Thanks, guys.
Only four toes.
Em, yes, BIG Pre raphaelite fan. Oh, and don't mention #september! It's not going so well.
Cheers, everyone. More updates soon. I hope!
SO beautiful...can't wait to see the finished piece!
I love the subtle color, Andrea!
Lovely, it´s delicious.