 |
blossom~original drawing
graphite/tinted graphite on bristol 7x9
©the enchanted easel 2015 |
second in a series of three summer/flower girls.
the ORIGINAL DRAWING is FOR SALE
here. also, sweet little
Flora can be found in shop as well...and then for the winter lover like myself, well there are three pristine ice princesses in my
shop FOR SALE also.
with Blossom and Flora complete, there is only lovely Camillia left in the series...COMING SOON! :)
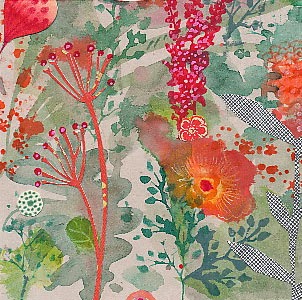
Playing with watercolors and collage. I like some of the shapes and textures I ended up with, and the color scheme is different for me.
Have a nice weekend friends!
 |
| cut paper design |
I don't know how I got here....but it feels right for now. Would you like a plate like this?
Still working on sketches for my e-course, The Art & Business of Surface Pattern Design Module 4 ... I did some doodles and sketches with geometric, floral, and typography themes in mind.
I'm not sure if the final results below would be considered strictly geometric but hey, I drew grids and shapes and then got carried away filling them up. There are florals there too, so perhaps I managed to work on two of the themes at one go. Oh, and some typography too ...


The second one is still unfinished. I 'work' on it whenever I have time, i.e. when I'm uploading designs onto stores. I used to have a dodopad in high school, and used to colour it in with magic markers, does anyone remember those? These grid doodles reminded me of that, and the whole exercise is teaching me tons about colour, and is fun to boot.
I did some typographical sketches with a holiday theme:

I love playing with text design. And some of you may know that this year I've decided to do a monthly design based on "I Choose ..." as a positive affirmation, that I make available as a free printable to the subscribers of the Floating Lemons Newsletter. It's a hugely wonderful experiment in typography for myself, and these are the ones I've come up with so far, for January till April:

They count as typographical exercises, wouldn't you say? Next month I'll be doing "I Choose Courage", as I'm going through huge changes in my life that require a large amount of deep breathing, and I'll be plunging into a different life and lifestyle. Scary, but also very exciting. I'm thoroughly enjoying the text designs and the affirmations that are emerging, and hope to do a calendar with them at the end of the year.
Meanwhile, I'll be away for two weeks as of next week. I shall try to blog as much as possible, but as it's my dad's 80th birthday that we're celebrating, I may not be able to do that, so forgive me in advance. I'll be posting up at the facebook page, so follow me there if you want a peek at my updates, and to see photographs of whatever inspiring bits I pick up from the United Kingdom and Istanbul (yay).
Meanwhile, have a fantastic week and don't forget to experiment joyfully. Cheers.


Snapped photos of some marigolds from the garden, erased the background on Photoshop and then popped them into Corel Painter and used oil brushes to repaint them. Back into Photoshop for a cleanup, and here they are.
Then played around a bit with filters to see if enhancing them further would give me extra-ordinary results. Came up with the result below and I do like it, though I think I prefer the colours and contrasts of the original above. Still, there's something slightly crazy about the version below that appeals to the 'need-to-experiment-more' side of my nature that's demanding my attention at present.

Wishing you a bright, extraordinary day. Cheers.

"ta-da!" (as the waitress at the coffee shop I go to always says when she brings the food)
Usually I do things with a white background.
I guess I felt I had something to prove.
This is 8 x 8 inches (20 x 20 cm), Prismacolors and Polychromos on Stonehenge paper.
Phew. What made me decide to do this, I can't remember.
This is about 4,000 layers of Polychromos and Prismacolors.
Its a Chinese floral design. The original reference is darker and more "contrast-y", but I muted it some so it would 'stay back'.
This is what it looked like before I added the dark. Its pretty, but spotty. It needed the dark to tie it all together, to make a unified background that won't fight with the main subject matter.
Now its onto the stars of the show.
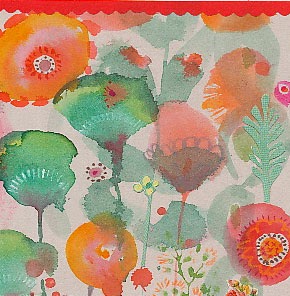
For this week's Illustration Friday topic, I decided to play with watercolors and created this little painting of one of my favorite flowers - poppies (which I think are a perennial flower, but I could be wrong).
 This painting is cobbled together from several photos I'd taken when we lived in Los Angeles. This type of poppy (Alpine poppy?) was a popular garden flower in California. I remember seeing sizeable beds of them at my husband's office and we had some smaller collections of them at our little apartment complex. I always looked forward to their blooming every spring!
This painting is for sale - here - at my Etsy shop.

I’m so glad to be finished with another dress – it seemed like ages since I made one, haha! This one is made from 2 matching feedsacks, probably from the 1930s. Luckily I had enough fabric (just enough, really). When I acquired the feedsacks, I didn’t know I would use them to make something to wear; this type of feedsack fabric is thicker and more loosely woven than calico. As a dress, I thought I might literally look like I was wearing a sack but the print was too pretty to languish in my stash for much longer so I went for it. And in my own small way, I was paying homage to all the women back in the ’30s who really had no choice but to use their feedsacks to clothes themselves and their families. (It’s amazing the pretty and eco-friendly frocks they created with similar sacks.)
The pattern I used is New Look 6889. I decided on a simple, modern pattern because I didn’t want to spend a lot of time fitting the little pieces together that one often finds in vintage patterns, plus I knew this dress had to be 2 things: easy to put on without a closure and quick to make.

This pattern fit the bill although I laugh and laugh at their “2 hour” claim! I must be the slowest sewist EVER because it took much longer than 2 hours. (Even if you exclude the time it took me to make the ruffle and the belt.) Thankfully, the fitting of this dress was fairly uneventful and not difficult to do. Based on the given garment measurements I cut out the pattern 1 size smaller than my own. I also took in the center front an extra 1/2″ (total 1″) and the center back 1/2″ (total 1″) at the neckline because it pooched out (extra width, I suppose, to allow for slipping it over one’s head). I added some back darts to reduce the tent-like shapelessness which really helped.

To give it a ’30s vibe, one of the things I added is a ruffle around the neck made up of cotton/silk voile (my favorite fabric) that I edged with green thread using a zig-zag stitch. A little green velvet bow tops it off.

I added elastic to the waist, the same way I did to my Built by Wendy dress. Much to my surprise I had enough to make a belt! At first I thought I might go with a vintage red bakelite buckle but opted for this sweet mother of pearl one instead.

Then I added some decorative mother of pearl buttons to the pockets.

(Don’t you love this print?!)
 0 Comments on Dress Parade {Feedsack Flowers} as of 1/1/1900


.jpeg?picon=2420)


Never would have guessed.
Love it !!
Beautiful!!
So beautiful...the tablecloth background was an inspired idea!
Thanks, all of you!