new posts in all blogs
Viewing: Blog Posts Tagged with: ikea, Most Recent at Top [Help]
Results 1 - 20 of 20
How to use this Page
You are viewing the most recent posts tagged with the words: ikea in the JacketFlap blog reader. What is a tag? Think of a tag as a keyword or category label. Tags can both help you find posts on JacketFlap.com as well as provide an easy way for you to "remember" and classify posts for later recall. Try adding a tag yourself by clicking "Add a tag" below a post's header. Scroll down through the list of Recent Posts in the left column and click on a post title that sounds interesting. You can view all posts from a specific blog by clicking the Blog name in the right column, or you can click a 'More Posts from this Blog' link in any individual post.
I was really pleased to see Ikea were again working with artist and designer Laure Girardin. After her successful multicoloured tree design comes a set of three food prints, plus a new alphabet design. You can find the posters in your local Ikea now and online.
.jpg?picon=3687)
By: Bowie Style,
on 9/3/2015
Blog:
print & pattern
(
Login to Add to MyJacketFlap)
JacketFlap tags:
IKEA,
Add a tag
At the end of August an Ikea catalogue always comes through the letterbox and gives me the perfect excuse to see whats new in their textiles and prints. The first things to catch my eye are some fun bedding designs created by Edholm and Ullenius on the theme animals and music. Above and below is Flickoga followed by Silveroga which both co-ordinate with shaped cushions called Thorine.
Studio Kelkka are a Finnish print & surface design group who will be exhibiting at PrintSource in New York for the first time tomorrow. Their Scandinavian fresh, beautiful and fun designs have spread all around the world through numerous international companies such as Ikea. For their first appearance in NYC they will present a new collection that "Springs from the strong presence of Nordic
The Kapitza studio whose beautiful geometrics we have featured on the P&P blog before have created some wall art for Ikea. Their cute geometric canvases called Pjatteryd are available in Ikea stores worldwide for a limited time only. Also at Ikea there are some great geometrics by Margrethe Odgaard for their PS range. Margrethe's designs for Ikea are reminiscent of her Navajo drawings. This is
I found this beautiful poster (above) with its cute arrangement of colourful graphic trees at Ikea and this led me to want to know more about it's creator Laure Girardin Vissian. Laure is a freelance designer, colourist and illustrator based in France. Her clients have included Harlequin, Boden, Nouvelles Images, Petit Bateau, and of course Ikea. She also sells her wall art prints at Art.co.uk

Okay this is an ad for Ikea, but it is also a fantasy for most of us. Like, a Sex in the City/Axe ad level fantasy.
Imagine being a cosplayer in your small room, and all the parts of your Axis Powers Hetalia, Slam Dunk and other costumes are just strewn about, willy nilly, making your tiny living quarters a squalid mess. LIke you do. And then Ikea comes along and magically, wonderfully, enchantingly CLEANS EVERYTHING UP and puts all your wigs, satin gowns and plastic swords in a Besta or a Kassett. Lots and lots of Kassetts. And when you come back by MAGIC you have a clean organized home! And even your girl/boyfriend approves.
Admit it, you’ve had this fantasy MORE than the one about a $50,000 shopping spree at Nordstrom’s, haven’t you?
Frank is a Singapore cosplayer who has competed in the World Cosplay Summit for his country. And he has lived the fantasy.
However, it is only a fantasy, as one of the you tube commenters put it. “And truth be told…that room will be tidy until next con.”
So so true.
By: Bowie Style,
on 2/1/2012
Blog:
print & pattern
(
Login to Add to MyJacketFlap)
JacketFlap tags:
IKEA,
Add a tag
i paid a visit to ikea this week in search of a new wardrobe and obviously took a few snapshots whilst i was there. especially of interest were lots of new napkins by design duo edholm ullenius. 'gunga' is their new spring floral series, and they have expanded their beautiful bird print. they are also responsible for the pattern on the cute glass cups.
By: Bowie Style,
on 2/24/2011
Blog:
print & pattern
(
Login to Add to MyJacketFlap)
JacketFlap tags:
IKEA,
Add a tag
finally im rounding of the week with some more store snaps from a recent trip to ikea. featured here are fabrics and textiles, a floral patterned storage box, tree design paper serviettes, the latest surface print on ikea's regular tripp tins, and a map of new york poster print.
By: Bowie Style,
on 2/15/2011
Blog:
print & pattern
(
Login to Add to MyJacketFlap)
JacketFlap tags:
IKEA,
Add a tag
i went to ikea last week and was so excited to see these postcards by maria holmer dahlgren. picking up on her fashionable city designs ikea have spotted the trend and put together postcards for five areas of sweden. see them in your local branch or online.
also from my visit to ikea i can never resist checking out the bright and bold prints of the children's department. something new i hadnt seen before was the striking new bedlinen (above and below) by eva lundgreen.

By: Lauren,
on 10/29/2010
Blog:
OUPblog
(
Login to Add to MyJacketFlap)
JacketFlap tags:
Blogs,
cows,
ghosts,
ikea,
esquire,
handwriting,
gizmodo,
foursquare,
linked up,
federal budget,
vegan,
rent,
mashable,
urlesque,
dominoes,
trendland,
Featured,
burger,
bravo,
Add a tag
[Insert witticism here.]
Book Dominoes FTW! [Urlesque]
This week in unnecessarily large versions of unhealthy foods… [Good]
Esquire thinks we can balance the federal budget in 3 days. Good luck with that one, guys. [Esquire]
Type in your own handwriting! [Pilot via GalleyCat]
If you didn’t already know, being vegan is hard. [Gizmodo]
A new blog of short essays. [BOTA]
Former OUPblogger “Johnny” in his Halloween costume… [Bravo TV]
Are you ready to be Super Duper/Epic on Foursquare??? [Mashable]
IKEA gets into the cookbook biz. [Trendland]
“51% of Americans would live with a ghost as long as rent were free, while 27% would share space with a spectre for a 50% reduction in rent.” [USA Today via The Awl]

Posted on 7/7/2010
Blog:
OUPblog
(
Login to Add to MyJacketFlap)
JacketFlap tags:
Literature,
vampires,
meg cabot,
paranormal,
vampire,
A-Featured,
dracula,
ikea,
supernatural,
princess diaries,
OWC,
Bram Stoker,
burberry,
oxford world classics,
insatiable,
blade,
michael nourri,
bram,
cadaver,
Add a tag
Meg Cabot (of Princess Diaries fame) is the author of over twenty-five series and books for both adults and teens. Her most recent book is the paranormal romance Insatiable, a modern sequel to Bram Stoker’s Dracula. Armed with the Oxford World Classics edition, she launched a Dracula reading group earlier this summer, and now–in an exclusive Q&A–shares her thoughts on all things vampire. Read on for the chance to test your Dracula knowledge and win prizes!
If you were bitten tomorrow, and had to choose a vampire name, what would it be?
Well, obviously, Meg Cadaver.
If someone attacked “Meg Cadaver” with a stake, and you only had Dracula to block the blow, would it work?
Absolutely. My super vampire strength, combined with the amazing power of Bram Stoker’s prose, would easily defeat their piddling human arm and wooden stake that was probably made by Ikea.
If Dracula had a Twitter handle, what would it be?
The possibilities are so endless . . .
Longinthetooth
Vampyvlad
Undeaddandy
CoffinCasanova
Although personally, I’d probably go with a simple 8U.
What is the most fascinating thing about vampires?
They never seem to die.
What is the most boring thing about vampires?
They never seem to die.
Who is the most ultimate, hard-core, awesome vampire of all time?
I feel compelled, because of the forum, to answer Dracula. But if you weren’t here I would answer Blade. I realize he’s a Daywalker, of course, but he has that awesome haircut.
Who is the sexiest vampire of all time?
Sadly for me it’s Michael Nourri circa 1979 as Dracula in “The Curse of Dracula” on the TV show “Cliffhangers,” which I wasn’t ever actually allowed to stay up to watch. Which is probably why, in my feverish imagination, it’s still the best. And now I never want to see it, as it could never live up to what I remember thinking, from the commercials: that it had to be the most fantastic show of all time. Considering it was canceled after only one season, I think this must be untrue. But you never know.
I’m upset that most modern vampires don’t wear cloaks. How do you feel about this?
I agree. In Insatiable, I gave my vampire a black Burberry trench coat, the tail of which flapped around a lot in the wind during moments of high tension, to give the impression of a cloak. But it’s definitely not the same thing. In my defense, the only way to give a vampire a cloak in a book set in modern times and not have him stand out like a big freak is to either make him be an eccentric bestselling author, have live him in the subway tunnels of NYC with the mole people, or have him work at a Medieval Times restaurant. None of these are particularly appealing options, especially the first.
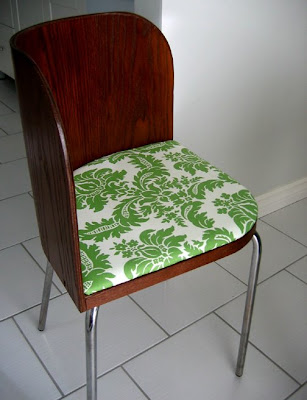 Sometimes I post something and then I think it needs a little follow-up. In this case it's the IKEA Fusion dining set. I loved it when we bought it and it did fit perfectly into our kitchen eat-in area. But I was never really happy with the cushions.
The set comes with the seats covered in a black matte vinyl? fabric. I really didn't like it. So I used an aqua and white striped fabric I had on hand to recover them. But I made some mistakes. First of all I didn't pre-wash the fabric and I had bought it 2nd hand so it turns out that there were dusty marks on it. I didn't notice until later.
Also I didn't remove the black fabric that was already there since it was attached with about 1000 staples. This isn't a good idea because it doesn't feel right and there was a subtle dark shadow from having the black underneath the white and blue striped fabric.
 So this time I was determined to do it right. (if something is worth doing, etc...) For some reason I was picturing a green and white print and finally found the perfect one at a fabric store on Queen West. The best part is that it was a fabric that was usually $19/yard but I found an end piece that was around 1.5 yards for only $10! The green colour was exactly what I was looking for, and it was a nice upholstery weight with a lovely smooth feel to it.
Bradley helped remove the 1000 staples and I attached the new fabric and now I re-love the IKEA dining set. Yay!
I'm organizing my studio today. This may sound very industrious, but really, it actually involves me staring at my stacks and wishing that I could go to Ikea and buy all the wonderful new cabinets I've been dreaming of. With actual storage spaces the stacks would disappear and I would be able to accomplish so much more each day. As I said, I'm dreaming today.
Meanwhile, here are a few sketches from this week.
 Thank you for the shelf comments, they really cheered me up! This weekend we finally put up the fan back up over the stove, and I can't tell you how happy I am about it. When I say "we" I mean Bradley because I did very little aside from finding screws and washers, picking them up when they fell, and holding the fan for a few minutes. Also saying things like "wow, it looks so good", "do you want me to leave you alone now?" and "I can't believe you finished that bit already". The latter because it was much more difficult than expected.
The problem in the first place is that given the height of the cabinets and the hole in the wall where the fan used to be, there was a new gap between the two. Otherwise the cabinets would have been too low on the wall and too close to the countertop. This is the kind of thing that makes installing your IKEA kitchen tricky.
So first Bradley used finishing panels to construct a box that would be the shelf. Finishing panels are just big flat pieces from IKEA that have the same finish as the door fronts so that you can attach them to the sides of your cupboards so that they match. So dad-in-law helped cut pieces to size with his table saw. That was a few weeks ago.
Then after assembling the box, Bradley had to move the entire row of cabinets (they hang on a rail) a tiny bit to the left to fit the box in, then back again so that it was snug. This involved taking everything out of all the cabinets. Then finally an extra hole was needed in the wall for the fan to fit in place and then the fan was attached onto the new shelf.
This is sort of what it looked like before (I took this picture before the countertop was installed). The fan was sitting between the stove and countertop since it was still attached by a power cord. It was in the way, was accidentally scorched when I turned the wrong burner on one day, and was generally driving me nuts.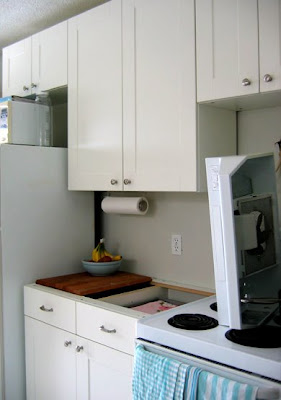 And this is the fan finally back in place! With an extra little shelf that I've decided to put our Denby Blue Linen baking dishes on. I just need to do a little caulking and paint touch-ups.
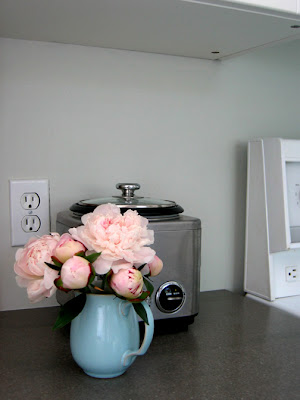
 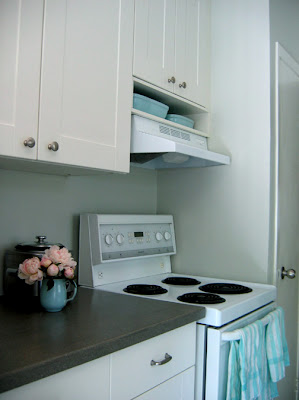 And in case you're wondering we don't usually have a blue jug of peonies on the countertop, I went out and picked them specially for the photo shoot. ( I guess without the fan there the countertop was looking kind of bare). I love peonies and was thrilled to see two bushes grow up this spring, one in our front and one in the backyard. Such a luxury after condo living.
Bookstore Shelving
Bookstore shelving can be one of the more difficult decisions for a new shop owner to make. The look and feel of his shop will obviously be affected quite a bit as will his budget. Our bookstore has been open for three and a half years now, long enough to see how our shelving choice has stood up. For the reasons mention above we decided to skip custom shelving and go with Ikea. The look of their black-brown veneer shleving has been commented on by a majority of our visitors all in the positive.
We also need to consider the practicality of building or having somebody build your shelves. All the cutting, measuring (twice of course!) and especially staining and finishing is quite time consuming. If you are paying a contractor to do this it will get expensive fast.You will also most likely be forced to keep the shelves where they are. What I really like about the Ikea shelves is that not only were they a breeze to construct, taking about ten minutes per unit, but if you ever decide to modify the layout of the shop you can easily move the shelves around. We have actually done this three times already.
Calculating the cost is simple enough, just calculate the wall space, or floor space that you need to cover, jump onto the Ikea web site to see the sizes they offer and do some simple math. You will quickly see what your costs will be. Now find a contractor and ask for an estimate. Keep in mind the overruns in cost (often over 25%), add in the dust/noise/inconvenience/smell of varnish and time chewed up and you should have a fairly clear view of which choice to make.
One other quick word about color choice if you decide to go with the Ikea shleves. We chose the black-brown option and are quite happy with it. You would think that a darker color may not be the best choice for hiding dust but it works fine. The shelves are easy to maintain and the dust that does accumulate does not really show.
Another bonus with this system is that all but the middle shelf are replaceable. If you have some shelves that become bowed over time it’s very easy to buy a replacement shelf. This has not happened to us yet.
So to finalize we went with Ikea’s Billy system, black-brown veneer finish for our bookstore shelving and are quite happy with the results.
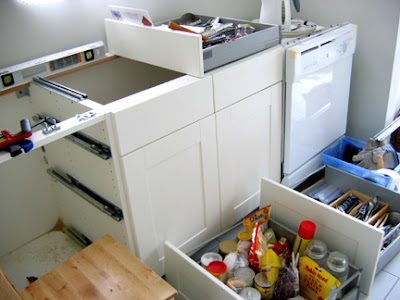 This is yet another one of those rambling posts about our kitchen chaos. I was thinking about it and if this was a magazine the story wouldn't be ready until I had a perfect final kitchen with beautifully styled pictures. But that's why blogs have something to offer that glossy magazines don't. When we were wondering if we could actually assemble our IKEA kitchen cabinets ourselves I was looking all over the internet for other people's work-in-progress pictures and suggestions.
So that's what this post is about because we've learned things along the way. But first of all I should mention that we had a very simple situation, relatively, because our kitchen layout was already working well, the appliances, plumbing and electrical are all in the same positions. Also, we have a galley kitchen with no corners, islands or oddly shaped walls (aside from the fact that they're not straight in some places but I'll get to that). So I can only say that if you are in a similar situation you can certainly do it yourself, but it's not easy. Unless you're really skilled with renovation-type work of course. I'd say we're handy, but not particularly skilled.
And after a few weeks of this we are tired out, with sore hands and muscles. I woke up this morning with a weird pain in the middle of my back and I had trouble getting up out of bed. I couldn't even turn over! I've been walking around today saying "ouch, ouch, ouch!" and trying to figure out what I can and can't do just now. I can sit and walk, but oddly I can't really lie down. I've tried a few things and I think it was from lots of sawing. I tried imaginary sawing and that hurt the most. But enough about my back.
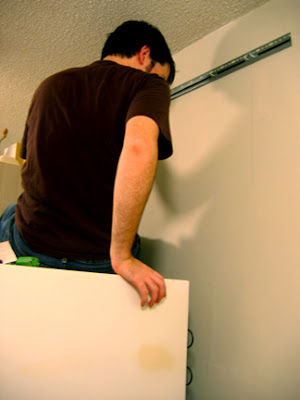
On Friday I assembled the upper cabinets. We decided there may be a good reason to put those up first so we should try to do it. Our current deadline is Wednesday because that's when someone is coming to measure for our countertop so everything needs to be in place by then.
 Assembling the cabinets is the easiest part. Especially if you've assembled lots of IKEA things in the past and you're careful about reading the instructions. I think I spend more time undoing things (which is difficult) because of putting things in on the wrong side or whatever. I was also frustrated to find that one of the back panels sustained a crack somewhere along the way, and I drove in a couple of nails askew which caused some small chips inside.
I recommend putting the door hardware on before you hang the cabinets. The screws are actually a bit tough and take some work to get in and it's easier if you can brace against the floor.
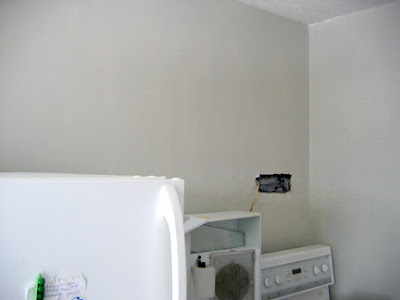
As mentioned last week, I had this last wall to repair and paint. IKEA recommends that you paint one coat, then put up the cabinets, then do the second coat. This saves a bit of paint, and I guess you can do touch-ups if you scratch the paint. One of my tricks was not doing too much work on smoothing out the walls because in most places the rough spots where the old cabinets used to be attached were covered by the new cabinets.
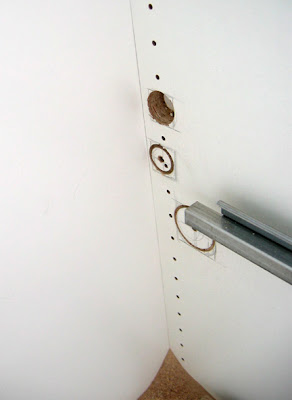
 At this point you need to put up a metal rail that the cabinets hang from (get a nice big level it will be very handy). The rail wasn't long enough, so it was a tricky matter of working out where the studs were, where the cabinets were and cutting two pieces of rail that would maximise the amount of support for each cabinet. I recommend marking your studs on the wall with a pencil and measuring everything carefully and marking it on the wall.
Our oven fan vent can't really be moved and was the biggest problem. It determined where the vent would go, which determined where the cabinet above it would be which determined where all the other cabinets would be. We discovered there wouldn't be enough space between the countertop and cabinets - even our kettle wouldn't fit.
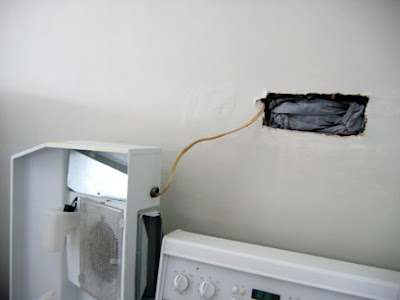 Our brilliant solution was that we would (later on) create a small box that could be used as a small shelf. This box would attach to the cabinet over the stove, and the fan would attach to it. This meant the cabinets could be placed higher up. The other tricky part at this stage is working out the position of the little panel strips that fill gaps. In this case a 2" strip goes beside the over-stove cabinet so that its door can open fully, and this allows for a 1" space on either side of our free-standing stove.
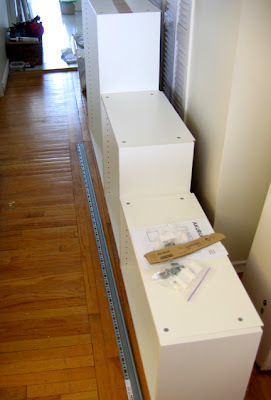
At this point we measured and cut the rails with a small hacksaw. The saw is only $4 and works well but it takes a while to cut through the rails. If you had a power saw that cuts metal it would be much easier. The picture below shows Bradley attaching the first rail. You need to buy your own screws for this, we got some really big ones because there's going to be a lot of weight on this rail. And of course the rail needs to be attached to a few studs. The hardest part for us is that the battery for our new drill isn't working properly and it had barely any power.
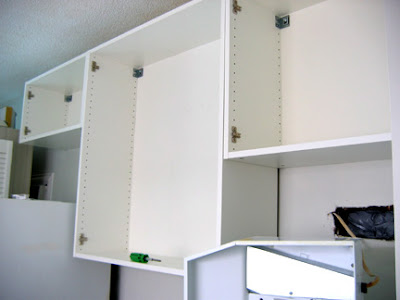
 Then finally we could put up all the cabinets. This part isn't too bad, the cabinets are heavy but they attach at two places with a simple bolt. Then they can be adjusted afterwards by sliding them along the rail so that they are all snug against each other. Also you can make sure at this point you have a 2" gap on the side for the filler panel.
Luckily the walls on this side of our kitchen are straight. We have a single cabinet for the other side of the kitchen and the wall it's next to is on an angle. If we added a filler panel there it would be really obvious so we're just going to leave a large gap. It's possible because it's a single cabinet, and we can centre it on the small patch of wall next to the window that it's going on, but if it wasn't we'd have had a problem. Or it just wouldn't look right which is frustrating after spending so much time and money.
 This is as far as we've gotten. Next, you drill holes and attach the cabinets to each other, then add shelves and doors. Finally you add the hardware for the doors.
The only other difficult thing so far is drilling holes for our plumbing that comes from a side wall instead of directly under the sink. We did three neat holes for the pipes on one side of the end cabinet. We did this with a little hole saw kit - you can get a basic one for under $20. The pieces attach to your regular drill.
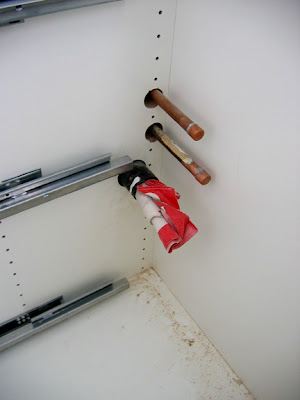 But the drill isn't working well now and we have six more holes to go! We're going to need to buy a new battery. If your plumbing comes in directly below the sink it's a lot easier because you're cutting through the thin back panel, not through the thick walls of your cabinets.
 In short, you can do it yourself. But you may find yourself getting really annoyed at the IKEA DVD and posters (included with any kitchen purchase) that make it look really easy. I found watching the DVD quite soothing until I realized they were basically installing cabinets in what seemed like a completely perfect room, without any crooked walls, unevenly spaced studs, oven vents, or evidence of plumbing or electrical outlets to worry about.
My biggest tip is to make a list and make sure you do things in the right order. I hope we are, because we're not done yet!
The Just One More Book!! website has been plagued with extremely spotty Internet service over the last two days while our ISP battled networking problems. Full service was restored around noon, today.
Thank you for your patience!
Tags:
Just One More Book,
network problems,
Thank you for your patienceJust One More Book,
network problems,
Thank you for your patience


.jpg?picon=380)
Nicely done! Speaking as an OCD clean freak myself, I like this a lot.