new posts in all blogs
Viewing Blog: Shawna JC Tenney, Most Recent at Top
Results 1 - 25 of 243

Shawna is a children's illustrator.
Statistics for Shawna JC Tenney
Number of Readers that added this blog to their MyJacketFlap: 10
Yes, you read that right! I've finally decided to make the switch. I am going to be moving my blog directly to my website. It will be a new blog. In fact, you can see it here. It's sad to say good-bye to my old blogspot blog. We've been together for 9 years now! But it is much better nowadays to have everything on the same site.
In honor of the old blog, over the next little while, I will be moving over and revising old popular blog posts to the new blog. I will be posting every Wednesday! I will keep everything here also- at least for a while until things are really established over at the new blog. Thanks everyone for reading, and I hope to see you over at my new blog. There is an email subscribe button, and and RSS feed on the new blog, so I hope you will come on over and subscribe.
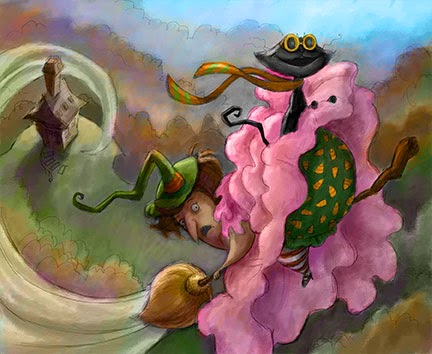
I recently finished the artwork for my book Brunhilda's Backwards Day. The book will be published in fall 2016 by Sky Pony Press.
Although I can't share a lot of images from the book yet, I wanted to share a little sneak peak of Brunhilda's dress. In the story, Brunhilda wakes up one day to find things quite different than she is used to, and all she can find to wear if an annoyingly fluffy pink ballgown! Well, I just coudn't skip on the opportunity to make this dress look as ridiculously ruffly as possible.
But then, guess what?! I had to paint the darn thing no less than 20 times in the book! And I had to adjust it all according to the lighting and mood in each picture. Yes, it was a pain. But in the end, it was all worth it. Long live the ridiculous fluffy pink ballgown! I can't wait to share the book with all of you next year!
 |
| Willow the Squirrel |
 |
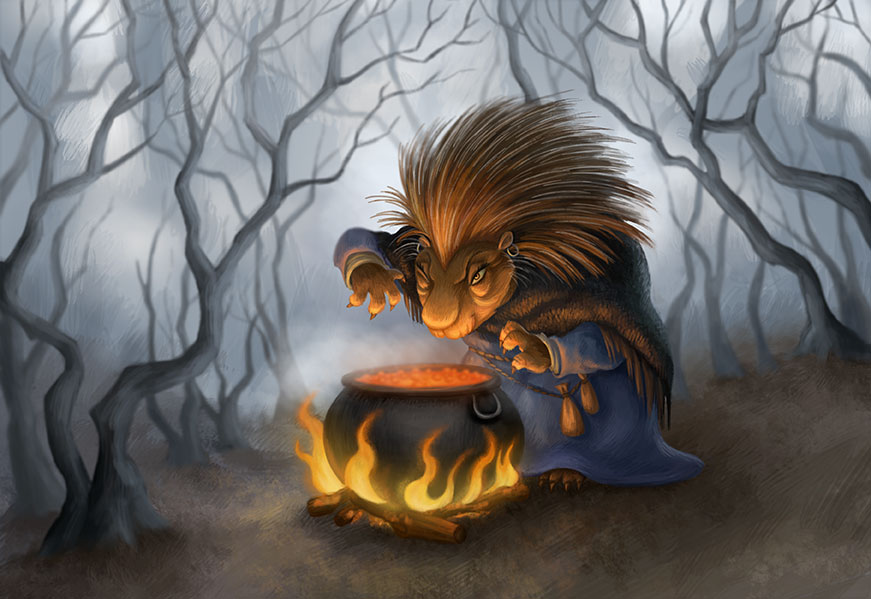
Rowena the Porcupine
|
Greeting blog friends! Do you remember the game, Wizards of the Wild which I helped illustrate that was funded on Kickstarter back in March and April? Well, since the Kickstarter campaign reached so many stretch goals, I was able to make two new characters for the game. This time two female wizards.
Introducing: Willow the Squirrel and Rowena the Porcupine! These characters were so fun to do, and I learned a lot while doing them.
Good day friends! Over the weekend, I once again hung out with some of my art friends to bring you another conversation about being a professional artist today. You'll notice I was not in Episode 2, as I was speaking on a panel at a local writing conference that day. But I was glad to be back, we had a great conversation.
This time we interviewed Mallory Carlson. We talked about not shying away from the things that are your weaknesses in art, because if you take the time to really work on those things, they will soon become your strengths. We talked about the challenges of taking care of our bodies and taking time to socialize and other things that are important that we sometimes neglect as artists. We also talked about where we are most inspired.
It's a great conversation to listen to while you draw today! If you like it, share it with friends!
In other news, I also need to mention that the game I helped illustrate- Wizards of the Wild was successfully funded on Kickstarter! In fact, it ended up being funded way over the original goal mark! And since the project reached so many stretch goals, I get to illustrate 2 new characters! I already have them designed and ready to color! Thanks to all the backers!
I'm happy to announce that the game, Wizards of the Wild, for which I was one of the illustrators is now funding on Kickstarter! Click here to go to the Kickstarter page!
I had the great opportunity to participate in this fun project! I illustrated the cover, the character cards and some of the magic cards. I especially loved creating the characters! I am posting the full illustrations of the characters below. Enjoy! And please come help back the game and pass the word along! I would love to see this game be published!
Greetings friends! Over the weekend, I hung out with an awesome group of artists, and we had a great discussion about our careers as artists. We started by interviewing artist Jose-Luis Segura, and then broke into a group discussion. Come and listen while you work! We hope to do more of these in the future, stay tuned!
 |
| Some sketches of a character I have been working on from my sketchbook! |
In the month of December, I drew in my sketch book nearly every day. I skipped a couple weekend days and Christmas, but I was proud of the fact that I sketched nearly every day. I managed to keep it up a lot of January, but slacked off a bit near the end of the month. But I'm determined to keep going. I started this challenge because I got some feedback from Stephen Silver at CTN on my character drawings. He told me to just keep practicing and drawing my characters in motion. I haven't ever been really good about sketching in my sketch book regularly. I came to CTN with a blank sketch book with the first page cut out because my first drawing was really bad and I was embarrassed.
 |
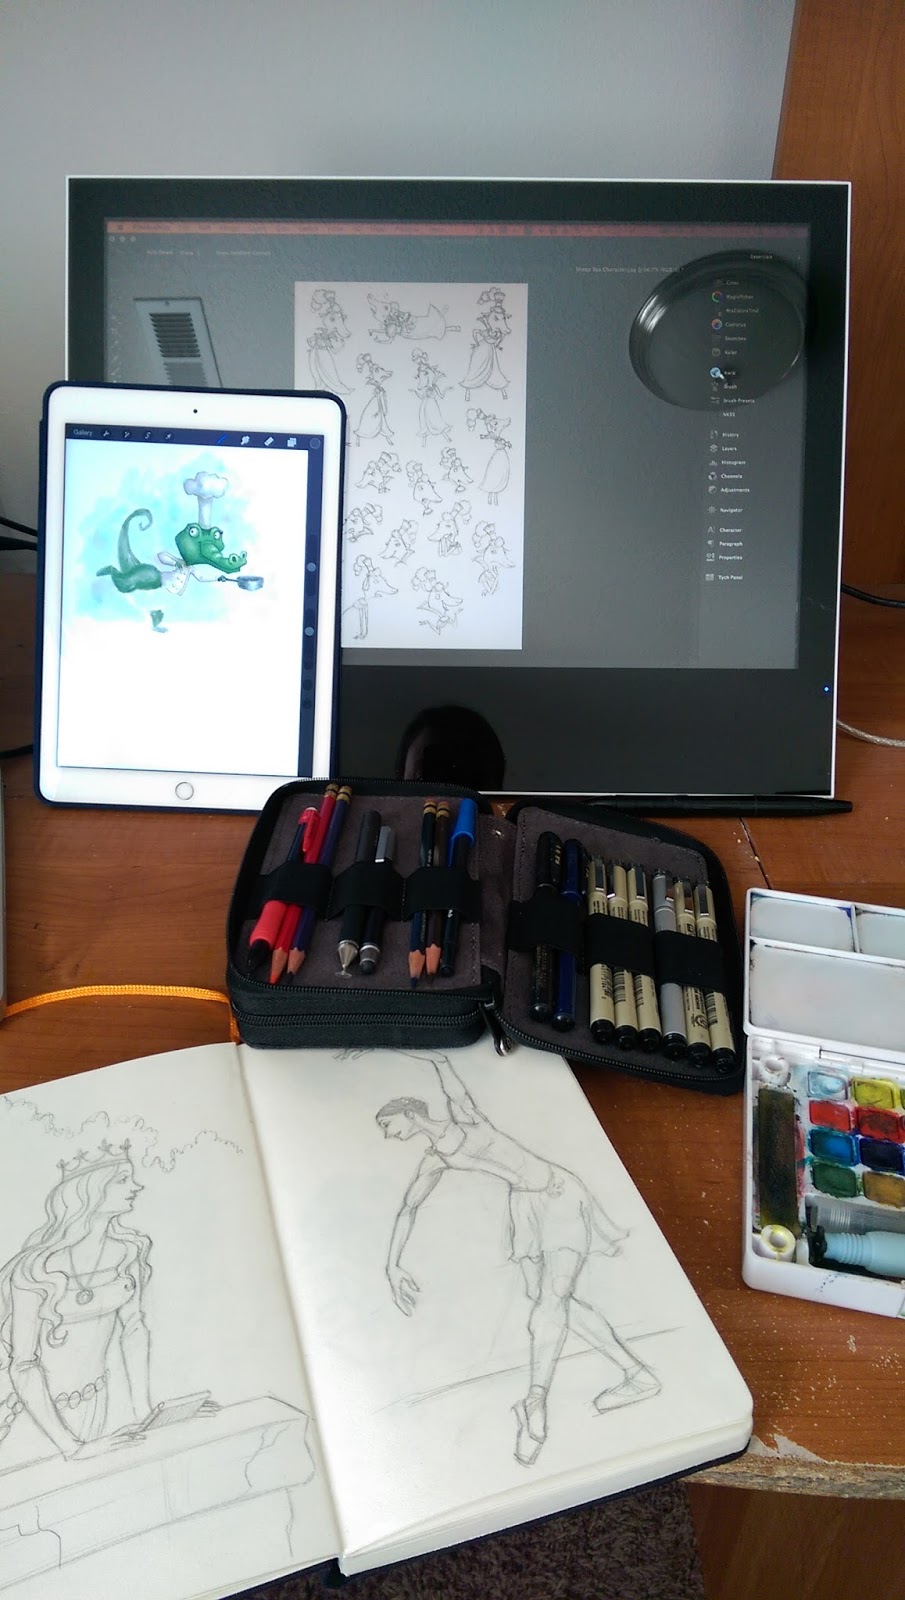
| Trying out different mediums! Pen and Ink with Watercolor! |
Sketching daily feels a lot more comfortable now, and I don't need to be embarrassed about what is in my sketch book. One thing that helped me in this was remembering that it is all just practice, which means I'm not obligated to show any one else my drawings. I have been doing my own drawings, and I have also been copying other people's character sketches for practice and study. It has been great. And I'm going to continue it this year, and I know I will get better.
Join me this year, and challenge yourself to sketch more! In fact, if you want an official challenge, the #kidlitart chat community is doing a challenge to draw every day in February.
Check out the details here. |
| Sketching on the Ipad! This one was done in the Procreate App. |
To help you get motivated and inspired, here are some prompts and tools that I have been using.
First, Here are some things that help me think of what to sketch every day:
- Draw your own already designed characters in different poses.
- Use Stephen Silver's
Character Design Shuffle app to come up with new character ideas.
- Copy another person's character design sketches. Of course, these are for personal study, so don't post them on the web, but keep them for yourself.
-Try different mediums- pens, watercolor, markers different art apps on the Ipad etc.
- Choose a photo from Pinterest and draw it.
- Use images from the apps
Posebook or
Posetool for reference.
- Prompts from
Sketchdailies.
- Color studies from nature in watercolor or on the Ipad.
- And of course the best idea is to just draw the things you love!
 |
| Artwork by Shawna (that's me)! |
Utah and Southern Idaho Illustrators Unite!! Mark your calendars!
Utah/ Southern Idaho SCBWI presents, our 2015 Illustrator's Conference, February 21, 2015 with art director
Kristine Brogno from Chronicle Books! Other speakers will be Author/Illustrator
Mark Pett (The Girl and the Bicycle), and Illustrator
Guy Francis (Clark the Shark). Come join us for a day full of fun and inspiration!
Keep up to date on the Drawing Sunshine Blog:
http://drawingsunshine.wordpress.com/Also, you can register here:
https://utahsouthidaho.scbwi.org/events/utah-southern-idaho-scbwi-illustrators-conference-2015/
Hurray! I participated once again in
PiBoIdMo in November- 30 picture book ideas in 30 days. It was a little tricky with CTNx and Thanksgiving, but somehow I managed to come up with 31 ideas! I can guarantee that the majority of them are pretty bad ideas, but maybe there are a handful of gems in there that might become great picture books someday! I'm happy that I did it once again. I think one of my favorite things about
PiBoIdMo is all the inspiring blog posts by guest bloggers on Tara Lazar's blog. They give great ideas for coming up with picture book ideas, tell about their experiences, or just give great encouragement. This is definitely going to continue to be a yearly tradition for me.
As for the month of December, I have decided to do one sketch a day. I am not good at doing daily warm up sketches, I'm really not. I think it is because I have such a limited amount of time working as a freelance illustrator and then trying to do all my mom duties as well- I guess the daily sketch usually gets pushed to the back burner. But I am going to commit to it for one month. I know December is a weird month to do it, but I was so inspired after CTN, and I just want to start now. So here I go. I am committing to sketching every day. I may or may not post sketches. Some of my sketches may be copies of what other people have done for educational purposes- so I definitely won't be posting those. I know I will probably come up with some pretty bad sketches. But the thing is, if I am sketching more, I am going to get better. So I am committing to do it today!
I had a most amazing time going to CTNx (Creative Talent Network Animation Expo) in Burbank this past weekend. Here are a couple highlights from my trip.
The day before the Expo, we got together with people from the Oatley Academy. We had breakfast together and then we went to the
Getty Museum. It was amazing to be with wonderful people who I have taken classes with at the Oatley Academy who have become some of my best friends.
After looking around the museum, we had "OA family time." Chris Oatley, Lora Innes, and Justin Copeland gave us some great talks on what to expect at CTN, longevity of careers in art, and not quenching our passions because of what other people think.
Here's a picture of some of my favorite people.
After the Getty, we went to the Center Stage Gallery to see the Lovely Ladies of Animation exhibit. It was awesome to see their original artwork in person! Here is a picture of us gathered after to eat and visit. We ended up in a circle of drawing awesomeness.
The Expo itself was amazing. I met so many people that I knew from school, from Utah, and from the internet. I met new amazing artists. I got to talk with artists who I really admire in person. Glen Keane's opening speech almost had me in tears. I took many amazing workshops. I bought far too many books. I laughed until I almost fell over, and I got lots of giant hugs.
Helping out at the Oatley Academy Booth.
With Peter De Seve.
With Pascal Campion.
Hanging with friends. The Muppet Crowd of Awesomeness!
Now you might be wondering what a children's illustrator is doing going to an animation expo. Well let me tell you. I have learned so much from the animation industry over the last couple years. I had a very good education from BYU, where I got my degree. But character design, and story boarding were not really part of what I was required to learn. I think these are important skills for anyone wanting to make children's books. After all, making a children's book is almost like making your very own personal movie (without the animation part). Having well designed characters is going to be a big part of the appeal of your picture books!
Also, a lot of people in animation are also into the children's illustration world as well. I picked up a few picture books while I was there! I thought I would feel silly saying I was an illustrator (not a character designer or visual development artist), but it turned out that many of the people there exhibiting are illustrators just like me.
While I was at CTN, I got the chance to see so much good good art. The expo floor is like a giant Comic Con, but all the art is actually really really good (no crappy fan art). There was so much inspiration there. Some amazing character designers there that gave me some good advice for my character designs. I also went to a few workshops that were really inspiring and helpful to any artist.
Also, being at CTN was like a giant family reunion where so many of my friends were gathered. I loved going so much, and I hope I can go again in future years. I hope to see some of you there in future years!
I was going through some old photos and found this little gem. This is me 11 years ago, 2003, my senior year in the Illustration department at BYU. We went on a trip to L.A. where we visited museums and some studios. I remember when I visited the studio, they were working on
The Incredibles, and they had in the works and planning stages, a
Rapunzel movie...which wouldn't come out for quite some time! This was also at the very end of most of the 2D animation.
Brother Bear just was about to come out. Fun to look back on this trip!
I have never been interested in working for a big studio, mostly because my most important job is to be a mom. Which is why I chose the path of being a freelance illustrator. In fact, at the time this photo was taken, I was 6 week pregnant with my first baby. Sometimes it is really hard to be both a full time mom and a full time illustrator, but I am really glad I can do both!
Despite never really wanting to be part of a big studio, I have learned so much from the animation world! And although the studio route is not for me, I have thought it would be fun to try out some freelance character designing and such. Because of these things (and also to meet up with some good friends), I will be going to the CTN animation Expo next month in Burbank California! I am very excited!
Also, a little update on what I have in the works. Things have been a bit slow, as I have had a bunch of freelance work going on. But I am working on a very exciting project that I hope will be beneficial to all of you, dear readers! There will be more details soon, and I hope to start posting this super secret project at the beginning of the year in January! Until then, hopefully I will find sometime to post some art work and maybe some more industry tips soon!
Happy October everyone, and keep drawing!
Come join me and my literary agent, Jodell Sadler at Sundance Lodge Writing Retreats where she will be doing picture book critiques on August 30th!
The cost for the whole day (including 3 gourmet meals) is $150. If you need lodging for Friday and Saturday night, cost is another $100. Contact Mette Ivie Harrison ([email protected]) to get signed up and get more information.
Other speakers will be Julie Olson (Discovering America), Kristyn Crow (Zombelina), Sharlee Glenn, and me, Shawna Tenney!
Great views, great company, the best food, a chance to meet casually with other writers, new and more experienced, along with the chance to talk one-on-one with an agent--it's a chance that's hard to beat. In addition to the critique, you'll have a chance to talk casually with all of the presenters and with Jodell, and to ask all the questions your inquiring heart desires.
In this video blog post, I talk about questions you should ask a potential client for book illustration jobs, whether they be working at a publishing house, or a self publishing author. It is important to have good communication to weed out potentially bad jobs, and to know exactly what the client is expecting.
Here is my affiliate link to the book I mention in the video, Business and Legal Forms for Illustrators by Tad Crawford.
In this Youtube Video, I share the technique I use to make my one layered sketch into a multi-layered illustration in Photoshop. Please "like" and share if this is helpful to you!
Here are a few character sketches from a new personal book project I am working on! This represents only a very small portion of the pages and pages of character sketches that I have drawn, and I am sure there will be many many more to come.
Something I am really trying to think about is varying the shapes and sizes and proportions in each character. I am also trying to give them unique silhouettes. This is something I didn't think about much before I started learning from artists in the animation industry. These are principles I think every children's illustrator should think about when designing characters for books.
Another great tip I learned from my friend, and concept artist at Disney Infinity in Salt Lake,
Nasan Hardcastle is to start out really small and loose. Draw your character first in very small and simple shapes- almost like drawing a letter. Work loosely. Get the main general shapes first and then work up to a bigger size and work in the details.
Greetings Illustrator Amigos! Today I am part of a blog tour!
I was invited by the super talented illustrator and banjo player, Russ Cox! Before I begin, let me introduce you to Russ!
Russ Cox was raised by a pack of crazed hillbillies in the back woods of Tennessee. Without much in the way of modern conveniences, like a television set or running water, he spent his time drawing and whittling away the hours. All of that drawing paid off. He has illustrated the Freddy the Frogcaster series written by Janice Dean (Regnery Kids). Major Manner Nite Nite Soldier, by Beth and Mike Hofner (Outhouse Ink). A Merry Moosey Christmas by Lynn Plourde (Islandport Press Fall 2014) and his first book that he wrote and illustrated, Faraway Friends, will be released in April 2015 by Sky Pony.
You can find out more about Russ and see his work at his website, www.smilingotis.com and his blog, www.smilingotis.blogspot.com.
Now on to the questions. This blog tour topic is Writing Process. Here is a little bit about my writing process!
1. What am I working on?
I am working on a new picture book- title to be revealed soon- that I have written and am now illustrating. The characters in the book are all sheep and goats set in an ancient (yet strangely modern) middle eastern style royal court. Right now I'm working on character design- it has been a struggle at times, but mostly a blast! Character design sketches to be posted here soon!
2. How does my work differ from others of this genre?
I have always loved fairy tales and spoofs on fairy tales. My stories usually don't take place in the every day life of a child like many picture books do. I do like to write books that are character driven, but my stories often take place in fantasy or fairy tale- like settings.
Also a lot of children's illustrations use very flat and stylized and local color , whereas in my illustrations, although stylized, I like to use light and shadow and atmosphere.
3. Why do I write what I do?
For a long time, I tried to write and illustrate things I thought would work well in the market- what I thought everyone else would want to read.
But I was not writing what really resonated with me and with who I was.
So I decided to write and illustrate something that I would want to read, and that's when I really started feeling happy and successful about my work.
4. How does my writing process work?
When I write my story, I am already thinking of where I can show things with pictures instead of words. I usually write a few drafts of my story before I take it to my critique groups, and then revise it again a few times.
Then I design the characters and do some other visual development for the book. This takes a while, because I want to get the characters just right for the story. Some of this takes place later in my process- every thing is ongoing.
Next, I make a pacing book which is 8 pieces of paper, folded in half and stapled together. I tape the words of my story into the book and then turn the pages, and rearrange them until I like the pacing.
After that, I make a storyboard and revise that a few times. At this point I will show the story to my agent and critique group, and do a few more revisions.
Then I make my dummy book/ more polished sketches, which will also go through a few revisions.
In other words, write, revise, write, revise, draw, revise, draw, revise, draw again, revise, rewrite, redraw....that's my process!
So now that you know a little bit about my process, I hope you will join my friends next week (July 3rd) to find out about their writing processes. Hopefully hearing from all these amazing talented artist illustrators will give you some good ideas about what you can do to improve your writing craft.
So without further delay, I would like to introduce you to some of my writer/illustrator friends!
First up, we have Mr. John Nez! I will let him introduce himself. Take it away, John!
I've illustrated over 50 books of every sort, from toddler board books to historical non-fiction. I'm now also writing and illustrating my own picture books and interactive e-book apps, which is a lot of fun.
I draw mostly in a whimsical style with the goal of conveying lots of feeling in my pictures... happy, sad, sneaky, mad, hopeful, afraid... whatever. I'd guess that's about the main point of any illustration.
I work in Photoshop and Illustrator, which greatly expand the illustrator's toolbox. The combination of traditional and digital mediums allows for amazing new possiblities... and lots of fun.
You can find more about John by visting his website at www.johnnez.com and his blog at johnnez.blogspot.com.
Next up is my food friend, Manelle Oliphant. Here's a little about Manelle:
Manelle Oliphant graduated from BYU-Idaho with her illustration degree. She loves illustrating historical stories and fairytales. She lives with her husband in Salt Lake City, Utah.
You can see her work and download free coloring pages on her website at www.manelleoliphant.com.
And last but not least is another great friend of mine, Sherry Meidell. Here's a little bit about Sherry:
Sherry Meidell loves to tell stories with paint. She is a signature member of the National Watercolor Society, Utah Watercolor Society, and Western Federation of Watercolor Societies. She has received numerous awards and is a member and illustrator coordinator for the Society of Children’s Book Writers and Illustrators. She keeps her paint brushes busy painting watercolors and illustrating children’s picture books.
Welcome to Part Three of my Dummy Book Series!
If you missed it:
Today in Part 3, I will talk about what to submit to Editors and Agents, sending your dummy book out into the world, waiting, dealing with rejections and celebrating successes.
What to Put in Your Package for Editors and Agents
What to put in your package may vary from publisher to publisher. Many editors and agents want you to send everything via email, and others want you to send everything via snail mail.
How will you know what each Publisher or Agency wants?
Research Publishers and Agents
You can find a list of Publisher who are accepting unsolicited manuscripts, and Literary Agents in either the Children's Writer's and Illustrator's Market book or in The Book, a publication that is only available to SCBWI members. There are not very many publishers who are accepting unsolicited (unagented) manuscripts anymore, so if you plan to write and illustrate a lot of your own books, it may be better to find an literary agent first.
When looking for a publisher or agent, always go look at their website. Make sure your work will be a good fit with their agency.
I found that many of the agents listed didn't even have a website. A good agency will have a nice website and be involved in social media. It is an essential part of being successful in this business nowadays.
Networking
In my own recent search for a literary agent, I sent my dummy book and illustration samples to several agents. I was rejected by a few, and others never answered my queries at all. It was not until I got a referral from another author-illustrator that I was successful in finding and landing my current agent.
This also happened nine years ago when I was looking for my (former) art rep. I was able to connect with my art rep through another art rep's referral. Remember, this is not always the case, but if you are able to network with someone, there may be a better chance of an agent looking at your work.
An Important Reminder For All of Us
Let me pause for a moment to remind you of something very important to remember. The process and timing of finding an agent or a publisher is going to be different for each of us. It may be a matter of being in the right place at the right time.
The process of being successful as an illustrator may take years, or it might happen right away. But more often than not, it will take time. I have been working in the industry for nine years and I have still never illustrated a trade book, whereas I know other artists who successfully jumped right away into the trade industry. But those cases are rare. It more often takes more time and perseverance to be successful. Remember to be patient.
Submission Guidelines
After finding a good list of Publishers or Agents, and you've checked their website to make sure your work is a good fit, find their submission guidelines. They are usually pretty easy to find on each website. Read the submission guidelines carefully. Everyone wants you to send slightly different things in the email, or include different things in your cover letter.
When Sending a Manuscript Package in the Mail
When I am sending a package in the mail, along with a letter and a printed dummy book, I like to include a business card and a couple of nicely printed post cards. I get my post cards printed at gotprint.com. They do a very nice job, and they come highly recommended!
Just make sure everything looks clean and professional. If you send extras, only send a couple. Don't overwhelm the editor!
Cover Letters
Research how to write a query or cover letter. There are many online resources available. Here is an article that I found helpful: Writing a Cover Letter
When you are submitting a picture book that is both written and illustrated by you, the story and pictures can do most of the talking. So in other words, keep your letter brief.
Remember to be courteous and professional. Make sure you proofread your query letter carefully.
Many publishers and agents like to know if you are submitting to other publisher or agencies at the same time, so make sure to tell them if it is a simultaneous submission.
Sending Your Work Out Into the World and Waiting...
Respect the publishers or agents space. Remember they get hundreds of submissions every month (or maybe even every week), so give them time and space, and don't bother them.
After you hand your package over to the post office worker, or click the send button on the email, you are going to be doing a lot of waiting.
In the mean time, start another personal project. Keep working on your craft and doing what you love to do instead of focusing on the waiting. Sometimes, it may take a long time to hear back from anyone. And sometimes you may never hear back at all. Just keep doing what you love to do and focus on things that are going well.
Dealing with Rejections
When you get a personal reject, remember that is a good sign that your work is getting close to being a success.
There may be a good reason for a rejection. For example, I got a few rejections from agents. In the rejections the agents said I had a good story, and my artwork was great, but the story wasn't right for them. I was happy for their rejections, because I didn't wanted to be agented by someone who wasn't absolutely thrilled by my story, style of writing and artwork.
Try to take time to do something fun to celebrate your rejections. There was one week where I got three rejections in one week. I got really down and depressed and started thinking destructive things about my artwork and career. A better thing for me to do would have been to go on a fun family outing to celebrate the fact that I am actually being brave and getting my work out there.
Rejections are just part of the process, so think of ways you can celebrate what you are doing instead of focusing on the negative.
Just remember that if you are working on your craft all the time- learning how to be a better illustrator and a better writer, taking good critiques to heart and improving, if you are persistent and you are working every day for that dream, you will be successful.
Remember it takes time. Don't forget the many famous people in history who took years to be successful. Take hope from their stories, and don't give up!
Celebrating Successes
Don't forget to celebrate all your successes along the way- big or little, whether it be a break though in your writing or drawing, signing on with a new agent, or having your manuscript accepted by a publisher. Tell a friend, buy yourself an new art book, or go out for ice cream with your family!
Remember to look back at where you were 10 years ago, and see the progress you've made.
Welcome to Part 2 of my series on Dummy Books!
Stay tuned for part three next week, where I will talk about researching editors and agents and sending your Dummy Book out into the world.
In case you missed it,
here is where you can find part 1, where I talked about making your dummy book- perfecting the story, making the story board, drawing the sketches and taking them to final paintings. Today I am going to talk about making your dummy book into a PDF, printing it and getting it ready to send to agents and publishers.
Making your dummy book into a PDF
It's simple to make a dummy book in
Adobe Indesign.
Here is a few simple steps to get you started.
In Indesign from the "File" menu, choose "New" and then "Document."
Then you can decide on a size. Make the size of the document the same size as your book will be. So for instance, if you decided your book will be 11 inches by 9 inches, make it that size. You can make your own page size by clicking on "Custom."
Set your document up to have spreads.
Once you are in the document, use the hot keys Command + D (on the Mac) or in the "File" menu click on "Place." Find your illustration file and place it on the page you would like it to go on, and move it around to center it. Continue doing this until you have filled up your entire book.
After you have placed all the illustrations where you want them to go, type in all the words where you would like them to be placed. If you have planned things out right from your storyboard to your sketches, there should be places for your text to go in each spread (
see Part 1).
You can then choose "File" and then "Export" and export your file to a PDF.
Printing Your Dummy Book
There are many options for printing your dummy book.
You can print your book on an online printing and publishing site such
DiggyPod or
Blurb, along with dozens of others. Just google "print my book online."
You could also get your book printed at your local print and copy store such as Alphagraphics or FedEx Office.
I prefer to print my own books on my printer. It looks just as nice if I use card stock so the ink doesn't bleed through. I like this option, because I may want to send my book out to more than one publisher or agent at a time, and it's the cheapest option for printing multiple books.
I don't print the book at 100%, I just print it at a good mailable size. Then I get my book spiral bound with clear plastic covers at the local copy and mailing store. The most important thing to remember is that your dummy book should look clean and professional!
Also remember to keep your digital dummy book handy because many publishers and agents like you to send them everything via email.
Stay tuned for next week's post, Dummy Books Part 3- Sending Your Book to Agents and Publisher, where I will discuss what to put in your packages/emails to editors and agents. I will also talk about waiting, rejections and celebrations.
Snippets of Wisdom from the NY SCBWI Conference
It's been over a month since the conference, but today in part 2, I'm keeping my promise to share a few of the snippets of wisdom I learned at the SCBWI New York Conference.
What I learned from Tomie DePaola, children's book illustrator:
The influence of theater in Illustration.
Tomie was involved in theater from a young age. In college he had a teacher who told him that "Joining the theater is best thing you can do for your illustration. If you want to be an illustrator, you must love great theater." Tomie has really taken that to heart over the years!
Costumes can really help define a character. You have to think both in time period and personality when it comes to costumes. Also it's important to take the color of the costume into account with designing the set.
When designing scenery for your illustration, think of how you can change the mood of the scene with color and weather changes.
Character sketches are your casting call. It's important to contrast your characters with size differences and varying features. Make sure you give different characters in the scene different reactions.
What I learned from Brett Helquist, children's book illustrator:
Casting and Character Development
It is important to really spend time to learn the craft of drawing. When characters are drawn well, they are alive. Often times we see illustrations are very well rendered and beautifully composed but the characters are lifeless.
It is important to push the faces of your characters to be different and not falling into the habit of always drawing the same face.
Don't fuss with the details early on. Be messy and make mistakes. Just start drawing different characters until you find the right one. Do loose and fast drawings to develop emotions and moods. Don't be afraid to play around with shapes and sizes. Push yourself to draw things you've never drawn before.
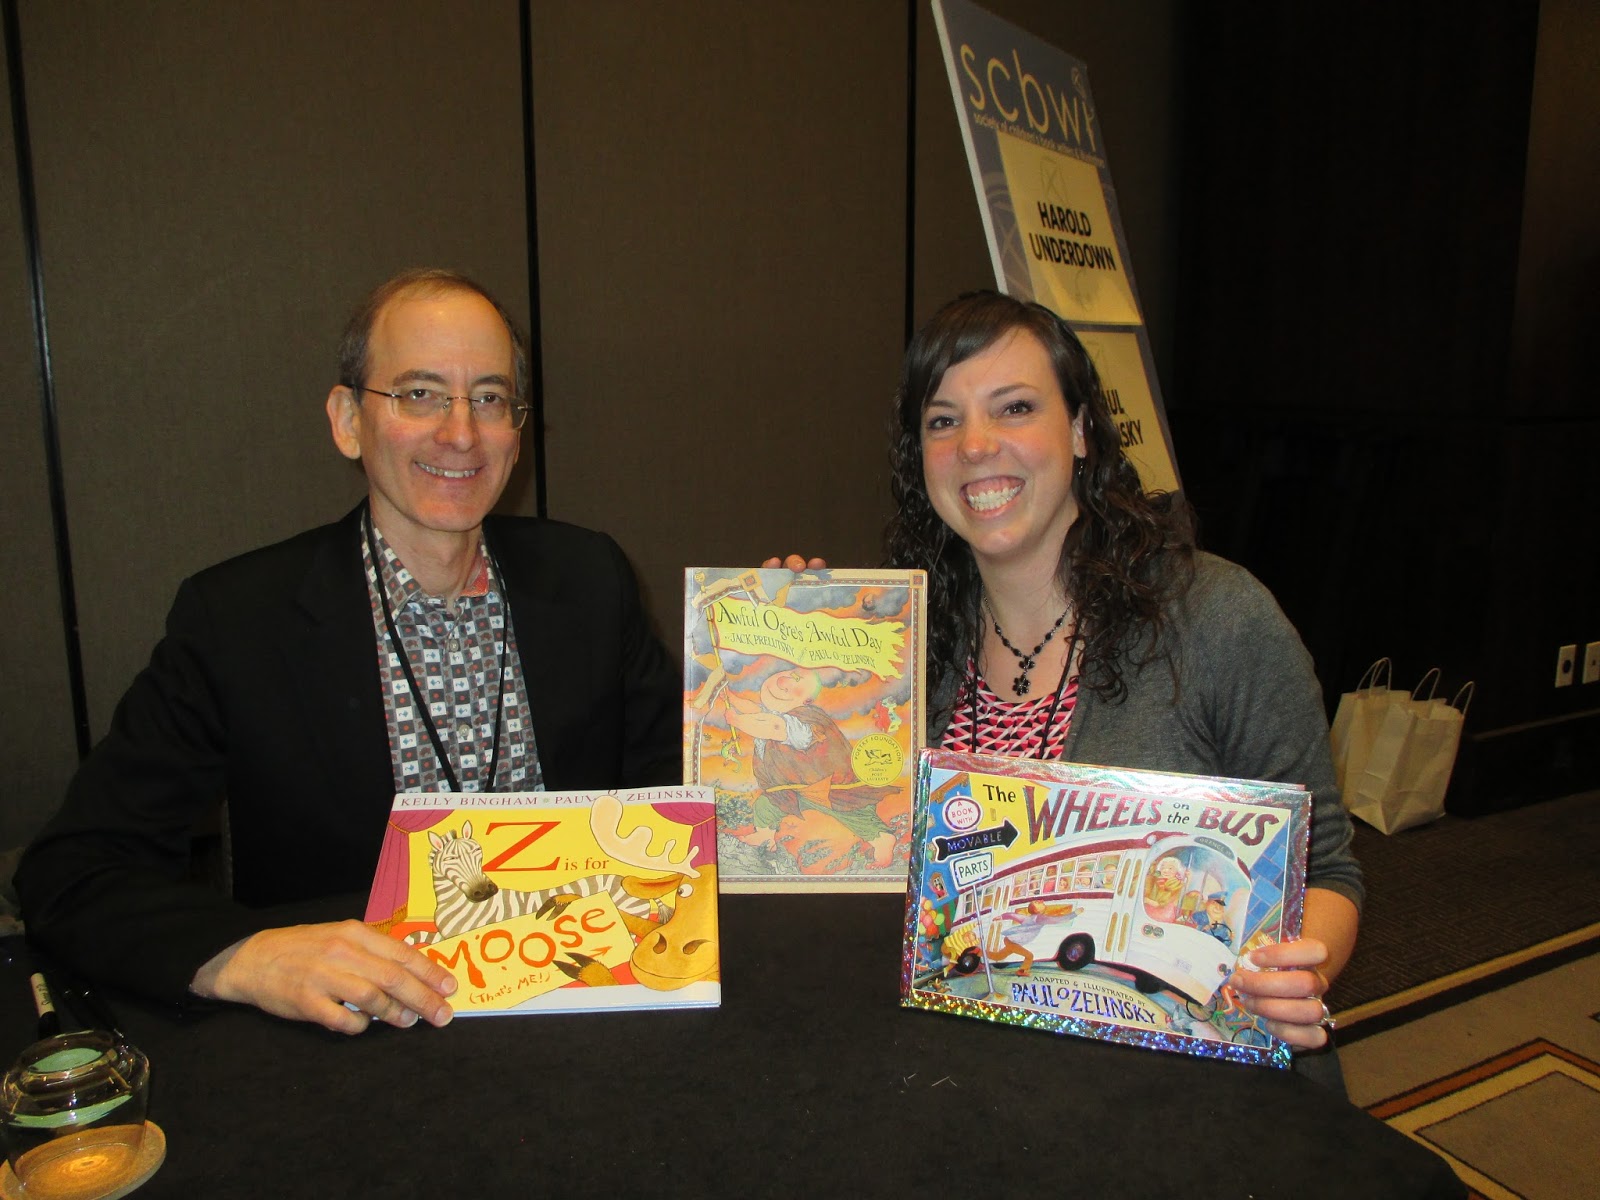
What I learned from Paul O. Zelinski, children's book illustrator:
Staging
A Picture book makers could be making a movie. There are characters, lighting and costumes. The edge of the books makes the set. You need to stage every element of the design, including the text in each spread.
The story will tell you what the right shape is for your particular book.
Perspective is fun. Different angles can add to a picture. Horizontal lines represent rules, strictness or stillness. Diagonal lines represent chaos, or moving. Low angle and high angle can tell different stories and add to the psychology of the picture.
What I learned from Holly McGhee art agent, Arthur Levine publisher, and Lily Malcom art director:
This was a panel where these three industry professionals were critiquing work from attendees of the illustrators intensive. Here's a little bit of what they had to say:
It's good to show different expressions and emotional interactions between characters in a picture book. Show the relationships between characters. Use diversity in your characters. Show that two characters relate differently to another character or event in the story.
Show energy in your illustration, don't make your illustrations static. A curve of the neck or a turn of a hand can make a character less wooden.
Vary your values. Remember atmospheric perspective. Recede values. Lights and darks can help to focus and mood a piece. Pay attention to your color palette.
Book covers should convey one clear moment instead of trying to capture the whole book in one image.
What I learned from Laurant Lynn, art director at Simon and Schuster:
Self-Promotion
Remember You are a business. Consider making a recognizable branding. Make goals for updating your website and sending out postcards. Make a one year plan and a five year plan and keep on task.
Website. Keep it clean, simple and easy to navigate. Separate different styles. Include a bio.
Postcards. Send your best work to art directors on post cards with images on both sides. Send out a new card every 3-4 months.
Expand your horizons. Try doing different kinds of illustration and art work. Don't get pigeon holed into a certain genre.
Go to Conferences. Get out and talk to people. Ask questions.
Challenge yourself and your craft. Continually update your art. You never know who is looking at your art. Know what is essential to have in your portfolio, and what you should take out.
Challenge yourself to get better at drawing. Go to figure drawing classes. Read all the time!
Social Media. Just do it! Facebook, Twitter, Instagram, Tumblr, Blog!
I was privileged to be among the first students of the
Oatley Academy when it was started by
Chris Oatley in August of 2012. I was among the first to experience the mind-blowing awesomeness of his class Painting Drama 1. Ever since I have been a loyal fan of the academy. It has been life changing to say the least.
Last month I started taking Chris's awe-inspiring course, Painting Drama 2. Unlike Chris's
Magic Box digital painting course which is done all online (which is also phenomenal and I highly recommend), this class is done live in real time. It is amazing to interact with Chris and the other students, many of which were in my first Painting Drama class. I learned so much in the first class, and now my mind is being blown again!
Whereas the first Painting Drama class was all about the structure and composition of an illustration, this class is all about color. I thought I knew and understood color. I even read
Color and Light by James Gurney, which is amazing by the way, and every artist should read it. But there is so much I never thought about or learned in this particular way, especially from a digital painter's point of view.
Below are a few of the assignments I have been working on for the class. I have been using a lot of my sketches from my book
Brunhilda's Backwards Day to play with the different color assignments.
Color swatches to portray mood of a scene
Split complimentary palettes.
High key and low key monochromatic/analogous.
High Key Magenta
Low Key Magenta
Experimenting with different times of day and weather conditions.
Sunset
Foggy
Rainy
Morning light
 |
| Me at age 6 with the mural I made for my 1st grade class Christmas program. |
Today I am getting ready for an elementary school presentation. I am going to talk to the kids about how I became an illustrator. I wanted to connect what they are doing now to what they may do in the future. I found this picture and the story behind it is so inspiring, I wanted to share with the rest of you.
When I was little I loved to draw. Big surprise. I had a difficult time in school. Later, as an adult, I discovered that I had undiagnosed ADHD. I had a hard time concentrating on most of my school work, and school was a struggle for me.
I had a wonderful first grade teacher, Mrs. Clark. She could see that I struggled in school, but she could also see that I loved art. Art was therapy for me. So instead of discouraging me from drawing, she encouraged me.
She had me draw a special nativity scene mural for the class Christmas program. She had me make special scenery for the class puppet show. She saw my potential and encouraged my artistic growth. If it weren't for her, I might have become discouraged and never have become the artist I am today. I wish I could find Mrs. Clark now and thank her.
To contrast with that, in third grade, I had a teacher that never did art projects. Ever. My drawing was discouraged. I was literally sick for three weeks and wasn't able to go to school.
Teachers, you are important. Encourage your students where you see their potential. Don't forget art. The arts should always be part of the school curriculum. Don't forget that many people grow up to have jobs in the arts. Not only that, but art, music, and dance feed parts of the brain that help kids in all other areas of their academics and social well being.
Hear my plea. Don't forget the art.
Greetings friends out in Internet Land! You may have wondered why it has been a month since I have posted anything. Well, I've been hard at work preparing for the New York SCBWI Winter Conference!
Here is a brief recap of some of the people and places I saw on my trip! There will be a part 2 where I share a few things I learned on my trip! There's lots of great hyperlinks in this post, so click on the link and discover some great illustrators and great places to visit!
I met some awesome illustrators that I have always admired! Some illustrators from the conference to follow: Paul O. Zelinski, Peter Brown, Brett Helquist (fellow BYU graduate), Tomie dePaola, Oliver Jeffers, Marla Frazee, Raul Colon, and Shadra Strickland.

I had the opportunity to see some beautiful artwork, both in New York and in Massachusettes. In New York, I had the opportunity to go to an exhibit at the New York Public Library called
The ABC of It: Why Children's books matter. There was some great picture book art there, including some artwork by one of my favorite classic illustrators,
Arthur Rackham.
In Massachusettes, I had the privilege of going to the
Norman Rockwell Museum. There I was able to see many beautiful works of art by Norman Rockwell. I also got to see some beautiful artwork by
Ruth Sanderson, one of my favorite children's fairy tale illustrators!
If you live nearby any of these places, go take advantage of these great opportunities and visit them!
The best part was being with great friends and family!
After the conference, I met up with my sister Bethany, and she took me around Connecticut and Massachusettes! Ah, what a great trip!
Making a Dummy Book- My Process
 |
| ©2014 Shawna JC Tenney |
In today's post, I will share how I make a children's book dummy by sharing how I am making my current book project, Brunhilda's Backwards Day.
In the next post (coming soon), I will talk about my process of getting the dummy book into printed and digital forms and sending them out to literary agents and/or editors.
I have had many people ask for me to share more about my process. This post series was inspired by an email from Claire, a student studying art at Plymouth College of Art. Claire was interested in finding out more about my process from getting a book from initial roughs to a publishable project.
First before I start, if you have never learned very much about writing and illustrating a picture book, I would recommend reading Writing with Pictures by Uri Shulevitz. It is a complete comprehensive guide to writing and illustrating a picture book from writing the story to the roughs, to the finished illustrations. The book is a bit out-dated, but still a great resource.
What is a dummy book?
A dummy book is a model of your children's book. It is the entire book laid out with pictures in sketch form with the type. It is made in the size that you want the final printed book to be. There is no real standard size for children's books, but 8 1/2 x 11 is probably the most common. Most artists like to include a couple finished illustrations in their dummy book. This book is used to show to literary agents, editors and art directors.
1. Perfect Your Story First
In the past, I have had failed dummy books because I did not take the time to perfect the craft of writing and revising a children's book. It is an important skill to learn if you are wanting to write and illustrate your own books.
Know Picture Books:
•Know the language of picture books. Picture books have a much different type of language than children's chapter books. Read 100 picture books.
•Know the format of a picture book. Know that picture books are typically 32 pages long. Know that 500 words or less is a good average word count for picture books.
Learn the craft of writing children's books:
•Read books about it. Two books that changed my writing were Invisible Ink by Brian McDonald and Writing Picture Books by Ann Whitford Paul.
•Find online children's book writing classes or communities.
•Join the SCBWI and go to a local writing critique group.
•Also, check out my post on the Plot Line of a Picture Book.
2. Gather Reference
This is a step that you will be doing during the whole process of making your book.
I set up a secret pin board on Pinterest to gather all my reference. As of right now there are 393 pins in the board for my current project, and I will add more!
3. Character Design and Visual Development
As the illustrator of a picture book, you are also the visual developer. It is important to design your character and your settings before you start the sketches for your book.
Design your Characters and Setting
Draw and redraw your characters. Find the perfect combination of shapes that fits your character's personality.
In the process of illustrating my book, I didn't take the time to design some of my characters up front, which made for boring characters in my sketches. They were not the main characters so I didn't want to waste my time worrying about making them interesting character. I was sure things would come together in illustration sketches. I went into autopilot.
When my husband pointed out that they looked the same as all the kid character I have drawn in the past, and that this was my opportunity to make my new characters shine, I knew he was right. I had to go back to this step and perfect the characters.
After doing that, the sketches and the story dynamics turned out a so much more interesting.
Here are a bunch of cat studies I did. It took drawing lots of different shape combinations to find the perfect combination for my character!
Here is some of my final character design for both Brunhilda and her cat.
I also took time to design their environment.
4. The Story Board
Take 1: Pacing booklet
After I have written my story and have designed my characters, the next thing I do is make a "pacing booklet."
I take 8 sheets of blank copy paper, fold them in half and staple them down the middle (you can also use a rubber band or string). This makes a 32 page booklet. Then I take my printed story and cut up the text. Then I tape the text into the book where I think things should go pacing-wise. Then I read through the book and see if the page turns come at good times. If not, I readjust until it feels right to me.
Take 2: Rough Thumbnails
Next, I make very rough and small thumbnails. I make a story board based on the size I want to make my book. I make boxes the actual size of the book in Adobe Illustrator (mine were 11 x 9) and then scale them down to the size small enough to fit all the spreads onto a regular 8 1/2 x 11 piece of paper. I print that out and draw my first very sloppy thumbnails on this page.
Take 3: Tighter Thumbnails
Next, I print out a larger story board with larger thumbnail boxes on 11 x 17 paper using my large format Epson Artisan 1430 printer. (Before I had my large format printer, I printed out my thumbnail boxes on regular-sized paper and taped them to a poster board or large piece of drawing paper.) I place the text under each spread where it will appear in the book, so I know what is happening in each scene.
Then I draw out tighter thumbnails, leaving space for where the text will go.
When I do this, I am really thinking about the compositions. I want to make sure there is a good variety in my compositions- close ups, far away, different angles etc.
If a thumbnail isn't working. I draw more thumbnails on an extra piece of paper. I cut out the new thumbnail and tape it over the thumbnail that wasn't working. Sometimes I will draw and draw and draw many thumbnails for one scene until I get it right. Sometimes I will think it feels right until I start sketching it, and realize that I need to go back to the thumbnail stage.
As you can see here on my storyboard, I have taped multiple thumbnails on top of each other.
5. The Sketches
Even when I feel like my thumbnail is great, I still need to do a lot of editing when I get to the sketching phase. Don't be afraid to draw and redraw, and get critiques from your friends and then redraw again. I like to draw my sketches traditionally with a pencil and paper and then scan them in and finish them digitally. I use the lasso tool a lot to resize things and move things around. Drawing digitally is much easier now with the help of my Yiynova MSP19U tablet monitor.
Here is an example of an sketch that needed lots of revisions.
Take one: Here's is my beginning sketch. It was okay, but there was a lot of issues with the perspective. I was going for sort of the wonky-look, but it wasn't working out very well.
Take two: Here I got the perspective right, but there was a lot lacking in the story.
Also the objects around the room were somewhat the same size.
Take three: I am finally getting to where I want to be story- wise here. The perspective is working out, and I have payed attention to the overlap, and size and rhythm of the objects in the room.
6. Gray Scale and Color Studies
After I perfect my sketches, it's important to get my gray scale and color studies right before moving on to your final illustrations, or things might get messy.
These were my first gray scale and color study attempts. As you can see, the values weren't working out too well. Things were a bit confusing.
7. Final Illustrations
You can fudge some of the steps. You can skip steps. But you aren't going to do your best work for your picture book dummy if you don't give your best effort to each step.
The sooner in the process you get things figured out the better. For example, it's better to get your story written and revised the right way before you do the final sketch and painting, because then it's a lot harder time-wise and emotionally-wise to change things after that. It's a lot easier to get the design right in the storyboard/thumbnail stage than to trying to perfect the large sketch and having to redraw the whole thing if its not working.
The key is don't just go with your first draft or your first thumbnail. Revise and revise, ask for critiques, be humble and revise some more. Don't be afraid to rewrite and redraw.
Good luck to you in your dummy book pursuits!
Today's coloring page: Christmas Elves from Rosie The Reindeer!
Click on this link for a higher res pdf to print!Buy the book on
Rosie's Website, or now you can also buy the book on
Amazon!
View Next 25 Posts