


My faithful
studio companion
in repose.
;)
For more creative and enlightening "six word saturdays" click here!
17 Comments on Six Word Saturday #3, last added: 1/26/2010
Display Comments
Add a Comment

 By: Laurel Gaylord,
on 1/23/2010
By: Laurel Gaylord,
on 1/23/2010
By: Laurel Gaylord,
on 1/16/2010

By: Laurel Gaylord,
on 7/29/2009

By: Laurel Gaylord,
on 1/28/2009

 By: Laurie Halse Anderson,
on 1/26/2009
By: Laurie Halse Anderson,
on 1/26/2009
I have finally calmed down and warmed up enough to blog. Sort of.
Where to start?
I know.
Congratulations to all of the winners and honor book winners announced today at ALA MidWinter!!! (I am looking for one page to link to that lists all of the winners. Can anyone help with that?)
I am especially happy for my old SCBWI friends who earned well-deserved awards: Hope Anita Smith won a Coretta Scott King Honor for Keeping the Night Watch and Jen Bryant, author of the Caldecott Honor book, A River of Words: The Story of William Carlos Williams. YAY!!!
Fellow-NBA nominees Kathi Appelt won a Newbery Honor for The Underneath and E. Lockhart won a Printz Honor for The Disreputable History of Frankie Landau-Banks. My sometimes-brother M.T. Anderson also won a Printz Honor for The Astonishing Life of Octavian Nothing, Traitor to the Nation Volume II: The Kingdom on the Waves. If there was an award for the longest title, I think he'd win that, too. And Jackie Woodson earned another Newbery Honor, this time for After Tupac and D Foster!
Last but not least, I am totally stoked that Neil Gaiman won the Newbery for The Graveyard Book! I have long been a fan of his writing (actually, I am one of those crazy, drooling gaimainites) and it is wonderful to see his work honored by librarians as well as fans.
And, um, yeah. I won an award too.
::cheeks blush, eyes puddle up::
The good and gracious members of the Edwards Committee have bestowed the breathtakingly stupendous Margaret A. Edwards Award, which "honors an author, as well as a specific body of his or her work, for significant and lasting achievement," on me.
::wipes eyes, takes deep breath, composes self::
The beginning of the official announcement reads thusly: "Laurie Halse Anderson is the winner of the 2009 Margaret A. Edwards Award for Catalyst, Fever 1793, and Speak. These gripping and exceptionally well-written novels, through various settings, time periods, and circumstances, poignantly reflect the growing and changing realities facing teens. Iconic and classic in her storytelling and character development, Anderson has created for teens a body of work that continues to be widely read and cherished by a diverse audience."
There's more, but it stretches the bounds of Blatant Self Promotion to post it all. Read it on the YALSA site.
And make sure you check out the previous Edwards winners.
Suffice it to say, I am honored and humbled to have my work put in the class with writers whom I admire so much. And I am particularly proud that the committee singled out both Catalyst and Fever 1793, and that they get to stand shoulder-to-shoulder with Speak, instead of in its shadow.
I actually found out about the Edwards earlier this weekend and, once again, had to walk around with two hands clapped over my mouth. (This made eating difficult and drinking coffee rather perilous.) I was extremely certain that Chains would not make anymore awards lists (it's had its share, don't you think?) and I know the anguish of sitting around watching the phone not ring, so early this morning, I packed up my bag and headed for the gym. Had a wonderful, if slow, 6-mile run onthe treadmill, then I treated myself to the ultimate reward: a two-hour massage. That's right. TWO hours.
::Grrrrrrrrgggggllleee::
I came home, all relaxed and squishy, and VERY hungry. Stoked the woodstove, let the dog out, brought the dog in, locked the door, heated up a bowl of beef soup made from scratch, and reached for the book I am reading. I was one page into the book, three spoonfuls into the soup, when someone knocked on the front door. The Creature With Fangs went crazy. It was just the nice flower deliveryman, bringing me a gorgeous bouquet from Uncle Penguin. I stepped out into the vestibule to get the flowers and closed the door behind me, so the dog wouldn't eat the nice deliveryman. As his truck drove away, I reached for the door handle.
It did not open. It had locked behind me.
I tried all of our doors. All locked. This is a very secure house, did you know that? It felt like 7 degrees outside, but it was sunny so the vestibule wasn't quite that cold. BH had been down in Syracuse, but I knew he would be home soon, so it wasn't worth hiking down to the farm to use their phone.
What does one do in that situation, locked out of one's house on a winter's day, hungry, tired, with no book to read or phone to call?
If you've just been awarded the Margaret A. Edwards Award, you listen to the music in your head and dance to keep warm. So I did. A little more than an hour later, BH came home, and all was well.
I am told that the cool color to wear to the Edwards shindig is orange. Must! Find! Orange! Shoes!
By: Laurie Halse Anderson,
on 6/23/2008
So here is the The Very Nearly Perfect Thing I was talking about last week.
Be sure to hang around for the credits.
 By: Claire Louise Milne,
on 2/22/2008
By: Claire Louise Milne,
on 2/22/2008
 As part of the blow-by-blow aspect of the blog world, here is the latest stage in our kitchen renovation. Sorry if this is too much fuss over our little galley kitchen, but we were so excited to finally get our new countertop today. Also there's some technical details I'll share in case they're helpful for those of you also working on your kitchens.
We ordered it at Home Depot. The company that made and installed it is called Contours and they did such a nice job. The holes for the sink and faucet are perfect, and the installer even asked me about exactly where we'd like the faucet. As you can see in the top picture they had to cut away from the cabinet at the back a little bit to fit the sink. Then they added extra strips of wood on the walls for support. Then they put in the countertops and cut the holes:
 We still need to install the dishwasher, so the wooden frame it's standing on will go and it will attach to the countertop. The countertop material is Corian solid surface, but there is a strip of wood affixed to the underside that you can screw the dishwasher into. (ie. no need for a side-mounting kit). We chose an "eased" edge for the countertop which means it looks square but the corners aren't too sharp. It's 1.5" thick on the edges but the main area is thinner than that.
Because we have IKEA cabinets without a frame, you need a "build up" for laminate countertops so that the drawers clear the countertop when you pull them out. This isn't necessary for Corian countertops because they are already built up with the way they are put together. They did such a nice job,even the caulking around the edges is perfect:
 Here's the right side of the kitchen:
 And finally a detail of the surface:
 My tips for picking your countertop are to take a cabinet door with you if you can, and a paint chip of your wall colour. It's hard to remember colours, and there's so many different whites and browns and greys it can be hard to guess what will coordinate if you don't have them in front of you.
We chose Corian because it's very practical, it's stain & scratch-resistant, maintenance free, non-porous, bacteria-resistant and heat-resistant. It can be repaired if you damage the surface because it's a solid material as opposed to laminate which is a coating on another material. Also I've always loved the feel of it, it has a smooth stony feeling.
It was one of the most expensive ones, but we just gave up with the budget. We've done pretty well so far and it's really a bargain kitchen all things considered. So we spent more than we'd expected but it was worth it. We just couldn't find a cheaper option we really liked. When you've done so much work and already spent a lot, it's disheartening to choose something you don't really like.
Now that we have this done we can take a sample piece of the countertop when we go to choose backsplash tiles. That's going to be lots of fun! Also we will finally have our sink installed early next week and so no more washing up in the bathroom sink. Can't wait for that!
By: Claire Louise Milne,
on 1/28/2008
 This is yet another one of those rambling posts about our kitchen chaos. I was thinking about it and if this was a magazine the story wouldn't be ready until I had a perfect final kitchen with beautifully styled pictures. But that's why blogs have something to offer that glossy magazines don't. When we were wondering if we could actually assemble our IKEA kitchen cabinets ourselves I was looking all over the internet for other people's work-in-progress pictures and suggestions.
So that's what this post is about because we've learned things along the way. But first of all I should mention that we had a very simple situation, relatively, because our kitchen layout was already working well, the appliances, plumbing and electrical are all in the same positions. Also, we have a galley kitchen with no corners, islands or oddly shaped walls (aside from the fact that they're not straight in some places but I'll get to that). So I can only say that if you are in a similar situation you can certainly do it yourself, but it's not easy. Unless you're really skilled with renovation-type work of course. I'd say we're handy, but not particularly skilled.
And after a few weeks of this we are tired out, with sore hands and muscles. I woke up this morning with a weird pain in the middle of my back and I had trouble getting up out of bed. I couldn't even turn over! I've been walking around today saying "ouch, ouch, ouch!" and trying to figure out what I can and can't do just now. I can sit and walk, but oddly I can't really lie down. I've tried a few things and I think it was from lots of sawing. I tried imaginary sawing and that hurt the most. But enough about my back.
On Friday I assembled the upper cabinets. We decided there may be a good reason to put those up first so we should try to do it. Our current deadline is Wednesday because that's when someone is coming to measure for our countertop so everything needs to be in place by then. Assembling the cabinets is the easiest part. Especially if you've assembled lots of IKEA things in the past and you're careful about reading the instructions. I think I spend more time undoing things (which is difficult) because of putting things in on the wrong side or whatever. I was also frustrated to find that one of the back panels sustained a crack somewhere along the way, and I drove in a couple of nails askew which caused some small chips inside.
I recommend putting the door hardware on before you hang the cabinets. The screws are actually a bit tough and take some work to get in and it's easier if you can brace against the floor.
As mentioned last week, I had this last wall to repair and paint. IKEA recommends that you paint one coat, then put up the cabinets, then do the second coat. This saves a bit of paint, and I guess you can do touch-ups if you scratch the paint. One of my tricks was not doing too much work on smoothing out the walls because in most places the rough spots where the old cabinets used to be attached were covered by the new cabinets. At this point you need to put up a metal rail that the cabinets hang from (get a nice big level it will be very handy). The rail wasn't long enough, so it was a tricky matter of working out where the studs were, where the cabinets were and cutting two pieces of rail that would maximise the amount of support for each cabinet. I recommend marking your studs on the wall with a pencil and measuring everything carefully and marking it on the wall.
Our oven fan vent can't really be moved and was the biggest problem. It determined where the vent would go, which determined where the cabinet above it would be which determined where all the other cabinets would be. We discovered there wouldn't be enough space between the countertop and cabinets - even our kettle wouldn't fit. Our brilliant solution was that we would (later on) create a small box that could be used as a small shelf. This box would attach to the cabinet over the stove, and the fan would attach to it. This meant the cabinets could be placed higher up. The other tricky part at this stage is working out the position of the little panel strips that fill gaps. In this case a 2" strip goes beside the over-stove cabinet so that its door can open fully, and this allows for a 1" space on either side of our free-standing stove.
At this point we measured and cut the rails with a small hacksaw. The saw is only $4 and works well but it takes a while to cut through the rails. If you had a power saw that cuts metal it would be much easier. The picture below shows Bradley attaching the first rail. You need to buy your own screws for this, we got some really big ones because there's going to be a lot of weight on this rail. And of course the rail needs to be attached to a few studs. The hardest part for us is that the battery for our new drill isn't working properly and it had barely any power. Then finally we could put up all the cabinets. This part isn't too bad, the cabinets are heavy but they attach at two places with a simple bolt. Then they can be adjusted afterwards by sliding them along the rail so that they are all snug against each other. Also you can make sure at this point you have a 2" gap on the side for the filler panel.
Luckily the walls on this side of our kitchen are straight. We have a single cabinet for the other side of the kitchen and the wall it's next to is on an angle. If we added a filler panel there it would be really obvious so we're just going to leave a large gap. It's possible because it's a single cabinet, and we can centre it on the small patch of wall next to the window that it's going on, but if it wasn't we'd have had a problem. Or it just wouldn't look right which is frustrating after spending so much time and money. This is as far as we've gotten. Next, you drill holes and attach the cabinets to each other, then add shelves and doors. Finally you add the hardware for the doors.
The only other difficult thing so far is drilling holes for our plumbing that comes from a side wall instead of directly under the sink. We did three neat holes for the pipes on one side of the end cabinet. We did this with a little hole saw kit - you can get a basic one for under $20. The pieces attach to your regular drill. But the drill isn't working well now and we have six more holes to go! We're going to need to buy a new battery. If your plumbing comes in directly below the sink it's a lot easier because you're cutting through the thin back panel, not through the thick walls of your cabinets.
 In short, you can do it yourself. But you may find yourself getting really annoyed at the IKEA DVD and posters (included with any kitchen purchase) that make it look really easy. I found watching the DVD quite soothing until I realized they were basically installing cabinets in what seemed like a completely perfect room, without any crooked walls, unevenly spaced studs, oven vents, or evidence of plumbing or electrical outlets to worry about.
My biggest tip is to make a list and make sure you do things in the right order. I hope we are, because we're not done yet!
 By: Alan Silberberg,
on 1/22/2008
By: Claire Louise Milne,
on 1/15/2008
By: Alan Silberberg,
on 1/22/2008
By: Claire Louise Milne,
on 1/15/2008
 A few friends have asked us if our kitchen cabinets are installed and the short answer to that is "no!". I think we're a little tired out from all the renovating and we've definitely slowed down. So today I decided to post the state of things to answer that question, but I also thought that possibly the embarrassment of showing the sad state of our house will push me to get cracking.
The picture of our hallway really tells the whole story. Most of the IKEA cabinets are in boxes - and when I say most I mean all but the one that we've assembled so far. Just past that we have the shower fixture that we can finally install onto our clawfoot tub now that the plumbing has been fixed. The new flooring has raised the floor height of the entire area by around 1/2". So we had to wait a few weeks for new supply lines for the tub to arrive.
Across from that you can see our old countertop propped against the wall which we are getting rid of. Also the doors to various closets that are all around 1/2 an inch too tall now to fit back in place. Then on to the kitchen with more IKEA boxes.
 This wooden strip is called a "reducer" and bridges the big gap and 3/4" step that was between the tile and wood floor areas. There were rough edges on either side and old floorboards and ditra showing in the middle. I sanded a little chip from the bottom corner of the baseboard to fit over the reducer.
  Oh... and hidden behind some of those IKEA boxes were these shelves that are going into the bathroom over the washing machine for storage. We also need to replace baseboards throughout (the old ones were removed when renovating the floors and most were damaged and too short and yucky to begin with).
 This is the one cabinet we've put together so far - now it just needs soft shutting mechanisms on the drawers, handles, legs and a countertop!
 And the original bright yellow colour is still there in the eat-in area past the cabinets. The wall was damaged in a few patches so we definitely couldn't have kept that colour. And I find it a bit too heavy. This is the left side:
 And the right side:
 What a mess. I really dislike the air conditioner too - and not sure how to remove it now it's been installed into the wall. But that will have to be resolved later. Maybe we can just put a cabinet in front of it!
By: Claire Louise Milne,
on 12/13/2007
What a mess. I really dislike the air conditioner too - and not sure how to remove it now it's been installed into the wall. But that will have to be resolved later. Maybe we can just put a cabinet in front of it!
By: Claire Louise Milne,
on 12/13/2007
 We moved back into our house last weekend and had nothing but the toilet in the bathroom. We used the shut-off valves from the sink to get water. It was like camping in our own home. But I needed to be home to be able to meet an illustration deadline and get ready for the craft sale - I had odds and ends for that tucked all over the place. Our furniture was crammed all over the place so that we had to climb over things to move around or find things. The bedroom had the watertank in the doorway so we couldn't even close the door.
So you can imagine how thrilled we were when the plumber turned up and quickly put back the water tank (hot water! hurray!) and tub (bathing! I missed it!) and sink (heaven). The best part was finally seeing our new bathroom floors with the furnishings in the room, because without them I was wondering if the tile was too small - it looked a bit busy. But with the furnishings in there it's just right. The traditional style of hexagonal tile makes it look like those floors could have always been there and they work perfectly with the old clawfoot tub, and in short, I think they're beautiful. The porcelain also feels lovely, it's hard to describe but it's just very nice. Also I was very happy with how the cream paint on the tub looked with the new floor - there aren't a lot of colour choices with Tremclad but the cream really works (it's not quite as yellow as the picture above). And finally the new IKEA vanity/sink is also beautiful and soooo much better than the old one. It's a bit taller which I find more comfortable and I even love the shiny chrome knobs we picked to match the rest of our fixtures.
 There are still a few small problems, our new faucet was bought out of the box and there was a small part missing. So for now we have a different stopper in there and it doesn't close all the way and isn't the right one. Also, the new flooring is higher than the old one, due to the Ditra and porcelain tile being thicker than vinyl tile. The plumber had no trouble adjusting the drain length, but the offset supply lines are too short (and it looks like they got a bit bent). So we need to buy new ones because for now the tub is installed on a bit of an angle in order to make it fit. Soon I'll be painting the walls, and once that's done I can do a full reveal.
Our kitchen is looking very empty. When a room is bare you can really see it's qualities and it's really a nice space. The big window and sliding doors let in so much sunlight - I've been tempted to live without cabinets and turn it into an airy studio. But I guess I have to be practical. Anyway, now the walls are smooth and I can paint those too, and our cabinets are ready for pick-up at IKEA. Yesterday we put back our appliances and a little table, so we've created a kitchenette area that is all we need for now. The dishes get washed in the bathroom so of course I had to buy this cute vintage mug for the scrubbie...
 For the wall colours, I've been so inspired by the January Martha Stewart Living. I noticed a lot of pale blue and yellow, including mustard yellow which created a really fresh (but almost vintage style) colour scheme that appeals to me so much. You can even see it in our dishes on the chair in the kitchen photo, we have a pale blue Denby stoneware set, and a brown and mustard yellow striped vintage set of dishes that's more casual.
 The bathroom isn't as sunny as the kitchen, there's a window but it faces a wall. So the white walls are too stark and it needs a bit of colour. I've been wanting pale blue walls, but I was wondering how pale blue would go with the cream floor and tub then realized this was the colour scheme I was seeing in the magazine and loving. It was even already there in my favourite soaps in my Jonathan Adler soap dish. So I've picked up a big can of Benjamin Moore's "ocean air" and I can't wait to see it on the walls!
By: Claire Louise Milne,
on 12/5/2007
 Things are really coming along now, the large kitchen and hall tiles are almost completely installed. There's just this last patch in the hall and 2nd closet to do. The tiles look white but they're actually very very pale grey with tiny matchstick lines of grey and white. They'll also look nicer once the grout is added. It's going to be a light grey so there won't be such dark lines between the tiles.
To the left you can see the bathroom is almost finished too. It doesn't look perfect, but I know it will once the grout is there. We've been visiting the house throughout the project and we can see that this job has been done with careful attention to detail, things we didn't even think about ourselves. Once we add the new baseboards, paint the walls and return the clawfoot tub and new vanity it's going to be really nice I think. Right now the pattern is a little hard on the eyes, mostly due to the dark lines between the tiles. They've also done more work on the walls where the tiles were removed and they're looking really good. I know once we prime we'll see places we have to touch up a bit here and there but that's easily done.
 So far so good...
Read the rest of this post
So far so good...
Read the rest of this post
By: Claire Louise Milne,
on 11/29/2007
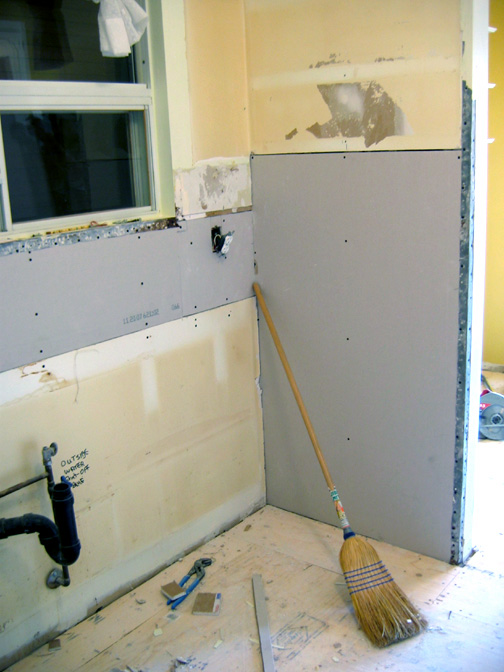 Just a quick update, we have new patches of drywall where the old wall tile used to be attached. They tried to take the tiles off but the glue was ripping up the wall so they just cut out the areas where the tile was and attached new drywall. I love it. Rough around the edges but I am delighted to have that yucky old tile gone. Really, it's a big improvement.
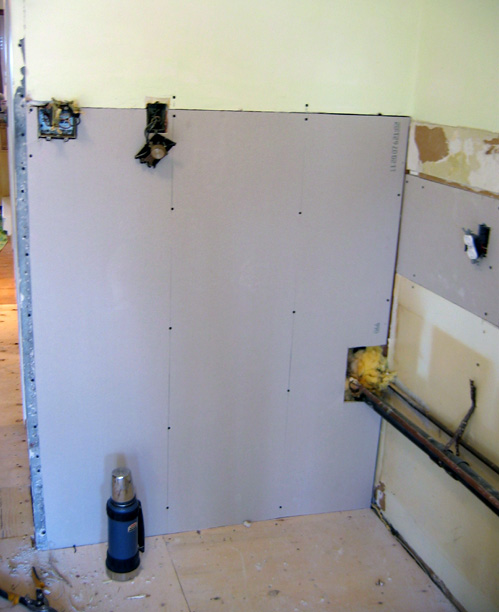
By: Claire Louise Milne,
on 11/28/2007
 Thank you everyone for the tips and comments. The renovation is making good progress so I thought I'd show more pictures. As the work goes along we keep finding out about problems in the house that are being fixed now and it's confirming that this work really needed to be done. As it stands our badly damaged bathroom floorboards have been repaired and fresh plywood laid on top. I went for a visit yesterday and it looks fantastic. This is the bathroom now:
 I wasn't going to post the pictures, because they're kind of boring, but then I had another look at how it looked just two days ago and it reminded me what a transformation it is! The picture at the top of the post is our hallway now. The post below is the kitchen. Remember the big pile of old tile and flooring? It's all been cleared out (onto our front porch for now).
 Believe it or not, the kitchen area in our house is an addition. That means the original house was probably around 300 square feet - smaller than our old studio condo. It was a worker's cottage built probably just before 1930 - I keep imagining everyone huddled around a stove in one room. Not the luxury we enjoy today! Incidentally my dad was the one who researched the age of the house by looking in public records. He got back to before 1930 but those records are on microfiche only and very difficult to read.
 Anyway the snowballing isn't quite over as ripping out the cabinets damaged parts of the walls (see above), and we've never liked the wall tiles that are there and carry all the way to the floor in places. Also putting new cabinetry over old tiles we're planning to replace doesn't make sense. Trying to take them off has just caused more damage so now we're looking at replacing those areas of wall with fresh drywall. More cost again, but well worth it. We can also easily wait until later to add new backsplash tiles.
The fun part of all this has been using the IKEA templates to plan our new cabinetry. We're not going to get it all right away - but being able to add pieces over time is one of the great things about IKEA. Unfortunately their online planning program isn't available for mac or I'd be all over that. But the little punchouts and grid they give you work well too. We've chosen the Lidingo style (a town in Sweden the Beatles visited in 1964 apparently), I think it will be really pretty and of course it's affordable too. It's basically the same white look as our new Liatorp bookcases, our Pax wardrobe and our new bathroom vanity. Our whole house is going to match. For the walls I'm considering Benjamin Moore's "grey cashmere". It's a very soft grey with a hint of sage/green.
Here's a picture of the Lidingo cabinetry from the IKEA website: Not that our kitchen will look like this! But this is the inspiration.
p.s. when you go to IKEA now you need to buy plastic bags for five cents if you want them. When I went, the proceeds were being donated to Tree Canada. Even better if you can remember to bring your own cloth shopping bags. Finally an excuse for my tote bag sewing compulsion...
Read the rest of this post
By: Claire Louise Milne,
on 11/25/2007
 Well I'm sorry to say it's the same old boring story, a snowballing renovation. We started out planning to fix our bathroom floor which had holes from replacing the dysfunctional clawfoot tub plumbing. It had vinyl tiles that were permanently stained and missing in some places. And we've ended by essentially gutting our bathroom and kitchen.
Given the asbestos tile underneath and the general bad condition of the floor in the kitchen we realized it would make sense to do both kitchen and bathroom floors at the same time. This was confirmed when we moved the old chest freezer left behind by the previous owner out of our closet and found mold, rust and a badly damaged patch of floor.
Our tiler had an opening in his schedule, so we hurried around and removed our old vanity from the bathroom and put the washing machine onto our deck. Then we emptied the lower kitchen cabinets which needed to come out, put the stove on the deck and our fridge in the living room. We were so glad to see the old vanity go. And the best part is we left it outside with its old sink and faucet and someone took it - so we don't even have extra creating-more-garbage guilt.
So this is what our hallway looks like now. I love the look of the greyed floorboards, but they're not in great condition and there's tons of nailheads sticking up! And this is what our bathroom floor looks like now. On Friday we found out that we'll need to have an extra material installed on top due to the poor condition of the floorboards.
(After ripping out and rebuilding the floor - the corner is really unstable and that's where we had the washing machine jumping around! We're now having Ditra installed throughout the kitchen and bathroom) And this is now our kitchen:
 As you can see above, the cabinet didn't survive after all, as it was adhered with spray foam. Oddly enough. I guess they thought that fake-wood-plastic-laminate-particleboard cabinets would last forever! So we are now planning on buying new kitchen cabinets sooner than expected. The good news is pretty new cabinets, the bad news is of course the cost.
  Today we painted our clawfoot tub - since it was sitting in the hallway and finally accessible from all sides. This is the tub "before", rusty with a few layers of paint on two sides, in brown, blue, Pepto-Bismol pink and finally Big Bird yellow (this picture really doesn't do it justice):
 Luckily it is quite sound, the rust was superficial and the legs are still nice and sturdy. So I spent two hours sanding the tub, and finally started adding the cream-coloured Tremclad. This is a picture of the first exciting moment of covering this old uncared-for tub with glossy new paint:
 And finally, a lovely freshly painted tub:
 For some reason I love the raised letter label on the bottom of the tub:
 Transformations like this are so satisfying and remind us that it's worth all the work and expense. Well we think so anyway.
By: Claire Louise Milne,
on 11/18/2007
 Finally a non-communal front door so we can have a wreath! I have some berries I can add later to make it more festive in December
 If you want to see how this looked before, it's in a previous post
 To improve the lighting in the room, I've added sheer curtains to the front window. The big find there was a bay window rod from Umbra. I found it at their new shop on John St. just up from Queen West. I didn't even know these existed until recently, but they're brilliant - each side telescopes so you can adjust the size, and the corners are bendy so you can match the rod to the curve of your window. This way you don't lose the extra space in a bay window and you don't have several rods and hooks cluttering up your window. The next step is to paint out that dreary wood!
  Then I went to IKEA and found some plain white linen lampshades for two new lamps that we have at the corners of the sofa. This extra lighting has made the room much cosier and well lit. The lampshades were from Goodwill and had terrible shades, which it turns out are harder to find replacements for than you might think. A lot of stores only sell the lamps and shades together. Also these called for an "uno" shade style which most stores d0n't have at all (uno describes the way the shades are attached to the lamp).
 So the other big reason we're so busy is that we were planning to retile the bathroom - I had picked out a lovely porcelain white hexagonal 1" mosaic tile (it has that vintage look, and it's nice and fresh and light.) But what we realized when we considered how we could install them is that we have vinyl tiles with older tiles underneath, and it turns out those older tiles have asbestos in them.
By: Claire Louise Milne,
on 8/15/2007
So the other big reason we're so busy is that we were planning to retile the bathroom - I had picked out a lovely porcelain white hexagonal 1" mosaic tile (it has that vintage look, and it's nice and fresh and light.) But what we realized when we considered how we could install them is that we have vinyl tiles with older tiles underneath, and it turns out those older tiles have asbestos in them.
By: Claire Louise Milne,
on 8/15/2007
 Things are going well so far, we love our new house (especially our lovely deck and garden - we have a rose-of-sharon tree which is flowering now and a forsythia that has bright yellow flowers in the spring) but we've been swamped with things we want to fix up.
First of all I could. not. live with the flourescent light fixtures, so those are all gone now. I think they had some extra cold "let's do surgery!" style tubes in them, and it was really depressing. We've also been doing unpacking, painting, cleaning, clearing out some things that were left behind and even a little bit of demolition. There's still so much to do but I thought I'd share some of what we're doing with "before" and "later" pictures, although there aren't quite any "after"s yet!
The first wall to get painted was in the bedroom. Here's the before: It's a tiny room, just big enough for our bed, side table, pax and bureau, and the dark blue was definitely not the right colour to make it look spacious. I love our little wooden bed, and even though we've just primed the walls it already looks lots better. Here's the "later" picture:
 The hallway and front living/dining room were both a caramel colour that was also too dark. It wasn't doing much for our long hallway. The hall closet doors were pretty terrible, one of them was only half height, with a bit of curtain tacked on the bottom. Both of them were thick and awkwardly attached so that they swayed in and out of the alcove. Here's the "before" picture.
  I painted the hallway a nice creamy white colour (cil "chalk"), and already it's looking much sunnier. We also added a new light fixture to replace the flourescent light, and that made a huge difference. Once the right sized bifold doors arrive, they'll all get painted white to match the trim and will fit neatly into the alcoves. The bureau will also tuck inside the cupboards once we remove the old chest freezer that was left behind. This is the "later" picture:
 The kitchen cupboards are icky fake wood laminate and the cabinet by the doorway seemed to jut out and we'd both hit our heads on it. We thought it made the kitchen have a bit of a crowded feeling and we actually have tons of cabinets - much more storage than we had before. The "before" picture:
 So we took out the cupboards by the doorway entirely - ahh! space! I read in a magazine that every kitchen should have one bare wall and it really does make a difference. It feels more like a room and less like a tunnel of cabinets.
 And I primed and painted two of the cupboards. I like the way it looks - so I'll be doing all of them. They're odd custom sizes so we'd have to replace them entirely otherwise and that's not at the top of our wish list. I also made some swiss dot type sheer curtains. Here's a "later" picture:
 So that's all I'm going to show you for now. The craft/art studio is in the front room so I'll be sharing that too when it's in better shape!

By any other name, a handsome beastie! :)
What a beautiful kittie! I love having Cosmo as my studio companion, there's just something about a living breathing creature that's there, but not bugging you!
She looks like a queen. All cats can look like queens can't they.
xoxox
Beautiful shot....what a kitty! LOVE, LOVE, LOVE the book pages by Marianne with her beautiful kitty....those are so precious! Have an awesome weekend girl!!!
I love you and I will never forget what we mean to each other.
You are right. This morning Nathan was up really early and sitting with me and I was crying because my legs were sore sore and my neck and my and my and my.......
Feel like such a loser. But I know I'm not so you don't have to say anything, it is just when in pain it brings you down.
How is your level of pain today.
I love you.
xoxoxo
This cat looks like it reigns in your studio! The king of beasts!!!
Beautiful!
Enjoy your Saturday!
:D
Nothing like a cat for inspiration!
He, those are 6 words too......
Gorgeous creature she is!
have a fun weekend!
went back to have another look at my pages. I can't get enough of it.
hugs
>M<
Our two cats are always in "repose".
Yay kitties!! She's beautiful, and so is the bed she lays on!!
Happy 6WS,
~Autumn
Oh, the floofiness, the comfy round bed and the pretty fabric...perfect setting for a repose...
ah, the life of a cat!
Sweet kitty.
Talk about living in the lap of luxury :)...What a terrific shot....Love the light...Beautiful! :)
very cute kitty so relaxed
Is this kitty a Main Coon? My next friend and companion will be a Main Coon cat. I still miss our Elvis, who flew away to kitty heaven five years ago this month.
beautiful photo and kitty! I can see why she keeps your company, a lovely spot to relax and enjoy the creative doings. THanks for sharing.