I began collecting quite a few years ago (yes it's more than 10, no, I'm not saying how many-ha!), and I've stuck with it. Usually when I'm not writing, (when is that?) I'm dreaming up some new miniature project. Guess what? The process isn't all that much different. While I have to sometimes struggle to find the words I want, or to get a story to go in the direction I had in mind, working in miniature works much the same way. I'm still planning and creating except with paper, clay, wood, paints and other materials instead of on the computer. The one drawback is doing something in miniature often requires measuring and math, which I'm really not good at. Terrible; it took me several tries to get some wood framing cut right. I think the best thing about having a hobby is it can actually improve your writing (or at least your well-being!) I can stew over my writing subconsciously while I concentrate on something else. Often the problem, or the solution I'm looking for, comes to mind once I'm not obsessing over it. Continue reading
Add a CommentViewing: Blog Posts Tagged with: Miniatures, Most Recent at Top [Help]
Results 26 - 45 of 45
Blog: YA & MG Fantasy Author Rebecca Ryals Russell (Login to Add to MyJacketFlap)
JacketFlap tags: children's books, dogs, miniatures, collecting, Blog Hop, Christine Verstraete, horror short stories, MusItUp Publishing, Add a tag
Blog: Gurney Journey (Login to Add to MyJacketFlap)
JacketFlap tags: Miniatures, Museum Visits, Add a tag
A few months ago I put out an invitation for a sculptor to bring to life a robot named Stanley. 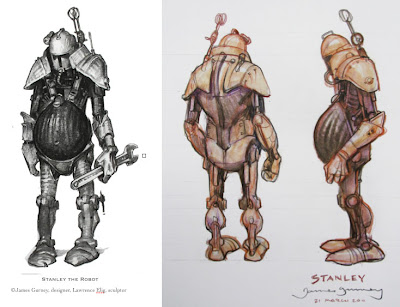
I designed Stanley nearly 30 years ago, but thought that maybe this was his moment to be born in 3D.
The occasion was a robot event called "Robot Nation" coming up this Saturday at the Norman Rockwell Museum.
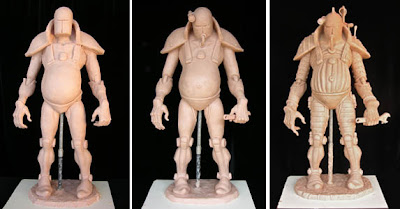
Sculptor Lawrence Elig from Rhode Island rose to the challenge. Here is the rough sculpt leading to the final sculpt.
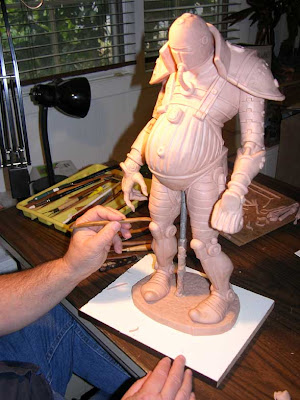
And here’s the sculptor at work. Stanley is a pot-bellied steamerbot constructed from spare junk thrown behind an intergalactic restaurant. He has worked odd jobs at spaceport fast food joints. He’s brave and loyal, but he has a tendency to drink all the frier oil and sing off-key.
Larry took the rough sculpt apart so that he could do a layup in the moldboard.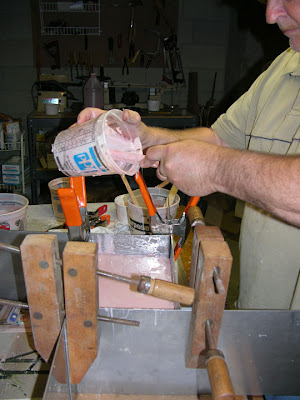
Then he poured in the rubber mold material.
Here’s what the cold cast bronze process looks like for Stanley’s arms.
Stanley rises from the workbench. You can practically hear his clanking gears.
And the finished sculpture. Awesome job, Larry! Stanley has just been installed at the Rockwell Museum in Stockbridge, Massachusetts, ready for his debut at
7 Comments on Stanley The Robot’s Debut, last added: 7/13/2011
Blog: Gurney Journey (Login to Add to MyJacketFlap)
JacketFlap tags: Miniatures, Models Posing, Color and Light Book, Add a tag
Sometimes I think it’s helpful to use several different reference sources for a given figure. For this science fiction cover called Space Jockey (Color and Light, page 163), I wanted to show a space pilot who seemed to come from the “Right Stuff” era of bold space exploration.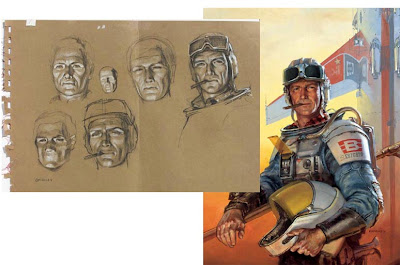
Instead of resorting to the camera to take photos of a specific model, I tried to construct the character in my imagination by using a variety of charcoal studies on tone paper. Some are done from my own face in a mirror, lit frontally with a clip-on lamp. I also used a couple of my little plaster head maquettes as models. The one in the lower left is the simplified plane head (Imaginative Realism, page 69, based on George Bridgman’s analysis) with a “mouth barrel.”
In the end I only used photo reference indirectly for some of the costume details, but not for the face and hands. This way of working helps steer me to a more structural understanding, away from a purely photographic look.
----------
Color and Light on Amazon
Imaginative Realism on Amazon
Or get them signed at the Dinotopia Store
Previous Posts: Character Maquettes,
Tone paper studies, Using (or not using) Photo Reference
Blog: Gurney Journey (Login to Add to MyJacketFlap)
JacketFlap tags: Miniatures, Add a tag
Damian Johnson reworked this photo of me shooting a maquette to show the “Real Gurney Method.”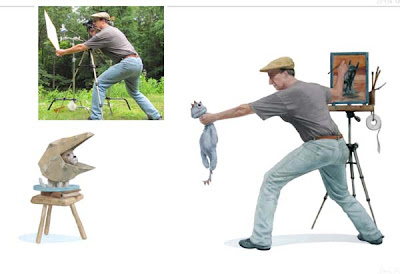
The original photo, along with the story of the making of the Tylosaurus painting, is covered in the upcoming February/March issue of International Artist.
-------
Previous Posts: Painting Tylosaurus.
International Artist magazine
Thanks, Damian!
Blog: Gurney Journey (Login to Add to MyJacketFlap)
JacketFlap tags: Dinotopia, Miniatures, Imaginative Realism, Add a tag
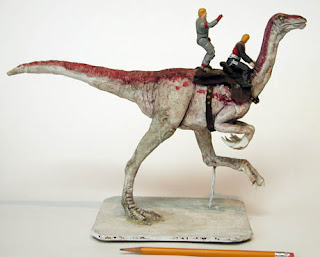
A couple of action figures glued to the saddle of a homemade Deinocheirus filled the bill for helping imagine an olympic event in Dinotopia.
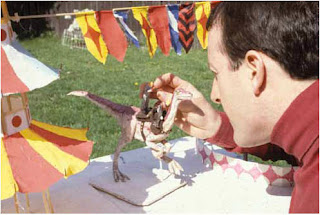
I also built a maquette of the pagodas, made from wire, dowel rods, and tissue paper. I discarded the paper pagodas after the photo shoot, but by then they had served their purpose.

Here's the finished painting, which is currently on exhibit, along with the dinosaur maquette (and the little action figures) at the Berkshire Museum in Pittsfield, Massachusetts, through Jan. 2.
In addition, the show of children's book art has two original paintings from Norman Rockwell's "Willie Was Different," original art by Tasha Tudor, and more.
--------------
The Berkshire Museum's Festival of Trees through January 2
This process is documented in Imaginative Realism: A Guide for the Realist Painter. (Available at Amazon, or signed at the Dinotopia Store)
Previously: Backyard Posing Party
Blog: Gurney Journey (Login to Add to MyJacketFlap)
JacketFlap tags: Miniatures, Add a tag
Artist Dragan Bibin has developed an interesting method to create reference maquettes using gesso-saturated cotton.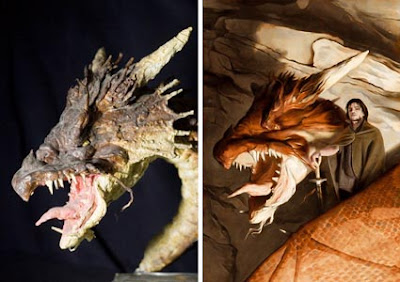
He begins with an armature made from aluminum wire and tin foil, wrapped in masking tape.
This framework is coated with acrylic gesso. Then bits of dry cotton are applied to the wet surface and shaped with a small brush, adding more acrylic gesso until the cotton is saturated enough to hold the desired shape. 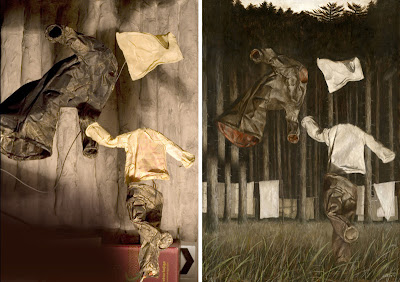
All the shaping is done with a small brush. The forms are built by adding layers of patches of the saturated cotton. This method is actually very fast, because you don’t have to wait for the surface to dry to build upon it.
The resulting maquette is inexpensive, lightweight, airy, very tough, and durable, since the acrylic polymers are fairly elastic. Once it is fully dry, it can later be sanded and painted with acrylic paints.
Thanks, Dragan!
Dragan's Blog with more pictures
Dragan's Website
Blog: Gurney Journey (Login to Add to MyJacketFlap)
JacketFlap tags: Miniatures, Add a tag
J. D. Harding wrote a book way back in 1854 that still has solid-gold advice for art and architecture students today. He suggested making models of architecture to use as drawing subjects.
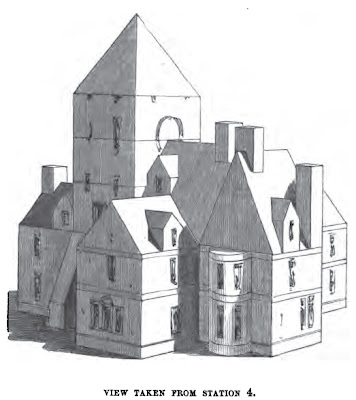 They teach you perspective and light and shade in a way that nothing else can. The geometric forms are a good supplement to the organic shapes of figure and cast drawing.
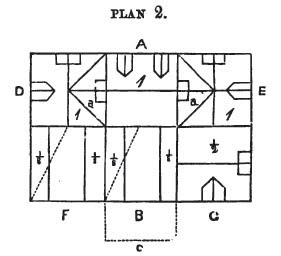 The book shows roof plans for various grand estates. If you’ve got a wood shop, you can cut all the various architectural pieces out of larger pieces of wood. The model pieces also make great blocks for kids to build with. Nowadays you could also use build them out of cardboard or foam core board, or cut them out of a dense foam.
His book, “Drawing Models and Their Uses” is available as a free download from Google Books.
-------
Drawing Models and Their Uses from Google Books (click the "Download PDF" button at the right side of the page)
Blog: Gurney Journey (Login to Add to MyJacketFlap)
JacketFlap tags: Miniatures, Add a tag
There are at least two ways to make a gargoyle: Carve it or sculpt it.I carved this one out of poplar wood for the end of the handrail in the stairway to my studio. Poplar splits easily and I messed up on the other side---which is why I put the bad side to the wall.
But there’s an easier way if the piece is only decorative. You can sculpt the head out of the air-drying foam called “Model Magic,” and then paint it with acrylic to simulate wood grain. The whole process only takes a couple of hours.
That’s how Jeanette and I did the green men that live on the keystones of the arches over the studio windows.
Blog: doodles and noodles (Login to Add to MyJacketFlap)
JacketFlap tags: holiday traditions, advent blog, recipe. parenting, miniatures, Add a tag
Happy Advent, which I guess technically started yesterday, but in my household it begins officially on December 1st (making me early! At least in the U.S.!) Last year, I wrote about my family's advent traditions which are focused around a little Elf dropping by to leave the kids little gifts and chocolates in a pocket calendar to minimize the "I can't wait for Christmas" whining. I also linked to a zillion ways to make your own creative calendar. (You can see my 2008 post here - I checked and all the links still work. Amazing.)
2 Comments on Advent Traditions: Encouraging Affection, Kindness, and Gratitude with Tiny Food and Little Notes, last added: 12/3/2009
Blog: doodles and noodles (Login to Add to MyJacketFlap)
JacketFlap tags: miniatures, craft tutorial, an apple pie for dinner, Add a tag
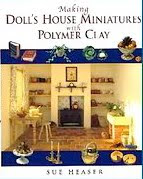 You can read about Sue at her website here and also find ordering information for the book - which I really cannot recommend highly enough if you're into making polymer clay tiny things.
- Clay I used Fimo "sandstone" for the crust and a mix of yellow and white for the apples (but you could certainly cheat on them since they barely show). Any brand of polymer clay will work. If you're making this with a very young child, you might want to consider using a more kid-friendly modeling material like Crayola's Model Magic, plasticine, or even play dough. For that matter, you could use snippets of real dough and apple bits (though I'd recommend either not eating the finished product or removing the plastic liner from the bottle cap first).
- Bottle Cap This will be the pie pan. You can buy unused ones at craft stores or some kitchen/beer-making supply places and they're really ideal since they flare out a little more. But I just used one from a bottle of root beer, and it was fine. If you're making this with a young child, consider using some larger "pan" like a bigger metal lid or dessert patty pan - this scale is challenging for little fingers.
- Soft Pastels OR Ground Cinnamon You'll use these to "brown" your pie to a lovely golden color. You also need a tool to scrape some of the pastel dust off and a paint brush to spread the coloring, whichever you u
0 Comments on Miniature Apple Pie Tutorial as of 1/1/1900Add a Comment
Blog: Gurney Journey (Login to Add to MyJacketFlap)
JacketFlap tags: Animals, Miniatures, Ranger Rick, Add a tag
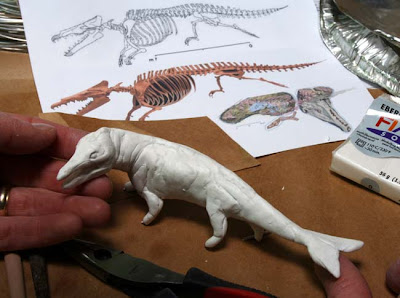 To imagine the four-legged whale Maiacetus, I made a quick maquette out of Fimo, keeping it in scale to printouts of the skeleton drawings. The baby maquette was easier to make; it didn't even need legs, because I knew I would photograph it mostly underwater.
 After painting the maquettes, I placed them on a blackened cookie sheet covered with about a half inch of water. The C-stand holds a white umbrella to try to get some fill light into the shadow.
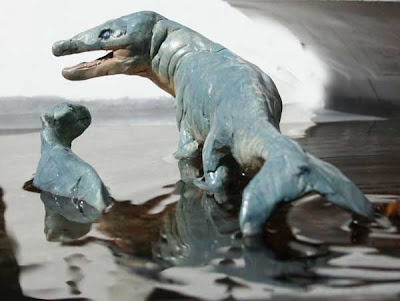 Here's the resulting photo, with small waves creating reflections. The reason I added the tail flukes was that I read an argument for them on a science discussion forum online. There are no bones in a whale's tail flukes, so it seemed reasonable to speculate that flukes might have been emerging in this cetacean ancestor.
 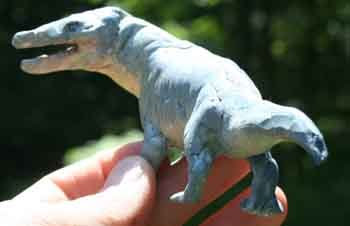 But just to be sure, I contacted Dr. Philip Gingerich, who made the fossil discovery, and he said the evidence of the tail bones definitely rules out flukes. So off they came.
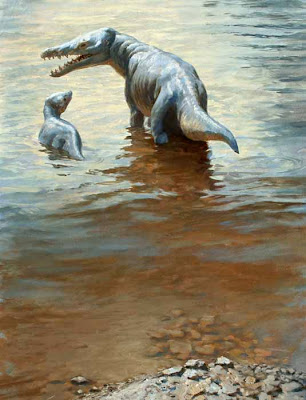 With the help of the reference photos, along with plein air studies that I had made of lakeside scenes, I did the final oil painting.
------
To see all the Ranger Rick posts back to back, link.
Blog: Gurney Journey (Login to Add to MyJacketFlap)
JacketFlap tags: Miniatures, Add a tag
Don’t throw out those old wine-bottle corks! You can use them for maquette-building.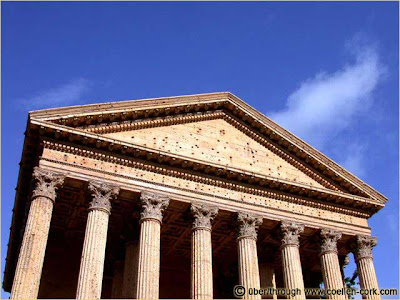 Blog reader and Art-by-Committee contributor Damien Johnston sent some cool links showing how model builders have used corks for architectural maquettes. Whether plain or painted, they can simulate the rough texture of stone.
Since bottle corks are rather small, you can also get larger sheets of cork from a home improvement store. It comes in foot-square sheets for wall tiles or larger panels for bulletin boards.
Cork Gallery, link.
Cork Models of Rome, link.
Thanks, Damian Johnston.
Blog: Gurney Journey (Login to Add to MyJacketFlap)
JacketFlap tags: Animals, Miniatures, Ranger Rick, Add a tag
Yesterday I showed you the first steps in reconstructing the baby mammoth, known from a well preserved frozen mummy.
It would have been tempting to just find a wildlife photo of a mother elephant and baby in more or less the same pose I sketched from my head. But mammoths have important differences from elephants, most obviously the small ears and the long tusks (in adults).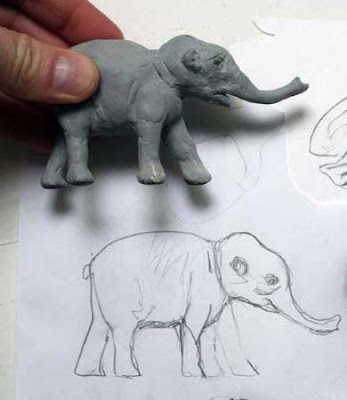
So I made a quick maquette out of Sculpey, following a sketch I made from the photo of the actual discovery. I also made a head maquette of the mom and attached it to a body that was a cardboard cutout.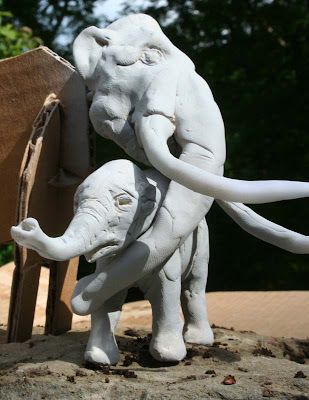 Now I could really experiment with lighting and angles, and after a lot of experimentation, I hit upon this pose. It has a much lower eye level than the sketch, which makes them look bigger.
After talking to the art director, Donna Miller, I decided to change the background to a light value, which made more sense for the arctic, and I flopped the layout from the original sketch that you saw yesterday. Even though the baby was found most of its wool worn off, in life it would have had a good shaggy coat.
For the wool texture, I studied images of woolly bulls and musk oxen. I designed the lighting so that the mammoths are in bright light, with the middle ground in shadow, and the distance again in light.
Blog: Elysium Rain (Login to Add to MyJacketFlap)
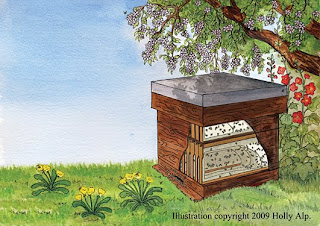
JacketFlap tags: beehive, summer, crafts, bees, miniatures, Add a tag
Wow, what a summer! Like every summer out here my paints (unlike myself) have spent the last several months chilling in the fridge. Yep, you read that right; my paints (mostly my solid watercolours) have a lovely habit of melting in high temperatures. Never the less I somehow managed to do the following –

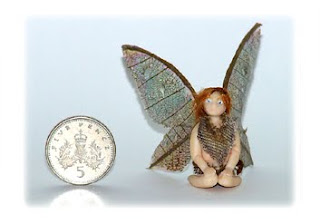
Miniatures will up for grabs on ebay later this week.
Blog: Gurney Journey (Login to Add to MyJacketFlap)
JacketFlap tags: Dinosaurs, Miniatures, Preliminary Sketches, Add a tag
Today we continue the behind the scenes look at the new paintings for the October issue of Ranger Rick magazine.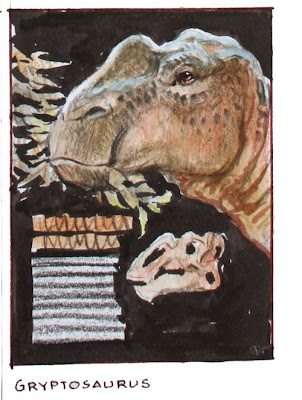 The next creature I needed to visualize was a duck-billed dinosaur called a Gryposaurus (and I misspelled the name). As you can see from my colored pencil sketch, I wasn't too sure what the forms would look like. Even though I was looking at lots of fossils, he looks lumpy and unconvincing. If I went ahead on the final painting, it would only have looked about 10% better.
 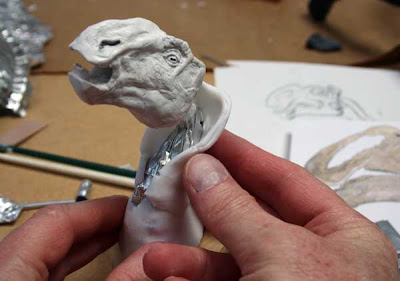 I think you really learn a form through your fingers (that's why I love museums that have casts of great sculptures that you can run your hands over). By making a tiny sculpture of this particular dinosaur, using Fimo over tin foil and armature wire, I came to know my subject.
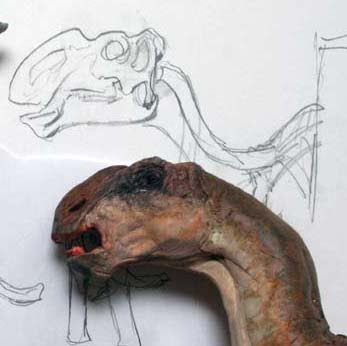 I kept checking it against the drawing. That nasal bone is not quite high enough.
I painted it with acrylic, darkening around the eyes. Many animals have dark color around their eyes for the same reason that football players smudge stuff around their eyes: to cut down on glare.
Tomorrow I'll show you how I photographed the maquette and proceeded with the painting.
Blog: Gurney Journey (Login to Add to MyJacketFlap)
JacketFlap tags: Animals, Miniatures, Add a tag
The next step in the painting of the giant fossil snake was to make a maquette of the snake and the croc out of Sculpey, painted in acrylic. It only took a few hours to do this rough model, but without this step I never would have understood how the forms needed to wrap around each other.
I set up the maquette in a tiny diorama, with a rock and some sticks that I found in the backyard. 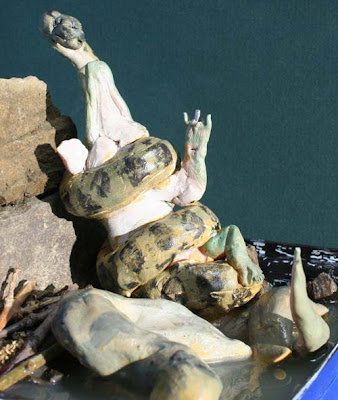 The wrestling reptiles are sitting half submerged in a take-out food container which I painted black inside and filled with muddy water. The background is a piece of mat board.
 I lit the maquette with a theater spotlight and shot it with a Canon Digital Rebel single lens reflex camera and printed out several variations.
With that information, combined with many photographs of living snakes, I proceeded with the final pencil drawing and then the painting. For more info on this procedure, check out these earlier posts “Technique Nuts and Bolts” “Utopiales Line Drawing.”Here’s the painting in progress. The pencil drawing shows through in the lower area.
And the final painting, 14 x 19 inches, finished five days after starting the maquette. By contrast to the Cumberland painting, this painting went together pretty briskly. Inset in the painting is the page layout as it will appear in the October issue of Ranger Rick magazine.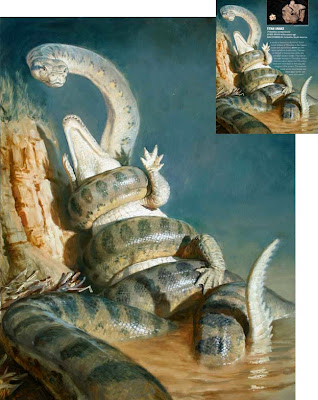 I find that the greatest value of the maquette in a case like this is in providing little accidents of cast shadows, like the hand of the dying croc on the snake’s neck, and the tail’s shadow crossing the snake's body farther down. It also helped in the placement of the highlights, something that can be tricky to guess at on an organic form.
Those little unexpected nuances are almost impossible (for me) to invent out of pure imagination but they give the ring of truth that I believe is vital in a piece like this.
Blog: Cynthia's Attic Blog (Login to Add to MyJacketFlap)
JacketFlap tags: miniatures, starry night, Van Gogh, museum of science and industry, doll houses, books, reading, chicago, Add a tag
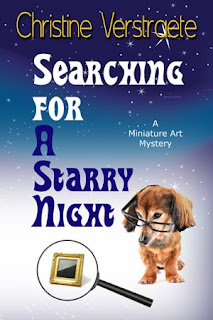
My guest this week in Cynthia's Attic is author, Christine Verstraete
Christine grew up in Chicago, the third-generation to live in the two-story house bought by her Belgian-born grandfather in the mid-1900s. She now lives just over the border in Wisconsin.
She has a bachelor's degree in journalism from Chicago's Columbia College, and has received various awards from llinois and national press associations for nonfiction articles.
Her favorite pastime, building dollhouses and miniature rooms, has served as inspiration for nonfiction stories, a nonfiction ebook, In Miniature Style, and plays a role in her just released ya mystery, SEARCHING FOR A STARRY NIGHT!
*Your "Miniature Art Mystery," Searching For A Starry Night, was just published by Quake in May of this year. Tell us...What, exactly, is a miniature art mystery?
Being a long-time collector of dollhouse miniatures, I had to somehow work that into my book. The title and subtitle refer to the search for a miniature replica of Vincent Van Gogh’s famous painting, (The) Starry Night. You can see an actual miniature oil painting of Starry Night at my blog, The Candid Canine or at MySpace,
*How did you approach writing this book? Did the idea come from a personal experience?
I’ve always liked Van Gogh’s art. I started writing a set of short stories that also featured my character, Sam, from SEARCHING FOR A STARRY NIGHT. One was set in an art gallery, which got me thinking about expanding the theme of art, which led to miniatures, which led to miniature art…. It was a six-degrees kind of thing, I guess. LOL!
*Your miniatures are fascinating, Christine! The little girl in me is envious of your dollhouse miniatures. Did a particular dollhouse inspire your passion for making miniatures?
Growing up in Chicago, I was lucky enough to be able to see Colleen Moore’s Fairy Castle at the Museum of Science and Industry more than once. Created by a Twenties film star, the castle is filled with fantasy, books by real authors, jewels, and everything enchanted. You have to fall in love with miniatures after you see that!
*You are also involved in the anthology, "Heat of the Moment," that benefits survivors and heroes of the San Diego wildfires of 2007. Can you tell us a little about your contributing story? A little about the book in general and the writers?
My story, “Fire and Magic,” involves Sam and her mother, who face a menace from the past. The story is a little more “grown-up” themed since the book included stories that were fire-related. I was thrilled to be asked to contribute a story along with 20 other exceptional authors to help a good cause.
*How did the idea for this book come together?
Echelon Press publisher, Karen Syed, wanted to do something to help those who lost, and went through so much, in the wildfires. It also recognizes those who give so much to keep all of us safe, the firefighters
*How did the idea for this book come together?
In miniature or in writing? ha! I write fiction and nonfiction, so it keeps me busy. And when I’m not writing, I’m planning a new miniature scene. I tend to have quite a few projects going in both miniatures and writing.
*What are your upcoming plans for the release of Searching For A Starry Night?
This is among several blog appearances I’m doing to promote Searching For A Starry Night. I also am setting up in-person appearances and will be giving away a miniature scene and some fantastic prizes to visitors to my website, and to book purchasers in the coming weeks. So please be sure to stop at my website or check in at my Candid Canine blog, to see what’s new!
Mary, thank you for hosting me!
Blog: Mayra's Secret Bookcase (Login to Add to MyJacketFlap)
JacketFlap tags: dogs, miniatures, echelon press, searching for a starry night, dog books, Add a tag
Why don’t you begin by telling us a little about yourself?
I’m an award-winning journalist, miniaturist, and now a novelist – a lot of “ists.” Ha!
When did you decide you wanted to become an author?
I think it was destiny that I became a writer! In my favorite baby photo, I’m holding a newspaper and have a pencil behind my ear.
Do you have another job besides writing?
I also freelance for newspapers and magazines, and if anyone needs a dynamite press release at a reasonable rate, they should contact me at my website, http://cverstraete.com/
Were you an avid reader as a child? What type of books did you enjoy reading?
 My mom always joked that the house could explode and I’d still have my nose in a book! I’ve always loved to read. I loved Nancy Drew and read every horse book there was.
Tell us a bit about your latest book, and what inspired you to write such a story.
SEARCHING FOR A STARRY NIGHT, A Miniature Art Mystery, will be published June 15 by Quake/Echelon Press, http://www.quakeme.com/.
How would you describe your creative process while writing this book? Was it stream-of-consciousness writing, or did you first write an outline?
I tend to outline as I need to figure out what comes next, although new ideas do pop up as I write.
Did your book require a lot of research?
I did do some online research about miniature art, but I’m also familiar with some artworks that I have seen firsthand at miniature and dollhouse shows.
What type of writer are you—the one who experiences before writing, like Hemingway, or the one who mostly daydreams and fantasizes?
Oh, I’m a big daydreamer. Ha! Or is that another name for procrastinator?
Agatha Christie got her best ideas while eating green apples in the bathtub. Steven Spielberg says he gets his best ideas while driving on the highway. When do you get your best ideas and why do you think this is?
What really helps me is if I’m stuck on something, I sleep on it. Somehow, the ideas come to me in my sleep. The rest? I don’t know where they come from…
Do you get along with your muse? What do you do to placate her when she refuses to inspire you?
My muse is pretty accommodating. If I’m not inspired, I either switch to something else or just force myself to keep going. Deadlines don’t allow you to be uninspired for long.
From the moment you conceived the idea for the story, to the published book, how long did it take?
It’s been over a year. I initially had written a shorter story and then added more ideas to expand it.
Describe your working environment.
I have a small room at home just big enough for a desk, small worktable, 2 bookcases and a couple file cabinets.
Do you write non-stop until you have a first draft, or do you edit as you move along?
I’m a re-reader. That’s good, and bad. I tend to change things (then go back and change some more!). I’ve learned that even later after several read-throughs, I still see things to change or that need to be changed.
They say authors have immensely fragile egos… How would you handle negative criticism or a negative review?
I know, you have to accept the negative with the positive. I’m sure I’ll shed a few private tears and move on. You can’t please everyone, nor do I expect everyone to like the book though I hope most will enjoy it.
As a writer, what scares you the most?
Not being able to write because of physical injury or some calamity.
When writing, what themes do you feel passionate about?
I love animals and feel strongly about them being mistreated.
Are you a disciplined writer?
I do write every day. Is that disciplined enough? :>)
Anything else you’d like to say about yourself or your work?
Only that I hope that Searching For A Starry Night is the first of many.
Thanks for stopping by! It was a pleasure to have you here!
Mayra, thank you! I enjoyed visiting with you and your readers.
Readers can stop by my website, http://cverstraete.com/ or my blog, http://candidcanine.blogspot.com/, to get details on some contests and a chance to win a signed copy of Searching For A Starry Night and other prizes!
Blog: OUPblog (Login to Add to MyJacketFlap)
JacketFlap tags: Law, Education, Politics, Philosophy, oxford, privacy, A-Featured, james, rule, oupblog, edenthorpe, sutter, automating, pupils, whereabouts, peril, b, bush, Add a tag
James B. Rule, author of Privacy in Peril: How We are Sacrificing a Fundamental Right in Exchange for Security and Convenience is Distinguished Affiliated Scholar at the Center for the Study of Law and Society at the University of California, Berkeley and a former fellow of the Center for Advanced Study in the Behavioral Sciences at Stanford University. He is also a winner of the C. Wright Mills Award. Privacy in Peril looks at the legal ways in which our private data is used by the government and private industry. In the original article below Rule looks at a seemingly innocuous effort to track schoolchildren and the issues it raises.
If you increasingly feel that information about your life is taking on a life of its own—collected, monitored, transmitted and used by interests outside your control—you’re probably not paranoid.
A recent story in Information Week tells of a school in Edenthorpe, England, that is experimenting with electronic tracking of its pupils. The idea is to fit their clothing with RFID tags—tiny radio transmitters—that can enable school authorities to monitor people’s whereabouts throughout the school day. RFID technology is already widely in use by retailers to track merchandise within shops and, some suspect, after purchase by customers. (more…)
Blog: OUPblog (Login to Add to MyJacketFlap)
JacketFlap tags: Literature, Education, Blogs, alice, discussion, A-Featured, Prose, rule, douglass, adams, trial, meaning, Add a tag
 I’m going to digress for a moment but I promise it will all come around to Alice’s Adventures in Wonderland.
In The Hitchhiker’s Guide to the Galaxy (another great cult classic like Alice) the answer to “the great question… of Life, the Universe and Everything is…forty two.” The better question of course, is what the great question is. The great computer Deep Thought says, “So once you know what the question actually is, you’ll know what the answer means.” (more…)





this sculpture is so awesome! i wonder if larry would be willing to post some of his materials and process or if he has a tutorial online?
this is a really really top notch sculpt! you guys are going to win for sure!
Wonderful! I love the pot-belly feature! The quality is amazing.
Stanley looks great and it's fun to peek into Larry's working process. It must be nice for you to see one of your creations come to 'life' after so many years!
Oi! "Intergalactic" means somewhere in the quiet spaces between here and Andromeda. Or beyond. I think the word you want is "interstellar", which can be anywhere within the Milky Way outside our solar system.
I do love Stanley.
Jay, pedant
Truly Amazing to see this come to life. I wondered if you found anyone for the task. Great job Larry!
Awesome robot! Love the egg-beater "antenna". I like Larry's use of sheet metal for the mold-making box...should try that if I ever get back into that kind of stuff instead of wasting cardboard or wood.
Great design, great execution!
In an oversubscribed genre he's got a unique quality.