First of all I make sure that my manuscript is well edited and ready.
You will need to know who your printing company will be beforehand and understand all their guidelines, margins, fonts and all the printer's requirements.
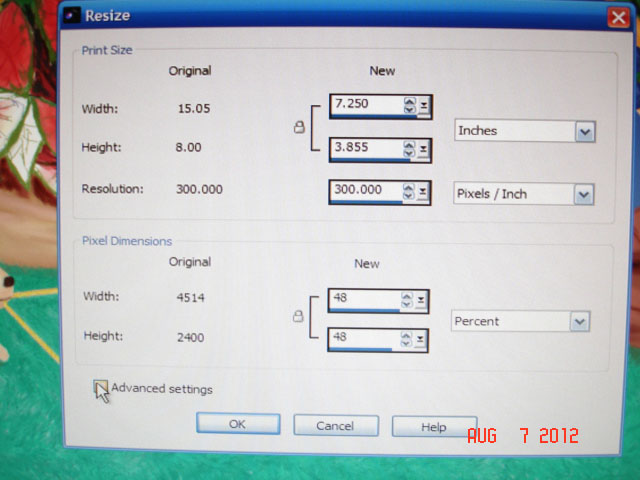
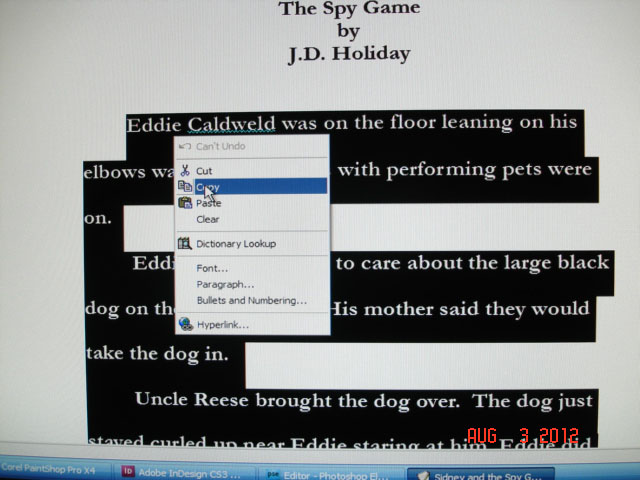
Next, I resize all my images and make sure they are in TIFF format which works best, I've found in Indesign. I use a few art programs to do my artwork in and resize them. They are Adobe Photoshop Elements, Corel Painter Essentials and Corel PaintShop Pro. I use each one for whatever the program does best.
(NOTE: my images and dates are not in order which does not matter for this preview)
To start with, here, I am using PaintShop Pro to resize images and add frames, edges and borders to some of them to neaten them up.
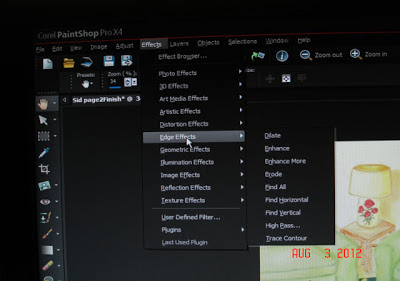 |
| Here, I'm using EFFECTS, then choosing EDGE EFFECTS for this image. |
 |
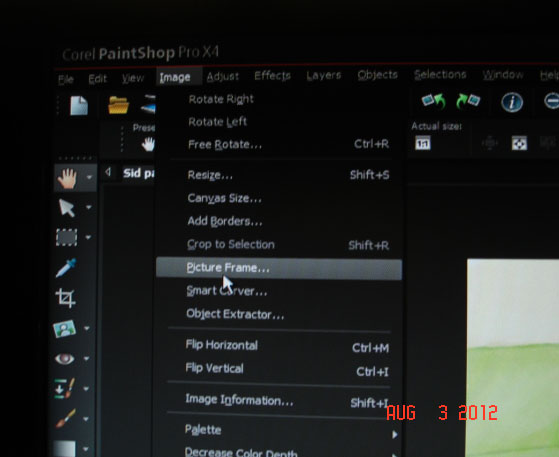
| 1. Here, I'm using IMAGE> PICTURE FRAME. |
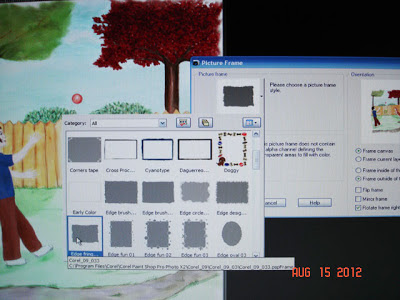 |
2. Here you see there are a number of choices.
For printing books your printer will need the resolution or DPI /Dots Per Inch to be 300 DPI or 600 DPI. I always scan in my images at 300 DPI. A higher DPI means a higher quality print, image or screen resolution. (NOTE: Also know, that the larger the images the more space each image will need on your computer for storaging them. This is important to know because the more high resolution images on you drive can stop some programs from running due to limiting usable space on the hard drive.)
I pick the size of each image due to the size page that it will fit on in my book. |
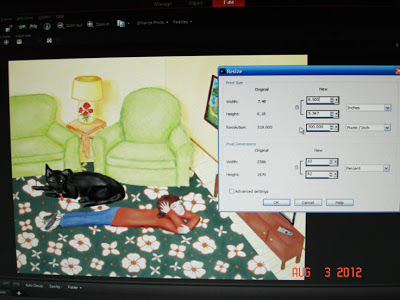 |
Making sure the images are at least 300 dpi or higher.
NEXT: Moving To My Book program: Indesign CS 3
How I Make My Picture Books: Part II
|
I use Indesign CS3 for make my books. (There are now later versions of Indesign.)
Indesign does not come with a book instruction manual and there is a lot to
Indesign cs3. I suggest you read one or two books on it so you know the ins and outs for this book making wonderful tool.
The books for Indesign CS 3 that I have are:
Adobe Indesign CS3 Bible by Galen Gruman. I use this one as a reference book.
Adobe Indesign CS3 Classroom in a BookI found
Indesign to be a fun program to work in. It has some much more to it than I use.
There are many tools and you have to familiarize yourself with them so you can use the ones you will need for your project.
The tools I used most are:
Direct Selection Tool - to grab and size pages and images
Selection Tool - moving and re-sizing images
Type Tool - the
Type Tool makes the frames needed to place your text in. To edit and format with the
Type Tool. It works much like word processing software. Indesign has auto-fill which you use
by load the
Type Tool and it flows through the text frames. However, I manually add my text
due to the amount of images, the small amount of text on some pages and how I design my
pages.
In Indesign, you make images and frames. For text frames you place your text either using 'auto fill' or cut and pasting then place a image and the two frames click together. Then you do it again for the next page, and on and on.
If your images are your pages, and you plan to add text into them you selected the
Type Tool and place the text where you want it in the image.
Before we get started, let me remain you to SAVE often while you are working in Indesign.
You start by creating a document.
Start Indesign. Choose FILE: then, NEW: then, DOCUMENT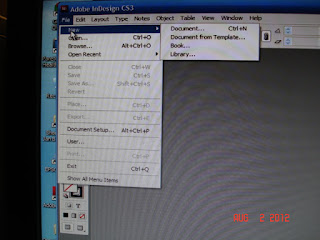 |
| Here I am opening the document. FILE: NEW: DOCUMENT |
 |
| The file opens and this is what it looks like. |
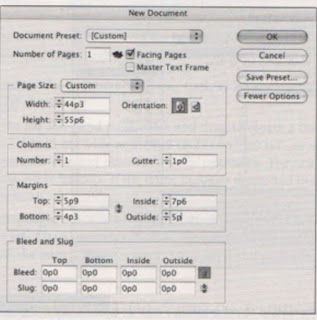
I choose for the DOCUMENT PRESET: Custom
In the Number of Pages area, I add the number of pages, including the blank first page, title page, the copyright page, dedication page (if any) and a blank page at the end of the book required by my printer for their use.
I also click the FACING PAGES check box, for just that facing pages in the book.
For PAGE SIZE I use inches, and having check for book sizes in my book printer's specs (which you should know at this point.)
At COLUMNS I add a 1, since one column is what is needed for my books.
In the MARGINS area, click on the MAKE ALL SETTINGS THE SAME icon for the same margin on all sides of the book. I add half inch/ .50, which is the margin my printer uses.
At the
BLEED area I add
one quarter in/ .25.I don't worry about the
SLUG area.
You can save your
PRESET for later use for another book.
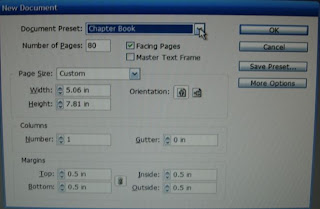 |
| Here you see that I have a PRESET for chapter books. |
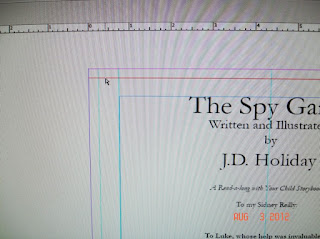
Here the
DOCUMENT is open. This is a title page/first page of the document.
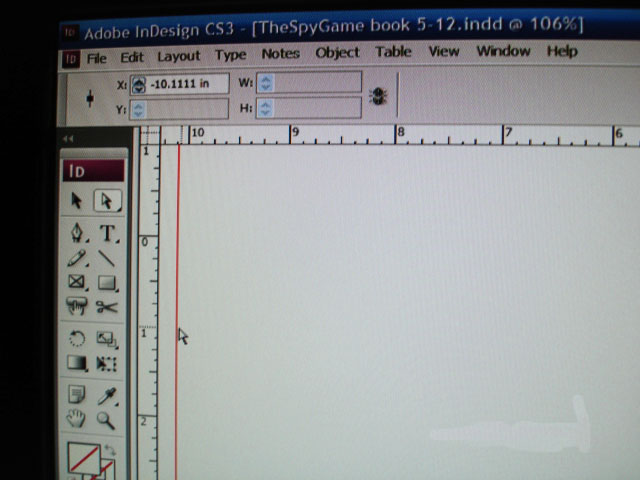
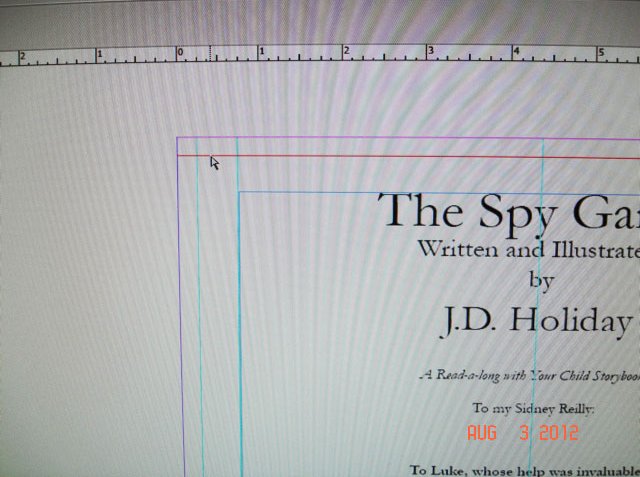
With INDESIGN you can put GUIDES around the document so you can see the margin, gutter or bleed areas and not place text or images in them.
~
 |
| A |
 |
B
In both pictures here, A and B, you can see the Arrows pointing to the top and side GUIDES. The Guides turn from read to blue when placed. You GRAB the Guides by going to the ruler, (top and left side rulers,) with your Mice and drag it to your margin, gutter and bleed areas. THAT EASY!~
~
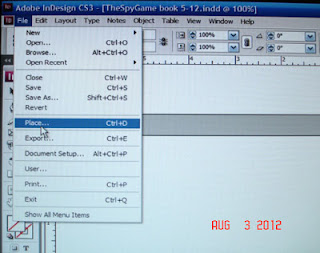
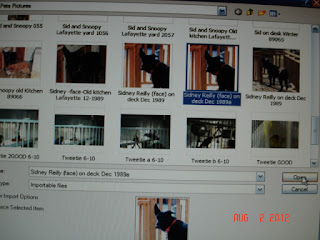
To add an image or graphic (in TIFF Format) to a page, you use the Selection Tool and go to FILE> PLACE.
Your computer opens and you find the image you are looking for and click OPEN.
Then move the Selection Tool to the place you want it on the page and click the spot.
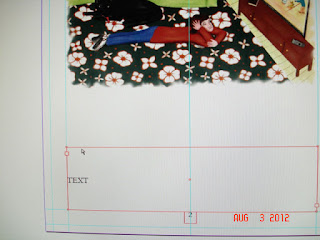 | | HOW to make a text frame is you take the TEXT TOOL and click and drag on the area in the page you want to add text. |
 | To add text by cutting and pasting, you open you Word, Office Writer or other word processor
and copy from it the text you want to use and move back to Indesign and paste it where you want it. |
|

Now here I have images I have put text into. The area where the text is in these two picture is part of the image themselves. When I PLACED these images in Indesign I had yet to put the text in. So to do what
I did just what I had in the example above, and COPIED and PASTED the text from my word processor and added it to the area I had painted for that purpose.
Throughout this process you are designing your book!Now you will show how I send my BOOK DOCUMENT to my printer.
To return to Part I: http://jdswritersblog.blogspot.com/2013/02/how-i-make-my-picture-books-part-i_8924.htmlTo go to Part III:
http://jdswritersblog.blogspot.com/2013/01/how-i-make-my-picture-books-part-iii.html
First of all I make sure that my manuscript is well edited and ready.
You will need to know who your printing company will be beforehand and understand all their guidelines, margins and all the printers requirements.
Next, I resize all my images. I use a few art programs to do my artwork in and resize them. They are Adobe Photoshop Elements, Corel Painter Essentials and Corel PaintShop Pro. I use each one for whatever the program does best.
(NOTE: my images and dates are not in order which does not matter for this preview)
To start with, here, I am using PaintShop Pro to resize images and add frames, edges and borders to some of them to neaten them up.
|
| Here, I'm using EFFECTS, then choosing EDGE EFFECTS for this image. |
|
| 1. Here, I'm using IMAGE> PICTURE FRAME. |
|
2. Here you see there are a number of choices.
For printing books your printer will need the resolution or DPI /Dots Per Inch to be 300 DPI or 600 DPI. I always scan in my images at 300 DPI. A higher DPI means a higher quality print, image or screen resolution. (NOTE: Also know, that the larger the images the more space each image will need on your computer for storaging them. This is important to know because the more high resolution images on you drive can stop some programs from running due to limiting usable space on the hard drive.)
I pick the size of each image due to the size page that it will fit on in my book. |
|
Making sure the images are at least 300 dpi or higher.
NEXT: Moving To My Book program: Indesign CS 3
How I Make My Picture Books: Part II |