new posts in all blogs
Viewing: Blog Posts Tagged with: kitchen, Most Recent at Top [Help]
Results 26 - 43 of 43
How to use this Page
You are viewing the most recent posts tagged with the words: kitchen in the JacketFlap blog reader. What is a tag? Think of a tag as a keyword or category label. Tags can both help you find posts on JacketFlap.com as well as provide an easy way for you to "remember" and classify posts for later recall. Try adding a tag yourself by clicking "Add a tag" below a post's header. Scroll down through the list of Recent Posts in the left column and click on a post title that sounds interesting. You can view all posts from a specific blog by clicking the Blog name in the right column, or you can click a 'More Posts from this Blog' link in any individual post.
 Perhaps because it has been raining. Perhaps because the trees keep losing their leaves at a rapid, unstoppable clip. Perhaps because I have allowed myself back inside a novel I have trembled about for months.
Perhaps I don't know why, but the house is a different sort of quiet.
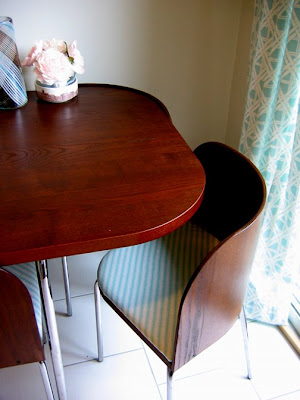
Yesterday, running outside with my camera between rain showers, I stopped and glanced toward the kitchen, so unpeopled just then, so still. No stacks of my son's homework on the table, my mother not there with her cup of tea.
This quiet is a new quiet. I'm learning to bend it toward me, finally.
Before here and here... The kitchen and dining area before had white walls and blue and burgundy accents with linoleum flooring.
Now the walls are a warm maple cream with deep berry brick curtains and black and cream accents.
 The project hasn't been without it's problems, namely the finishing of the hardwood floors. We had problems applying the polyurethane with the applicator the manufacturer recommended and had to strip the two coats we applied. Husband K did all the work including all the sanding between coats. Tips for applying polyurethane: lightly sand floor before applying 2-3 coats by hand with a brush. Allow to dry more than 16-24 hours. Sand and reapply additional coats.

The light fixture we wanted for over the island didn't come in black so I sanded it and sprayed it black to match the new black chandelier.


All the hardware was gold and we replaced it with a burnished brass. The chandelier is black with gold brushwork.

It's hard to capture the color of the walls however they are a beautiful warm maple cream and we couldn't be happier with the way they turned out. K also upgraded all the baseboards and added new corner pieces throughout the main floor.


We just love the new hardware! We'll replace the faucet with a new black one as soon as we can find the one we want.
The flooring continues down the full length of the hall to the upper bedrooms and is just beautiful. We plan to change the countertops to granite or granite like in the new year and we'll replace all the appliances with stainless steel or possibly black, still undecided yet.

New blinds for the windows (for under the drapery) will be ordered and I'll swap out the china in the cabinet for the cranberry Wedgewood "Bramble" from one of the other rooms.

We found the table cloth but I am still not sure if I like it, the pattern is quite large, but it has black it in. My husband says one can never have too many table cloths so live with it, see if it grows on you and purchase new ones as you find them. (What woman wouldn't love to hear her husband say this! :) I may even have one custom made if I can find a fabric I like. We've been searching for two oil paintings for each side of the china cabinet but still haven't found the ones we want.

by Maurie J. Manning

This bird thought he'd join his friends in the birdbath....


With the hardwood floors almost completed, it's just about time to paint the walls. The color is one I have never gravitated towards before however we are looking for something that will enhance the richness of the wood cabinets and hardwood floors. Currently the walls are white. We are looking for a
golden shade with a hint of Tuscany flavor, not too bright, not too yellow, not too orange-muted, yet rich in tone. Ok, so what's left you say? Here are two color swatches. We tried the Laura Ashley Gold 3 but against these colors and the walls it actually looked like it fell more into the tan family. Our kitchen and dining area are small and both colors look suitable, even in a smaller area.
The cabinets and flooring are golden oak in color. The other color we thought of was a pale blue shade with a hint of turquoise (enhances the rich golden oak) however it might clash with our great room which is in a midtone muted evergreen shade.
What do you think? Your suggestions would be most helpful!
Melissa from
The Inspired Room posted a list of
"20 Little Things" that inspired her in Autumn. Since autumn is my favorite time of year, hear are my list of 20 little things:
1. Painting the kitchen and renovating (always autum projects)
2. Family gatherings
3. Crock pots of bubbly beef stew and fresh baked loaves of bread
4. Riding in an open topped convertible through Breads Hills, Michigan
5. Thick and cozy handmade sweaters
6. Teracott pots over flowing with Chrysanthemums
7. Paint chipped chairs and furniture
8. Hot Pumpkin pie
9. Candles scents of cinammon and berries
10. Thick warm blankets on a cold night
11. Gourds, squash and pumpkins
12. Fall festivals
13. A hot latte with a warm berry Stella
14. Flannel jackets and duck boots
15. Early morning mist
16. Apple cider
17. Bike rides around the lake, through the leaves
18. Knee high boots and skirts
19. Fresh fruit scones with marmalade
20. Fresh breezes through open windows!
 Click on the photo above for a closer view....
Husband K worked all day prepping the floor and tonight was ready to cut the carpet out of the hallway...Yikes! Not that I doubt his talents for a moment, but once you cut the carpet in two, you are committed.
We had several funny conversations revolving around me picking out the boards tonight, so I could choose the colors I wanted next to each other, and he remarking that if I waited too long it would all be planked by the time I returned home from work tomorrow.

The kitchen floor, not pretty, but soon it will have a shiny new surface!
 The weekend before last I finally did a whole bunch of craiglisting and swapped all kinds of furniture. I sold two storage ottomans(men?) and threw in the cushions I'd made for the top because the person who came for them seemed to like them so much. I sold an IKEA bureau that just had camping gear - all that went into the shed. I sold a sideboard and a bedside table, also from IKEA, neither of which had a place to go anymore. And finally our very tall IKEA hutch. Oh, and my old camping backpack. I can't tell you how good it was to clear all those things out!!
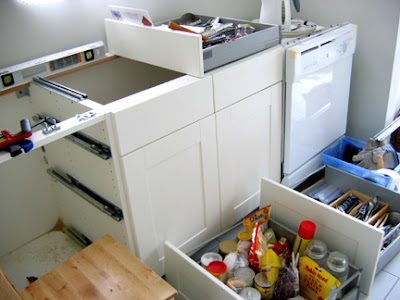
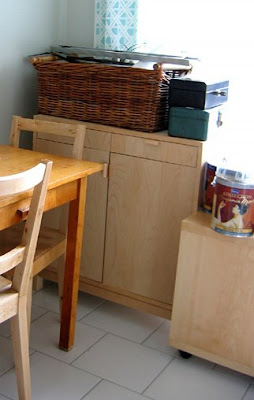 Before: this corner of the kitchen used to be a workshop, with all the tools and supplies for the renovation.
Then we bought a new hutch in a vintage style I like so much better, and a glass door bookcase that now holds all my yarn and some spillover fabric. I'll probably post that later once it's sorted out. The new hutch is similar in style to our china cabinet that holds all my fabric, I would guess 1930s, which seems to be my favourite decade for design.
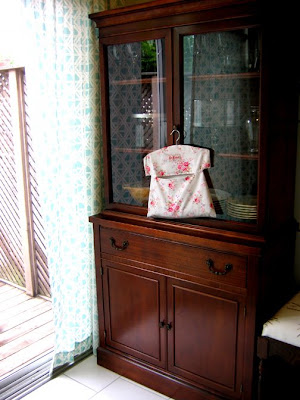
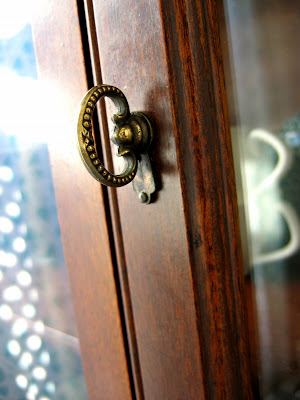
It's nice little details like this handle that I like so much:
Then we bought the new IKEA Fusion table and chair set, which luckily matches the hutch since the wood finish on the hutch is very nice and I wouldn't want to paint it. So now our kitchen nook is almost done!
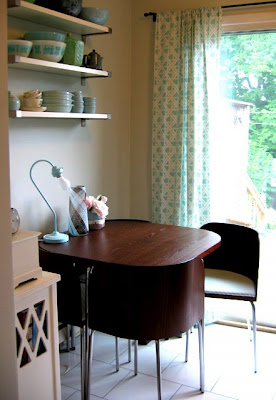
The lamp on the table was a family yard sale find, there's a pair of them and I just need to find glass lampshades for them.
It's basically done, but someday we'd like to replace the sliding doors (that don't slide very well), the ceiling fan and the dusty old stucco on the ceiling. The Fusion set is great because the chairs curve around the table and it doesn't take up much room. I didn't care for the black seat covers, so I replaced those with a striped aqua and white fabric that I bought at the Textile Museum Yardage sale.
 I was trying to pick a fabric then noticed this one matches the curtains perfectly, hurray!
Speaking of which, I can't tell you how much great stuff I found at the Yardage sale, but to paint a picture, I looked like a bag lady who lives on a bicycle on the way home. I had huge tote bags sort of wedged and tied to the baskets at the back. Most of it is in the new bookcase so you'll see it then...
Read the rest of this post
 Thank you for the shelf comments, they really cheered me up! This weekend we finally put up the fan back up over the stove, and I can't tell you how happy I am about it. When I say "we" I mean Bradley because I did very little aside from finding screws and washers, picking them up when they fell, and holding the fan for a few minutes. Also saying things like "wow, it looks so good", "do you want me to leave you alone now?" and "I can't believe you finished that bit already". The latter because it was much more difficult than expected.
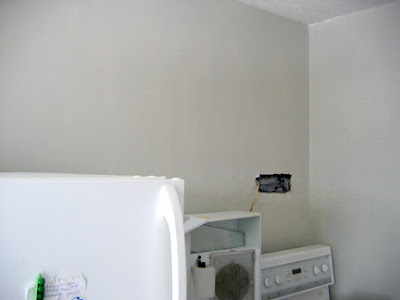
The problem in the first place is that given the height of the cabinets and the hole in the wall where the fan used to be, there was a new gap between the two. Otherwise the cabinets would have been too low on the wall and too close to the countertop. This is the kind of thing that makes installing your IKEA kitchen tricky.
So first Bradley used finishing panels to construct a box that would be the shelf. Finishing panels are just big flat pieces from IKEA that have the same finish as the door fronts so that you can attach them to the sides of your cupboards so that they match. So dad-in-law helped cut pieces to size with his table saw. That was a few weeks ago.
Then after assembling the box, Bradley had to move the entire row of cabinets (they hang on a rail) a tiny bit to the left to fit the box in, then back again so that it was snug. This involved taking everything out of all the cabinets. Then finally an extra hole was needed in the wall for the fan to fit in place and then the fan was attached onto the new shelf.
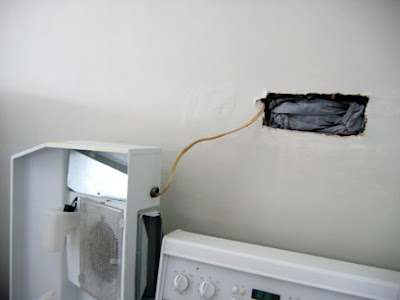
This is sort of what it looked like before (I took this picture before the countertop was installed). The fan was sitting between the stove and countertop since it was still attached by a power cord. It was in the way, was accidentally scorched when I turned the wrong burner on one day, and was generally driving me nuts.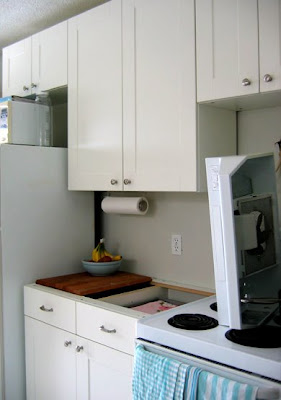 And this is the fan finally back in place! With an extra little shelf that I've decided to put our Denby Blue Linen baking dishes on. I just need to do a little caulking and paint touch-ups.
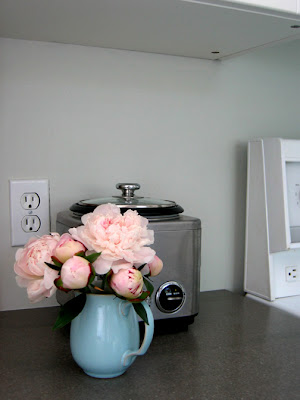
 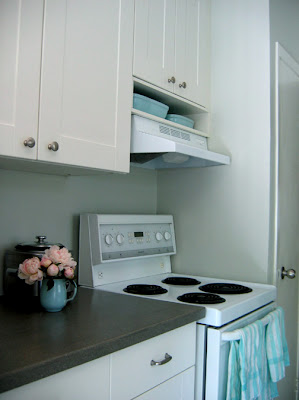 And in case you're wondering we don't usually have a blue jug of peonies on the countertop, I went out and picked them specially for the photo shoot. ( I guess without the fan there the countertop was looking kind of bare). I love peonies and was thrilled to see two bushes grow up this spring, one in our front and one in the backyard. Such a luxury after condo living.
 These lilies of the valley showed up in our backyard. They last very well if you pick them, and with only these three the kitchen smells lovely!
We took a long break after the main part of our kitchen renovation was done and for the past few weeks we haven't done much at all. But there are still lots of finishing details to do (you know, minor things like baseboards). Recently we've been starting to get back into it and I finally cleared out all the paint and tools that were in one corner. If you're pausing in your renovation I recommend it. It's worth trouping out to our shed to get a paintbrush in exchange for a (sort of) tidy kitchen again.
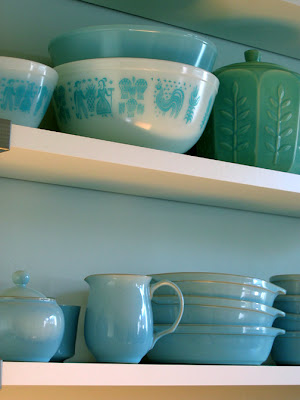
Today I filled the big bare wall in the eating nook area (we're nook people) with shelves from IKEA. They're just plain white ones, rather than something charming and countryish but they match the cabinets and when we sell the house someday I can leave them behind without any regrets.
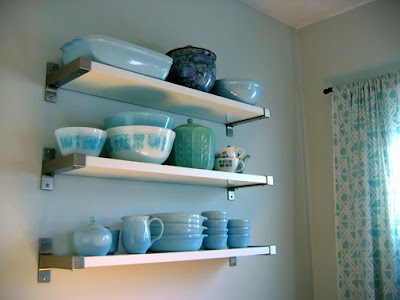
As you probably know by now I love monochromatic schemes, and especially blue so I've put lots of blue/green things on the shelves.
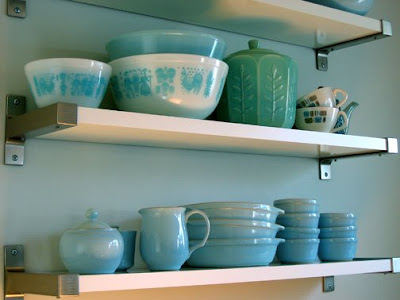
Sometimes I feel self-conscious about blogging, I suddenly realize I'm showing you pictures of my kitchen shelves, which is kind of trivial. And I worry I'm boring you. But before I put the shelves up I was looking around on Flickr (how pretty is
this) to see how other people had arranged their shelves. And I was trying to decide if I was happy with this style of shelf, or if we should take them back. So my point is I guess I find it helpful when other people post pictures of their kitchen shelves and a surprisingly large number of people do.
While I was looking I also found this brilliant
idea for the shelves - if you had a cat. I love how Egyptian the orange cat at the top looks.
p.s. I really really want that couch too
Drew on a lazy Sunday while watching my favorite movie,
Amelie.
 As part of the blow-by-blow aspect of the blog world, here is the latest stage in our kitchen renovation. Sorry if this is too much fuss over our little galley kitchen, but we were so excited to finally get our new countertop today. Also there's some technical details I'll share in case they're helpful for those of you also working on your kitchens.
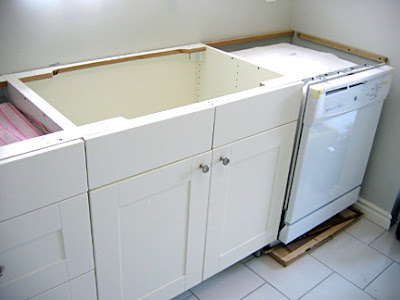
We ordered it at Home Depot. The company that made and installed it is called Contours and they did such a nice job. The holes for the sink and faucet are perfect, and the installer even asked me about exactly where we'd like the faucet. As you can see in the top picture they had to cut away from the cabinet at the back a little bit to fit the sink. Then they added extra strips of wood on the walls for support.
 Then they put in the countertops and cut the holes:
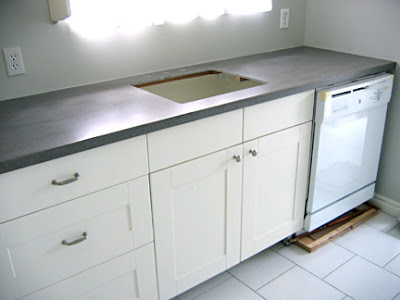 We still need to install the dishwasher, so the wooden frame it's standing on will go and it will attach to the countertop. The countertop material is Corian solid surface, but there is a strip of wood affixed to the underside that you can screw the dishwasher into. (ie. no need for a side-mounting kit). We chose an "eased" edge for the countertop which means it looks square but the corners aren't too sharp. It's 1.5" thick on the edges but the main area is thinner than that.
Because we have IKEA cabinets without a frame, you need a "build up" for laminate countertops so that the drawers clear the countertop when you pull them out. This isn't necessary for Corian countertops because they are already built up with the way they are put together.
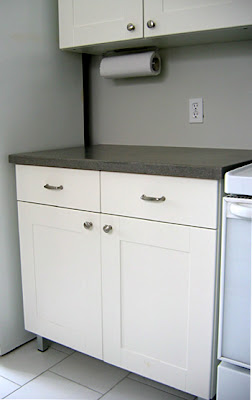
 They did such a nice job,even the caulking around the edges is perfect:
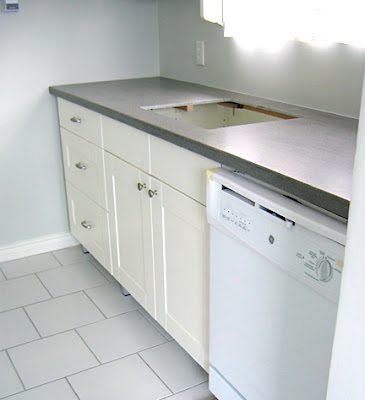
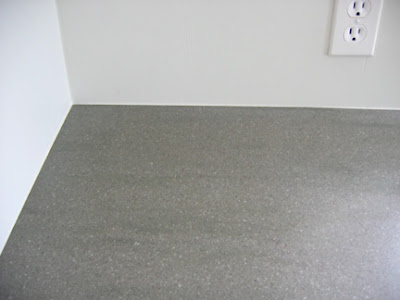 Here's the right side of the kitchen:
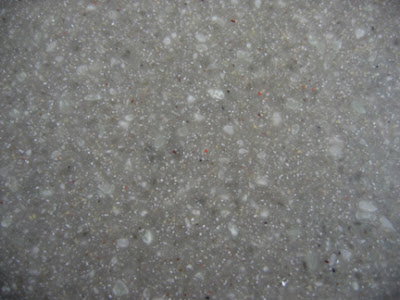
 And finally a detail of the surface:
 My tips for picking your countertop are to take a cabinet door with you if you can, and a paint chip of your wall colour. It's hard to remember colours, and there's so many different whites and browns and greys it can be hard to guess what will coordinate if you don't have them in front of you.
We chose Corian because it's very practical, it's stain & scratch-resistant, maintenance free, non-porous, bacteria-resistant and heat-resistant. It can be repaired if you damage the surface because it's a solid material as opposed to laminate which is a coating on another material. Also I've always loved the feel of it, it has a smooth stony feeling.
It was one of the most expensive ones, but we just gave up with the budget. We've done pretty well so far and it's really a bargain kitchen all things considered. So we spent more than we'd expected but it was worth it. We just couldn't find a cheaper option we really liked. When you've done so much work and already spent a lot, it's disheartening to choose something you don't really like.
Now that we have this done we can take a sample piece of the countertop when we go to choose backsplash tiles. That's going to be lots of fun! Also we will finally have our sink installed early next week and so no more washing up in the bathroom sink. Can't wait for that!

By:
Valerie Walsh,
on 2/22/2008
Blog:
ValGal Art
(
Login to Add to MyJacketFlap)
JacketFlap tags:
Valerie Walsh,
Sinkronicity,
dimensional painting,
kitchen,
Five Easy Pieces,
Five Easy Pieces,
dimensional painting,
Sinkronicity,
Illustration Friday,
Valerie Walsh,
kitchen,
Add a tag
My submission for Illustration Friday's "Multiple" is a dimensional painting called "The dish ran away with the spoon" and deals nicely with the subject of multiple dwellings. I have constructed the kitchen idea a few times and each is slightly different. One version was called "Sinkronicity" and was part of a show called "Five Easy Pieces". I love making kitchens and scenes that require furniture. It is made from wood, foamboard, salt, string, clay, acrylic paints and resin. Happy Illustration Friday everyone!
 This is yet another one of those rambling posts about our kitchen chaos. I was thinking about it and if this was a magazine the story wouldn't be ready until I had a perfect final kitchen with beautifully styled pictures. But that's why blogs have something to offer that glossy magazines don't. When we were wondering if we could actually assemble our IKEA kitchen cabinets ourselves I was looking all over the internet for other people's work-in-progress pictures and suggestions.
So that's what this post is about because we've learned things along the way. But first of all I should mention that we had a very simple situation, relatively, because our kitchen layout was already working well, the appliances, plumbing and electrical are all in the same positions. Also, we have a galley kitchen with no corners, islands or oddly shaped walls (aside from the fact that they're not straight in some places but I'll get to that). So I can only say that if you are in a similar situation you can certainly do it yourself, but it's not easy. Unless you're really skilled with renovation-type work of course. I'd say we're handy, but not particularly skilled.
And after a few weeks of this we are tired out, with sore hands and muscles. I woke up this morning with a weird pain in the middle of my back and I had trouble getting up out of bed. I couldn't even turn over! I've been walking around today saying "ouch, ouch, ouch!" and trying to figure out what I can and can't do just now. I can sit and walk, but oddly I can't really lie down. I've tried a few things and I think it was from lots of sawing. I tried imaginary sawing and that hurt the most. But enough about my back.
On Friday I assembled the upper cabinets. We decided there may be a good reason to put those up first so we should try to do it. Our current deadline is Wednesday because that's when someone is coming to measure for our countertop so everything needs to be in place by then.
 Assembling the cabinets is the easiest part. Especially if you've assembled lots of IKEA things in the past and you're careful about reading the instructions. I think I spend more time undoing things (which is difficult) because of putting things in on the wrong side or whatever. I was also frustrated to find that one of the back panels sustained a crack somewhere along the way, and I drove in a couple of nails askew which caused some small chips inside.
I recommend putting the door hardware on before you hang the cabinets. The screws are actually a bit tough and take some work to get in and it's easier if you can brace against the floor.
As mentioned last week, I had this last wall to repair and paint. IKEA recommends that you paint one coat, then put up the cabinets, then do the second coat. This saves a bit of paint, and I guess you can do touch-ups if you scratch the paint. One of my tricks was not doing too much work on smoothing out the walls because in most places the rough spots where the old cabinets used to be attached were covered by the new cabinets.
 At this point you need to put up a metal rail that the cabinets hang from (get a nice big level it will be very handy). The rail wasn't long enough, so it was a tricky matter of working out where the studs were, where the cabinets were and cutting two pieces of rail that would maximise the amount of support for each cabinet. I recommend marking your studs on the wall with a pencil and measuring everything carefully and marking it on the wall.
Our oven fan vent can't really be moved and was the biggest problem. It determined where the vent would go, which determined where the cabinet above it would be which determined where all the other cabinets would be. We discovered there wouldn't be enough space between the countertop and cabinets - even our kettle wouldn't fit.
 Our brilliant solution was that we would (later on) create a small box that could be used as a small shelf. This box would attach to the cabinet over the stove, and the fan would attach to it. This meant the cabinets could be placed higher up. The other tricky part at this stage is working out the position of the little panel strips that fill gaps. In this case a 2" strip goes beside the over-stove cabinet so that its door can open fully, and this allows for a 1" space on either side of our free-standing stove.
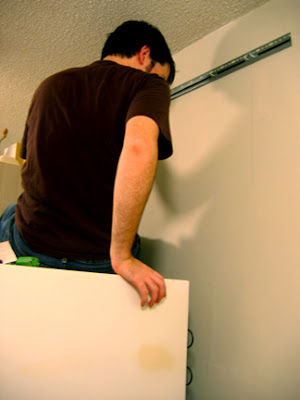
At this point we measured and cut the rails with a small hacksaw. The saw is only $4 and works well but it takes a while to cut through the rails. If you had a power saw that cuts metal it would be much easier. The picture below shows Bradley attaching the first rail. You need to buy your own screws for this, we got some really big ones because there's going to be a lot of weight on this rail. And of course the rail needs to be attached to a few studs. The hardest part for us is that the battery for our new drill isn't working properly and it had barely any power.
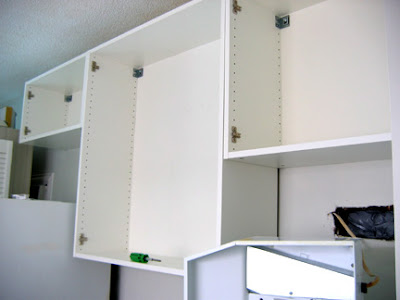
 Then finally we could put up all the cabinets. This part isn't too bad, the cabinets are heavy but they attach at two places with a simple bolt. Then they can be adjusted afterwards by sliding them along the rail so that they are all snug against each other. Also you can make sure at this point you have a 2" gap on the side for the filler panel.
Luckily the walls on this side of our kitchen are straight. We have a single cabinet for the other side of the kitchen and the wall it's next to is on an angle. If we added a filler panel there it would be really obvious so we're just going to leave a large gap. It's possible because it's a single cabinet, and we can centre it on the small patch of wall next to the window that it's going on, but if it wasn't we'd have had a problem. Or it just wouldn't look right which is frustrating after spending so much time and money.
 This is as far as we've gotten. Next, you drill holes and attach the cabinets to each other, then add shelves and doors. Finally you add the hardware for the doors.
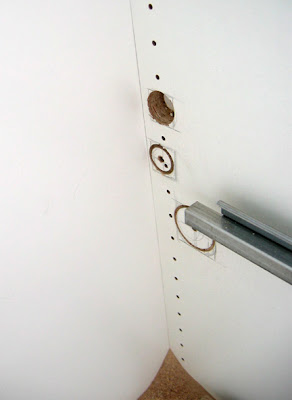
The only other difficult thing so far is drilling holes for our plumbing that comes from a side wall instead of directly under the sink. We did three neat holes for the pipes on one side of the end cabinet. We did this with a little hole saw kit - you can get a basic one for under $20. The pieces attach to your regular drill.
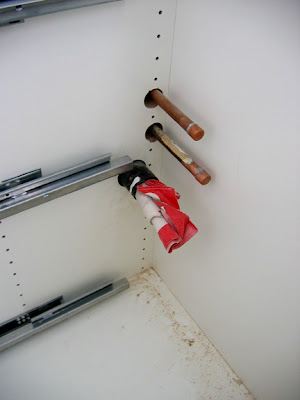 But the drill isn't working well now and we have six more holes to go! We're going to need to buy a new battery. If your plumbing comes in directly below the sink it's a lot easier because you're cutting through the thin back panel, not through the thick walls of your cabinets.
 In short, you can do it yourself. But you may find yourself getting really annoyed at the IKEA DVD and posters (included with any kitchen purchase) that make it look really easy. I found watching the DVD quite soothing until I realized they were basically installing cabinets in what seemed like a completely perfect room, without any crooked walls, unevenly spaced studs, oven vents, or evidence of plumbing or electrical outlets to worry about.
My biggest tip is to make a list and make sure you do things in the right order. I hope we are, because we're not done yet!

By:
Claire Louise Milne,
on 1/21/2008
Blog:
Needle Book
(
Login to Add to MyJacketFlap)
JacketFlap tags:
decorating,
decor,
bathroom,
kitchen,
renovating,
kitchen,
decor,
decorating,
bathroom,
renovating,
home,
Add a tag
 I can't believe what we got done this weekend. Friday I painted the eat-in area and moved in a small white shelf that fit perfectly in the spot the hutch used to have. Having books beside the kitchen table has made it feel so homey, it invites tea drinking and reading. It's so sunny in that spot, we just needed our small table back in place to make it a popular corner of the house again.
If you look just beyond that you can see that all the lower cabinets are now assembled, thanks to Bradley who has recovered from his cold and was behaving like a superhero all weekend. The cabinets even have their feet on now.
And he shortened the closet doors so they're now all back in place. Phew! We kept knocking them over while moving things around. I also finally added the second coat of paint in the hallway. The walls had been a bit scuffed up from the flooring work as well.
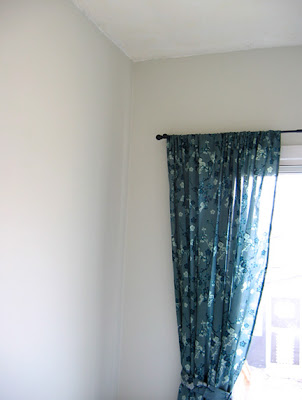
Friday I added curtains to cover the sliding doors. As much as I like to make my own, ready made curtains can be a real bargain considering how much fabric they have. I found these at Urban Outfitters, they're nice and sheer and soft. They came with an extra strip of fabric each, I sewed buttonholes and buttons on those to make ties. The rod is from the new Umbra store on John St.
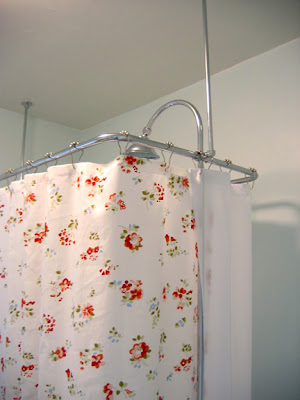
 Although not kitchen related, I'd like to mention that we also finally assembled the shower for our clawfoot tub and I can't tell you how thrilled we were to be able to have a shower again.
 I also managed to get one of the shelves up. I'd like to get more of the white wicker baskets from IKEA to go on the shelves. As you can see I've painted the Ocean Air on the walls.
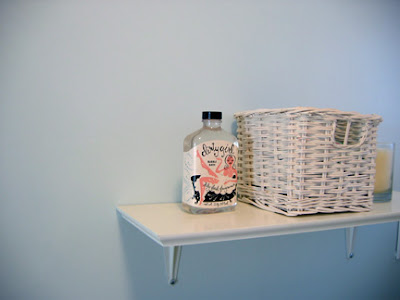 Realizing it was time to order our countertop we went to Home Depot on Sunday. I had been hemming and hawing for ages about that choice. It was hard to decide what would work with our flooring, cabinets, sink and walls, and what we should spend and which material would be most practical. As I've mentioned before we hadn't planned on gutting the kitchen in the first place so we've been making decisions as we go along. I wouldn't recommend this method but so far we're very happy with the results. So anyway we ordered a countertop but I'll save which one for the reveal!
But before they can measure for the countertop we need to wrap things up, which means installing baseboards (while we can move the cabinets and get back there), setting up the wiring for the new dishwasher, having the plumber over to set up the plumbing and finally attaching the lower cabinets in place. Usually you're supposed to install the uppers first but this won't be the first time we've done something backwards. I guess the main reason was to try to keep the kitchen liveable as we did the work.
These are the old uppers:
 Until yesterday we were using these old upper cabinets for storage. But last night we finally emptied and took down the last of the old cabinets (well I moved some things but Bradley did the real work) and the wall now looks like this:
 So cleaning, patching, sanding, priming and painting these last two walls is my job for today. Along with some illustration work in case you were wondering if I still have a job...
Read the rest of this post
So cleaning, patching, sanding, priming and painting these last two walls is my job for today. Along with some illustration work in case you were wondering if I still have a job...
Read the rest of this post
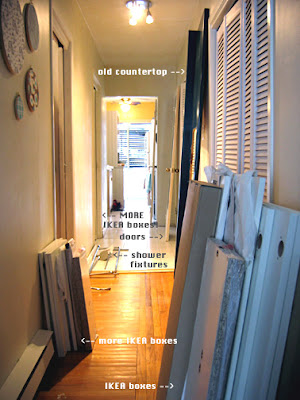 A few friends have asked us if our kitchen cabinets are installed and the short answer to that is "no!". I think we're a little tired out from all the renovating and we've definitely slowed down. So today I decided to post the state of things to answer that question, but I also thought that possibly the embarrassment of showing the sad state of our house will push me to get cracking.
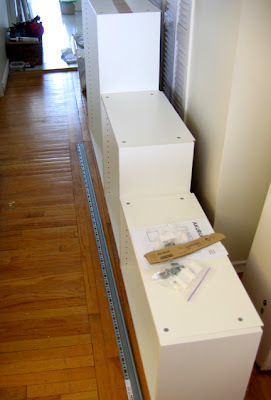
The picture of our hallway really tells the whole story. Most of the IKEA cabinets are in boxes - and when I say most I mean all but the one that we've assembled so far. Just past that we have the shower fixture that we can finally install onto our clawfoot tub now that the plumbing has been fixed. The new flooring has raised the floor height of the entire area by around 1/2". So we had to wait a few weeks for new supply lines for the tub to arrive.
Across from that you can see our old countertop propped against the wall which we are getting rid of. Also the doors to various closets that are all around 1/2 an inch too tall now to fit back in place. Then on to the kitchen with more IKEA boxes.
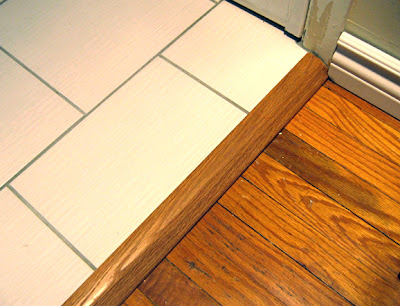 This wooden strip is called a "reducer" and bridges the big gap and 3/4" step that was between the tile and wood floor areas. There were rough edges on either side and old floorboards and ditra showing in the middle. I sanded a little chip from the bottom corner of the baseboard to fit over the reducer.
 It's partly that everything seems to take more time and trouble than expected. Just finding this wooden reducer to bridge the tile to the hardwood took weeks. But we were thrilled when we found one at Home Depot that was the right wood, the right stain, the right length, with a shallow overlapping bit for the tile side and a 3/4" step down to the hardwood floor side. Then it was just a small matter of borrowing a power saw to cut it, after cutting the adjacent new baseboards to make sure it would be the right length. Then finding the right glue to attach it and then going back for the caulking gun that was needed to apply the glue. Phew! So more trouble than we expected but it's finally done and it looks finished now. Now we just need to do the gap between the hall and bathroom...

Oh... and hidden behind some of those IKEA boxes were these shelves that are going into the bathroom over the washing machine for storage. We also need to replace baseboards throughout (the old ones were removed when renovating the floors and most were damaged and too short and yucky to begin with).
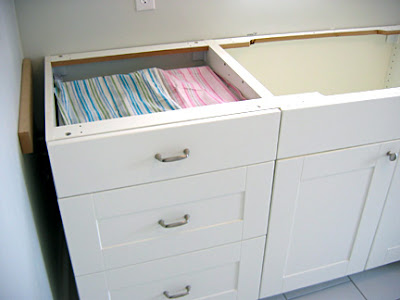
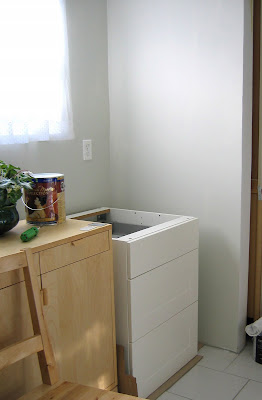 This is the one cabinet we've put together so far - now it just needs soft shutting mechanisms on the drawers, handles, legs and a countertop!
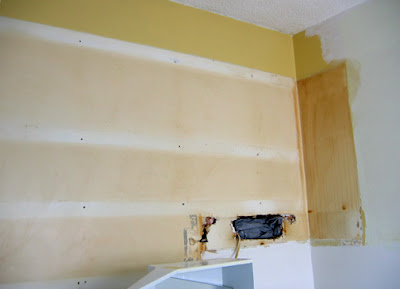
Which brings me to today's goal. I've painted the left side of the kitchen in the alcove area with our new colour. Choosing the perfect grey took a looong time but I'm happy with it now that it's on the walls. It's Benjamin Moore's Titanium, and it's a very soft pale grey that actually seems to look grey rather than a bit green, or blue, or beige as grey's often do. It also works nicely with the cabinets and the new floor which has tiny pale grey stripes in it.
But the walls on the other side still look like this:
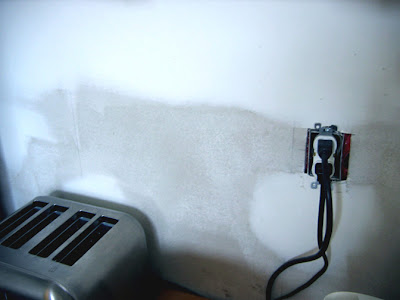
And the original bright yellow colour is still there in the eat-in area past the cabinets. The wall was damaged in a few patches so we definitely couldn't have kept that colour. And I find it a bit too heavy. This is the left side:
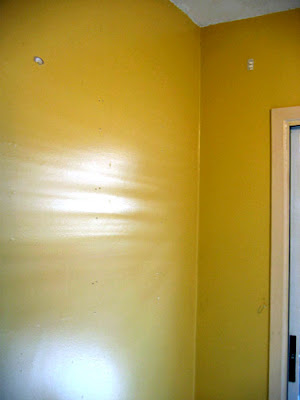
And the right side:
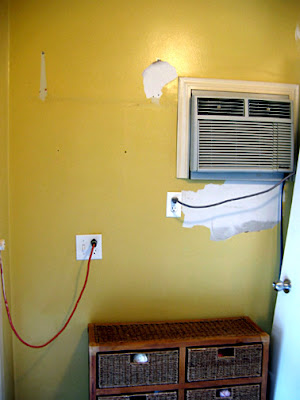
What a mess. I really dislike the air conditioner too - and not sure how to remove it now it's been installed into the wall. But that will have to be resolved later. Maybe we can just put a cabinet in front of it!
And last but not least, the mechanized shutters that go over the back doors are broken and stuck halfway up. Or halfway down depending on how you want to look at it. So someone is supposed to be coming by today to repair those. So that's the state of things, now I'll surely be motivated to post some "after pictures" as soon as possible!
By:
Claire Louise Milne,
on 12/13/2007
Blog:
Needle Book
(
Login to Add to MyJacketFlap)
JacketFlap tags:
plumbing,
renovation,
bathroom,
kitchen,
tiles,
flooring,
kitchen,
renovation,
bathroom,
tiles,
flooring,
plumbing,
Add a tag
 We moved back into our house last weekend and had nothing but the toilet in the bathroom. We used the shut-off valves from the sink to get water. It was like camping in our own home. But I needed to be home to be able to meet an illustration deadline and get ready for the craft sale - I had odds and ends for that tucked all over the place. Our furniture was crammed all over the place so that we had to climb over things to move around or find things. The bedroom had the watertank in the doorway so we couldn't even close the door.
So you can imagine how thrilled we were when the plumber turned up and quickly put back the water tank (hot water! hurray!) and tub (bathing! I missed it!) and sink (heaven). The best part was finally seeing our new bathroom floors with the furnishings in the room, because without them I was wondering if the tile was too small - it looked a bit busy. But with the furnishings in there it's just right. The traditional style of hexagonal tile makes it look like those floors could have always been there and they work perfectly with the old clawfoot tub, and in short, I think they're beautiful. The porcelain also feels lovely, it's hard to describe but it's just very nice.
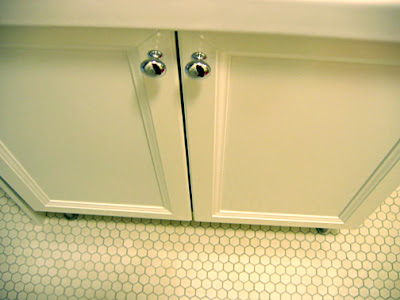
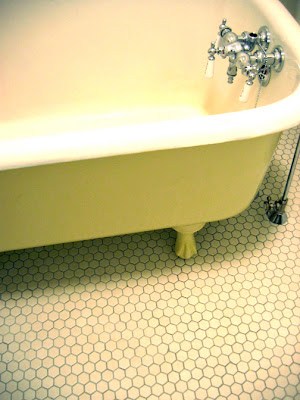 Also I was very happy with how the cream paint on the tub looked with the new floor - there aren't a lot of colour choices with Tremclad but the cream really works (it's not quite as yellow as the picture above). And finally the new IKEA vanity/sink is also beautiful and soooo much better than the old one. It's a bit taller which I find more comfortable and I even love the shiny chrome knobs we picked to match the rest of our fixtures.
 There are still a few small problems, our new faucet was bought out of the box and there was a small part missing. So for now we have a different stopper in there and it doesn't close all the way and isn't the right one. Also, the new flooring is higher than the old one, due to the Ditra and porcelain tile being thicker than vinyl tile. The plumber had no trouble adjusting the drain length, but the offset supply lines are too short (and it looks like they got a bit bent). So we need to buy new ones because for now the tub is installed on a bit of an angle in order to make it fit. Soon I'll be painting the walls, and once that's done I can do a full reveal.
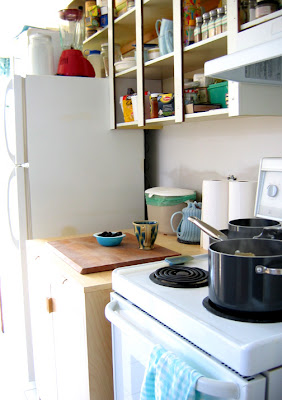
Our kitchen is looking very empty. When a room is bare you can really see it's qualities and it's really a nice space. The big window and sliding doors let in so much sunlight - I've been tempted to live without cabinets and turn it into an airy studio. But I guess I have to be practical. Anyway, now the walls are smooth and I can paint those too, and our cabinets are ready for pick-up at IKEA. Yesterday we put back our appliances and a little table, so we've created a kitchenette area that is all we need for now.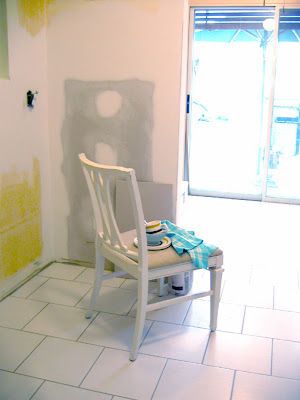 The dishes get washed in the bathroom so of course I had to buy this cute vintage mug for the scrubbie...
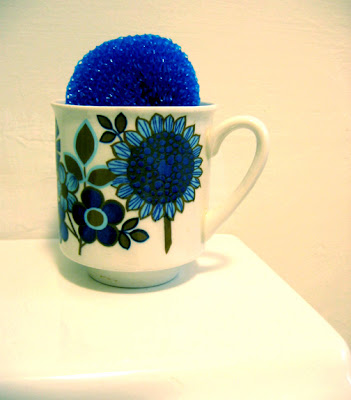 For the wall colours, I've been so inspired by the January Martha Stewart Living. I noticed a lot of pale blue and yellow, including mustard yellow which created a really fresh (but almost vintage style) colour scheme that appeals to me so much. You can even see it in our dishes on the chair in the kitchen photo, we have a pale blue Denby stoneware set, and a brown and mustard yellow striped vintage set of dishes that's more casual.
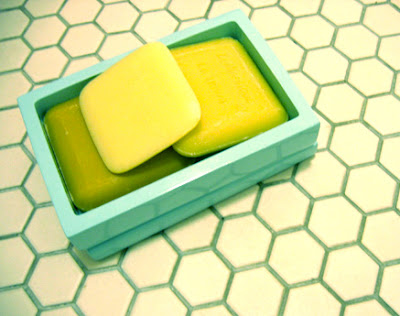 The bathroom isn't as sunny as the kitchen, there's a window but it faces a wall. So the white walls are too stark and it needs a bit of colour. I've been wanting pale blue walls, but I was wondering how pale blue would go with the cream floor and tub then realized this was the colour scheme I was seeing in the magazine and loving. It was even already there in my favourite soaps in my Jonathan Adler soap dish. So I've picked up a big can of Benjamin Moore's "ocean air" and I can't wait to see it on the walls!
Wow. I can’t believe it’s already this weekend (well, almost) and I haven’t even blogged about last weekend. Work, political activities and kids (well, kid – my daughter was away at Nature’s Classroom all week, the lucky thing) have really taken away from my blogging time.
So the kids were with their dad last weekend for the first time since the end of July, so I got to go up to Boston and visit the Webmeister.
What with it being a bank holiday weekend, a journey that normally takes me 3 hours max took me FIVE, which ended up being rather stressful since we had theater tickets for 8pm. I left CT at 3, thinking I’d have plenty of time to toodle up to Boston, change clothes, relax and drive to the theater together. As it turned out, I arrived drove straight to the theater and arrived with about five minutes to spare.
It was a rather fun Boston Center for the Arts production of “A Funny Thing Happened on the Way to the Forum”, which I haven’t seen in yonks, and thoroughly enjoyed.
Afterwards, we walked past the Mills Gallery on the way to dinner. It had an installation by British artist Martin Creed called “The Lights Going On and Off”, which is apparently one of Creed’s most well known works, for which he received the Turner Prize in 2001.
Basically the entire gallery was painted white, with a little white sofa and table in one of the windows. And…you guessed it – the lights kept turning on and off every few minutes. As we stood in front of the windows watching a man walked by and expressed my opinion perfectly – “What a load of cr*p!”
Ok, I’ll admit that I don’t “get” all modern art. But I was practically rolling on the pavement laughing when I read the explanation of the work on the gallery door:
The title is descriptive – in the work the lights go on and off, like someone flipping a switch, repeatedly and at set time intervals. Using the existing track lights in the Mills, it will fill the entire 2200 sq. foot space for an installation that is pointedly spare and quietly provocative, with a touch of humor and wonder at the role of inspiration in the creative process. Ultimately, The Lights Going On and Off is an experiential art viewing event, one that is both challenging and poetic.
”Quietly provocative”?! “Challenging and poetic”?! Give me a break! How about
ANNOYING AS HELL? I was facing the gallery when while we ate dinner (al fresco, in the Northeast, in October…amazing!) and the only thing it inspired me to do was to blog about how ridiculous I found it.
On Saturday evening we had dessert at this amazing place called
Finale. It specializes in my favorite food group, dessert. The Webmeister and I each had one of the Signature Molten Chocolate desserts.

To say it was awesome would be an understatement. I was glad that we weren’t sharing, otherwise I might have had to stab the Webmeister’s hand with my fork. I mean love might be love, but all’s fair when it comes to molten chocolate desserts.
Continuing our modern art theme, we went to the
DeCordova Museum and Sculpture Park on Sunday. If you’re ever in the Boston area, I’d highly recommend a visit. This is modern art I “get” – or at least kind of get.
For example, there were many days during the Never Ending (but Finally Ended) Divorce that I felt like this:

The Webmeister and I had a fun time walking around and trying to guess the names of the sculptures. I nailed the “Trojan Chicken”

and with a guess of “Trojan Pig” came really close to this one:

(real name: “Trojan Piggy Bank” – not sure about the obsession with Trojans but maybe the artist had just drooled over the delectable Eric Bana

in
Troy, or something)
But there were some that really had me flummoxed – and like “Lights Turning on and Off”, somewhat annoyed.
Like this one:

Ok, so what do
YOU think this is called? No cheating now…but when you’ve made your guess,
Ok, so was called “Butterflies”. Go figure. My guess was “Cannonballs”. If I were getting really avant garde maybe I’d go with “Rabbit Turds”. But
”Butterflies”?. Go figure.
I can’t remember the exact name for this one, but I wasn’t far off with “Coneheads”.

And I was going to suggest The Webmeister and I take a romantic photo a deux next to this one:

till we got closer and realized that maybe it was quite so romantic after all:


There’s something about pickaxes and body parts that kinda takes the romance out of things, no?
It was a fun weekend – just the right amount of culture, activity, chocolate and napping.
Check out the DeCordova Museum's exhibits. One of it's past exhibits was called Telling Stories with Pictures, The Art of Picture Book Illustration and highlighted the work of picture book artists.


 Perhaps because it has been raining. Perhaps because the trees keep losing their leaves at a rapid, unstoppable clip. Perhaps because I have allowed myself back inside a novel I have trembled about for months.


Quiet and uncluttered. Your house looks like a magazine shoot! Is that REALLY your house? Oh man, I will clean for weeks if you ever come over to mine!
It looks inviting! I can come join you and bring the kids along if you want!
Melissa, I am laughing. And now I will confess: I am an inveterate cleaner; I live with the fewest possible things. It helps me think.
PJ, you have me laughing!
I'm with Melissa--my dining room table never looks like that!