


In March, I took a fascinating class with Gwen Hernandez on working with the software program, Scrivener . Scrivener, available from Literature and Latte, is widely touted as a totally wonderful program for writing, and while I had owned it for a while, I knew I needed guidance in fully taking advantage of its many features. The class was great. Hernandez laid out daily information in chunks that were just right to absorb and work with. The homework was easy and helpful. I end the month with a growing level of comfort with using Scrivener—in fact, this post is written in Scrivener. Overall, though, I still have questions about how useful it is when compared to regular word processors.
WYSIWYG: What You See Is What You Get
Scrivener is not a WYSIWYG (What You See Is What You Get — pronounced Wizziwig) word processor. I am old enough to remember how exciting it was to actually get a WYSIWYG word processor, to have the ability to SEE what your document would look like. In that respect, Scrivener is a throw-back to a time when typewriters were the only way to get your story on paper and then you left it to a printer to actually typeset a page. Let me quickly say, Scrivener is anything but a throwback in any other respect; it’s a complex program with many features.
But let’s discuss the WYSIWYG question. Do you want to SEE what your words will look like when typeset/printed as you create the story?
Creating in WYSIWYG. I’ve done it both ways. Joel Friedlander sells book design templates, which allow authors to design and layout a book in MSWord. There are many arguments for and against using MSWord for this and I don’t want to get into that. Instead, I want to focus on my experience of writing in an exact WYSIWYG environment. I had a novel almost done when I put it into a template and worked with that environment as I revised. I found it fascinating and enjoyable. I found that it did affect how I wrote: the voice, the wording, chapter length and more. The choice of typeface mattered. The layout on the page mattered. The story demanded a certain voice, which was strengthened by the layout and design. In fact, I loved it.
The Compose Window of Scrivener isolates the writing in its own screen and helps you focus.
Creating in Non-WYSIWYG. On the other hand, I am typing this in Scrivener, and it’s definitely NOT WYSIWYG. The environment here is more focused on productivity. I’m writing in the Compose window, which shuts out every other window on my computer and helps me focus on the writing at hand. It tends to increase the flow. However, after you finish a draft, you must Scrivener’s Compile function to export into a printable format. In Gwen Hernandez’s book, Scrivener for Dummies, compiling takes 70 pages because of its complexity. For this blog post, it’s a simple copy and paste into my blogging software. For a novel, an ebook and other common formats, there are presets for compiling that make it simpler. But it’s not WYSIWYG; it’s an extra step to format. You must learn to become an old-fashioned printer and control all sorts of things: fonts, margins, headers, footers, page numbers, and so on. Or at least tweak the presets. Some say the beauty of Scrivener is that you can output the same writing into multiple formats. For some that will be an advantage; for others, it will be a shrug.
The relationship between layout and design and content isn’t straightforward. Maybe I’ll never decide between WYSIWYG or Non-WYSIWYG environments. Maybe it will be on a case-by-case basis. But if you are considering Scrivener as your word processor of choice, you must deal with the WYSIWYG problem. Which environment do you want to write in?
METADATA—STAYING ORGANIZED
One big advantage of Scrivener is the ability to track metadata, or data about the data. First, in the binder view, the hierarchical structure is always displayed. That’s not much different from a word processor that allows for an outline view. In Scrivener, however, each item is a separate file, and you can drag and drop these files to restructure. Nice—if you need that sort of thing. Of course, the question is this: do you need to restructure your writing often?
Second, you can mark any file (which can be a scene, a snippet of something like a description, or a full chapter—it’s up to you what goes in a file and how finely grained it is) by using one of three methods: labels, keywords, status.
Status. The default Status markings start with To Do and progresses to Finished. In other words, it marks your progress. But you can use status for anything you want. I liked using Status to indicate the setting of a fictional scene because the terms used here show up as watermarks in the cork board view. Making setting visual seemed a good use for metadata.
Labels, by default indicate Concepts or Chapters. You could expand that to terms like Idea, Rough Draft, and so on. Or you could switch and use Labels to indicate progress or some other story element. All the metadata can be customized.
Keywords have no default setting; the cool thing here is the ability to mark a folder with a colored tab. For example, if your keywords are characters, then in the cork board view you can see at-a-glance all the folders marked Orange for Villain. Of course—you must remember which color goes with which character to use this at-a-glance method. Otherwise, you must look up what color stands for what keyword. The more characters (or keywords) marked, the less useful and more confusing it becomes.
In other words, you have three major ways besides hierarchy to organize your writing. Some are color-coded, while others appear as watermarks in certain views. Some are more flexible and some are more comprehensive. One advantage is that you can search your project for files marked up in any way. For example, you can find all the “keyword: Villain POV” files and then print them separately for editing. You may want to search by status TO DO and keep that view up until all files have been worked on.
Flexible? Certainly. But overwhelming.
The metadata is flexible enough to accommodate cookbooks (keywords: chicken, beef, veal, etc.), fiction (keywords: character names), or nonfiction (keywords: fact, quote, indirect quote, opinion, analysis, etc.). But the metadata system of taming the chaos of writing doesn’t seem intuitive to me.
I went in search of what others have done with all this metadata. First, I asked Gwen Hernandez how she used the metadata. She said that it changes with each project and I shouldn’t worry about the metadata, but just write until I felt the need to separate out files and then decide what metadata made sense. In some ways, I understand that, and that method would work if I wrote by the seat-of-my-pants, a panster. I’m more middle ground, though. I like some structure to start and then I work a while and then adjust structure. And for the writer who loves structure so much they outline extensively, I doubt that answer would help.
Second, I looked at Scrivener templates to see how they used the metadata. Most just use the hierarchical structure and ignore the metadata. Labels, keywords and status were unused by all of the templates that I downloaded and installed.
That brings me to the question: What metadata do we NEED to know as we draft? As we revise? Is a hierarchy enough or do we truly need metadata?
Metadata and the Shrunken Manuscript
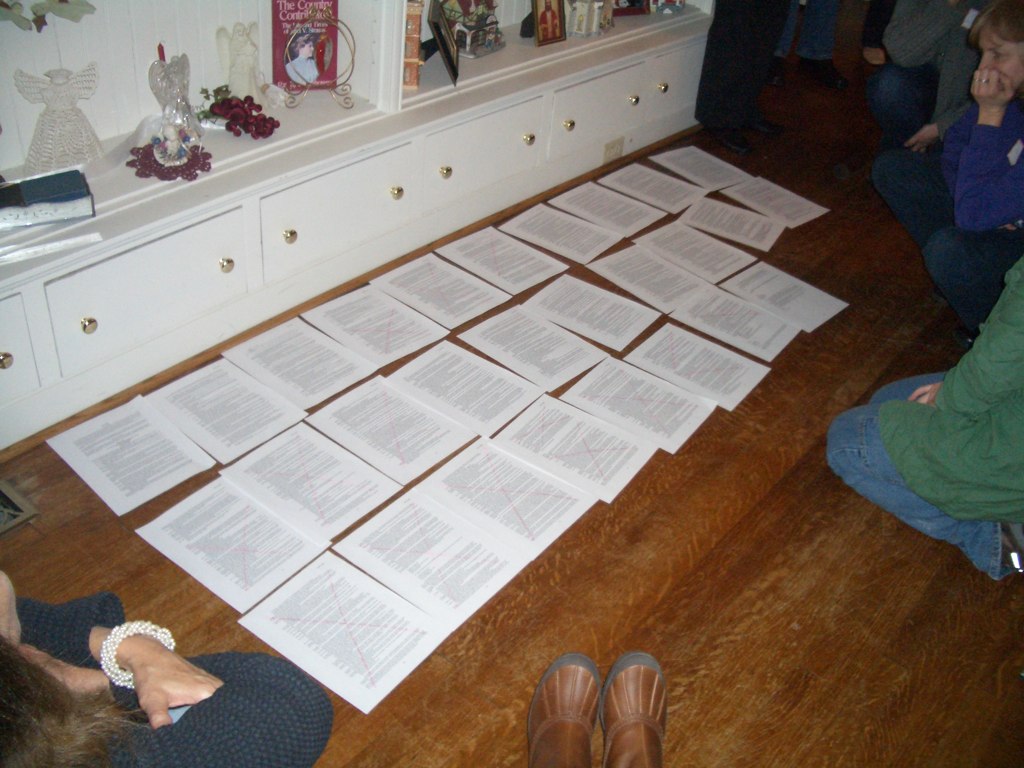
Shrunken Manuscript
I am known for the Shrunken Manuscript, a revision technique that shrinks pages so small that you can’t read it. After shrinking, I ask writers to mark their manuscript in various ways so they can SEE what they have done. After this Scrivener class, I realized that the Shrunken Manuscript deals with metadata, but in a manual and visual way. This technique is now popular with authors who need to see the underlying narrative structure. So, I know the value of metadata and making it visual. One thing I’ll be trying out with Scrivener is how metadata can work for us, without taking on a level of complexity that makes it onerous.
Overall, then, one supposed advantage of Scrivener is it’s ability to keep your writing organized. It does this with a simple hierarchical view and the ability to add metadata in three ways. But I found few instances of people actually using the metadata or being able to explain when and where and why they use it. I’m undecided if this much-touted feature will help or just be too much complexity. I’ll report back after trying out some ideas and working with Scrivener for a while.
BACKUPS
I LOVE that the default is backing up every 2 seconds. That’s so aggressive! I thought I was smart when I changed my MSWord to backup every 2 minutes; backing up every 2 seconds is brilliant–and Scrivener does this seamlessly in the background without any hesitations or hitches..
PRODUCTIVITY
Scrivener has a built in way to track productivity: words per session, project goals, daily word counts, percentage of project completed, and so on. Some authors like this ability to tracking progress; they set and regularly meet productivity goals. Certainly, it’s possible to do this with word processors, but Scrivener makes it simple. I want to try this with my next major project.
Overall, I am still undecided about Scrivener. I do plan to use it for projects this year and Gwen Hernandez’s class was definitely helpful and worth the time. Ask me next year if I’m still using the program.