


I think I should rename the series to something else because we've moved past preparation and onto THE REAL DEAL! I completely failed to blog about what happens during a fair while the actual fair was happening because I was so dang tired. But! Here it is!
 I look terrified but don't be! It's all gravy! :)
- Greet your customers. A lot of stores & boutiques even have 'greeter' as a duty & there's a reason for it. It's important to make them feel acknowledged & welcomed to do more than just a glance-and-a-walk-away. And if they do pull that move, don't be discouraged--there's always someone new to talk to!
- If they decide to hang around, engage! Chat 'em up by asking a question as simple as 'how are you?' or tell them a fun fact about what they're eying. Make it interesting & don't be shy! If they ask how much it is, don't just say the price. Give the product a story so it's personal.
- Accessibility. When I say accessibility, I mean it to describe your products and YOU! You are the face of your business so make sure you're visible, smiling, and able to easily engage with your customers. You can do this while standing next to your booth, sitting behind, whatever. Just make sure you can be seen. Regarding product, I usually keep display copies in the front and the purchasable items in the back for safe keeping. And when I organize everything, I make sure everything I'll need urgently is immediately close by.
- Your supportive, visiting friends are important & of course you want to show your appreciation. I learned from experience that it's good to let them in behind the booth and talk to them while keeping an eye on the front of the booth. Friendship crowds are good but not so much if they're blocking access to your booth. Don't worry--your friends will understand.
- Making the sale. Congratulations! You did it!!! I think it's good to develop a rhythm--deliver the price, package the item, $ transaction, change, thank you & hand off, inventory log. If you have a helper--even better! I tend to handle the verbal/face action while my helper is backstage prepping it all.


- Stay hydrated, sit, take breaks, and eat. It'll be hard to find a moment to eat a complete meal without being interrupted so plan on lots of snacking. Bring fruit, granola, nuts, cookies and chocolate for a lovely pick-me-up. Oh & mints for that after-snacking breath :)
- Keep a notebook at your post in the event of artist suggestio
0 Comments on Craft Fair Preparation Demystified! part 5 as of 1/1/1900Add a Comment
 By: genevieve,
on 5/19/2011
By: genevieve,
on 5/19/2011
Blog: le petit elefant (Login to Add to MyJacketFlap)
JacketFlap tags: craft fair, craft fair prep, Add a tag
Aha! It's the day before the day before the big day. Although the day before the big day is actually a pretty big deal because in the case of Maker Faire, as also Unique LA, Friday (tomorrow) is set up day. So I treat tomorrow like the BIG DAY because it's all outta my hands after that.
So:
7. Getting Everything Ready for Move-In
 Extra business cards... check.
 Double check inventory numbers & print my inventory sheet, which doubles as my sales log.
 Dress up the extras like stamping craft bags & adding tags to all my plush. I print tickets/directions/information if there are any to be printed. In the case of Maker Faire, I bought a ticket for my weekend helper, Kevin (yay see you soooon!).
 & I neatly pack away the goods (top left clockwise):
- packaging: plastic bags for the big prints, newsprint if they want it to be rolled instead, craft bags for prints & cards, and paper bags. My clipboards are also in there with the inventory sheets & extra sheets of scrap paper for my hand-drawn sign up sheets. Pen is also already tied!
- 8x10 prints already packaged and taped in individual plastic sleeves, divided in their own section. Extra plastic sleeves & tape are also included.
- all things SQUISHY & sewn very carefully squeezed into the green chest I put in front of the booth for you to 'sift through & find a friend!'
- framed prints & cards: you can see a glimmer of the new print in the white square frame ;)
I learned from previous fairs that the less time I spend preparing a sold item for a customer at the fair the better. I used to have my prints loose and in a big pile, all mixed up. Now I take the time to sign each print & place it in a sleeve well before the fair. I don't know why but my brain goes crazy whenever I make a sale and I suddenly feel all this pressure like, oh my god this customer just bought something. What do I do?!? What do I do!? So I don't know. It helps to have it all ready & good to go.
Okay, time to do yoga & hit Trader Joes. I need my
By: genevieve,
on 5/18/2011
Blog: le petit elefant (Login to Add to MyJacketFlap)
JacketFlap tags: craft fair prep, craft fair, Add a tag
Ah, hello! Let's continue this craft fair demystifying shall we! (btw, if you're just joining us now, here's the previous post!)
6. Setting Intentions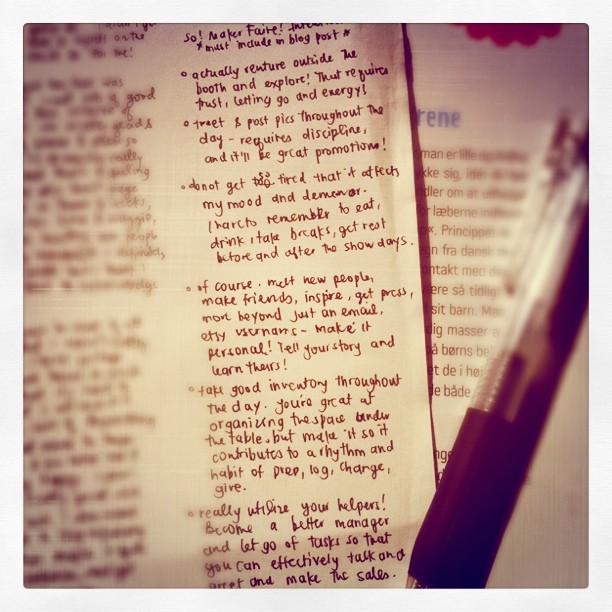 One thing that I always make sure to do before any fair, big or small, is set my intentions.
My early craft fair intentions used to go a little like this:
- make a profit, any profit!
- have people sign up for the mailing list
- don't be shy
- stay hydrated & don't forget to pee!
- learn a lot! make mistakes!
- actually venture outside the booth & explore! that requires trust, letting go & energy!
- tweet & post pictures throughout the day--requires discipline, and it'll be great promotion
- do not get so tired that it affects your mood and demeanor. remember to drink, take breaks, get rest before & after the show days
- of course meet new people, make friends, inspire, get press, move beyond just an email/etsy username--make it personal! tell your story and learn theirs.
- take good inventory throughout the day. you're great at organizing the space under the table, but make it so it contributes to a rhythm and habit of prep, log, change and give.
- really utilize your helpers! become a better manager and let go of tasks so that you can effectively talk and greet and make sales.
I love craft fairs because I get to meet so many people and not only see that they liked something enough to pick it up or buy it, but see WHY. Little known fact: I thought I was going into the plush business. Then I had my first craft fair and to my surprise, my artwork and prints stole all the glory! If I didn't learn that, I probably wouldn't be around. Probably would have been discouraged because no one was buying elephants, and I wouldn't know exactly why.
Craft fairs can be expensive, laborious affairs but I believe they're well worth the effort, stress, everything. So cheers to this weekend! I can't wait!
Stay tuned for the next post about what happens the DAY BEFORE THE FAIR! Dun dun DUNNNN!
By: genevieve,
on 5/17/2011
Blog: le petit elefant (Login to Add to MyJacketFlap)
JacketFlap tags: craft fair, craft fair prep, Add a tag
 I recently became a member of the SF etsy street team (yeah!) which has been incredible. It's opened me up to a wonderful community and lovely opportunities I didn't know existed! And on a regular basis too! A recent post was about preparing for one's first craft fair. That paired with meeting a couple new vendors to the craft fair scene at Unique LA got me thinking about how one prepares for a craft fair. So, I thought I'd share to help demystify the scary process. At least for me it's scary. Leading up to last year's Renegade Craft Fair, there were definitely many moments where Victoria and I would look up from our work and just barbarically yawp with anxiety!
So, process revealed! Keep in mind everyone works differently. This is just what works for me!
 dawww... my first fair!
For about a solid month, I researched for every craft fair & artist flea market in every state I wanted to vend. I did this months before they requested applications (which is typically 2-3 months before the show). If I didn't see information about this year's schedule, I made sure to join their mailing list. I emailed people, asked questions about the shows, and what they thought about it. I made a list of target craft fairs, organizing them by date. As the application deadlines neared, I started to narrow it down. Rejection & acceptance narrowed it down even more & then I knew where I was headed. A bit of advice: have lots of money saved to apply to the fairs! $400 for this fair, $250 for that one... it starts to add up like WHOA! Or plan to share a booth :)
2. Inventory preparation
 For me, the post-holiday months are the slowest months but I make sure to use the time well! I made a list of what I wanted to carry at the summer fairs, from prints, cards, plush and new items. I set target numbers and due dates, down to which week in which month I'd have all my dinosaurs done. For me, my plush inventory takes time. I sew every piece by hand, and it's just me. So from mid-Feb to mid-March, I sewed non-stop, reaching nearly 100 plush. Once the tough stuff was done, I worked on printing goodies, integrating a new painting or item every month or so. It was tough trying to blindly produce, with no one really buying after such an solid holiday season. But you gotta get over the discouragement because you'll be happy you did it later! (& I am :)
3. Design your Booth!
4 Comments on Craft Fair Preparation Demystified! part 1, last added: 5/19/2011
By: genevieve,
on 12/7/2010
Blog: le petit elefant (Login to Add to MyJacketFlap)
JacketFlap tags: san jose, bazaar bizarre, craft fair prep, Add a tag


Hi there. SF Etsy member here. Wonderful article. I was trying to print paper and then use the paper puncher like you do but I could never get the printed material to line up correctly. How did you do that?
hey! I saw you at unique LA and loved your space and items... I included a pic of your space in my post about the fair(the lighting was not great)
You can check it out here...
http://vintagescapes.blogspot.com/2011/05/my-day-at-unique-la.html
Just thought you might want to know :)
El at Tantalizing Stitches: I printed the tags on one big sheet then cut it down into strips. I had to then punch it upside down so I could see if it fit okay. Tedious but well worth it. It's tough on the palms too. Make sure to take breaks!
vintagescapes: Thank you thank you so much for the sweet post. Bubbly! :) If you're around for Renegade Craft Fair LA in July, please come by and reintroduce yourself! I really love your blog too so thank you x2 for sharing!
Awesome tips! Thanks so much for sharing! I'm looking forward to my first show on Sunday and I'll be sure to re-read this post again before I head off :)
Ewa from
www.boboboutique.etsy.com
www.thebobodiaries.blogspot.com