new posts in all blogs
Viewing: Blog Posts Tagged with: drop spindle, Most Recent at Top [Help]
Results 1 - 8 of 8
How to use this Page
You are viewing the most recent posts tagged with the words: drop spindle in the JacketFlap blog reader. What is a tag? Think of a tag as a keyword or category label. Tags can both help you find posts on JacketFlap.com as well as provide an easy way for you to "remember" and classify posts for later recall. Try adding a tag yourself by clicking "Add a tag" below a post's header. Scroll down through the list of Recent Posts in the left column and click on a post title that sounds interesting. You can view all posts from a specific blog by clicking the Blog name in the right column, or you can click a 'More Posts from this Blog' link in any individual post.
I haven't posted about spinning in a bit so I thought I'd show some recent projects. I finished spinning the
Koi Pond roving and was quite pleased with the results. When you dye roving in patches it's sometimes hard to predict how the finished yarn will turn out.
The main difference with spinning singles is that you're meant to spin with a little less twist. I also spun it a little bit thick and thin which is something you have to relearn after you've been spinning a while. You tend to get into a habit of spinning a certain way and I've been practising spinning thinner and more even yarn.
My next project is a beautiful blue and green merino braid from
Freckleface Fibers on Etsy. It arrived like this:
Then I pulled it apart and wound it into balls like this:
And now I'm spinning it up!
It's so much fun spinning colourful braids like this, the colours shift as you go and you never get bored. Here's a detail:
Then yesterday was my birthday and one of my treats from Bradley was a surprise visit to a fibre shop he discovered. It's in Mt. Albert and it's called
Gemini Fibres. I picked out lots of treats including a lovely new spindle made from white maple:
I also made up my own fibre sampler with lots of types of wool I haven't tried spinning before such as Falkland, Finn, Blue Faced Leicester (BFL) and Alpaca in beautiful natural colours. I can't wait to try each one!
This is the finished yarn that I made with the merino I dyed
recently. I divided the top into 5 parts lengthwise, then pre-drafted a little bit. I was trying to spin thicker yarn than I've been spinning lately, and to spin it thick and thin. But it turns out that once you've been spinning for a while it starts to get a bit automatic. So this yarn turned out thinner than I planned and more even.
You can see the thick and thinness in the picture of the single above..
And this is the result. When I first started to spin I really wanted to spin thin yarn, but it can be time consuming and I thought it would be nice to have a thick single with this yarn. Anyway, as the single turned out a bit thinner than expected I ended up doing a 2-ply after all.
I kind of like the way a yarn will kind of develop as you spin and you sometimes end up with something you didn't expect. In this case I like the way the colours blend together and I'm happy with the results.
Thank you Kristyn for the tips on leftover singles. In this case there was hardly anything leftover and I decided to just keep the last scrap of single and wash it to set the twist. I think I'll make a tiny pincushion with it or something like that. I actually like the single a lot, so in future I think I'll try keeping more of my handspun unplied.
Thank you to all you spinners who leave me tips and suggestions as comments, I appreciate every one and do always get around to trying them eventually!
This is a yarn I made a little while ago. I had to hold onto it for a bit but it's up for sale in my
shop now. I spun it with some roving that was included with the spindle (pictured above). I wish I knew what the fibre was, because it was lovely to spin. I dyed it with a variety of purples then pre-drafted it into a nice soft big ball of roving:
This is the finished single:
Just to make it come out even I Andean plied it:
I know it looks a little crazy and maybe Andean plying is meant for smaller amounts of yarn. I do like plying with bobbins (I'm going to show how I do that soon), if I have enough yarn, but sometimes when there's just 2 ounces or so I'd rather Andean ply and not worry about having leftover singles. I find it works really well, as long as the single isn't too fine, which can cause tangles.
One new technique I tried while plying was adding little coils/spirals into the yarn by pushing one strand up while the other strand is held in place. Here's a close up so you can see the spirals:
The final effect was subtle, but I thought it turned out well, quite pretty.
 As you know, I'm now a little spinning obsessed. I've bought a couple of spindles, because I love what they can do, and there are so many beautiful ones out there, plus it's a bit like knitting, you need extra ones so you can have more than one project on the go.
But I wanted more, and decided to figure out how I could make one myself. There's a few tutorials online, such as a cd spindle (just Google it for examples), this one made from a cardboard circle and a pencil, or even a potato on a stick. This is a good way to learn so that you can decide if you like spinning before you invest too much money. (If this has already happened feel free to mail me any spindles you don't want anymore. Just kidding. Sort of.)
My favourite idea is a drop spindle made from a wooden knob. Abby Franquemont's video Drop Spindle Basics shows you how to learn to spin with a low whorl drop spindle that is just a drawer pull (wooden knob) attached to a dowel.
I wanted to make one that was a little bit fancier, functional and even nice looking, while still not requiring any real woodworking skills. The results were better than I expected, and these handmade spindles work really well! The big trick was to use carved wooden knitting needles which added a nice decorative detail to the top and a smooth polished surface that tapers. But of course a piece of dowel is fine too.
Step 1:
Assemble your supplies. I used wooden knitting needles, vintage wooden knobs (in a variety of weights) from an antique store, a power drill, a scrap block of wood, hooks, pliers and wood glue. Step 2:
Use the pliers to open up the hooks. These ones have a triangular shape so that the yarn stays in place a bit better than a round hook.
 Step 3:
Place the wooden knob on the piece of scrap wood so that you protect the work surface when you drill right through the knob. Make sure you drill right through the centre.
 In case you hadn't noticed, I'm completely obsessed with spinning right now. It's a shame because I'm already a jack-of-all-trades and I really didn't need yet another craft to keep me busy. But there you go, it's something I can't help.
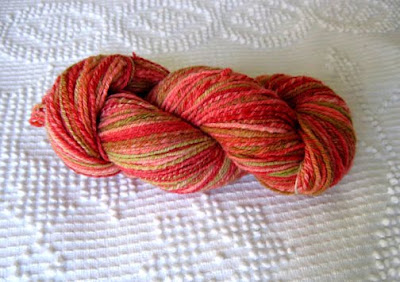
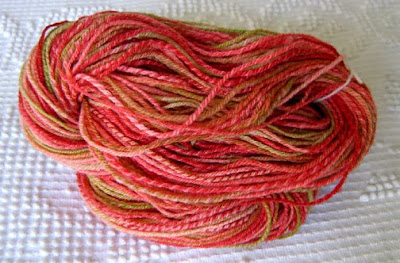
Anyway, here's something I've just learned. Navajo plying on a spindle! Before I finished the candy cane yarn I posted recently, I had finished spinning a single from the first batch of roving that I dyed with red, pink and green.

I forgot to take a picture of the single. I wish I had because it was incredibly fine. It took days to spin. I actually began to regret spinning it so fine, but decided to finish so I could see how it would turn out.
After reading a comment on my blog about Navajo plying, I looked it up and tried to discover if I could do this on my spindle. Thanks for the suggestion Rachel! I thought this would be a good solution for this yarn because I had spun it so fine that it would have been difficult to wind it in an Andean bracelet and it would have gotten really tangled. (I've learned I could wind it onto a nostepinne, but I don't have one yet.)
So here's what I've learned about Navajo plying on a spindle (with a reminder that I'm hardly an expert at this point):
What is Navajo plying?Navajo plying is essentially the same as creating a crochet chain, but with long loops. As you pull the loop through, the two strands it creates combine with the original single strand and you spin all 3 to ply them together.
Why bother?The benefits are that in the end you have a 3-ply yarn that maintains the colour sequence in your single. Also, as with Andean plying, you use every bit of your yarn and don't have to try to divvy up yarn into equally sized balls to ply together.
How do you learn how to do this?I figured out Navajo plying after watching
this video and
this one (and a few others) a few times. Then I had to think about exactly how I would do it on my spindle.
My big confusion was about what happens to the "knot" in the chain. The answer is that it is there, but it can hide a bit behind the twist. This is one reason though, why you might want to make longer loops. Longer loops = fewer "knots". However, the length of the loops also affects the way the colours blend together.
0 Comments on Navajo plying on a spindle as of 1/1/1900


Happy birthday! It sounds like you had a great day :)