new posts in all blogs
Viewing: Blog Posts Tagged with: handspun, Most Recent at Top [Help]
Results 1 - 10 of 10
How to use this Page
You are viewing the most recent posts tagged with the words: handspun in the JacketFlap blog reader. What is a tag? Think of a tag as a keyword or category label. Tags can both help you find posts on JacketFlap.com as well as provide an easy way for you to "remember" and classify posts for later recall. Try adding a tag yourself by clicking "Add a tag" below a post's header. Scroll down through the list of Recent Posts in the left column and click on a post title that sounds interesting. You can view all posts from a specific blog by clicking the Blog name in the right column, or you can click a 'More Posts from this Blog' link in any individual post.
I haven't posted any spinning for a while but I haven't abandoned it. It felt so good to get that bowl finished so I thought I would tackle some of my unfinished spinning. Plus I have a good adjustable niddy noddy tip!
This yarn started with a blue Cheviot from Pleasurecraft. I spun it up without really knowing what I would do with it, then left it on a bobbin for a while. These wooden bobbins are so nice, they're vintage, I found them on ebay. I bought a few and they're perfect for storing your singles before you decide what to do with them.
So then I finally finished spinning those
sailboat batts I made a long time ago. Unlike a lot of my other handspun yarn that's variegated, these spun up with an overall tweedy kind of look.
I didn't have that much, so I decided to ply the sailboat single together with the blue cheviot. It worked out really well, the solid blue evened out the colour a bit and I ended up with a bigger skein of thicker yarn.
So on to the adjustable niddy noddy tip I had. Here's a picture of my niddy noddy with the yarn wound around it:
To make skeins you wind the yarn around the niddy noddy. If you need help, there are Youtube videos that will show you how. You end up with a long loop:
There are niddy noddies for sample size skeins, medium sized and larger skeins. But when you take it apart it's just two curved end pieces with a dowel in the middle.
So once I had bought a sample sized niddy noddy (which is what I had found at Romni Wool) I realized I could make it adjustable by adding different lengths of dowel. I bought one large leng

By:
Claire Louise Milne,
on 12/13/2010
Blog:
Needle Book
(
Login to Add to MyJacketFlap)
JacketFlap tags:
jewellery,
embroidery,
pincushions,
handmade,
jewelry,
beads,
brooches,
city of craft,
handspun,
Add a tag
I've been very busy getting ready for
City of Craft! Here's a sneak peek..
I sold my last crocheted pincushion at Crafternoon Tea, so I decided to make some new ones. These are crocheted from my own handspun wool yarn combined with vintage feedsack floral fabric tops and vintage buttons with wool flowers or leaves underneath. They come with their coordinating pins! They're all stuffed with 100% wool fleece.
I've also embroidered lots of new brooches. These are made from thick white felted wool circles embroidered with crewel wool with a brooch clasp sewn on the back. I love making these! I generally just make up each picture as I go along.
And lastly I have some new necklaces. These are based on a new idea I had last year but I didn't have time to make more than one. I've added wool felt flowers to the usual beads and silver charms I use. I love the textile element and I've used lots of my favourite aqua and mustard. I'm just not tired of this colour combination! p.s. I only bought one pony charm (why? why?) so there is just the one pony necklace.
I hope I've tempted you to visit my table at City of Craft! I'm going to be inside the theatre in front of the stage steps close to my spot last year. If I have time this week, I'll show you another sneak peek. In the meantime, here's all the info:
City of Craft 2010
December 18 & 19, 2010
Saturday 11:00am-7:00pm
Sunday 11:00am-5:00pm
$2 Admission
Toronto's annual indie craft fair is back and better than ever. 50 vendors! A neighbourhood full of related art and installations! Free workshops and demos! Surprises!
This is the finished yarn that I made with the merino I dyed
recently. I divided the top into 5 parts lengthwise, then pre-drafted a little bit. I was trying to spin thicker yarn than I've been spinning lately, and to spin it thick and thin. But it turns out that once you've been spinning for a while it starts to get a bit automatic. So this yarn turned out thinner than I planned and more even.
You can see the thick and thinness in the picture of the single above..
And this is the result. When I first started to spin I really wanted to spin thin yarn, but it can be time consuming and I thought it would be nice to have a thick single with this yarn. Anyway, as the single turned out a bit thinner than expected I ended up doing a 2-ply after all.
I kind of like the way a yarn will kind of develop as you spin and you sometimes end up with something you didn't expect. In this case I like the way the colours blend together and I'm happy with the results.
Thank you Kristyn for the tips on leftover singles. In this case there was hardly anything leftover and I decided to just keep the last scrap of single and wash it to set the twist. I think I'll make a tiny pincushion with it or something like that. I actually like the single a lot, so in future I think I'll try keeping more of my handspun unplied.
Thank you to all you spinners who leave me tips and suggestions as comments, I appreciate every one and do always get around to trying them eventually!
This is a yarn I made a little while ago. I had to hold onto it for a bit but it's up for sale in my
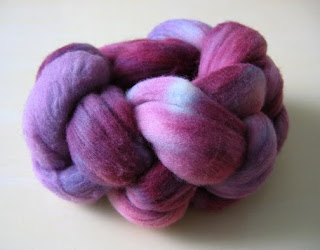
shop now. I spun it with some roving that was included with the spindle (pictured above). I wish I knew what the fibre was, because it was lovely to spin. I dyed it with a variety of purples then pre-drafted it into a nice soft big ball of roving:
This is the finished single:
Just to make it come out even I Andean plied it:
I know it looks a little crazy and maybe Andean plying is meant for smaller amounts of yarn. I do like plying with bobbins (I'm going to show how I do that soon), if I have enough yarn, but sometimes when there's just 2 ounces or so I'd rather Andean ply and not worry about having leftover singles. I find it works really well, as long as the single isn't too fine, which can cause tangles.
One new technique I tried while plying was adding little coils/spirals into the yarn by pushing one strand up while the other strand is held in place. Here's a close up so you can see the spirals:
The final effect was subtle, but I thought it turned out well, quite pretty.
the original hot pink spun on the left, the new blend on the right
I've now tried and instantly become addicted to drum carding. On Saturday I rented the Louet junior drum carder from Lettuce Knit and so far I've made lots of blended batts and reached the point where I am now rummaging around to find more things to card. It's like that.
Batts resulting from the hot pink blended with dark brown, and the hot pink blended with pale pink
So just to show you how it works, and how fun it is, I'll show you my main project. I had a 1/2 pound bag of very vibrant hot pink corriedale top that was languishing around since I didn't really like the colour anymore. It was just too bright. So I dyed some of it dark purple/brown, then blended that with the original hot pink to soften the colour. Then I blended some of the original hot pink with some very pale pink.
Then I blended the resulting dark pink and medium pink with more of the pale pink while keeping the stripes fairly distinct.
I find I use the dog brush a lot while drum carding. I use it to remove the batts with gentle short strokes so that little strands aren't left behind. You can also turn it around and use it to burnish the batt as you would with a burnishing brush. It smooths the batt down and you can make a denser batt.
The resulting batt - rolled up
The batts aren't too wide with the junior drum carder, so I've found the best way to handle the batts once they're done is to draft them out a little bit, then wind them up into a ball. Drafting out a bit helps straighten out any last little bits of fibre that aren't perfectly aligned and makes the batts easy to spin.
The last few days have been all about wool. I've done some more dyeing with Kool-Aid. I used four plain white merino 50g braids that I bought at Lettuce Knit recently.
This one is called Koi pond:
This one is called Lilac:
and lastly this one is Rusty Ship, because it reminds me of rust on an old ship:
I did two braids in this colourway (100g) so that I would have enough yarn to finish a project. I can't wait to spin these! After spinning plain brown for so long, it's so fun to be spinning colours again. I just finished spinning this corriedale braid from Kristyn of
Pleasurecraft:
into this:
Spinning 2-ply is my favourite now. I think this skein is Sport weight (around 14 WPI).
Today I've been doing some drum carding, I rented the Louet Junior drum carder from Lettuce Knit. I'll show that next!
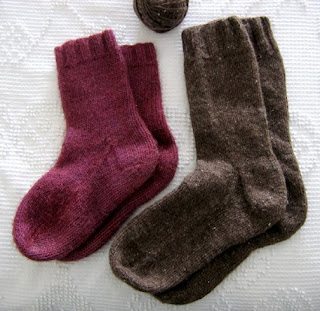
So as I mentioned before, I was frantically spinning before the holidays to make Bradley some handspun, handknit socks for Christmas. I had bought a 1/2 pound bag of roving from Romni, thinking that I would have plenty for maybe 2 pairs. Or at least a pair for him and a smaller pair for me. Or something like that.
Anyway what happened is it took
forever to spin a 1/2 pound bag, and I ended up with just one pair of socks and a tiny batch of roving and a tiny ball of yarn left over. The big thing I learned is that I bought a bag of
roving, and realized later that it was actually roving, not the lovely smooth combed
top that is often sold as roving even though it's really top. I'd heard about this distinction but I didn't really know what it meant until I tried spinning with the roving.
The difference seemed to be that the fibres were shorter, with some tufty bits that were fine as it gave the yarn a tweedy look, but also lots and lots of vegetable matter (vm). In case you don't spin, this is basically little bits of dried grass, twigs and bits of burrs that the animals have gotten caught up in their coats. Some people put covers on their sheep to avoid this, but there's still always some in there. Anyway I was picking out vm while spinning, then while winding onto bobbins, then while plying, then while knitting, then after washing the socks. Kind of tiresome.
However, I'm not complaining about what I was sold, because I did get 1/2 pound of merino for only $15. Which is a very good price for that much soft merino. And now I fully appreciate the difference between roving and top.
The other thing I learned is that this roving seemed to require a different kind of spinning. The short fibres didn't hold together in the same way so I was letting twist up into the fibre source which is more of a woolen method of spinning than worsted. (Worsted is a way of spinning so that the fibres align and it creates a smooth yarn. With woolen spinning the fibres criss-cross and this creates a fuzzier, airy yarn that is very warm. Not to be confused with worsted
weight yarn, which is a medium thickness of yarn.)
After letting twist up into the fibre, it was like pulling the yarn out, and by doing it at the right rate given how fast the spindle is spinning, you can make an evenly spun yarn. I found it a bit lumpy but I ended up doing a 3-ply so it averaged out a bit and was fine. 3-ply also creates a rounder looking yarn, as opposed to the beaded look of a 2-ply.
So doing a (non-navajo) 3-ply was the next new thing I was trying. I wound the yarn onto bobbins after spinning a full spindle, then used a tip from a commenter (thank you Rachel) to create a lazy kate using a cardboard box and some knitting needles. (Another tip is that you can just ply off spindles if you have enough of them to do that.)
Then I plied the yarn until I was left with some leftover singles (it's hard to wind 3 bobbins of singles and have them come out even). I realized I could wind a leftover single back onto the spindle and spin a bit more. And basically drive myself crazy trying to make it come out even. Which in the end I practically did. Not that I recommend being that obsessive it... suffice to say I was winding back and forth several times.
So after all this spinning (and washing and drying the yarn) I wanted to make the socks using the same
nice sock pattern I had used for mine (pictured at the top on the left). This is how I adapted the pattern for men's socks:
- Larger needle: US size 7&nb
 The locks all combed and ready to spin, just as soft as they look in the photo. A winter nest anyone?
As promised, here's a post about how I'm preparing the fleece I bought at the Royal Winter Fair. This is the fleece as it arrived home in a big shopping bag:
 I even got to keep the 1st place ribbon this fleece won!
Fleece from: Ann Moffat in Schomberg
I've done a lot of reading lately on how to do this. I've ordered lots and lots of library books on the topic and read them pretty much cover to cover.
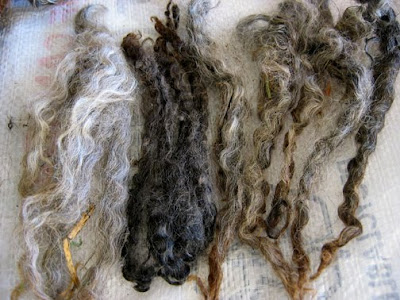 The locks in this fleece range in colour from pale silvery grey to very dark brown/black (pictured in the 2nd lock photo)
Once the locks are washed they needed to be picked apart before putting them on a drum carder. Then the drum carder combs the fleece into a batt which can be divided into roving so that it's ready to spin. You can also use drum carders to blend a variety of fleeces together. I'd like to try one sometime, but for now they're out of the budget at hundreds of dollars. In the future I may rent one.
Another way is to buy two hand carders (or mini-carders) and comb a small amount of locks at a time. Then you can roll up the fleece vertically into rolags for woolen spinning (lofty and fuzzy) or roll it up horizontally to make roving for worsted spinning (smoother, with aligned fibres). You can also use special sharp combs to comb out long locks.
The last way, which is the least expensive, is to just use a flick brush to comb out each lock. A dog brush works just as well, and that's what I have. As usual I'm trying to do things the simplest way I can without too many fancy tools, so that's one of the reasons I chose a fleece with well-defined locks so I could prepare it this way.
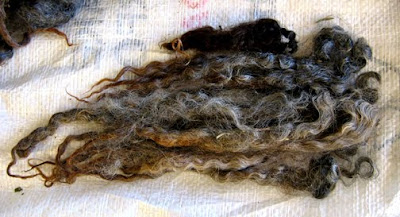 The locks vary in length, I've started working on the long (medium gray) ones
After flicking, I place the locks in a basket always aligned the same way
 In case you hadn't noticed, I'm completely obsessed with spinning right now. It's a shame because I'm already a jack-of-all-trades and I really didn't need yet another craft to keep me busy. But there you go, it's something I can't help.
Anyway, here's something I've just learned. Navajo plying on a spindle! Before I finished the candy cane yarn I posted recently, I had finished spinning a single from the first batch of roving that I dyed with red, pink and green.

I forgot to take a picture of the single. I wish I had because it was incredibly fine. It took days to spin. I actually began to regret spinning it so fine, but decided to finish so I could see how it would turn out.
After reading a comment on my blog about Navajo plying, I looked it up and tried to discover if I could do this on my spindle. Thanks for the suggestion Rachel! I thought this would be a good solution for this yarn because I had spun it so fine that it would have been difficult to wind it in an Andean bracelet and it would have gotten really tangled. (I've learned I could wind it onto a nostepinne, but I don't have one yet.)

So here's what I've learned about Navajo plying on a spindle (with a reminder that I'm hardly an expert at this point):
What is Navajo plying?Navajo plying is essentially the same as creating a crochet chain, but with long loops. As you pull the loop through, the two strands it creates combine with the original single strand and you spin all 3 to ply them together.
Why bother?The benefits are that in the end you have a 3-ply yarn that maintains the colour sequence in your single. Also, as with Andean plying, you use every bit of your yarn and don't have to try to divvy up yarn into equally sized balls to ply together.
How do you learn how to do this?I figured out Navajo plying after watching
this video and
this one (and a few others) a few times. Then I had to think about exactly how I would do it on my spindle.
My big confusion was about what happens to the "knot" in the chain. The answer is that it is there, but it can hide a bit behind the twist. This is one reason though, why you might want to make longer loops. Longer loops = fewer "knots". However, the length of the loops also affects the way the colours blend together.
0 Comments on Navajo plying on a spindle as of 1/1/1900


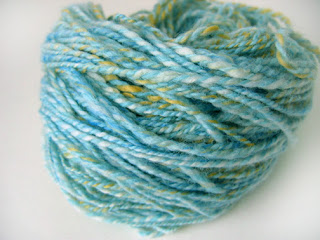


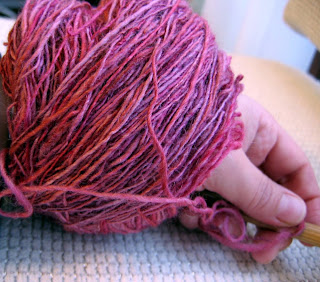






Gorgeous colour!
Very pretty yarn. I have a niddy noddy made from PVC and fittings. I intending to cut more center posts for it for the different sizes. Maybe I should just figure out what size is easiest to wind off the back of a chair and cut a piece for that size. :)
so lovely! once again, it is nice to see the results of collaboration!
oh wow! love the yarn, so pretty! and the baskets-very fun. will you be making them for the shop?
have a super weekend :)
Thanks Andrea, I have put handspun in my shop a couple of times, but I've found it's hard to price as each skein takes a few days! So I usually hoard it for myself :)
But I do use it for my crocheted pincushions which are in my shop.
I may put some bowls in sometime but I had a look and it turns out there's a quite a few talented felted bowl makers on Etsy already!