new posts in all blogs
Viewing: Blog Posts Tagged with: Planning, Most Recent at Top [Help]
Results 26 - 50 of 103
How to use this Page
You are viewing the most recent posts tagged with the words: Planning in the JacketFlap blog reader. What is a tag? Think of a tag as a keyword or category label. Tags can both help you find posts on JacketFlap.com as well as provide an easy way for you to "remember" and classify posts for later recall. Try adding a tag yourself by clicking "Add a tag" below a post's header. Scroll down through the list of Recent Posts in the left column and click on a post title that sounds interesting. You can view all posts from a specific blog by clicking the Blog name in the right column, or you can click a 'More Posts from this Blog' link in any individual post.
Last week, my publisher sent another big batch of draft spreads through for my Sketching People book. It's so exciting to see it coming together. It has been a very interesting learning process. It's so different to writing a picture book. Okay, there are an awful lot more words, of course, but that's not really what I mean. It's the process which is new.
Organising all my ideas was probably the biggest challenge and that is behind me now. All the text has been created to fit within specific chapters, each of which is subdivided into spreads - remember the Flat Plan? I have never worked in that way before and it has been interesting to watch how the plan has evolved as we've gone along. We are onto our 4th Flat Plan now.
About half of my text was generated by that process of organising my ideas, the rest revolves around specific sketches, selected from my archive of sketchbooks or from guest artists, chosen to help underline particular teaching points in the plan. Those decisions have been mine, but made with the advise and guidance of the editorial team at Quarto. As with any publishing project, it is far more of a team effort than it appears from the outside.
The bit where the rest of the team have really come into their own though, is with the design. I have written my text and chosen my sketches, spread by spread, concentrating on informative content, rather than how it will look. Now all that has to be organised visually, placed on the page in a way which is both clear and (hopefully) gorgeous to look at.
The sketches in these layouts are still using mostly my quickie photos by the way, which is why they are horribly grey. The gleamy, high res scans will be dropped in next, which will look better still:
A batch of initial layouts, for a small section of the book, came through back in March, but my team at Quarto are working on many more books at once than I am used to with picture books, so there has been quite a long gap, where I have been waiting my turn. Now though, things are really motoring.
This new batch is about a third of the book. I went through them last week, adding notations for changes, then we talked it all through on the phone.
You can see from the layout above, that sometimes there are greyed-out areas, where images are to be dropped it later. That's because I have yet to do the filmed sections. Yes... filmed! It's all a tad daunting: I will be filmed in action, then stills will be taken from the film, to use as step-by-step illustrations, in sections like the Colour Before Line step by step I showed you a while ago. Sometimes that's the only way to create something in stages: as with the section above, which is about drawing motion.
Anyway, still some bits to work on as a result of these layouts, so better get on.
Yes, it's definitely a bit of a monster, scanning all the artwork which I have selected from my archive of sketchbooks. I haven't counted how many individual sketches I have picked out to go into my urban sketching people book, but it's quite enough to keep John and I busy.
Originally, we had thought that John would do all the scanning for me, but I am working on the computer so much at the moment that he's having trouble getting sufficient time on the scanner.
So we tried a bit of teamwork this week, which really speeded things up. I found the low res version of each of the images on the computer, which was tagged with a reference number to remind me which sketchbook it was in, then John ferreted through the sketchbook piles to find the right book...
...then he flicked through the book to find the sketch. We had marked the possibles with post-its right back at the beginning of the project, so that helped too:
John held the sketchbook down flat on the scanner bed for me, while I set the scan parameters, then saved and filed the final file, while he was trying to find the next one in the sketchbook piles. All very dull, but it's got to be done (and over 400 times...).
Then of course, I still had to spend a while on each of the images later, correcting the tonal balance and touching up anomalies, like unwanted marks which had transferred from the opposite page or other sketches showing through from the reverse. I also have to get rid of unwanted text - my publisher is keen to remove any text that is not essential, so it doesn't create problems with co-editions.
We've made a fair old hole in the job now and I feel much better for it. I was originally going to wait until all the layouts were back, so I would know for certain that all the sketches I have chosen are in fact going into the book. It's possible that, by doing the scanning early, we have scanned some artwork unnecessarily, but I was getting a bit concerned, as time is passing and the deadline is looming. It's one of those tasks - very hard to know if you've allowed enough time for it, because it's impossible to judge how long you'll need. At least this way, hopefully I won't get caught out!
I have now officially finished the text of the new book. Hurrah!
Judging on the response to what I have been submitting over the last 6 months, we probably won't be changing the text that much - more tweaks that re-writes I should think - but that doesn't mean I'm done. There will still be a little jiggery-pokery with my image choices, once the layouts have all been designed, and there's also some new artwork to create specifically for the book (like the 'colour before line' step-by-step I did for the original presentation for the US co-edition).

The other big job that's left to do is the scanning. So far, we have been working with low-res images: either the photos I took of my tagged sketchbooks, or low-res scans lifted from the website. All those images now have to be located in the original sketchbooks and scanned at 300ppi, ready for print. John is helping with that, but I still have to go through all the scans individually, tweaking things, as my scanner picks up a lot of 'background noise' like paper texture and sketches coming through from the other side, much worse than you see with the eye.
Unfortunately there's another issue too. In 2010 I was rather into digitally tinting my pencil sketches, like this one of my new shoes (a reward after the first op I had on my poor feet). This means that there is another job for some of the scans from that period: because I was only playing, not consciously creating 'artwork', I only tinted the low-res scans I'd made for my website. Now that I want to feature some of those images in the book, I am having to create the coloured versions all over again.
This image is going into the 'drawing feet' section, because of the way the shoes are sculpted through shadow and highlights. Above is the new high-res scan of the original sketch, with a not very white background.
Once I had played with it in 'Levels' in Photoshop, it looked better. I moved the date across to the right a bit while I was at it, so it would better balance against the text (even though I suspect that the publisher will crop the text off this one):
Better. But the line-work in the old, tinted version was beefed up a bit and given a slightly blue tint, to help it to hold its own better against the colour, so I altered my new scan the same way (Photoshop is wonderful - how on earth would we have done something like that before?):
Then I painted the colours on a layer beneath the line work. The result was the sketch at the top. It was quite therapeutic actually - a nice bit of colouring in, with guaranteed success, so no brain power needed.
Sadly, those lovely red shoes have now bitten the dust. I did very recently buy myself another pair of bright red shoes though, so all is well.
I finished a chapter on my May Days project and started a new one. I also did some planning for the next two chapters. That's new work instead of revision. Hurray. And it's new work on my major goal for the year. Hurray, hurray.
However, I'm not working very much. Definitely wasting time. I got off to a bad start this month because I was traveling the first three days, and then had days during the next week when I needed to deal with family. So while I have worked all but two days this month on the May Days project, I often was working short amount of times because I only had short amount of times. Staying on that task under those circumstances seems like a very positive thing. I may, though, have gotten used to working like that. Except for two small administrative things, I only planned to work on the mummy book this week. But instead of committing big chunks of time to it, I figured, "Hey, I can finish this chapter easy," and dragged the work out.
Next week, I'll try to step up the pace. I do planning for the week on Monday. I'll plan to do more than just working on May Days this week and see if that will help keep me moving.
I have come up with a new idea that I thought I'd share with you...
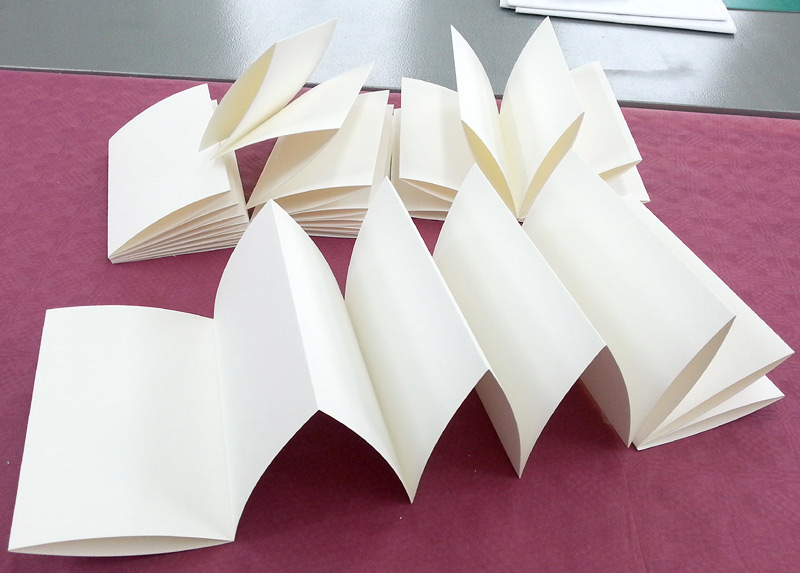
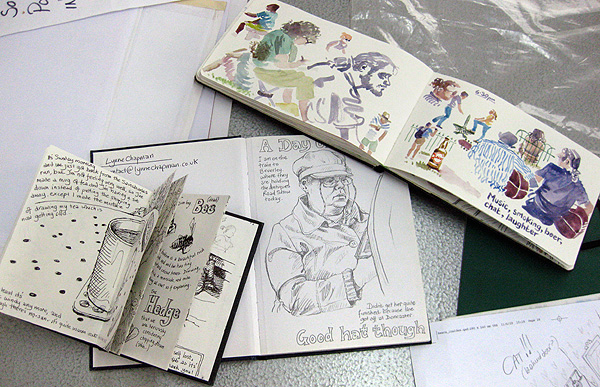
At the back of my mind, I am preparing for my up-coming residency with The Morgan Centre in Manchester, thinking about the art materials I will need and how to make things run as smoothly as possible. I have tried out my new concertina sketchbook design and am satisfied that will work well. There is one drawback to concertinas though - in order to make one page flow into another, you often need to open 3 pages at once, which means the paper is wider than the book and you have nothing to rest on. It can all get a bit cack-handed!
While I was thinking about this, I got a tip from another sketcher about water pots, which I thought might improve upon my hairspray-lid system (which does impinge upon my palette's mixing space). My friend suggested using the little, metal clip-on container that oil painters use for their linseed oil and white spirit. Sounded good, so I bought one. Trouble was, when I tried it out, there was no excess on my sketchbook to clip them to.
As it happens, these two problems have a common solution. I cut up one of those plastic folders you buy in stationers and created a sheet of plastic just over an inch taller than my concertina book and about half as wide again. This provides somewhere to clip the water-containers, while also providing an extended back-board to rest on:
The plastic is really light and flexible, so won't be a nuisance to carry around, but with the aid of the sketchbook cover, it is still stiff enough to support the water. I'll be able to tuck the plastic into my bag with my sketchbook and clip it on when I am working:
I've yet to give it a test-run, but it feels really comfortable. As you can see, the plastic doesn't extend quite as wide as 3 sections of paper, but doesn't really need to - that width is enough, because the 140lb watercolour paper is sufficiently stiff to support itself for the little bit of overhang. I didn't want to create something that would be too big and awkward to fit in my bag.
It's hard to believe that the end of the school year is already in sight. In the schools I where I currently work, mid-June is the end of the year--that's just four weeks away!
That means it's time to begin planning for next year!
I have been writing a section from the beginning of my book, discussing different art materials and looking in detail at the kit which I carry and why. Getting your personal kit-bag sorted is important, because you don't want to be fussing about what to take or leave behind, each time you go out. It's difficult, because we all know what it's like to want the very thing you left at home.
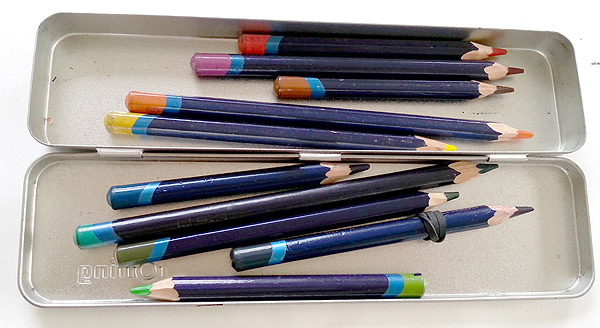
Nevertheless, you need to make decisions and pare things down. It's good to travel light, otherwise you aren't able to carry your kit with you 'just in case'. I have 3 versions of my kit. The slim-line version is just my trusty Sailor pen and an A5 - A6 book, which you don't even notice you're carrying. I tend to have these in a pocket most of the time, because you never know.
The next step up is to add my watercolour pencils, a waterbrush, a sweat-wristband (for cleaning the brush) and a knife. That's my medium kit and a good on-the-train kind of size: enough to see me though the odd hour here and there.
My full kit, for sketching day's out, is still pretty compact as I hate being loaded down. All the art equipment packs up into a zipper bag, the size of the average toiletries bag, which slips easily into a large handbag, along with a sketchbook or two.
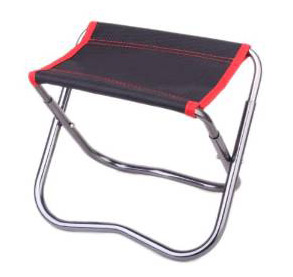
If it's an urban day, I usually pop my mini-stool in my bag too, so I don't have to look for benches or doorsteps. It weighs nothing and fits in a large handbag:
If I'm going rural, this foldaway sitting-mat from a camping shop is way better, because of uneven ground:
I have had to unpack my full kit this week and photograph every individual element for the book. This is because I want to dedicate a spread to peering inside my kit-bag, with pictures of everything and annotations, telling people exactly what each item is and why I have chosen it. I photographed 28 different items like this:
My snaps are not the photos we will end up using, but the designers need to know what everything looks like, so they can design suitable graphics for the page. Once that's done, the publisher will commission a proper photographer to take the pictures they need. In the meantime, I have been writing all the text.
If you are interested in getting some of the specific items like the Sailor or the stool, I have put together some links to where I got them. It's on Facebook here, as part of the Usk Yorkshire website.
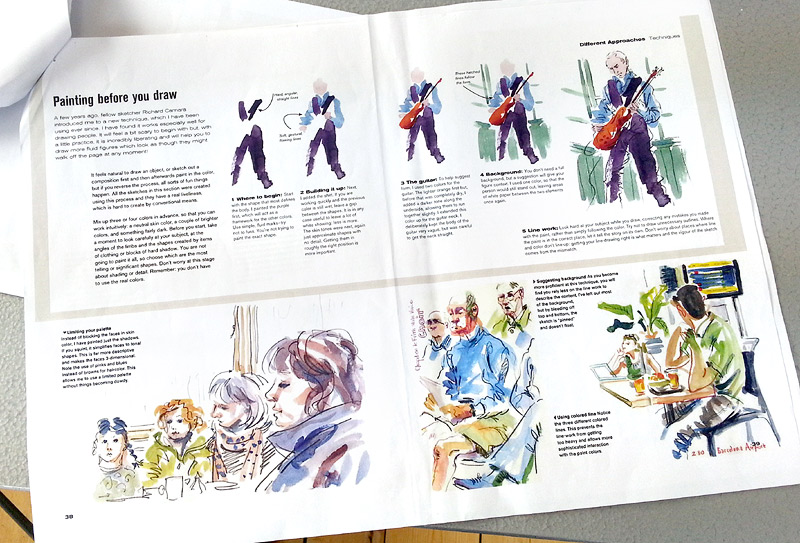
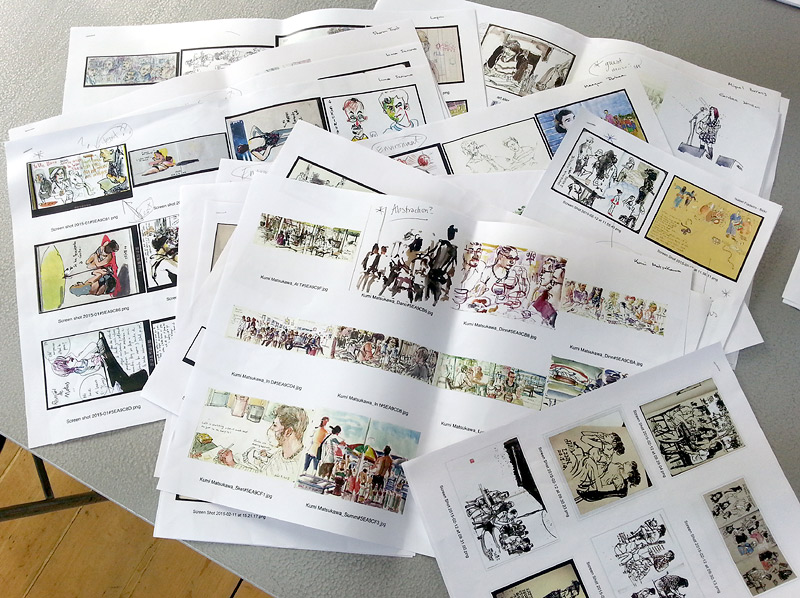
If you have been following the project, you will remember that I have a handful of spreads which are more or less finished - the ones we did as samples, to get the US edition signed up, including this painting before you draw spread:
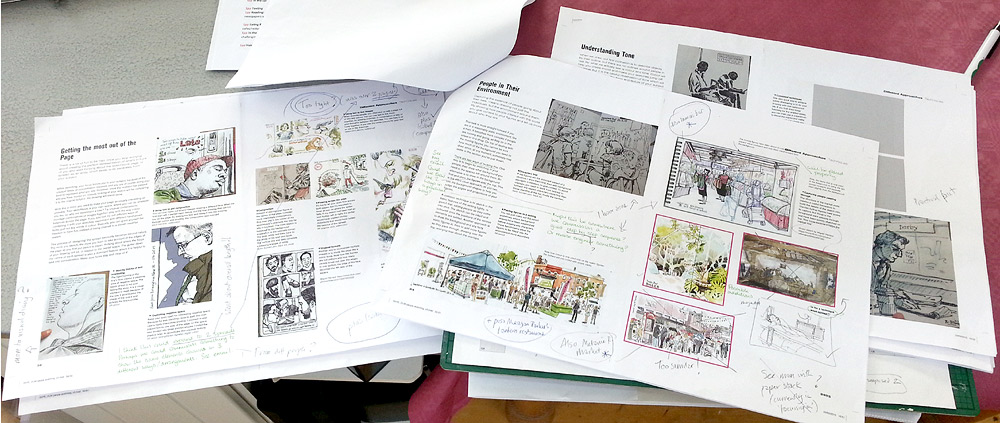
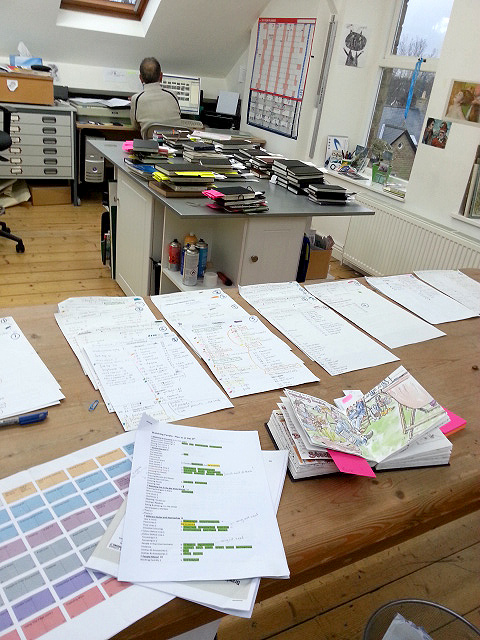
Then, at the start of the year, I sent off a good chunk of the text, along with all the images that will go with it (just photos of my sketchbook pages for now). My publisher has been working on it while I have been doing other things. About two thirds of what I submitted has now been set into very rough spreads and sent back with some suggestions for changes. I had an long phone call with my editor, where we went through everything in fine detail and I scribbled notes all over the spreads:
It's not too bad at all actually. All the text is intact without changes, it's pretty much all suggestions for either squeezing in more images or adding step-by-step breakdowns here and there.
The publisher also sent out a call for other sketchers to submit work for possible inclusion and I have sheets and sheets of gorgeous guest work to choose from. That's going to make things easier. So far, I have been trying to collect potential guest images by trawling Flickr and saving things into Pinterest.
I have mostly addressed the changes now. I just have some captions and annotations to write, to go with the added images, but I'm waiting until my suggestions have been given the green light before I do that.
For now, I have moved on and begun writing a new section of the book. This one looks in detail at how to draw specific parts of the body. We did sketching the eyes as one of the sample spreads. I took a couple of days to get my head back into things, after such a lengthy pause, but I am motoring nicely now and have already written 'feet', 'hair' and 'ears'. Still got mouths, hands and noses to do. Better get on...
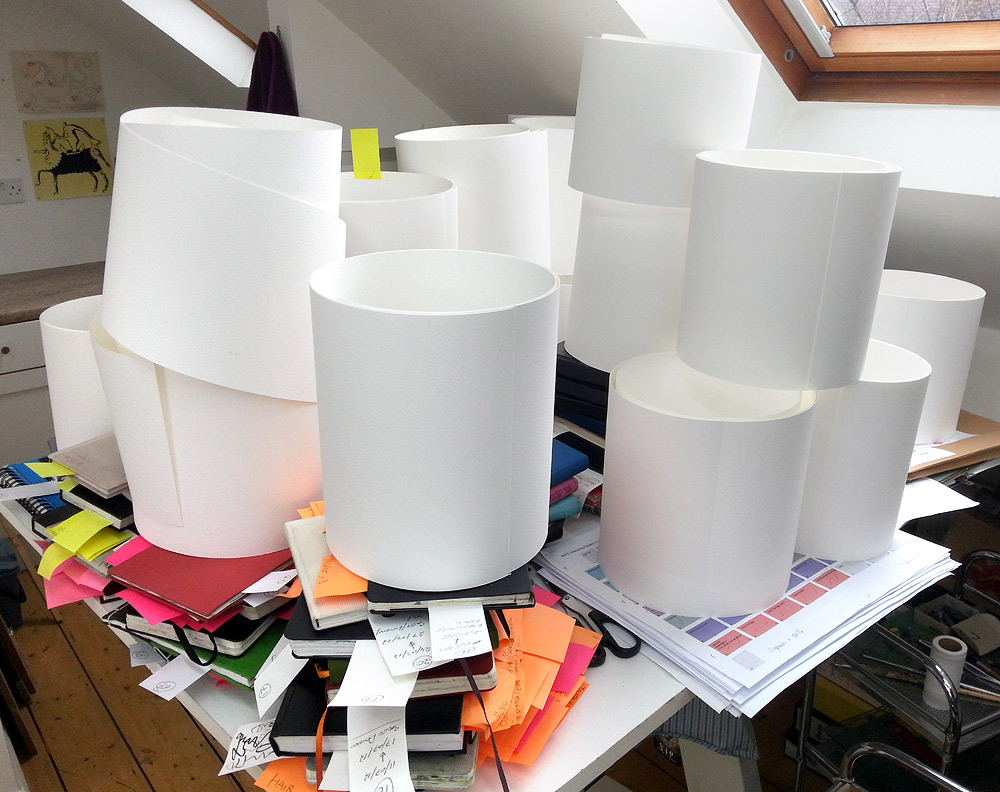
Yesterday afternoon, John and I cut up the very last section of the huge roll of paper for my concertina-format sketchbooks. It's been quite a marathon task, but I now have sketchbook paper coming out of my ears. It has mostly landed on my already full desk, where it is perched on top of all the tagged and numbered sketchbooks, which are still waiting to be scanned for my Urban Sketching book.
So, now I have to gird my lions for all the folding. The ones I folded on Wednesday have been sitting under piles of heavy books ever since. They do seem a little tamer for it:
I have folded 10 so far, so still another 25 to go.
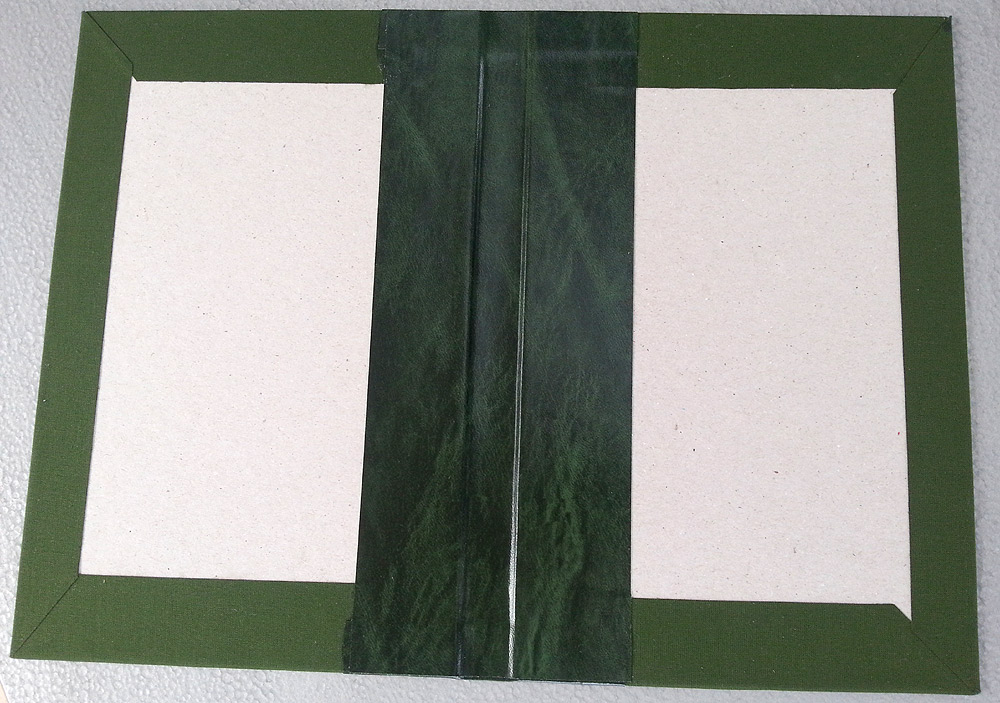
I have made a start on the detachable covers too. There are two to make, as there are two different sizes of paper. This was because the size I wanted to create didn't fit exactly into the width of the roll. Which meant that I got 30 sketchbooks at the 21.5 x 14 size, then another 5 from the 'excess' edge of the roll which were squarer, at 17.5 x 14.
I made a test one first, to fit a Moleskin-size, just to get the technique right. It worked really well. I bought some proper book-cloth specifically for this project, which was a great idea, as it cuts and sticks down very much easier than regular cloth. I also chose a snazzy print for the endpapers. This time, because I had a budget, I bought the proper stuff, rather than using gift-wrap, like I did for the Japanese bound ones:
Because the 300gsm paper folds up into quite a thick book, I had to create a reasonable sized spine for my covers, which I have done with a book vinyl. This is the inside of one of the covers so far:
In case people want to try making some for themselves, I have taking photos at the various stages to show you, but that's for next time.
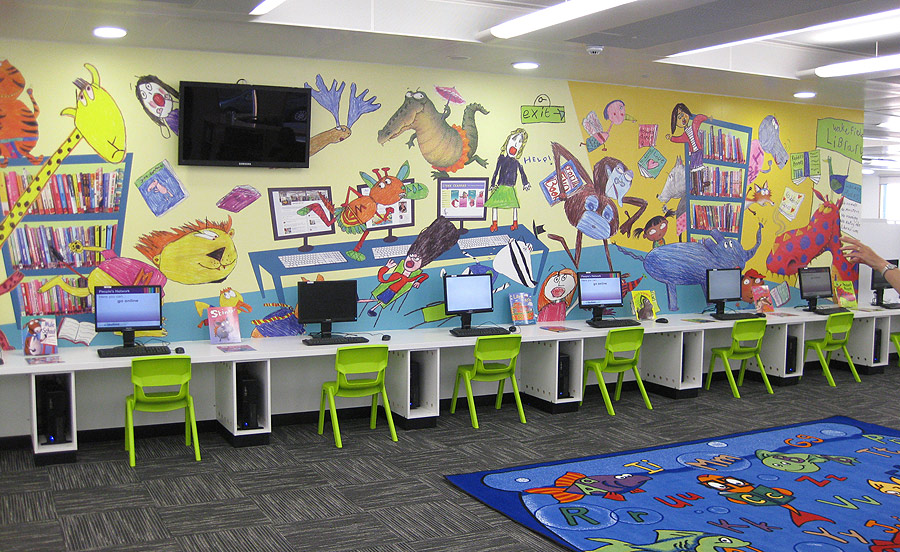
Because of World Book Day, I'm out visiting schools all this week (all over the place as usual) but, luckily, I just managed to get my mural artwork finished first. It was a skin-of-the-teeth thing - I didn't sign it off until 7pm last Friday night.
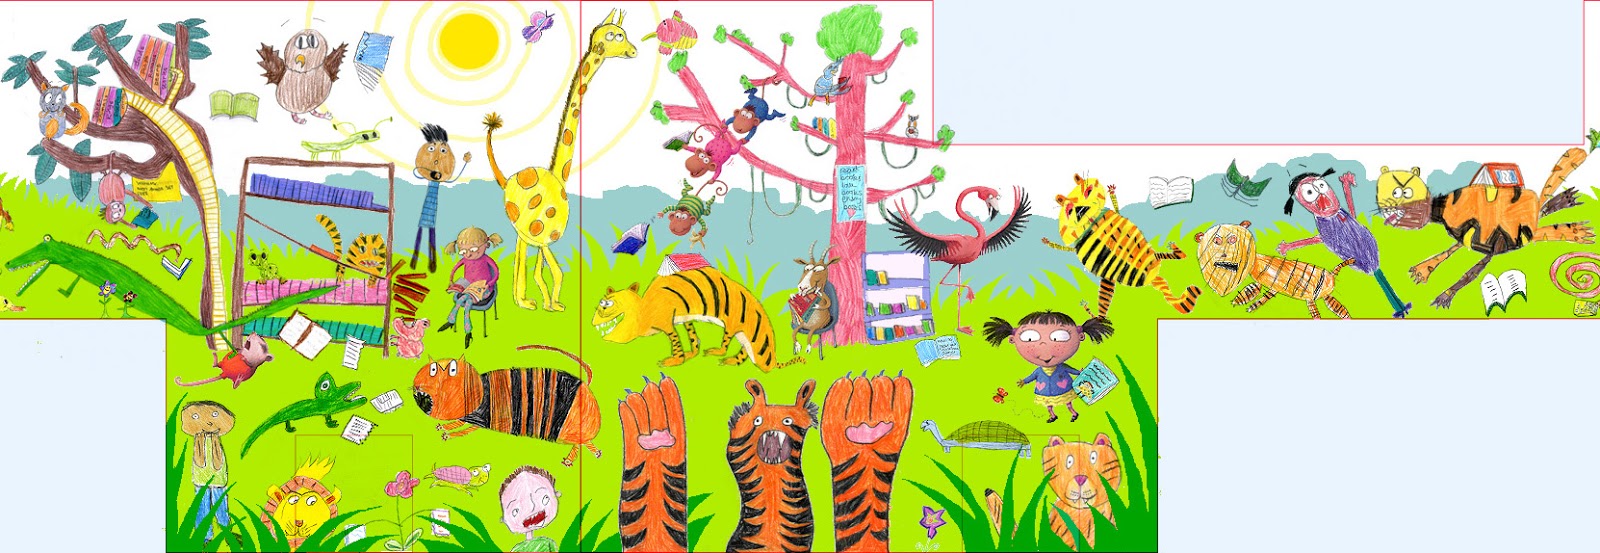
I'm enjoying being out and about again, as I have been locked at my computer for ages. The artwork stage has taken 3 weeks, working really long days mostly, but it is finally done. Hurrah! Below are the various sections, travelling around the walls anti-clockwise (ie from right to left), viewing what will be floor-to-ceiling once it's installed (though the emptier sections will be obscured by furniture):
There were so many different jobs to do and of course much of it took longer than expected - I think it's because I underestimated just how many individual characters and little objects I could cram into the huge space. Luckily, Wakefield Libraries have been absolutely LOVELY and said they will pay me for the time I've actually spent on it, rather than what I originally quoted them.
Every one of the new, high-res scans that John did of the various animals, books, trees etc had to be individually matched to their position on the low-res template I created earlier, re-sized to fit and then laboriously cut off the children's white, background paper in Photoshop.
Each component also had to have it's 'levels' balanced, to match the weight of the rest of the design, and then have extra colour added, so it was punchy enough. I even had to subtly go over some of the children's pencil outlines in Photoshop, thickening them up where they were too spindly.
And that's without all the graphic elements I had to draw for the background, like the distant forest and the various kinds of grasses and bushes.
Because I had to create the artwork in 6 sections (to keep the file sizes from blowing the brain of my computer), I also had the job of making sure the different sections joined accurately. That was a bit of a nightmare to be honest, as one millimetre's inaccuracy at each joint would obviously add up, and then the error would also be multiplied by 4, because of the artwork being 25% of the actual size. Yikes.
I was very good at remembering to 'save' all the time, not just to the computer, but also to an external hard drive, just in case any of the files decided to corrupt along the way. I got away without 'losing' anything, which is a great relief.
Then, just when I thought it was all finished, I realised I had forgotten the area of 'bleed' beneath the library's computer table! I had remembered to continue the design behind the bookshelves, so I don't know why I forgot the table. Tired I guess.
The colour boosting was the last job. I wanted to keep the mark-making from the children's colouring, so I made my final artwork translucent, then created a layer beneath the design, where I 'scribbled' half-opacity colour, so the effect was subtle and blended seamless with the children's coloured pencils. It was time consuming, but was worth it, as the boost made a huge difference. Look at the difference between the section above and part of the same section, before the extra colour:

Notice too, in some places I had to do extra tricksy things with the colour in Photoshop: look at the original colour of the desk, immediately above, then the colour it ended up.
Did you notice by the way, in the 2nd section from the beginning, I left my 'signature' on the computer screen? Sneaky huh? Actually, I suspect that most of this area will be obscured by book-bags, but I only really put it in as an after-thought.
The next stage is a final chat to the printer who will be transferring my design to wallpaper, ready to paste onto the walls. I'm a little concerned about how on earth we will manage to get things to line up where they are supposed to, what with crooked walls and wonky ceilings. For instance, all the creatures' feet, which need to be on the level with the tops of the bookshelves.
I am crossing fingers it all works out okay, as there isn't much I can do about that side of things.
Great news - Wakefield Library Service love the mural design, so it's full steam ahead.
While I was away during the first half of this week, working with under-graduates at Bishop's Grosseteste Uni in Lincoln, John was helping out back home, scanning all the children's work again, this time at high res. It is extremely boring to have to scan everything twice, but I didn't know until now which images were going to be used and at what size; the original drawings have been re-sized a lot, to make them fit together within the design.

I also decided to try and fit a Henry Moore sculpture into the design, because of his Castleford history. It makes for a good discussion point for school groups coming into the library. As I mentioned previously, using someone else's photo would raise copyright issues. I have various sketches of Moore's sculptures, but the one above, from a visit to the Yorkshire Sculpture Park is the only one in full colour. We still had to run it by the Henry Moore Foundation though, to get their blessing. Luckily, they love it and so have now been added to the invite list for the Grand Opening.
It was no mean feat trying to find a spot for Henry, but in the end I moved a bush-baby out of one of the trees (above), to create a space on a column between two bookshelves. I also popped a tiny owl (I think that's what it is) on top, which really helped to make the sculpture 'belong':
It's a bit surreal, but well, it's not as if the rest isn't! I did like the bush-baby though, so I rejigged things in another section, to make room for him in a new location. It's a nightmare though, because each thing you move has a knock-on effect. Spot the differences:
My next job is trying to find a way to work with the high res scans in Photoshop. I am working at 25% of the real size and divided the design into 6 sections, but the base layer of each section was still coming up at 470MB - still too big to be practical. So I am also having to work on just the upper part first, adding the below-bookshelf-height elements at the end.
It's still going to be a bit of an ordeal for the computer and I will have to 'flatten' the artwork as I introduce each new element, as floating layers make a file enormous and my poor computer is likely to throw in the towel if I am not extremely careful. 'Saving' really often seems like I good idea!
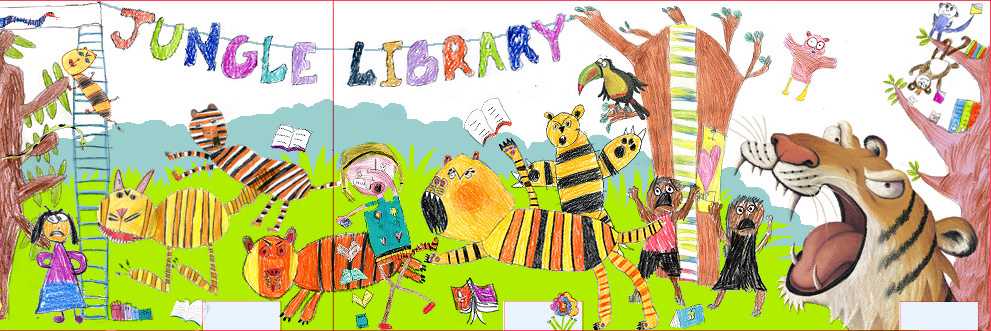
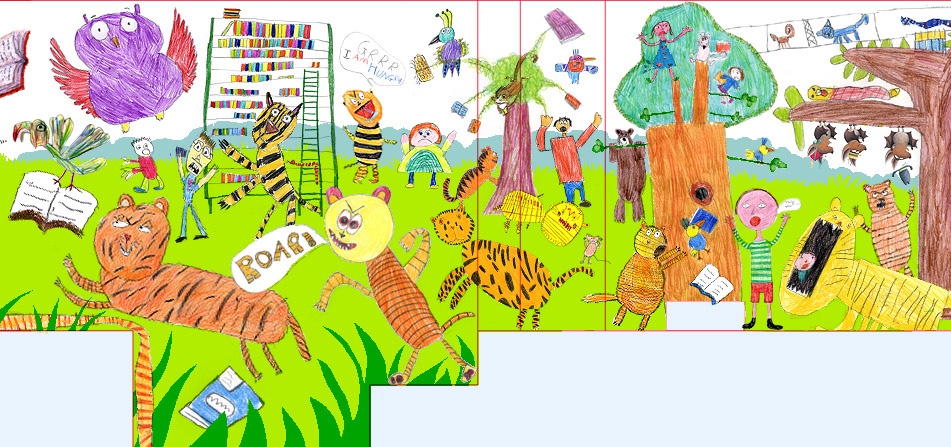
On Friday afternoon, I emailed my mural design to Wakefield Libraries - hurrah! It's looking really fun, as the children's drawings were even better this time around. This is a section from the middle:
The drawings weren't all finished and some were a bit wishy-washy, but I found it rather soothing, spending a whole day touching them up, colouring-in with my big tin of Derwent pencils. Then John helped me out by scanning everything (just low-res for now).
I abandoned my original plan of designing it in 3 sections: I needed to see the whole thing as one, with all 4 walls strung together into a long, thin template. I used the plans I drew a couple of weeks ago.
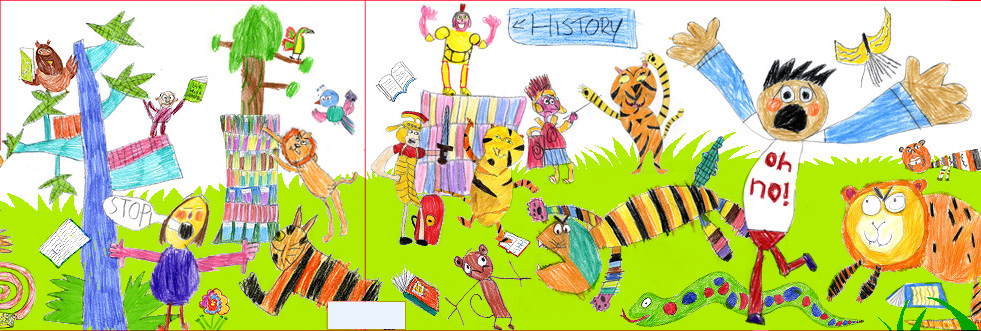
With over 100 drawings, it was hard to know where to begin. I had calm, library-like details as well as crazy, tiger-infested ones. This gave me the idea for the layout: the tigers could be bursting in from one end, so the other end would still be normal, for contrast. This is the far left, the calm end (with just the odd hint of tiger-trouble):
I established a horizon line early on, to stop things floating, and started to import the drawings, creating little groups and gradually building it up. It didn't look enough like a jungle though, so I introduced big fern-like shapes and tree-covered hills in the distance. Here are the first 2 stages:
I did my best to include everyone's work, though it got fuller and fuller! I did have to admit defeat before I fitted in every drawing, but I squeezed the vast majority in there. This is the tiger end, with my tiger from Open Wide, starting things off:
As with the first mural, in Wakefield Central Library, I was asked if I could pop some of my own characters in amongst the children's. There are quite a few dotted through this one.
Here is the section which joins onto the one above, as the tigers work their way into the library. My little trio of bats-in-hats are from When You're Not Looking! of course. I love some of the detailed and surreal shelving systems the children devised:
I hope you are impressed at how I managed to shoe-horn the Romans in. This was a requirement, because Castleford is an important archaeological site. In the end, it was a fun addition to have them bursting from the history shelves:
It was such a massive job that I had to spend all week glued to the computer, working it all out, but it was good fun and John had to virtually drag me from my chair at about 7 o'clock each evening.
I haven't yet included Henry Moore (Castleford was his place of birth), for want of a copyright-free image, but my idea was to add a hill in the background, with one of his massive sculptures on it. If necessary, I have a couple of sketchbook paintings I have done at the Yorkshire Sculpture Park.
Here's the whole thing. It should enlarge to a size you can see properly:
Cross-fingers that they like it, after all that work! I'll let you know.
It's been a while since I got the fantastic news that I have been awarded a grant from The Leverhulme Trust, to spend a year working with The Morgan Centre for Research into Everyday Lives at Manchester University, shadowing their research projects with my sketchbook in hand.
Unfortunately, because we wanted the project to span a single academic year, we set the start date as October 2015 - ages to wait when I'm so excited! In the meantime, we can at least start planning, so Professor Heath from The Morgan Centre came to the studio this week, for a meeting.
I have learnt that the main project I am working on is studying the effect the weather has on us Brits - more painting in the rain perhaps! Plus there is also a project around 'Dormant Things': objects we all own, which we don't need or even really want, but can't quite bear to throw away. Cellars, attics and bottom-drawers everywhere are packed with them.
Another couple of bits of research I might dip into are going to involve interviewing people on the streets of Manchester. One is about how people interact with public spaces and the other is looking at street fashion. That should be quite a challenge - my speed sketching will come into it's own!
I've also been commissioned separately to shadow their conference in July. The theme is 'Atmospheres' and they have some fantastic presentations booked in. It sounds like it is going to be fascinating, over and above the fun I am going to have recording it in my sketchbook. I will be co-delivering a presentation with Prof. Heath about our project and, as with the ASCEL conference, I will have a short slot on my own near the end, for showing what I have been drawing during the event and talking briefly about Urban Sketching.
Such a fun job. Can't wait.
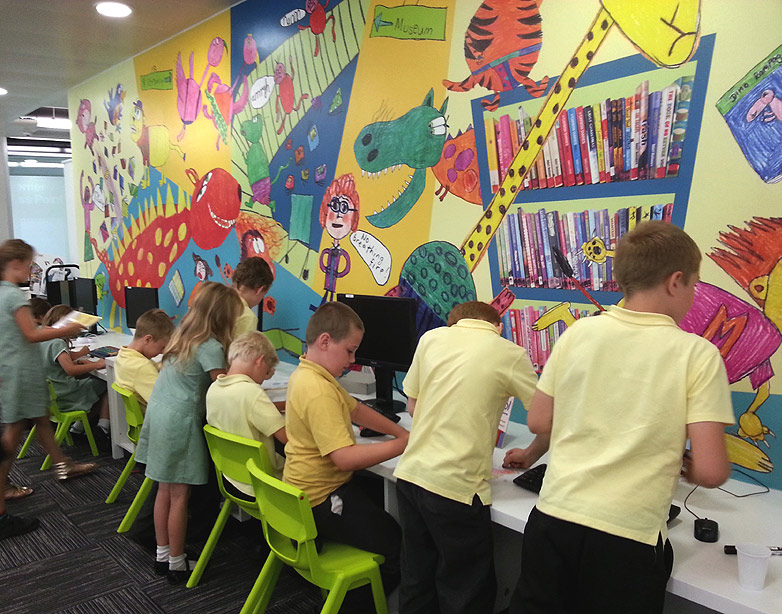
On Tuesday, the new mural was kicked off to a flying start, when I met the two Y4 classes, from St Joseph's Primary and Smawthorne Henry Moore schools in Castleford, who have been chosen to help me to create the artwork. We worked in Castleford Museum, just upstairs from where the mural will be housed. I had each group for less than two hours, so we had a lot to achieve in a short time
You may recall, I decided on a tiger theme,
because of the local rugby team and it was a small step from that to having tigers rampaging among the librarians and children in a 'jungle library'. So, I asked the morning group to focus on tigers. I demonstrated various quick techniques to help the children structure their animals and give them movement, then they were off!
They were so into it and all drew like demons for the entire time. I just love the one at the top by Riley Farrar from St Joseph's! Those that finished their tigers early, had a go at librarians. I showed them how to use body language and eyebrows to get across emotion. Not everyone finished colouring, so I will be getting out my Derwents soon!
For the afternoon session, I changed things slightly and asked children to be more general, drawing other jungle animals. We had some interesting discussions:
'Miss, can I draw a penguin?', 'I don't think you get penguins in the jungle, do you?', 'Well, how about a shark?'. Thank goodness for
Jungle Grumble, to get some idea of the animals you might actually find in the jungle!
I also asked them to think about background details for the jungle library, whist being careful not to actual colour the background, as that will of course be done digitally by me, once the design is sorted out.
The afternoon group drew me some children and a few more librarians too. Bethany has definitely got to win the prize for best librarian illustration. Look carefully and you will see that she has also featured one of the library's 'talking books':
As well as having a well known rugby team, Castleford is
an important archeological site (the museum is full of Roman artifacts, including the wheels of a chariot), so I have been asked to try and feature the Romans in the mural too. It's a hard match to the existing theme, but I wondered if a few Roman soldiers might come to life from the Ancient History bookshelves. They could help restore order and fight off the tigers perhaps. With this in mind, a few children drew Romans for me:
I did the return journey to Sheffield with a lovely, fat package of amazing illustrations. This week I have been scanning them into my computer, just as low-res images for now, so I can play around, dropping them into
the templates I created, trying to combine as many of them as possible into what will ultimately be one big illustration, rampaging around the walls of Castleford Children's Library.
Regular readers will remember the excitement of the 13m long mural I created for the shiny, new Wakefield Library, working with local school kids. To be completely honest, I was really apprehensive about taking on the project, as I had never done anything at all like it before, but the results far exceeded my expectations, so I'm really glad now that I took the plunge.
Wakefield have had such amazing feedback (hurrah!) that they want me to do another mural, this time in Castleford Library, which is having a refurb. Again, I am a little nervous. This time it is even more complicated, as it is a whole room. Also, instead of a simple (albeit BIG) panel, I have to work on the whole space, designing around bookshelves and windows etc.
How to begin?!
Well, I started by taking photos of the various walls in the space then, with a bit of jiggery-pokery in Photoshop, montaged them together to create a single flattened-out view:
So far so good.
I then asked the caretaker at the library to take his tape measure and note down every dimension. This was more complex than you might think, as I needed to know the exact size of obvious things like windows and bookshelves, but also the exact positions of objects like the alarm on the wall, the depth and width of the wall pillars, the height of the book-bag rail, the desk...
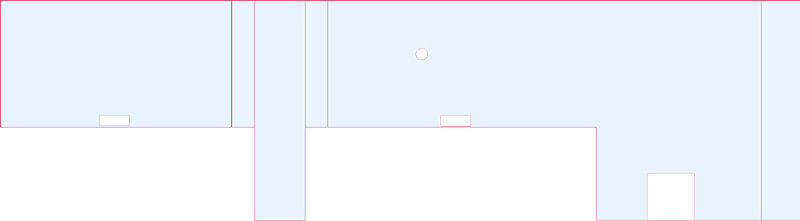
To organise that information into something that made sense, and thereby minimise the number of mistakes I was likely to make, I plotted all this information on top of the photo in Photoshop:
Then the even more fun job: I had to create a scale drawing of the space to act as a template: the shape to design the illustration into.
This is where it gets complicated, because the space is obviously VERY big. Eventually, I will create the high-res, digital artwork at 25%, but that's still going to mean working with massive files and, to stop the computer taking it's ball home, I will chop it up into 6 sections. Designing something in 6 bits is near impossible, so I am doing the designing at 10th size, so I only have to work in 3 sections.
This is what the template for section 1 looks like (the left third). You can see the pillar between the first 2 bookcases, the alarm and the first computer desk:
The next step is a bit more fun - a couple of illustration workshops with Y4 classes from local schools, to generate the children's drawings which I am going to build the design around. The workshops are tomorrow and the theme is: tigers loose in the library!
Today, I continue our Teaching Authors “What Are We ‘Plotting’ for 2015?” series. Deadlines loom for two educational publisher projects as well as a couple other things I hope to accomplish soon, so I promised myself I would keep this short. What I’m plotting is mostly more of the same: more writing, more submitting, and—this is the new part—more sticking my neck out.
On the first of the year, I wrote about my schedule for 2015. I blocked out more time to exercise and added in some time every week to focus on long-term goals. I have been walking more, which is good for my writing because something about the rhythm makes me think differently. I find myself jotting down notes and dictating text messages to send to my email. When I get home, surprise! Ideas!
 |
| my walking companion, Bea |
One way I hope to stick my neck out is by participating in Poetry Friday more often. Today, I posted a
poem on my blog in response to a challenge
Joyce Sidman issued last week in an interview with Michelle Heidenrich Barnes on
Today’s Little Ditty: a “Deeper Wisdom” poem, modeled after Joyce’s thoughtful “What Do the Trees Know?” in her gorgeous new poetry collection,
Winter Bees & Other Poems of the Cold. I really enjoyed the process, especially with such an inspiring model poem.
I’m also researching editors and trying to submit more manuscripts more regularly. I’d love to participate in conferences. And my web site desperately needs updating. I’d better get to work!
JoAnn Early Macken
P.S. Today's Poetry Friday Roundup is at
Live Your Poem. . . with Irene Latham. Enjoy!

As Mary Ann Rodman suggests, there is plotting and there is planning. But sometimes, especially when one reads and writes historical fiction, there’s the wibbly wobbly, timey wimey stuff.Historical fiction is the coming together of two opposing elements: fact and fiction. The controversy is grounded in conveying the ‘truth’ of history. Other popular genres have distinct rules that govern basic premises. Dystopian fiction, for example, features a futuristic universe in which the illusion of a perfect society is maintained through corporate, technologic, or totalitarian control. Using an exaggerate worse-case scenario, the dystopian story becomes a commentary about social norms and trends.
But, historical fiction defies easy explanation. For some, historical fiction is first and foremost fiction, and therefore anything goes. Others condemn the blending of invention with well-known and accepted facts, and consider the genre a betrayal.
Perhaps a better way to understand the genre is to take a lesson from The Doctor. Yes, that Doctor: “
People assume that time is a strict progression of cause and effect…but actually, it’s more like a big ball of wibbly wobbly, timey wimey stuff.” Perhaps the same thing can be said of plot and the historical fiction.
In historical fiction, setting is usually considered ‘historical’ if it is at fifty or more years in the past. As such, the author writes from research rather than personal experience. But as an old turnip, my personal history dates back to the years prior to Korean War. The Civil Rights Movement, the Freedom Riders, the Bay of Pigs, the JFK Assassination, the Landing on the Moon, and the first Dr. Who episode are not some fixed points in history but a function of my experience. Yet, for the last generations, these are often just dates in a textbook. And the plot is a linear expression that begins on a certain date. The award-winning book, The Watsons Go to Birmingham by Christopher Paul Curtis (1995), depicting the Birmingham, Alabama church bombing of 1963, is often listed as historical fiction. Yet I remember vividly watching the events unfold on my parents’ black and white television.
Defining the ‘historical’ in 'historical fiction' is a bit wobbly, depending upon the age of the
researcher and author. Historians work within a broad spectrum of data-gathering, gathering volumes of primary sources coupled with previous research. They use footnotes, endnotes, separate chapters, appendixes and other textual formatting to clarify their observations. Plotting and planning resemble Vinn diagrams and flowcharts, looking similar to the opening credits of Doctor Who as the Tardis moves forward and backward in time. But the artistic nature of historical fiction presents several challenges in books for children. Events must be “winnowed and sifted”, as Sheila Egoff explains, in order to create forward movement that leads to a resolution. Authors choose between which details to include, and exclude, and this choice is wholly dependent upon the character’s goal. More important, resolution rarely happens in history. The same with happy endings. Because of the culling process, critics often claim that historical fiction is inherently biased.
Yet, nothing about history is obvious, and facts are often open to interpretation. Once upon a time, it was considered factual that the world was flat, that blood-letting was the proper way of treating disease, that women were emotionally and physically incapable of rational thought. In 1492, Christopher Columbus sailed the ocean blue, but he didn’t discover America. In fact, some would say he was less an explorer and more of a conqueror. History tends to be written by those who survived it. As such, no history is without its bias. The meaning of history, just as it is for the novel, lays
“not in the chain of events themselves, but on the historian’s [and writer’s] interpretation of it,” as Jill Paton Walsh once noted.
Some facts, such as dates of specific events, are fixed. We know, for example, that the Battle of Gettysburg occurred July 1 to July 3, in 1963. The interpretations of what happened over those three days remains a favorite in historical fiction. My interpretation of the battle, in
Girls of Gettysburg (Holiday House, August 2014), featured three perspectives that are rare in these historical fiction depictions: the daughter of a free black living seven miles north from the Mason-Dixon line, the daughter of the well-to-do local merchant, and a girl disguised as a Confederate soldier. The plot weaves together the fates of these girls, a tapestry that reflects their humanity, heartache and heroism in a battle that ultimately defined a nation.
Critics and researchers can be unrelenting in their quest for accuracy. The process of writing historical fiction, like researching history itself, is neither straightforward nor a risk-free process. As the Doctor tells his companion, and in so doing reminding everyone, through those doors...
“… we might see anything. We could find new worlds, terrifying monsters, impossible things. And if you come with me... nothing will ever be the same again!” Bobbi Miller

Happy New Year, readers. I hope you had a wonderful holiday season that included reading some of our favorite books from December. (Too much to hope that much writing went on. At least not at my house.)
So we are starting off 2015 with a discussion of plotting a story.
Uh-oh. Houston, we have a problem.
I don't plot my stories. Ever, So if you are hoping to learn how to plot in this post, you can stop reading now. One of the other TA's will tell you everything you need to know in the following weeks.
I'm here to tell the rest of you still reading, it's OK to not plot.
I have visceral reaction to anything requires plotting. Anything that has to be done in specific sequential steps, sends me over the edge. Cooking, math, putting anything together with instructions. I'm awful at all of those things. A couple of years ago, when educational testing discovered that my daughter has the same difficulty I learned this had a name...something like "difficulty with executive reasoning." (Which I suppose means I'll never be President...but I digress.) Sometimes dessert should come first. I almost always read the end of a book first. Working from step A to step B to step C just doesn't work for me. Never has.
I was the student who wrote the term paper first, then the outline. When I was first trying to be a real writer (as opposed to that seat-of-my-pants writer I had been as a teen and young adult) I discovered that some real writers outlined everything they wrote as a first step. This news was so discouraging I stopped writing for several years, because obviously, I had been doing it wrong.
Of course, that didn't last forever. I went back to writing in the same old any-which-way-I can (including out of sequence) method. I did learn a few things. I learned to plan before I wrote.
Planning and plotting are not the same thing. Plotting is knowing what happens first, then next, then next and at the end. I never know more than one of those things before I start writing. I've stopped worrying about it. Planning is knowing what you need to know before you type that first word.
I've mentioned before that writing the minute you get a good idea is not usually the best thing to do. You need to know your characters before you write about them. Who can you write about more successfully? Your best friend or someone you talked to for five minutes at a party? You should know your characters as well as you do your friends before you write about them. That's the first step in my Plan.
Because once a librarian, always a librarian at heart, I think about what I don't know but should for my story. Do I need to research a geographic area? A time period? Speech patterns and slang for a particular area? A disease? A career that I know nothing about? Now is the time to get as many of those answers as you can, before you start writing. What is more frustrating than reaching page 100 and discovering you are missing a chunk of important information. (This will happen anyway, but not as much if you do it upfront.)
This is also the time I pick my Imaginary Reader. Imaginary Reader is the kid I envision reading my book. Imaginary Reader sits next to me while I write. Is IR a girl or a boy, or both? How old? Do they like to read or not? What about my story would interest them? (Actually, I should probably come with my IR first. See? That old executive reasoning problem.)
So if you are not a Plotter, fear not. You can be a Planner. It's worked for me so far.
Posted by Mary Ann Rodman
Hi folks, a brand new shiny year! Love it! I hope that you are making goals and opening up to new possibilities. Fold up all those disappointments and failures. Take anything you learned from these experiences and move on. Look forward. Huzzah!
In January, I always explore one of my great passions and that is novel craft. I'm a novelist at heart. My first published book was PLUMB CRAZY. It was out from Swoon Romance in June 2014, but is going away soon. Cancellation--just like so many fantastic TV shows that get cancelled (cough, Firefly), so goes my book. C'est la vie.
Don't despair, you who hunger for a paperback of PLUMB CRAZY to hold. I am going to self-publish the book for anyone who is interested. It's going to take a little time to put that together, but the book should be ready to be a summer read again. :) Thanks to all the people who have supported this first novel publishing effort of mine! Galaxies of stories are ahead!
Anyway, onto to novel craft. I am an extremely visual person. I see three dimensional landscapes in my head. I also write in many genres and find that the skills I use in one genre inform me as I approach a different genre. These skills serve me well. Writing picture books helps me write novels.
When I write a picture book, I write the text and then I write what is going on in the picture. From an absolute telling perspective, I write what is going on in the scene before I actually write the text for the picture book. I do this for every page. It turned out that this is an effective technique to write novel scenes, especially ones I'm stuck on. I just tell what is going down in the scene in a fat paragraph. When I'm finished I write the scene with that word picture I created in the back of my mind. Writing the scene rolls out a lot more smoothly.
Picture book structure helps me plan the structure of my novels. Picture books have the same beats as a novel but they come much faster. I make sure that my novel has clear beats that echo picture book structure. What is a beat? Plot points, turning points, plot twists. If you are having a tough time figuring out if your novel has a decent story arc. Study a few picture books. What launches the action? How does the mc react? What happens at the midpoint? How does the action rise? What is the climax? How long does it take the story to resolve? All these questions and a picture book in hand should send you on your way while writing a novel.
Well, there is a tea cup of usefulness for your creative journey. I hope you come back next week for more Novel Craft.
Here is a doodle. :) PINK
Robert F. Kennedy
Most - if not all - contemporary stories are modelled around Joseph Campbell's classic 'Hero's Journey', which he says represents ‘the pattern that lies behind every story ever told’. It’s a pattern that maps both outer journeys and inner, spiritual journeys.
Joseph Campbell created this mythic pathway by travelling the world collecting myths from primitive cultures. He discovered that all myths had certain sequences of actions, or stages, in common.
Typically, The Hero’s Journey follows the protagonist’s progress as he/she crosses the threshold from the known world into the unknown. The protagonist then faces various challenges and meets archetypal characters who perform specific roles. Typically, the hero confronts a dragon or the equivalent, and either dies or appears to die in order to be resurrected. He/she may then receive a gift, which they take back to the known world to benefit humanity.
Personally, I wouldn't advocate crafting your story according to a formula like this - but it's fascinating how (even without intending it) when a story 'works' it does seem to follow this pattern.
It can be helpful, therefore, to superimpose this pattern onto our stories at the first draft stage and ask ourselves the following questions:
Have we established our protagonist in the 'ordinary world' before we turn their lives upside down and make them venture out into the 'unknown'?
Does our protagonist need to meet a mentor - or gain wisdom from some other external source - in order to help them on their journey of transformation?
What is the 'dragon' that our protagonist has to face? Is it something or someone outside themselves? Or might the dragon be their own internal 'demons'?
Does our protagonist face their dragon and reach a point of 'death and rebirth' - which could mean that they have to face their worst fears, relinquish their strongest beliefs or greatest dreams - and change and evolve as a result?
What is the 'gift' that they get? Is it knowledge, courage or something more concrete?
Does their new insight or situation then allow them to overcome an old problem, or help somebody else?
Finally, can you relate The Hero's Journey to your story? Or even to stories in your own life? Or is it possible to create a story that doesn't follow this pattern at all - but still works? Heather Dyer's latest book is The Flying Bedroom.
Happy New Year! Are you all having a lovely holiday? Looking forward to getting back to work tomorrow?
Actually, I am. I'm really enjoying writing my book on sketching people and it's coming on really well. I am well ahead of schedule, which is good news, because I won't have much time once the work for the new children's library mural kicks in, not to mention all the school visits I have lined up between now and mid March.
My deadline for delivering the text is staggered. It's divided into 5 stages. I have to upload 20% of the content each month, between February and June. Since the spring will be tricky, I uploaded my first 20% just before Christmas. Because of the holidays, I've not had any feedback yet.
As well as the Drawing Strangers is Scary chapter I was telling you about last time, I have now completed the book's final chapter, called Capturing the Moment (if you remember, I am not taking them in order). After all the sections with more specific tips about how to draw people, which I've mostly yet to write, I finish up by sharing techniques for getting more out of your sketches.
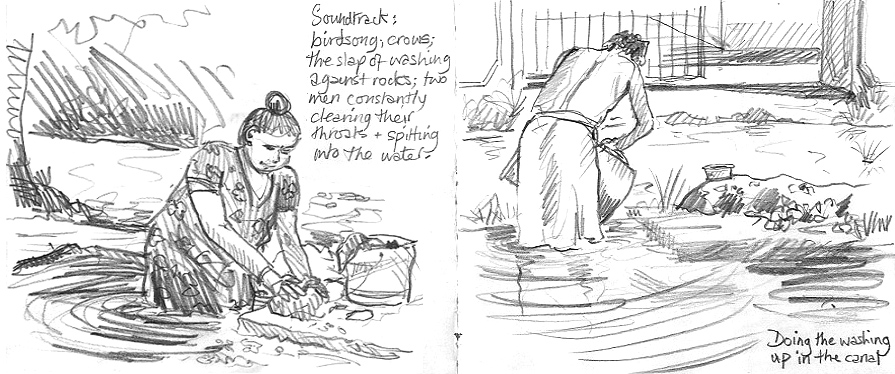
This section talks briefly about the difference between an urban sketch of a person and a portrait. Urban sketching is not so much about getting a likeness when you draw someone, as presenting a snapshot of them: a person as part of a time and place. That's why I never ask permission when I sketch people - it has to be natural, because I want to catch someone going about their life, not posing.
I talk about ways to soak up all sorts of peripheral information, to help place your sketch in-the-moment: bits of conversation, things that happen while you are drawing, observations about the weather etc, so that your sketchbooks don't only paint a very rich picture, but always take you straight back to where you were, like a visual diary.
As you know, I love incorporating this extra information, so I share techniques for adding text and having fun with the way you arrange things on a page, because the contents of your sketchbook does not have to match what's out there: you are free to experiment and play.
I think next, I might tackle the section which talks about how to cope with the fact that people move. It's very inconvenient, but inescapable: they do it all the time. But fear not - I have lots of tips to share!
At last! This week I have finally started properly writing my book.
I don't need a massive amount of text per spread. I am typically writing 200-300 words of general text on each spread and then the rest is explanation and teaching points attached to specific sketches. That's why the sketch-selection is so important.
The tagging system John devised is working really well. At the touch of a button, it shortlists each category for me, pulling from a pool of over 430 sketches we photographed last week (very glad that job is over), which makes it SO much easier for me to pick the 3 or 4 images I need for each spread.
I don't have to start from the beginning and work my way through chronologically as, for the most part, sections stand alone. My editor explained that, for this kind of publication, people rarely read from start to finish anyway: they tend to dip in and out all over the place. She suggested I begin where I feel most confident.
So I started with a chapter called Drawing Strangers is Scary. I find that sketchers are very inhibited by the thought that they might be 'caught in the act' while drawing someone, so I have written about tricks for keeping a low profile, but also what happens when you are discovered. The chapter then goes on to look at how you choose people to sketch, thinking about different locations and activities and how easy or tricky they typically are. I couldn't go through every possible option of course, so narrowed it down to 10, which are either recommendations or which have unexpected advantages of disadvantages. This is the chapter where the spread we did for the presentation, about drawing on the train, will go.
Meanwhile, my publisher has sent out a call to various urban sketchers, asking for examples of people-sketches. We won't need many more guest contributors, as I have already selected quite a few, as I mentioned previously, but they say it's good to do, as the perfect image for one of my teaching points may drop into our lap.
These are all sketches which have made the grade into that initial chapter, as far as I am concerned at least (but of course everything still has to be run by my editor and set by my designer - I am not even thinking about layout).
By the way, if you missed the beginning of this project and want to follow the progress of this book from the start, just use the Sketching People label on the right hand panel and scroll down. There have been 10 posts so far.
Now that the basic structure of my sketching book is sorted, I have to go back to all the piles of sketchbooks which John and I waded through when I first got started on the project in the summer. Of course, there are a few new ones now too.
Back then, I had a rough idea of the categories I was trying to illustrate, and used colour-coded bookmarks to help with that. Now the book's structure has been fine-tuned, I'm ready to make the selections, but I have to find a way of shortlisting from the hundreds of possible sketches, buried in nearly 90 books.
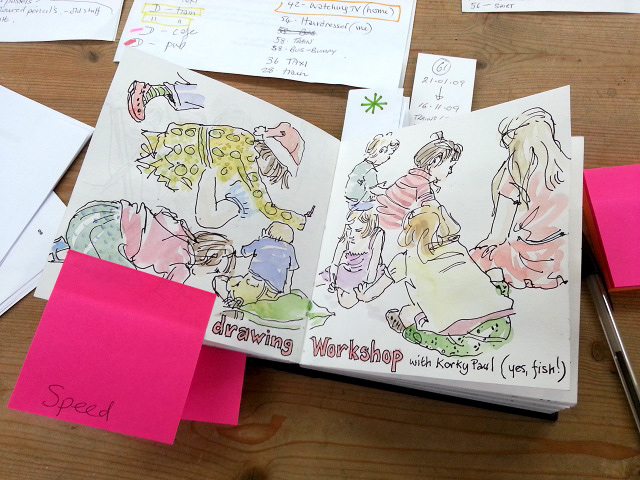
The plan we hatched was to work through the images we bookmarked last time, taking quick snaps on my phone, so I can see them all together. I used post-it notes to tag drawings against the sections of the book I had in mind. Trouble is, the tags needed transferring to the photos I'd taken, or I'd just end up with a bucketful of meaningless snaps, which wouldn't be much better than the piles of sketchbooks! Then there was the complication that most sketches could potentially work in various sections of the book. Oh dear...
There were so many images in play, I had to find a system that would be efficient, without being too time-consuming. John came to the rescue and downloaded Picasa: photo-album software, which lets you tag your images.
I have been working through the sketchbooks, numbering each sketch as I photograph it and logging it in a book, along with the number of the sketchbook (so we can find the sketch again when it comes to scanning), and any tags which might apply. The photos are then uploaded to the computer in batches and quickly renamed with the two reference numbers.
While I am snapping the next batch and scribbling in my book, poor John has the unenviable task of adding all the tags in Picasa. I'm still using the post-it notes, to speed up finding specific sketches if they make the grade and we need to scan them in:
The system is not as time-consuming as it sounds and we did the lot in a few days (though an emergency-dash to Staples had to be made half way through, for more post-its).
The tagging system is brilliant, as I can now pull together all the sketches of noses, or contour-drawing, or speed-sketching at the touch of a button. It's going to make the next stage much, much easier. Phew.
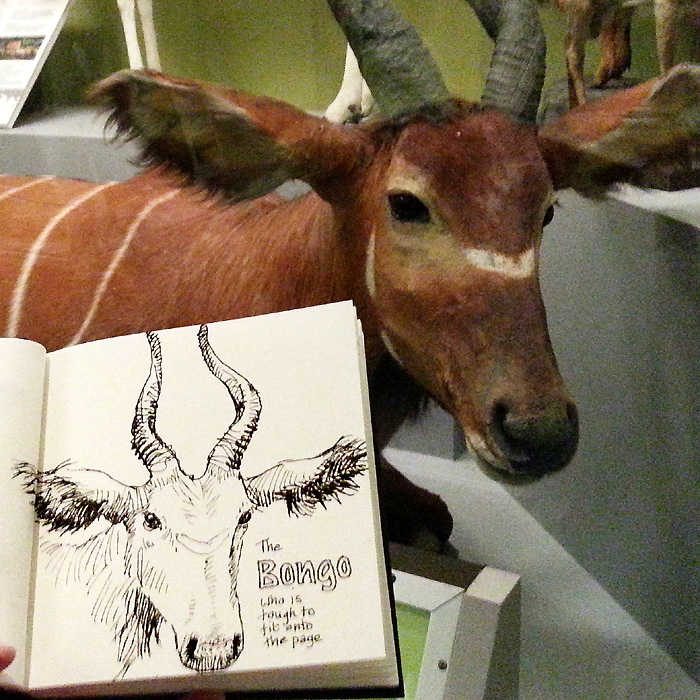
As you can see, I have been sketching stuffed animals:
But more of that later...
It's been a week since my trip to see the publisher of my latest project, the 'Sketching People' book. I have been pretty full-on with it ever since.
The meeting went really well. Everyone in the team was very friendly and easy to get on with. It was good to finally meet the designer, who I worked with on all the presentation spreads. Five of us sat round a table with proper coffee and very nice chocolate biscuits (their regular treat for author visits) and my editor sat me at the head of the table: I felt very important.
Once we got down to business, we really hammered away at the project. They were great at listening to my take on things and good at explaining what I needed to know, so all very positive.
I love that my editor is a straight-talker, like myself, so we got loads sorted in just a couple of hours. There were some tweakings needed to the flat plan and synopsis I had created, but luckily it was basically sound: the changes were mainly a structuring issue that I hadn't realised and a bit of streamlining, all of which was a great improvement.
A new flat plan has been created out of the meeting, although it is apparently still very fluid: the idea is that the structure is there to hang all my work on, but it can adjust to accommodate more or less space needed in the different sections, as I go along.After the meeting, I had a few hours to kill before my train home. It was bitterly cold and no good for sketching outside unfortunately, so I took myself and my sketchbook to the warmth of Natural History Museum, as I enjoyed it so much
the last time. Which is where our stuffed friends above come in.
The rest of last week was mostly spent choosing guest contributors for various sections of the book. We have to do that early on, to give plenty of time for people to sign the paperwork and get their artwork scanned. I need guests because there are some aspects of sketching people which I am pretty rubbish at - crowd scenes for one - so I have collected examples from people like
Caroline Johnson, who are great at it:
It's good to have a variety of approaches in other sections too, so I had my head in Flickr and Pinterest for days, searching people out, and got quite bug-eyed!
I have tried to mix it up a bit: some well-known
Urban Sketchers correspondents, whose work often appears in similar publications, but also some less known sketchers, as the book seems a great way to showcase talent. I sent a list of possibilities to the publisher today, and am waiting to hear what they think. Keep you posted!
I began writing my master business plan for publishing my novel series on March 9th, 2011. This was about 1½ years before I had a signed publishing contract under my belt. Since then, there have been many revisions to this plan. I decided to write down a business plan when I took the plunge to learn all I could about starting a blog to help me develop an author platform. After a few months of intense research, my blog launched May 4th, 2011. Publishing my first post was the beginning of putting my plan into action, and it was truly a lift off for me and my writing career.
My business plan and strategy spans five pages. I’ve broken down the plan into headings, and what I’d like to see happen. I’ve set short term goals (next 1-5 years) and long term goals (10 plus years). I also have an objective, which helps me keep my feet on the ground and fingers on the keyboard. I review my plan quarterly, and revise it once a year. This helps me keep on track and weed out the things I’m doing that aren’t working for me.
So how do you even go about preparing a business plan for your writing career? Every writer is different of course, and I can only give you the benefit of my experience writing MG/YA novel series. But we all have to start somewhere.
First:Begin with your objective. Why are you writing in the first place, and what do you hope to accomplish. I want to give readers an experience they’ll never forget, and organize my life around what makes me happy. Figure out your objective, and get it down!
Second:List your short term goals. What do you hope to accomplish in 1, 3, 5 years? Don’t go overboard you can only handle so much. Once you figure out what these goals are break them down into headings like ‘Online Presence’, ‘Website’, ‘Novels’, ‘Work in Progress’, ‘Time Management and Commitments’, ‘Sales Plan’, ‘Promotion and Marketing Strategy’, and ‘Financial Goals’.
Third: Now for the fun part! Under your headings list the steps you need to take to accomplish your goals. For example, under my ‘Online Presence’ heading I’ve listed in point form all the tasks I need to do to keep my author name out there in cyberspace. Here are some examples:
- I’ve joined HootSuite to help schedule my shares and tweets.
- Guest Blog on other author blogs within the same genre, and make sure to share this info on my social media groups.
- Continue to do interviews with other authors, especially when there’s a new release.
- Approach book blog reviewers, especially a month before a new release. Offer a free copy for honest review.
- Offer my blog as a platform for other YA authors—either interviews or guest posts.
Fourth:Depending on the amount of headings and steps you have, make sure you don’t pile on too much as to make this plan unmanageable. Get real with what you can handle, delegate what you can’t. I had to hire a web designer. No shame in that.
Fifth: Now onto the long term goals. Remember to dream big too! Would you like your books translated into movies? How many books do you plan on writing? What about a book series? Or graphic novels? How many books are you planning on writing in your series? Create a master plan for each series too. It will be easier on you in the long run. Intellectual property like video games or apps is also important to think about and write down. After all, you never know what the future holds if you don’t help it along.
Sixth:Finally, SIGN the bottom of your master business plan. This makes it real. Commit to it. Revise it when things aren’t working out, or your situation has changed. Be flexible, and ask for help if necessary. Rome wasn’t built in a day, and neither is your writing career.
Here’s a formula that will keep things in perspective and keep you on track of your writing goals: TIME + BACKLIST (4 or more books) = SUSTAINABLE AUTHOR CAREER.
Thank you for reading my blog. Have you created a master business plan for your writing or anything else you’d love to pursue? If so, please comment and share your experiences. Love to hear from you! Cheers!
View Next 25 Posts


.jpg?picon=1806)


