
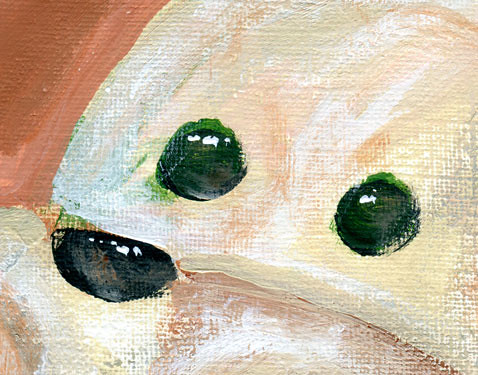
I received a couple hints for a painting involving coffee. Here is what I came up with. It’s listed in my etsy shop!

"Have Faith ... and Coffee" Print by {K}Mericks Studio
What do you think?
Also, I’m linking up to Paint Party Friday!


 By: Kate Mericks,
on 8/30/2012
By: Kate Mericks,
on 8/30/2012
I received a couple hints for a painting involving coffee. Here is what I came up with. It’s listed in my etsy shop!
"Have Faith ... and Coffee" Print by {K}Mericks Studio
What do you think?
Also, I’m linking up to Paint Party Friday!
By: Kate Mericks,
on 8/28/2012
I just wanted to quickly give a shout out to one of my favorite illustrators – Lynne Chapman. I love her work! See her video below!
By: Kate Mericks,
on 8/25/2012
I have been trying to learn Adobe Illustrator {therefore the prolonged absence}. This particular drawing is rather goofy, and I kinda like it. So I thought I’d actually submit it!

Submission for Illustration Friday by {K}Mericks
What do you think?
By: Kate Mericks,
on 8/1/2012
Happy August!
So my hubby found this recipe for me [by the Shaytards], because I am always wanting more protein ideas. (I would give you the link directly, but its a video and has inappropriate content which I do not really prefer to pass along).
As you might recall, I am a vegetarian, and I get tired easily of my regular options. I think anyone would LOVE this recipe. I’ll give you the recipe as it is posted online. The mix is simple to change if you want to add/subtract whatever. I didn’t put in jalapenos in hopes that the kiddo would eat it. Alas, the lime juice made it a no-go. I also added more black beans. Oh, and I’d recommend chips with more of a scoop shape, because the dip falls off regular chips easily.

Before Mixing with Quinoa
Here is the Recipe from the Video:
5. Mix with bowl above. All done, enjoy!
By: Kate Mericks,
on 8/1/2012
Happy August!
So my hubby found this recipe for me [by the Shaytards], because I am always wanting more protein ideas. (I would give you the link directly, but its a video and has inappropriate content which I do not really prefer to pass along).
As you might recall, I am a vegetarian, and I get tired easily of my regular options. I think anyone would LOVE this recipe. I’ll give you the recipe as it is posted online. The mix is simple to change if you want to add/subtract whatever. I didn’t put in jalapenos in hopes that the kiddo would eat it. Alas, the lime juice made it a no-go. I also added more black beans. Oh, and I’d recommend chips with more of a scoop shape, because the dip falls off regular chips easily.
Before Mixing with Quinoa
Here is the Recipe from the Video:
5. Mix with bowl above. All done, enjoy!
By: Kate Mericks,
on 7/31/2012
And so, I think we have eliminated yet another nap. I love spending time with the kiddo, but this was completely unexpected and left me scrambling. I haven’t quite figured out yet how to do the laundry and the cleaning and the creating and the blogging, etc… in one naptime (along with nigh-nigh time). Further, we just moved my office into the guest bedroom, and the walls are really bare. So I have been painting TONS! I have 4 paintings in progress right now. AND I have picked up my book writing again. So unfortunately blogging has moved down on my list of priorities. Things like exercise and gardening have moved off the list for right now. I know I know that isn’t the best, but we still take walks so that’s something right? I also feel like right now, creating is where I need to be. So that’s where I am.
Two of the paintings are almost done, and one painting I think I’m going to have to start over. Have you ever read about the painting technique where you should try to cover 90%+ of the previous work, every time you work on the canvas? Or the technique where you should alternate working only in cool tones and then warms ones the next time? Well, I wouldn’t recommend combining them. It has left some colors muddy. Of course, I could have gesso-ed before painting the opposing tones, but that would take more preparation than I was desiring. I enjoyed being impulsive with my work. I also learned tons about my preferences and style. But I have come out with a really ugly painting. I suppose 1 out of 4 isn’t awful! ![]()
So hopefully I’ll have progress up soon.
Also, I just can’t figure out the stupid FB page worth a darn. I also really don’t like FB, so I may be deleting that account. What do you think? I could handle having one less thing on my plate and quite honestly I’ve just never gotten into it to begin with.
By: Kate Mericks,
on 7/25/2012
New listing on Etsy and more to come!

{K}Mericks Etsy Listing "Sweet Dreams" Closeup
What do you think? xo
By: Kate Mericks,
on 7/25/2012
New listing on Etsy and more to come!
{K}Mericks Etsy Listing "Sweet Dreams" Closeup
What do you think? xo
By: Kate Mericks,
on 7/21/2012
I am so excited! I had multiple people enter, so silly me, I used an online random generator to pick who won. (I really wanted to use it!)
Anyways, congratulations Elisa Choi. Please email me your print pick and address, and I will get your prize to you!
In other news, I will have more paintings to list on Etsy soon.
In other other news, we got about 15 min solid rain for the first time in months a few nights ago, and some of the grass turned green again.
I guess I am in a pretty good mood right now. I ended every single sentence in an exclamation point, I forced myself to change that. ![]() It has been a great day for me, I hope yours was too. xo
It has been a great day for me, I hope yours was too. xo
By: Kate Mericks,
on 7/20/2012
I have been working feverishly on a new line of nursery art prints! This is a close up of my newest Etsy listing! I hope you love it too!
Close up of Latest Etsy Print by Kmericks
P.S. Linking up to PPF!
By: Kate Mericks,
on 7/20/2012
I have been working feverishly on a new line of nursery art prints! This is a close up of my newest Etsy listing! I hope you love it too!
Close up of Latest Etsy Print by Kmericks
P.S. Linking up to PPF!
P.S.S. My hubby thinks it looks more like a dog. What do you think, should I change the listing to puppy instead of bunny? (I mean it really doesn’t matter, because you can personalize the wording to whatever you’d like or not have words at all, but….)
By: Kate Mericks,
on 7/15/2012
Just a reminder that I have a Give-Away! Be sure to link up. Free art!
Hello, fellow PPF-ers and other Dear Readers! I’ve been working on postcards for the Liberate Your Art postcard swap and a few ATCs. Below is one of the completed ATCs that I am sending out tomorrow for a trade. Yeah!

Front of ATC by {K}Mericks Studio

Back of ATC by {K}mericks Studio
What do you think?
By: Kate Mericks,
on 7/15/2012
Just a reminder that I have a Give-Away! Be sure to link up. Free art!
Hello, fellow PPF-ers and other Dear Readers! I’ve been working on postcards for the Liberate Your Art postcard swap and a few ATCs. Below is one of the completed ATCs that I am sending out tomorrow for a trade. Yeah!
Front of ATC by {K}Mericks Studio
Back of ATC by {K}mericks Studio
What do you think?
By: Kate Mericks,
on 7/12/2012
First of all, I would like to announce a give-away! I have wanted to do one for a long time, so I’m super excited. The winner can choose any print from my Etsy shop!
All you have to do to be included in the drawing is to include this blog post link in a post on your blog and then leave a comment with a link to that blog post. It doesn’t have to be fancy or long or anything… I will draw a winner next Friday the 20th!
Oooh, and there is another giveaway happening at Nowhere to Go but Crazy happening right now. Join in hers too, her work is super awesome and so is she!
________________________________________________________________________
Now to the meat and potatoes. I promised this tutorial before Father’s Day and here it is:
I made a gift for my wonderful hubby to commemorate his first Father’s Day! {He loved it, FYI.} It’s a T-Shirt that my kiddo and I personalized. (Read to the end to see the finished product!)
Supplies that I used:
I used the following to make the Stencil:

Stencil Supplies
How I made this fantabulous piece of clothing:

Close-up of Paint with Tape to Keep the Center Protected
By: Kate Mericks,
on 7/12/2012
First of all, I would like to announce a give-away! I have wanted to do one for a long time, so I’m super excited. The winner can choose any print from my Etsy shop!
All you have to do to be included in the drawing is to include this blog post link in a post on your blog and then leave a comment with a link to that blog post. It doesn’t have to be fancy or long or anything… I will draw a winner next Friday the 20th!
Oooh, and there is another giveaway happening at Nowhere to Go but Crazy happening right now. Join in hers too, her work is super awesome and so is she!
________________________________________________________________________
Now to the meat and potatoes. I promised this tutorial before Father’s Day and here it is:
I made a gift for my wonderful hubby to commemorate his first Father’s Day! {He loved it, FYI.} It’s a T-Shirt that my kiddo and I personalized. (Read to the end to see the finished product!)
Supplies that I used:
I used the following to make the Stencil:
Stencil Supplies
How I made this fantabulous piece of clothing:
Close-up of Paint with Tape to Keep the Center Protected
By: Kate Mericks,
on 7/4/2012
We have lots going on around here right now… birthdays, weddings, fourth of july celebrations and lots of cleaning. ![]() I just thought I’d post a quick couple of tips for image transfers to canvas, as I just attempted it for the first time. There are lots and lots of blogs that describe the process, so I’m going to gloss over that part.
I just thought I’d post a quick couple of tips for image transfers to canvas, as I just attempted it for the first time. There are lots and lots of blogs that describe the process, so I’m going to gloss over that part.
Basic Steps:
As always, I just wanted to share what I figured out. I would love to show you an image of my end result, but it was a wedding gift and has personal info on it. ![]()
Do you have any other tips for image transfers?
By: Kate Mericks,
on 6/28/2012
I promise this is my last post reviewing this product for now. ![]() I just felt that I needed to amend my opinion after further research. To recap, in my first post about PanPastels, I was irritated at their messiness. (It turned out I was using them incorrectly, duh). In the second post, just a few days ago, I was saddened that they were still messy even after amending my approach. The pastels in the pan did cover better when I had enough product loaded on the tool. I still got quite dusty. I also said that I didn’t like the product. After looking into pastels a bit, I realized that this last point isn’t true.
I just felt that I needed to amend my opinion after further research. To recap, in my first post about PanPastels, I was irritated at their messiness. (It turned out I was using them incorrectly, duh). In the second post, just a few days ago, I was saddened that they were still messy even after amending my approach. The pastels in the pan did cover better when I had enough product loaded on the tool. I still got quite dusty. I also said that I didn’t like the product. After looking into pastels a bit, I realized that this last point isn’t true.
I must like the PanPastels somewhat, because I was dreaming about how I really wanted to get into pastels. I never, I repeat, Never, liked pastel sticks prior. I liked oil pastels just not hard/soft pastels. So if I was thinking about pastels to this extent, obviously the PanPastels left a positive impression.
Furthermore, looking into it again, I remembered (aside from the mess mess mess) that many pastels are toxic. They are basically pure pigment, and the dust is damaging to your lungs, etc… So without a properly ventilated work space, I would not recommend this medium. Also, I wouldn’t recommend it to people with kids who are likely to get into them. (Me, right now). According to this interview with co-founder of Colorfin, Inc. Bernadette Ward, PanPastels are not toxic and are certified lead-free. Good for us moms. So if I want to continue playing with pastels in general, I should probably try to figure out how to make friends with these pan pastel products. Plus, I already own them, so obviously this makes sense on that level too. But this does mean that I should try pastel paper. The interview says that the product works on most mediums, and while the pastel did work on the canvas, I don’t think that is the BEST substrate to use.
(And to clarify, according to the founders specifically, they don’t say NO dust, just LESS dust. So that’s that.) I am relieved to continue providing my most honest opinions even when they change two days later. Let me know if you have anything to add!
xx
By: Kate Mericks,
on 6/27/2012
Have you ever really wanted to love something but just couldn’t?
I was all ready, Pan Pastels setup, excitement building, canvas out. Grab a tool and apply paint. Apply more. and more. and more… you get the idea. It took a lot of pastel to be able to cover my 24″x48″ canvas, and I got a little tired of dabbing pan to canvas. Back and forth. But in the end, I am very pleased with the outcome, see? (I wish I had taken a before picture, but if you cross your eyes, take out the flowers and bring the saturation level down to just barely colored, you’d have the picture.) ![]()

Kitchen Wall Art of Imagined SW scene by {K}Mericks Studio
Ok, for the long awaited (ha) review continued from this post here. Dabbing pan and then the canvas, helped a ton. I actually got real color on the canvas in approximately the same time I worked previously and got nothing. Alas, I did not love the PanPastels, I didn’t really even like them. Except I did fall in love with pastels in general. So maybe with better material I would have a better appreciation for them. And maybe regular pastels are messIER, but these were still messy. I must just be too heavy handed for them. Also, I really like more hands-on approach, so I’d probably like the sticks better actually. (Than using a tool applicator.) AND I read that the paper makes a HUGE difference. So before trying out PanPastels, set yourself up right. Buy Pastel Paper! Don’t use a standard canvas. You’ll be more happy with the results.
I will probably be adding pastel work to my portfolio when I can figure out a space for a very messy medium. (It does wash off your hands/skin super easily with warm water and soap!) Do you have any questions or suggestions? xo
By: Kate Mericks,
on 6/27/2012
Have you ever really wanted to love something but just couldn’t?
I was all ready, Pan Pastels setup, excitement building, canvas out. Grab a tool and apply paint. Apply more. and more. and more… you get the idea. It took a lot of pastel to be able to cover my 24″x48″ canvas, and I got a little tired of dabbing pan to canvas. Back and forth. But in the end, I am very pleased with the outcome, see? (I wish I had taken a before picture, but if you cross your eyes, take out the flowers and bring the saturation level down to just barely colored, you’d have the picture.) ![]()
Kitchen Wall Art of Imagined SW scene by {K}Mericks Studio
Ok, for the long awaited (ha) review continued from this post here. Dabbing pan and then the canvas, helped a ton. I actually got real color on the canvas in approximately the same time I worked previously and got nothing. Alas, I did not love the PanPastels, I didn’t really even like them. Except I did fall in love with pastels in general. So maybe with better material I would have a better appreciation for them. And maybe regular pastels are messIER, but these were still messy. I must just be too heavy handed for them. Also, I really like more hands-on approach, so I’d probably like the sticks better actually. (Than using a tool applicator.) AND I read that the paper makes a HUGE difference. So before trying out PanPastels, set yourself up right. Buy Pastel Paper! Don’t use a standard canvas. You’ll be more happy with the results.
I will probably be adding pastel work to my portfolio when I can figure out a space for a very messy medium. (It does wash off your hands/skin super easily with warm water and soap!) Do you have any questions or suggestions? xo
By: Kate Mericks,
on 6/26/2012
Did you ever consider that maybe you love art (whatever yours might be) too much? I am reading a book titled “The War of Art” by Steven Pressfield. He writes in a very succinct, insightful manner. One of his chapters suggests that Professionals (vs. Amateurs) do not put too much emotion into their work. He is not saying that they don’t love creating, but that they know how to step back from their creations. He says that professionals are not artists. What we do does not define who we are… hmmmm. Interesting concept, although I don’t think that is true to it’s fullest extent, I get what he was trying to say. I am a Daughter of God, a Wife, and a Mom. I DO art. I paint, draw, write, plan, design, illustrate. But those things do not make up me in my entirety. Love it.

"The War of Art" by Steven Pressfield
This resonated with me on so many levels. I’m being really honest right now, and I think this goes along the recent blog flame “Things I’m Afraid to Tell You.” I think I have been trying to be too safe with my art, because I am too attached to it. I know it’s silly, but I was really hoping to have made some sort of Etsy sale by now. (Ok, a lot of that has to do with my husband saying that I couldn’t get a printer until I made my first sale, and there is a HUGE sale on printers that ends in a couple days and I was hoping to swing that, but still I am disappointed with myself). I am afraid of failure. I think it’s made it’s way into my art.
I have a piece of artwork hanging on my wall, that I am just not in love with. It feels stagnant and flat to me. I decided that I just needed to go for it. I took it down and threw some paint it on, pretty literally. I was so happy, so ecstatic with just trying to make myself love the piece. I think I brought through some sort of barrier. My husband was immediately like “You ruined it, I’m sure!” Then he looked at it more critically (note: it is still in very, very, very preliminary stages) and said, “You really went all out.” The highest compliment he has given me about my work. I wasn’t letting my fear of failure overcome me. I am ok if the picture is “ruined,” or doesn’t look perfect. I stepped past something blocking my artistic impulses.

Phase One: As it was on the Wall - Tree Art
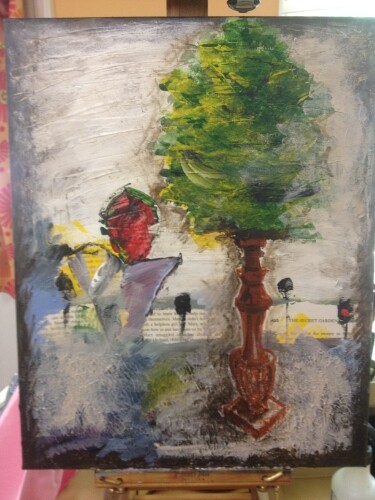
Phase Two: As it now sits on my Easel, Tree Art
So I have decided that my business summer goals are: to focus on the basics, get back to my roots, throw myself out there and see what happens. I am going to play with style and medium and shape and form. Its going to be a blast! I am going to practice practice practice. It’s ok if I don’t make it big on Etsy (or wherever). Taking a step back I realize that isn’
Add a Comment
By: Kate Mericks,
on 6/26/2012
Did you ever consider that maybe you love art (whatever yours might be) too much? I am reading a book titled “The War of Art” by Steven Pressfield. He writes in a very succinct, insightful manner. One of his chapters suggests that Professionals (vs. Amateurs) do not put too much emotion into their work. He is not saying that they don’t love creating, but that they know how to step back from their creations. He says that professionals are not artists. What we do does not define who we are… hmmmm. Interesting concept, although I don’t think that is true to it’s fullest extent, I get what he was trying to say. I am a Daughter of God, a Wife, and a Mom. I DO art. I paint, draw, write, plan, design, illustrate. But those things do not make up me in my entirety. Love it.
"The War of Art" by Steven Pressfield
This resonated with me on so many levels. I’m being really honest right now, and I think this goes along the recent blog flame “Things I’m Afraid to Tell You.” I think I have been trying to be too safe with my art, because I am too attached to it. I know it’s silly, but I was really hoping to have made some sort of Etsy sale by now. (Ok, a lot of that has to do with my husband saying that I couldn’t get a printer until I made my first sale, and there is a HUGE sale on printers that ends in a couple days and I was hoping to swing that, but still I am disappointed with myself). I am afraid of failure. I think it’s made it’s way into my art.
I have a piece of artwork hanging on my wall, that I am just not in love with. It feels stagnant and flat to me. I decided that I just needed to go for it. I took it down and threw some paint it on, pretty literally. I was so happy, so ecstatic with just trying to make myself love the piece. I think I brought through some sort of barrier. My husband was immediately like “You ruined it, I’m sure!” Then he looked at it more critically (note: it is still in very, very, very preliminary stages) and said, “You really went all out.” The highest compliment he has given me about my work. I wasn’t letting my fear of failure overcome me. I am ok if the picture is “ruined,” or doesn’t look perfect. I stepped past something blocking my artistic impulses.
Phase One: As it was on the Wall - Tree Art
Phase Two: As it now sits on my Easel, Tree Art
So I have decided that my business summer goals are: to focus on the basics, get back to my roots, throw myself out there and see what happens with honing in on my craft. I am going to play with style and medium and shape and form. Its going to be a blast! I am going to practice practice practice. It’s ok if I don’t make it big on Etsy (or wherever). Taking a step bac
Add a Comment