new posts in all blogs
Viewing Blog: My Fresh Plans, Most Recent at Top
Results 1 - 25 of 184

Lesson plans and resources for K-12, including standards-based, integrated, cross-curricular lessons using 21st century skills and technology.
Statistics for My Fresh Plans
Number of Readers that added this blog to their MyJacketFlap:
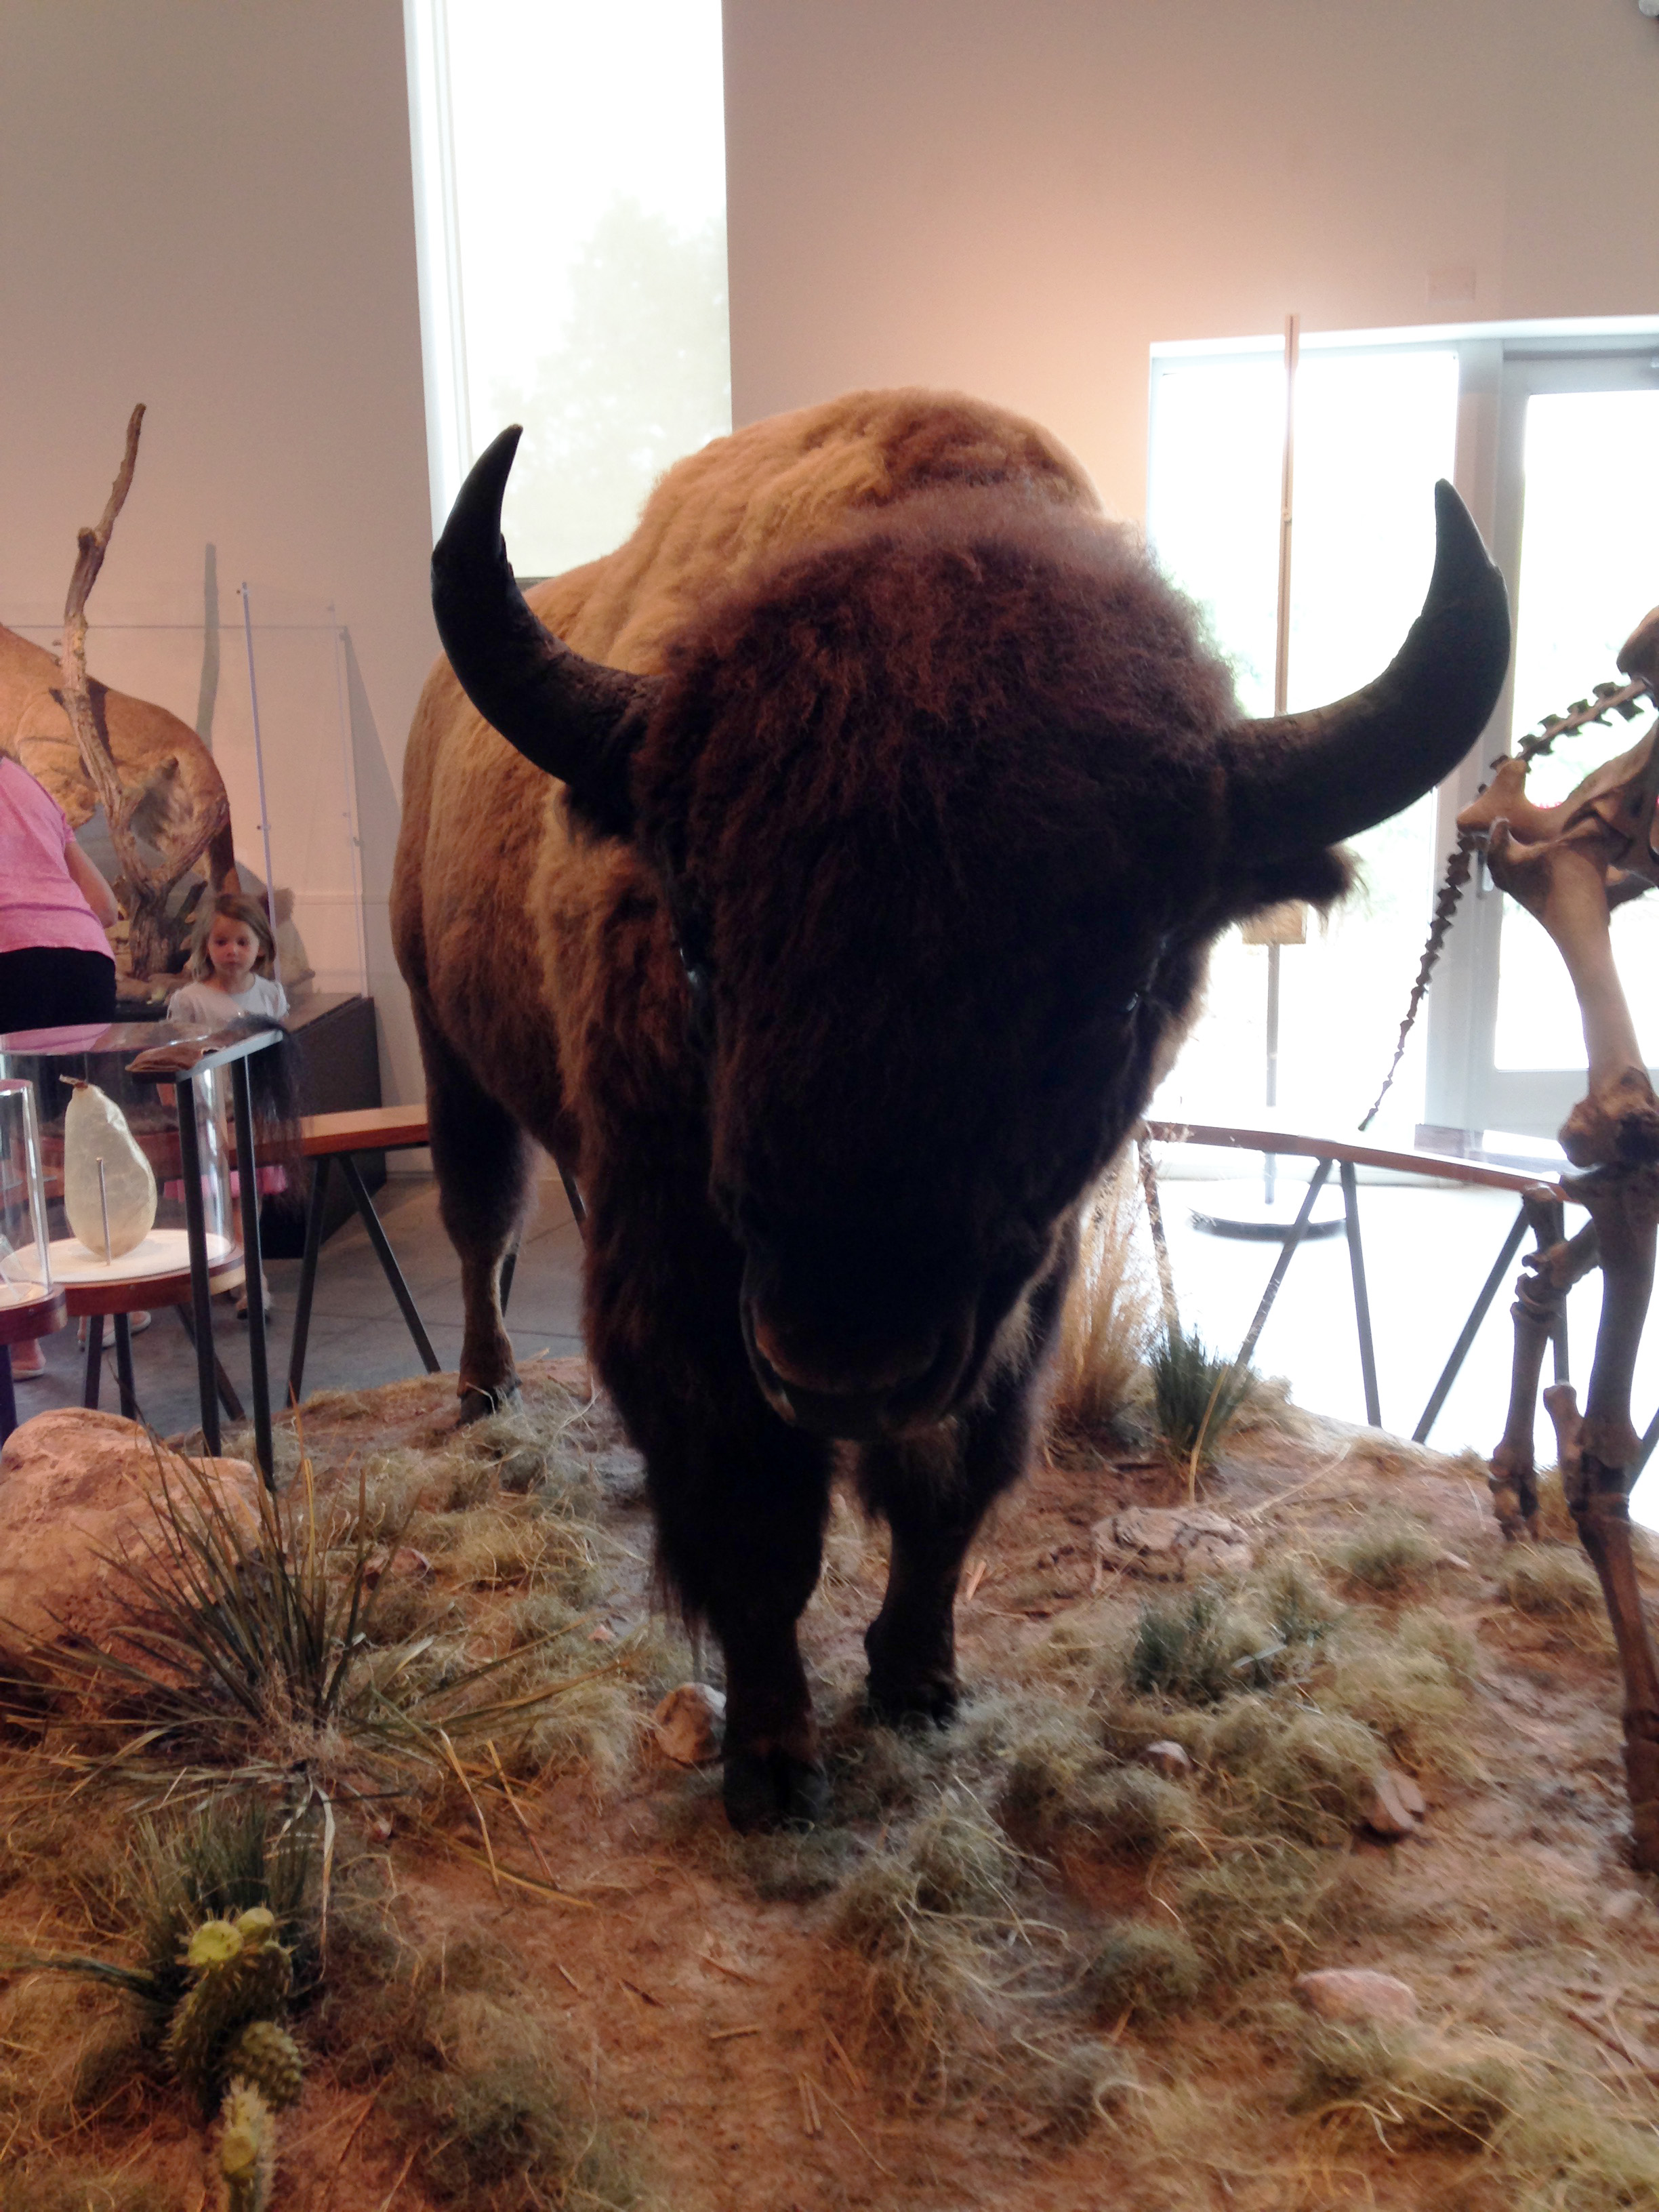
Zoo animals like lions and tigers may be exciting, but we have a native animal that’s just as big and exciting: the bison. A study of bison can liven up a study on Native Americans, pioneers, the West, or the Great Plains. They’re also a fun animal study subject.
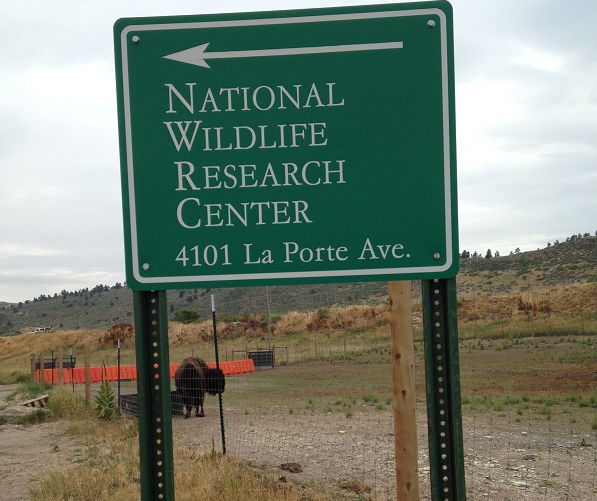
FreshPlans visited some bison at the National Wildlife Research Center in Ft. Collins, Colorado. Can you see the bison in the picture below? He doesn’t look very big, right? Up close, these are very big animals. They came up pretty close to get a good look at us, so we got a good look at them, too.
We saw bison standing around, eating grass, standing around, rolling in the dirt, and standing around. This is pretty much what we do, our guide explained. “They can run, and if they do, you want to get out of the way,” he told us. But they don’t go scampering around for fun.

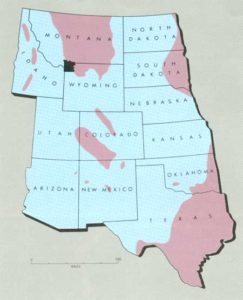
These bison are part of a joint USDA and Colorado State University project to bring healthy bison back to Colorado. A disease called brucellosis has become a problem in the herds of buffalo in Yellowstone Park. The project is using new technology to breed healthy bison who are descendants of the Yellowstone Park herds, without the dangerous disease.
When we teach about animals, we like to focus on four things:
- Morphology: the physical characteristics of animals, including body parts and adaptations.
- Life cycles: how animals are born, live, and reproduce.
- Habitats: the places where animals live.
- Relationships with humans: how humans affect the animals and how they affect us.
Even though we got a good look at the bison, we couldn’t touch them. We were curious about their unusual shape. So we went to the Discovery Museum in Ft. Collins to look at the skeleton of a bison. We saw that the big humps on their backs had bones inside. It reminded us of a stegoasaurus.
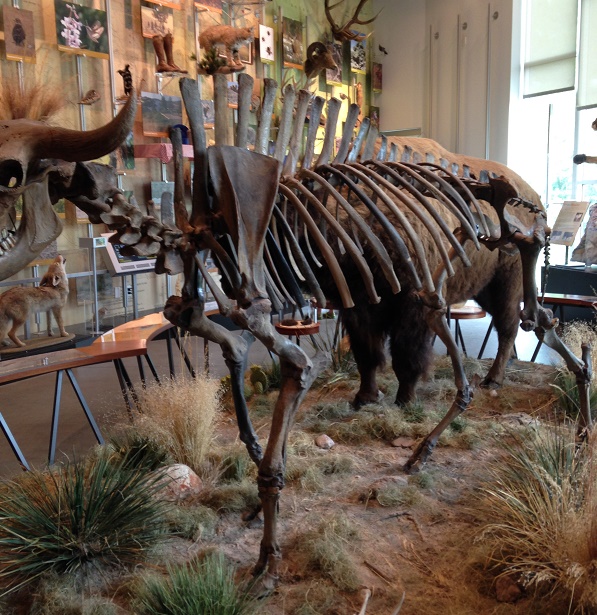
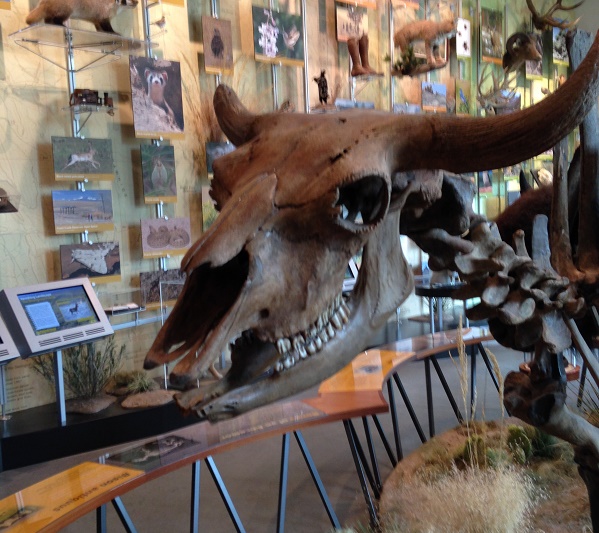
We got a good look at the skull of the bison, which seemed to be wearing a happy grin. Check out an interactive lesson on the bison’s digestive system to get an idea what’s inside a living bison.
We learned that bison are mammals and ruminants, like cows. They have live babies, which grow up and have babies of their own, just as people do.

The museum has a taxidermy bison, which looked a lot like the live bison we saw — although it was a lot cleaner and neater. We got to feel bison fun, and we were surprised to find that it was very soft.
This bison is shown in a place made to look like its natural habitat: the prairie. The bison we visited at the USDA Wildlife Research Center live on the prairie, but they don’t get to roam like the buffalo in the song.
While some people eat bison meat today, we learned that most “buffalo meat” you can buy in a restaurant or a grocery comes from animals which have both bison and domestic cow heritage. We found bison wool yarn in Ft. Collins, but once again it included both bison wool and wool from sheep. Bison’s relationship with people today is less about human beings using bison for practical purposes and more about humans trying to care for the bison and make sure our grandchildren can still see this majestic animal on our prairies when they grow up.
Native Americans living on the plains and prairies, however, relied heavily on bison. Let younger students try out this interactive lesson on the relationship between Native Americans and bison. Older students will enjoy this more complex interactive web page from the Smithsonian.
Here are some more resources for teaching about bison:
- Check out the Smithsonian’s Interactive Bison Exhibit for a little mouse practice and reading. Set it up as a station at your classroom computer and let students whet their appetite for learning about bison with a lot of intriguing facts.
- Mr. Nussbaum has some fun activities about bison, both online and printable.
- Texas Parks and Wildlife have a lesson on what bison eat. This page includes a number of different activities bringing up a lot of interesting points, and introducing the word “forbs,” which was a new one for us. There’s an interesting activity asking students to analyze a photograph, which we think could be a good part of critical reading and media literacy lessons. Feel free to use the photos on this page for your analysis!
- The U.S. Mint has a lesson that helps students to recognize bison as natural resources. Both this lesson and the previous link include plant study.
- Woolaroc Museum has a bison lesson plan pdf with reproducibles including information about bison and Plains Indians, as well as a retelling of a traditional folk tale.
- The Smithsonian American Art Museum has a lesson using George Catlin’s paintings and writings to explore the idea of regions.
- The National Wildlife Federation has a science process lesson that gives students hands-on insight into why it’s so hard to get firm numbers for animal populations. They also have a great bison lesson plan with lots of background information which could be used alongside the first lesson.
- Check out the LiveScience Bison News page. This could be part of your classroom morning news roundup, a great reading resource for your bison unit, or part of a student research project.
Save
Save
Save
Save
Save
Save
Save
The post Bison Lesson Plans appeared first on FreshPlans.

By: Gideon Haden,
on 8/18/2016
Blog:
My Fresh Plans
(
Login to Add to MyJacketFlap)
JacketFlap tags:
science,
Add a tag
Zoo animals like lions and tigers may be exciting, but we have a native animal that’s just as big and exciting: the bison. A study of bison can liven up a study on Native Americans, pioneers, or the Great Plains. They’re also a fun animal study subject.
FreshPlans visited some bison at the National Wildlife Research Center in Ft. Collins, Colorado. Can you see the bison in the picture below? He doesn’t look very big, right? Up close, these are very big animals. They came up pretty close to get a good look at us, so we got a good look at them, too.
We saw bison standing around, eating grass, standing around, rolling in the dirt, and standing around. This is pretty much what we do, our guide explained. “They can run, and if they do, you want to get out of the way,” he told us. But they don’t go scampering around for fun.
These bison are part of a joint USDA and Colorado State University project to bring healthy bison back to Colorado. A disease called brucellosis has become a problem in the herds of buffalo in Yellowstone Park. The project is using new technology to breed healthy bison who are descendants of the Yellowstone Park herds, without the dangerous disease.
When we teach about animals, we like to focus on four things:
- Morphology: the physical characteristics of animals, including body parts and adaptations.
- Life cycles: how animals are born, live, and reproduce.
- Habitats: the places where animals live.
- Relationships with humans: how humans affect the animals and how they affect us.
Even though we got a good look at the bison, we couldn’t touch them. We were curious about their unusual shape. So we went to the Discovery Museum in Ft. Collins to look at the skeleton of a bison. We saw that the big humps on their backs had bones inside. It reminded us of a stegoasaurus.
We got a good look at the skull of the bison, which seemed to be wearing a happy grin. Check out an interactive lesson on the bison’s digestive system to get an idea what’s inside a living bison.
We learned that bison are mammals and ruminants, like cows. They have live babies, which grow up and have babies of their own, just as people do.
The museum has a taxidermy bison, which looked a lot like the live bison we saw — although it was a lot cleaner and neater. We got to feel bison fun, and we were surprised to find that it was very soft.
This bison is shown in a place made to look like its natural habitat: the prairie. The bison we visited at the USDA Wildlife Research Center live on the prairie, but they don’t get to roam like the buffalo in the song.
While some people eat bison meat today, we learned that most “buffalo meat” you can buy in a restaurant or a grocery comes from animals which have both bison and domestic cow heritage. We found bison wool yarn in Ft. Collins, but once again it included both bison wool and wool from sheep. Bison’s relationship with people today is less about human beings using bison for practical purposes and more about humans trying to care for the bison and make sure our grandchildren can still see this majestic animal on our prairies when they grow up.
Native Americans living on the plains and prairies, however, relied heavily on bison. Let younger students try out this interactive lesson on the relationship between Native Americans and bison. Older students will enjoy this more complex interactive web page from the Smithsonian.
Here are some more resources for teaching about bison:
- Check out the Smithsonian’s Interactive Bison Exhibit for a little mouse practice and reading. Set it up as a station at your classroom computer and let students whet their appetite for learning about bison with a lot of intriguing facts.
- Mr. Nussbaum has some fun activities about bison, both online and printable.
- Texas Parks and Wildlife have a lesson on what bison eat. This page includes a number of different activities bringing up a lot of interesting points, and introducing the word “forbs,” which was a new one for us. There’s an interesting activity asking students to analyze a photograph, which we think could be a good part of critical reading and media literacy lessons. Feel free to use the photos on this page for your analysis!
- The U.S. Mint has a lesson that helps students to recognize bison as natural resources. Both this lesson and the previous link include plant study.
- Woolaroc Museum has a bison lesson plan pdf with reproducibles including information about bison and Plains Indians, as well as a retelling of a traditional folk tale.
- The Smithsonian American Art Museum has a lesson using George Catlin’s paintings and writings to explore the idea of regions.
- The National Wildlife Federation has a science process lesson that gives students hands-on insight into why it’s so hard to get firm numbers for animal populations. They also have a great bison lesson plan with lots of background information which could be used alongside the first lesson.
- Check out the LiveScience Bison News page. This could be part of your classroom morning news roundup, a great reading resource for your bison unit, or part of a student research project.
Save
Save
Save
Save
The post Bison Lesson Plans appeared first on FreshPlans.
By: Gideon Haden,
on 8/15/2016
Blog:
My Fresh Plans
(
Login to Add to MyJacketFlap)
JacketFlap tags:
Add a tag
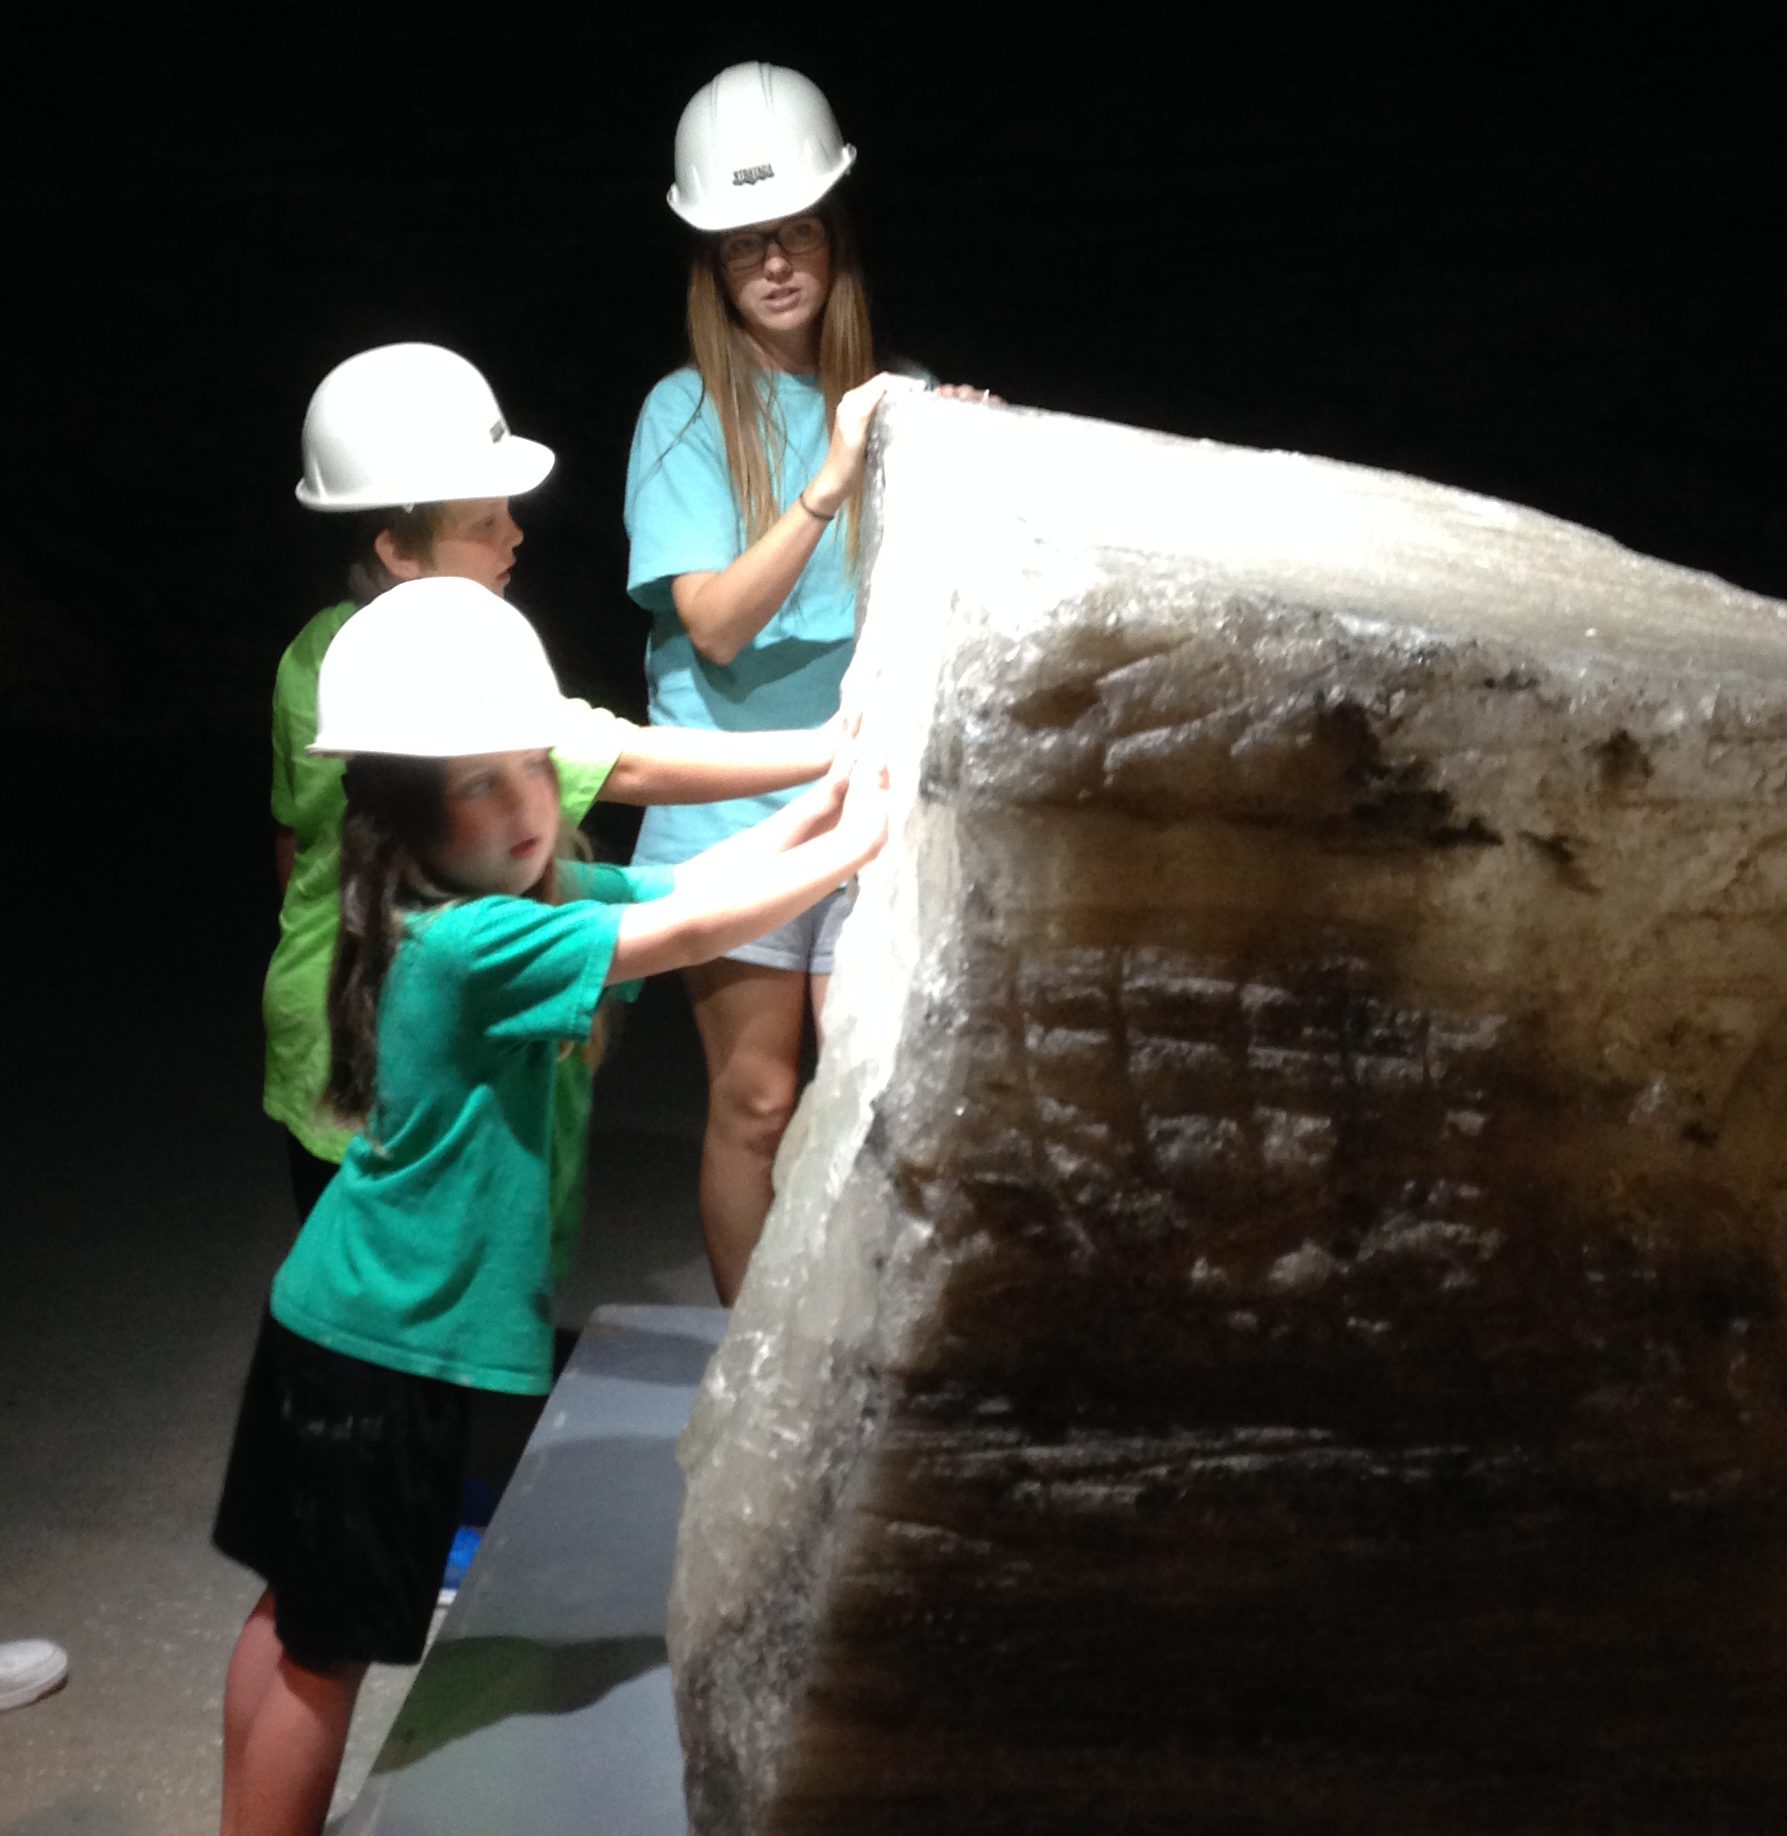
FreshPlans checked out Strataca, a museum at a working salt mine in Hutchinson, Kansas. We had the opportunity to go 650 feet down below the surface and see part of the mine. We learned a lot about salt!
There are still salt miners working in Hutchison, mining salt used on icy roads. This part of the mining industry, the nonmetallic mineral mining and quarrying industry, is not expected to grow in the future, but it’s essential work right now and an important part of the history of Hutchinson.
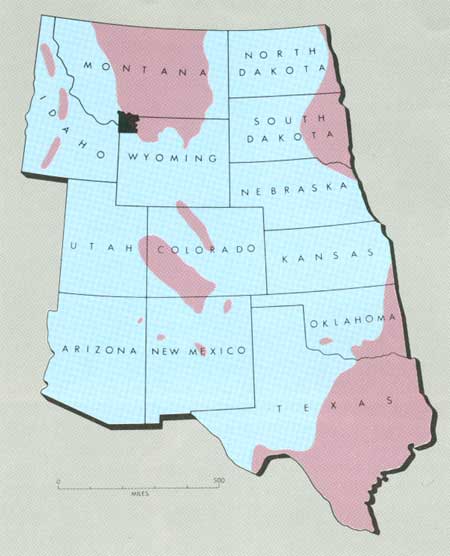
In fact, it’s an important part of the history of the Midwest, way back when it was under water. If your school is located in the middle of North America, chances are good that the land where it sits was once under the Permian Sea.
 Is your school’s location on this map? Does it look as though the land where your school sits used to be under the sea?
If so, you might have salt somewhere in your neighborhood, too.
The salt mine in Hutchinson, Kansas, is part of the Permian Wellington Formation, formed about 275 million years ago when the Permian Sea dried up. At 27,000 square miles, this is one of the world’s largest salt deposits.
The deposit was discovered in 1887 by a prospector who was looking for oil. He didn’t find oil, but he did find salt. By 1923, the salt mine we visited was producing salt commercially. It still turns out about 500,000 tons of rock salt each year.
It’s called “rock salt” because the salt is in rocks.

This giant piece of salt is fun to touch. The walls and ceilings in the salt mine are also made of salt. We got to ride in a little train through a part of the salt mine that is no longer in use. There we had a chance to see the places where the miners worked, the miners’ bathroom, and even a part of the mine where layers of salt had fallen from the ceiling to the floor. It was interesting to think about what it might have been like to work in a salt mine.
The Kansas Salt Museum at Strataca has some great resources for educators.
Here are some more online resources for a study of salt in the context of basic chemistry:
- A lesson on dissolving salt in water from PBS provides hands-on experience with ideas about solvents, solutes, and solutions, with study materials for high school students.
- Study Ladder has a whiteboard presentation on the subject of salt production.
- ScienceNetLinks has a lesson that uses salt to work with magnification. If you’ve got magnifying glasses and microscopes on hand, this lesson gives you a simple way to put them to work.
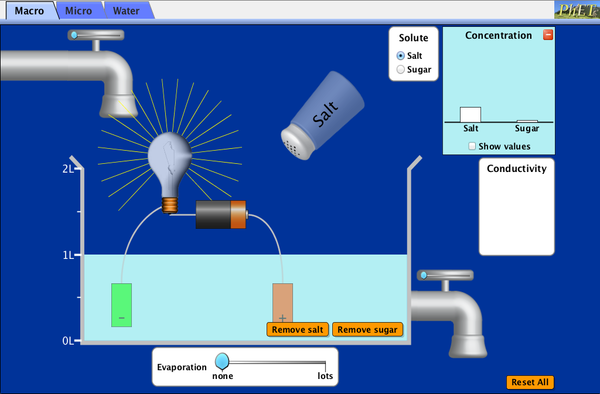
- The University of Colorado offers a Java simulation with lots of resources on salt and sugar solutions.
If you have a chance to visit Strataca, you should. If not, think about our field trip and spend a little time exploring salt in your classroom. Lunch will never be the same!
The post FreshPlans Visits a Salt Mine appeared first on FreshPlans.
FreshPlans checked out Strataca, a museum at a working salt mine in Hutchinson, Kansas. We had the opportunity to go 650 feet down below the surface and see part of the mine. We learned a lot about salt!
There are still salt miners working in Hutchison, mining salt used on icy roads. This part of the mining industry, the nonmetallic mineral mining and quarrying industry, is not expected to grow in the future, but it’s essential work right now and an important part of the history of Hutchinson.
In fact, it’s an important part of the history of the Midwest, way back when it was under water. If your school is located in the middle of North America, chances are good that the land where it sits was once under the Permian Sea.
Is your school’s location on this map? Does it look as though the land where your school sits used to be under the sea?
If so, you might have salt somewhere in your neighborhood, too.
The salt mine in Hutchinson, Kansas, is part of the Permian Wellington Formation, formed about 275 million years ago when the Permian Sea dried up. At 27,000 square miles, this is one of the world’s largest salt deposits.
The deposit was discovered in 1887 by a prospector who was looking for oil. He didn’t find oil, but he did find salt. By 1923, the salt mine we visited was producing salt commercially. It still turns out about 500,000 tons of rock salt each year.
It’s called “rock salt” because the salt is in rocks.
This giant piece of salt is fun to touch. The walls and ceilings in the salt mine are also made of salt. We got to ride in a little train through a part of the salt mine that is no longer in use. There we had a chance to see the places where the miners worked, the miners’ bathroom, and even a part of the mine where layers of salt had fallen from the ceiling to the floor. It was interesting to think about what it might have been like to work in a salt mine.
The Kansas Salt Museum at Strataca has some great resources for educators.
Here are some more online resources for a study of salt in the context of basic chemistry:
- A lesson on dissolving salt in water from PBS provides hands-on experience with ideas about solvents, solutes, and solutions, with study materials for high school students.
- Study Ladder has a whiteboard presentation on the subject of salt production.
- ScienceNetLinks has a lesson that uses salt to work with magnification. If you’ve got magnifying glasses and microscopes on hand, this lesson gives you a simple way to put them to work.
- The University of Colorado offers a Java simulation with lots of resources on salt and sugar solutions.
If you have a chance to visit Strataca, you should. If not, think about our field trip and spend a little time exploring salt in your classroom. Lunch will never be the same!
The post FreshPlans Visits a Salt Mine appeared first on FreshPlans.
By: Gideon Haden,
on 4/19/2015
Blog:
My Fresh Plans
(
Login to Add to MyJacketFlap)
JacketFlap tags:
Add a tag
When we study living things, we like to include four topics:
- morphology
- life cycles
- habitats
- relationships with humans
The morphology (study of the form) of flowers includes the parts of the flower and what each part does, as well as the different kinds of flowers. Start by introducing or reviewing the morphology of a flower:
- Download The Parts of a Flower Powerpoint Presentation for a clear introduction to the parts of a flower.
- Have students bring flowers to class and dissect them. (If you are in a setting in which students may not have easy access to wildflowers or flowers in their own gardens, bring a bouquet of mixed flowers to class.) Use the American Museum of Natural History’s Flower Anatomy page if you don’t have a diagram in your science text. Have students recreate the diagram with the parts of their flowers.
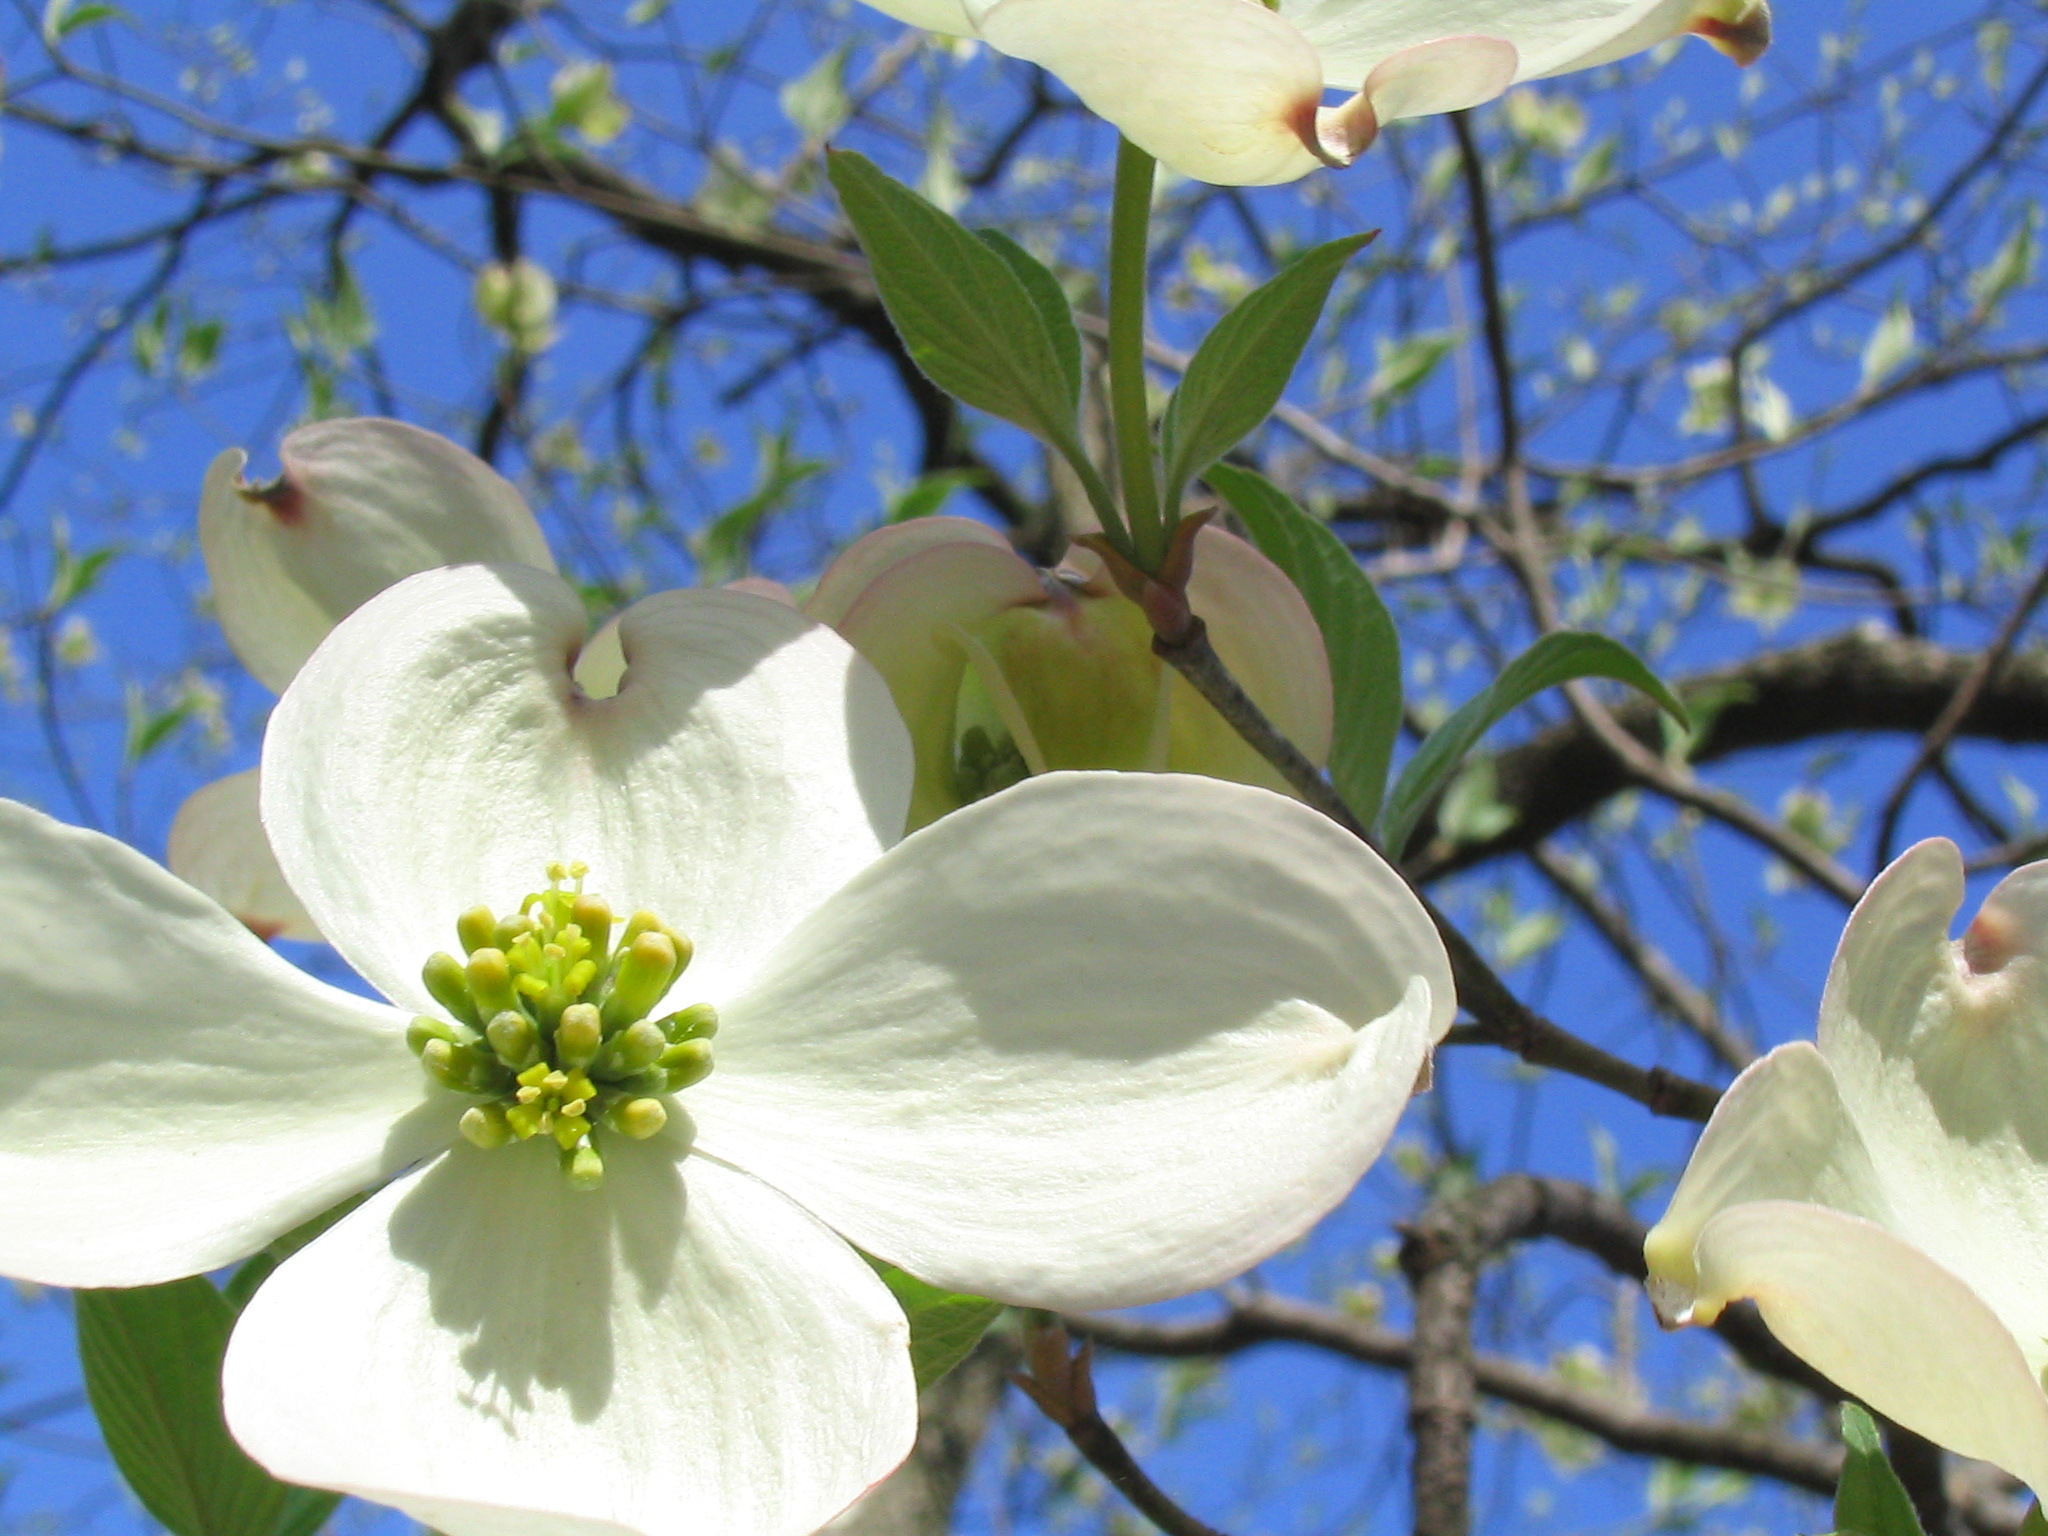
- Create a class Pinterest board showing as many different kinds of flowers as possible. Challenge students to find the petals and stamens of each flower. This can be tricky — for example, the large white flowers of the dogwood flower are actually bracts (like the poinsettia) and the petals are the tiny structures in the center.

The life cycles of flowering plants generally consist of
- pollination of the flower>
- formation of seeds>
- germination of seeds>
- growth leading to flowers>
- pollination again
Here are some resources on the life cycle of the plants:
Probably the best possible way to study the life cycle of the plant is to plant one. In Tech Lessons on Plants you can simulate the life cycle in Google Earth, or you can find a bean growing project in Jack and the Beanstalk.
Flowers grow in many different habitats. If you’re using the Pinterest board idea, you might want to add separate boards for flowers found in different habitats, such as mountains, deserts, tropical and temperate forests, prairies, and cities. However, these distinctions are often only relevant to wildflowers. Not only are flowers cultivated in plenty of habitats which are not their natural habitats, but they are also carefully bred to live in different habitats from their own.
Gardens are sort of like zoos for plants; most gardens, whether at your school or your students’ homes or a large botanical garden, showcase plants from many different places. Find a native plant garden in your area and visit it. How many of the flowers there are familiar to your class?
Use online research or field trips to identify ten plants that are native to your region. Plan a garden for your school using these plants. Maybe you can really plant the garden!
Flowers have a complex relationship with humans. Flowers show up in our homes and gardens, artwork and objects like clothing and wallpapers, and in our songs and stories. Here are a few choices for exploring this relationship:
- Use coloring pages of the state flowers to create a paper quilt of the United States. Divide the coloring pages among students and ask each student to find out why the flower was chosen by the state.
- Traditionally, flowers had a variety of meanings, so that people could communicate in their secret language. If you sent your friend a bunch of Bells of Ireland, it meant, “Good luck!” Check out the Language of Flowers page from Texas A&M, and see how practical this kind of communication might be. Decide how the main characters of the literature you’re currently reading would have put together a bouquet that showed their true feelings.
- Flowers turn up in literature sometimes. Discuss the flowers in Sleeping Beauty as an example. Then find examples of flowers that are important in books you’re reading, popular songs, and movies the class has seen.
The post Flowers Study Guide appeared first on FreshPlans.
When we study living things, we like to include four topics:
- morphology
- life cycles
- habitats
- relationships with humans
The morphology (study of the form) of flowers includes the parts of the flower and what each part does, as well as the different kinds of flowers. Start by introducing or reviewing the morphology of a flower:
- Download The Parts of a Flower Powerpoint Presentation for a clear introduction to the parts of a flower.
- Have students bring flowers to class and dissect them. (If you are in a setting in which students may not have easy access to wildflowers or flowers in their own gardens, bring a bouquet of mixed flowers to class.) Use the American Museum of Natural History’s Flower Anatomy page if you don’t have a diagram in your science text. Have students recreate the diagram with the parts of their flowers.
- Create a class Pinterest board showing as many different kinds of flowers as possible. Challenge students to find the petals and stamens of each flower. This can be tricky — for example, the large white flowers of the dogwood flower are actually bracts (like the poinsettia) and the petals are the tiny structures in the center.
The life cycles of flowering plants generally consist of
- pollination of the flower>
- formation of seeds>
- germination of seeds>
- growth leading to flowers>
- pollination again
Here are some resources on the life cycle of the plants:
Probably the best possible way to study the life cycle of the plant is to plant one. In Tech Lessons on Plants you can simulate the life cycle in Google Earth, or you can find a bean growing project in Jack and the Beanstalk.
Flowers grow in many different habitats. If you’re using the Pinterest board idea, you might want to add separate boards for flowers found in different habitats, such as mountains, deserts, tropical and temperate forests, prairies, and cities. However, these distinctions are often only relevant to wildflowers. Not only are flowers cultivated in plenty of habitats which are not their natural habitats, but they are also carefully bred to live in different habitats from their own.
Gardens are sort of like zoos for plants; most gardens, whether at your school or your students’ homes or a large botanical garden, showcase plants from many different places. Find a native plant garden in your area and visit it. How many of the flowers there are familiar to your class?
Use online research or field trips to identify ten plants that are native to your region. Plan a garden for your school using these plants. Maybe you can really plant the garden!
Flowers have a complex relationship with humans. Flowers show up in our homes and gardens, artwork and objects like clothing and wallpapers, and in our songs and stories. Here are a few choices for exploring this relationship:
- Use coloring pages of the state flowers to create a paper quilt of the United States. Divide the coloring pages among students and ask each student to find out why the flower was chosen by the state.
- Traditionally, flowers had a variety of meanings, so that people could communicate in their secret language. If you sent your friend a bunch of Bells of Ireland, it meant, “Good luck!” Check out the Language of Flowers page from Texas A&M, and see how practical this kind of communication might be. Decide how the main characters of the literature you’re currently reading would have put together a bouquet that showed their true feelings.
- Flowers turn up in literature sometimes. Discuss the flowers in Sleeping Beauty as an example. Then find examples of flowers that are important in books you’re reading, popular songs, and movies the class has seen.
The post Flowers Study Guide appeared first on FreshPlans.
By: Rebecca Haden,
on 3/5/2015
Blog:
My Fresh Plans
(
Login to Add to MyJacketFlap)
JacketFlap tags:
Add a tag
At this time of year, weather is the perfect multidisciplinary study. Weather is on everyone’s minds, whether you’re facing winter storms or signs of spring. There are perfect literature options like mythology about weather gods or parables and poems about the wind, plenty of science topics connect with weather and each one brings in math, and weather phenomena have inspired music, too.
Here’s a lesson that makes a great introduction to any unit on weather.
Visit Tag Galaxy to begin. You’ll have a place to type in your first word: weather.

Soon you’ll see a swirling collection of planets labeled with related words.
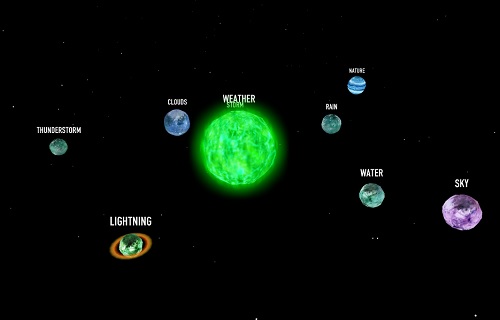
Click on the “sun” to see images from FlickR brought together to create an amazing graphic.
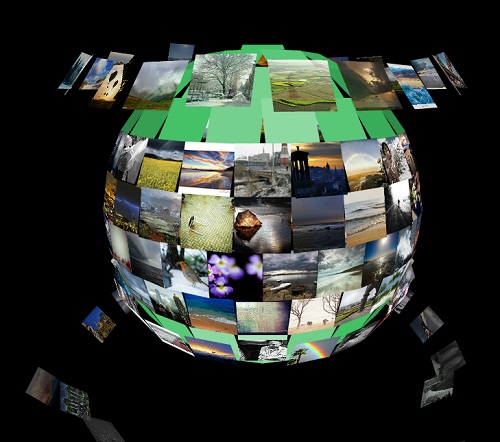
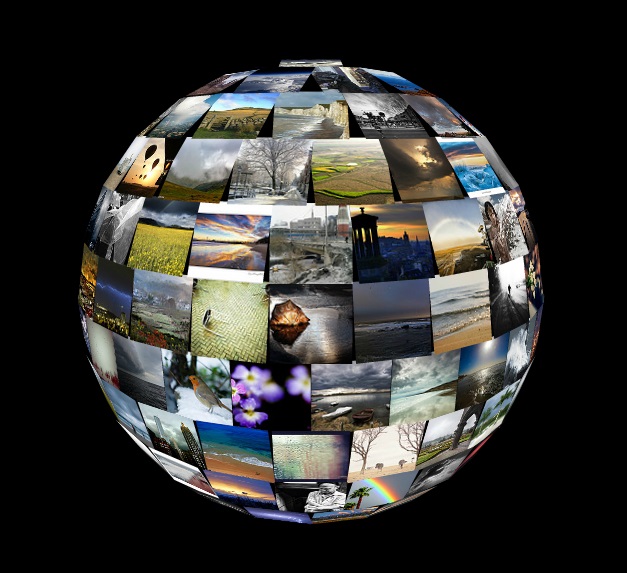
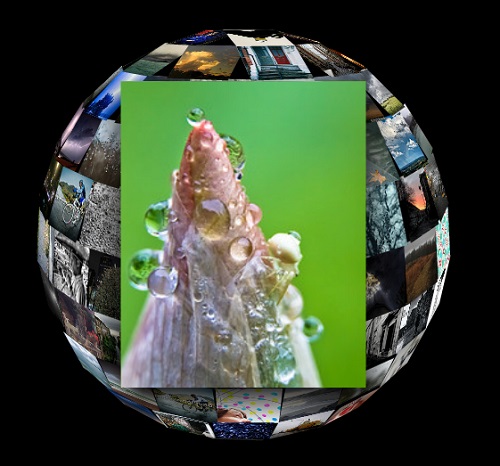
You can bring in more images, and you can also explore each of the “planets” in this way, discovering more words and more images. You can click on any picture to see it more closely — here’s a beautiful image from “rain”:
Tag Galaxy can be mesmerizing, and it rewards exploration. Show it first on your class projector and let everyone ooh and ahh for a while. Then let students explore the tool on their own computers.
Here are some ideas of what to do next:
- Have students list the words they find that relate to weather. Let students write individual words on cards or cut outs and hang them from the ceiling or post them on a bulletin board.
- Ask students to choose a word and then an image to use as a writing prompt. There are thousands of choices, so everyone should be able to find something inspiring.
- Making a globe from photos in real life would be a big job, but you can make a smaller version easily. Have students print out, draw, and/or cut out pictures of weather. Use a round template to make circles from the pictures, and then a triangular template to fold in the edges. Connect the edges to form a sphere, as shown for the “Disco Ball” ornament at this paper craft page.
At this point, your class should be excited about weather and ready for some learning!
The post Tag Galaxy Weather Studies appeared first on FreshPlans.
At this time of year, weather is the perfect multidisciplinary study. Weather is on everyone’s minds, whether you’re facing winter storms or signs of spring. There are perfect literature options like mythology about weather gods or parables and poems about the wind, plenty of science topics connect with weather and each one brings in math, and weather phenomena have inspired music, too.
Here’s a lesson that makes a great introduction to any unit on weather.
Visit Tag Galaxy to begin. You’ll have a place to type in your first word: weather.
Soon you’ll see a swirling collection of planets labeled with related words.
Click on the “sun” to see images from FlickR brought together to create an amazing graphic.
You can bring in more images, and you can also explore each of the “planets” in this way, discovering more words and more images. You can click on any picture to see it more closely — here’s a beautiful image from “rain”:
Tag Galaxy can be mesmerizing, and it rewards exploration. Show it first on your class projector and let everyone ooh and ahh for a while. Then let students explore the tool on their own computers.
Here are some ideas of what to do next:
- Have students list the words they find that relate to weather. Let students write individual words on cards or cut outs and hang them from the ceiling or post them on a bulletin board.
- Ask students to choose a word and then an image to use as a writing prompt. There are thousands of choices, so everyone should be able to find something inspiring.
- Making a globe from photos in real life would be a big job, but you can make a smaller version easily. Have students print out, draw, and/or cut out pictures of weather. Use a round template to make circles from the pictures, and then a triangular template to fold in the edges. Connect the edges to form a sphere, as shown for the “Disco Ball” ornament at this paper craft page.
At this point, your class should be excited about weather and ready for some learning!
The post Tag Galaxy Weather Studies appeared first on FreshPlans.
By: hadensites,
on 6/23/2014
Blog:
My Fresh Plans
(
Login to Add to MyJacketFlap)
JacketFlap tags:
Add a tag
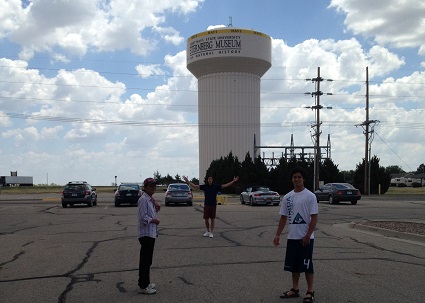
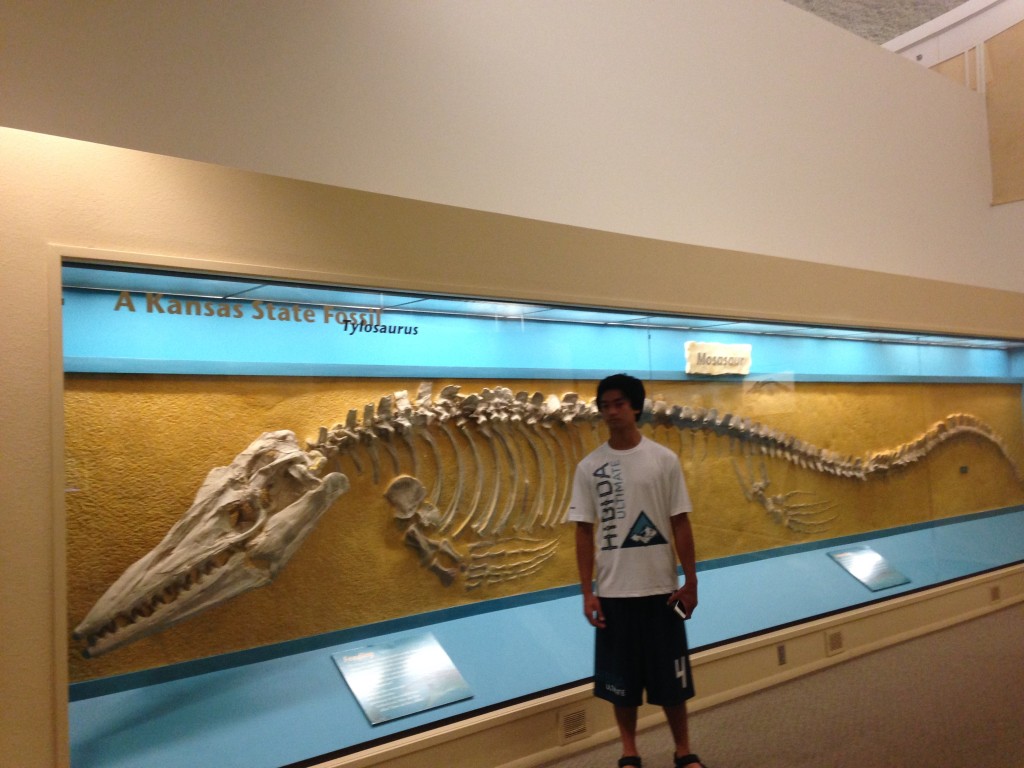
The Sternberg Museum of Natural History is a bit of a surprise.
Tucked away in a residential neighborhood in Hays, Kansas, the museum is unprepossessing from the outside. It grew out of the local fossils collections originally housed at the Kansas State Normal School, founded in 1902, which later became Ft. Hayes State University.
George F. Sternberg was in charge of gathering all the exhibits together into a museum that could share this wealth of specimens and knowledge. Sternberg found his first major fossil, a complete plesiosaur, in 1892. He was 9 years old at the time.
Here are the FreshPlans guys at the museum that bears Sternberg’s name. They’re feeling uncertain about this field trip.
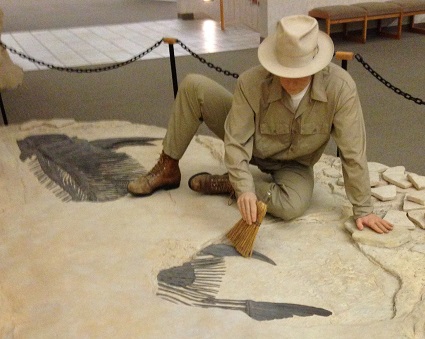
Once inside, they see that the museum is definitely worth a visit. Here’s Mr. Sternberg himself — or at least a model of him — showing how archaeologists and paleontologists work. All dirt and dust has to be cleaned away from the fossil very carefully so there’s no damage. Fossils tell us more all that we can know about what life was like before human beings were around to see and record the world. Being very careful and accurate is super important!
There are a number of permanent exhibits that show what Kansas looked like long before people came to see it. The “Titans of the Ice Age” exhibit shows the prehistoric animals that lived here during the last Ice Age, along with some modern animals that are similar to them.
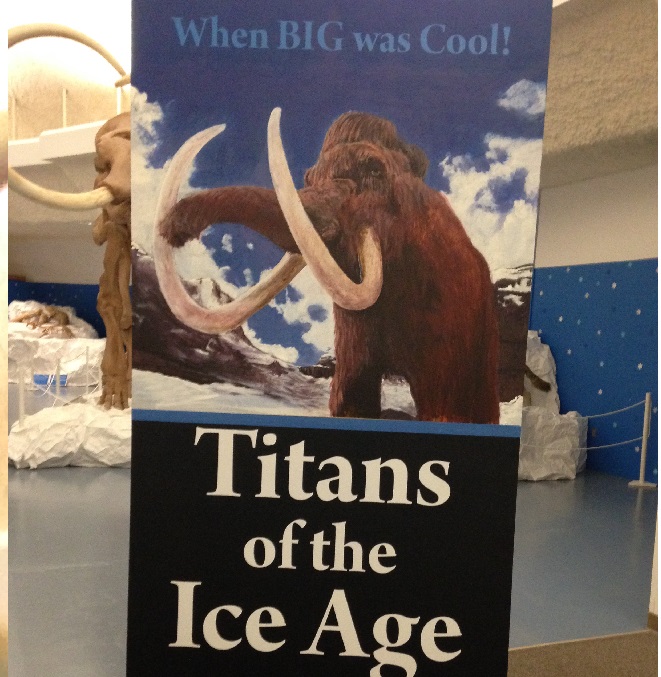
The modern lion, for example, is similar to the ancient lion which we know only from fossils.

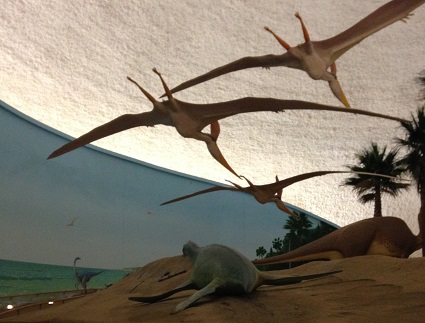
Before the Ice Age, dinosaurs roamed what would later become Kansas. Pteranodons are a special focus at the Sternberg, which has an exceptional collection of materials relating to these flying dinosaurs, the forerunners of modern birds.
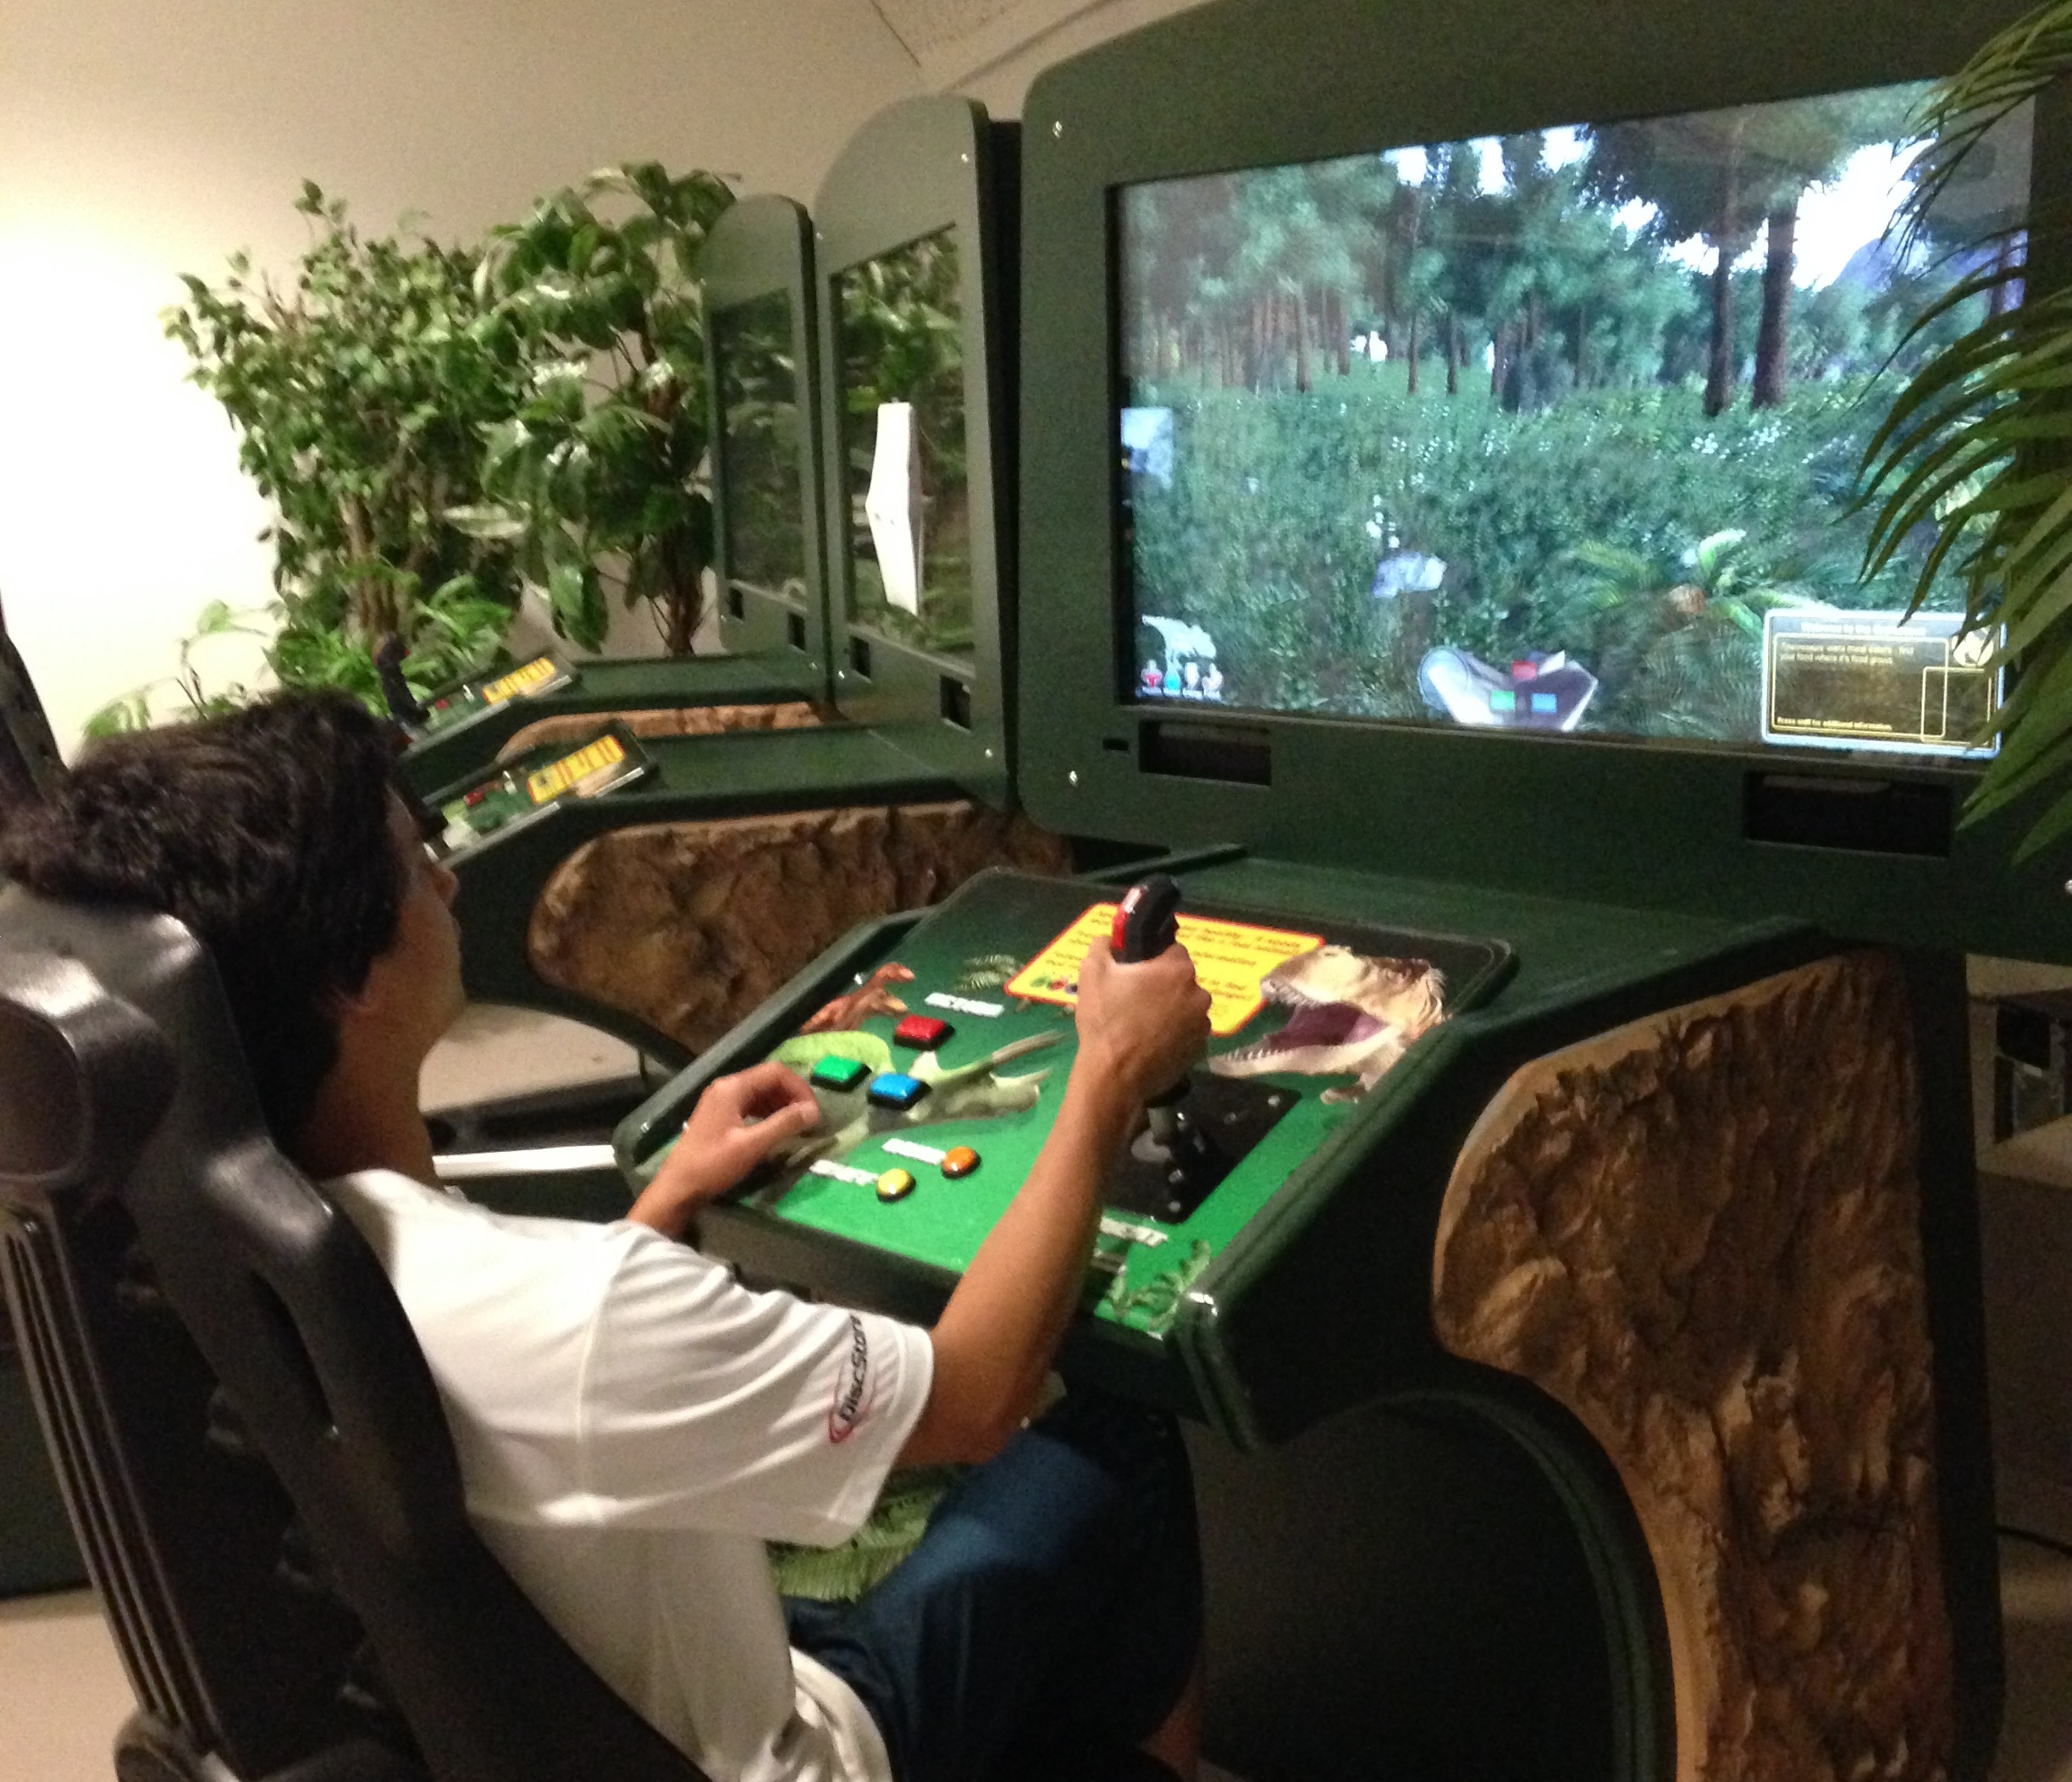
You can also play video games designed to help visitors understand what like would have been like for the dinosaurs, and to get a sense of these large animals as animals, rather than cartoon monsters. Using joysticks, visitors can make decisions based on the environment and the sensory information available to the dinosaurs.

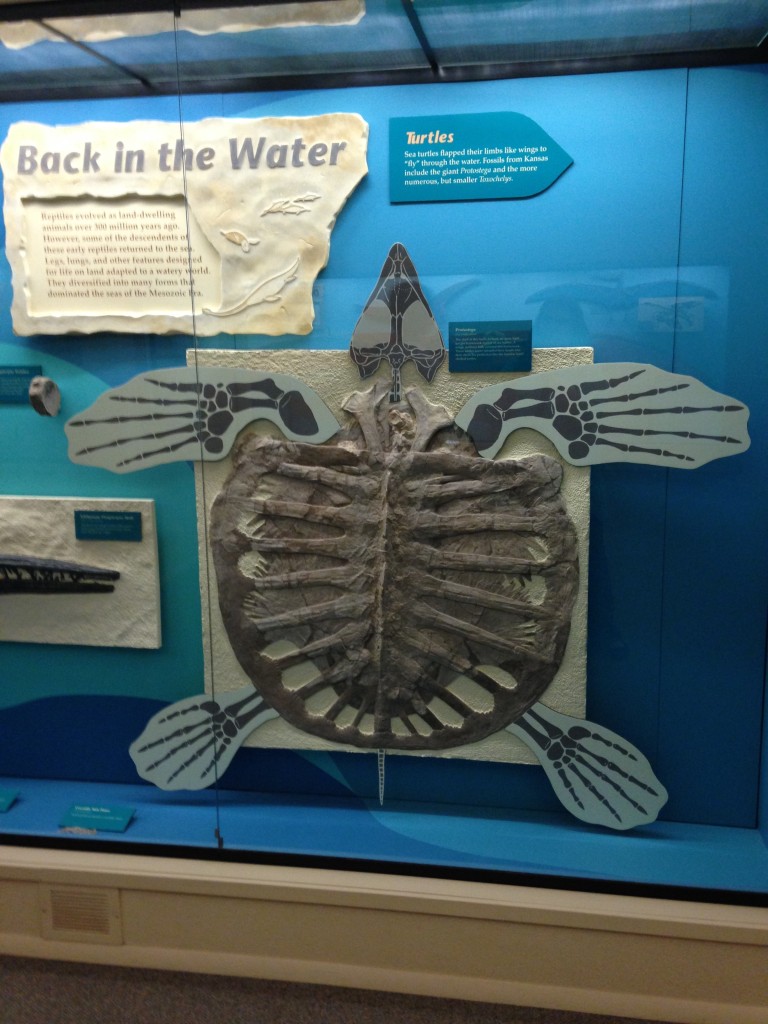
Traveling back even further in time, we come to the days when Kansas was under the sea.
It can be hard for kids to imagine that the places where they live were once covered by oceans, but the Sternberg has extensive interpretive materials which help visitors understand this more fully.
There are also temporary exhibits. When FreshPlans visited, there was an exhibit about rattlesnakes.
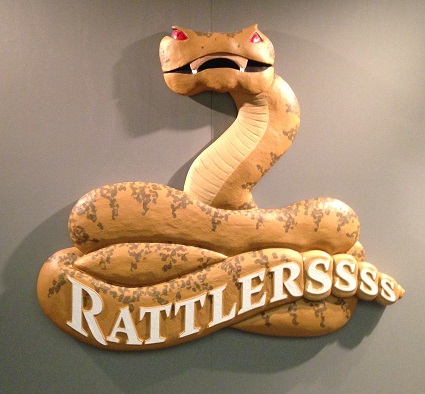
There were live snakes as well as interpretive exhibits that explained about the morphology, habitat, and habits of the rattlesnake, as well as their relationships with humans.

There were quite a few more live animals, and it was nice to see the modern animals along with those that are extinct. The sheer variety of exhibits kept the interest level high.
The Discovery Room is a great hands-on area with lots to see and do. There are many educational programs, from guided hikes to sleepovers, for schools and for families.
If you find yourself in Hays, do not fail to visit the Sternberg.
The post FreshPlans Visits the Sternberg Museum of Natural History appeared first on FreshPlans.
The Sternberg Museum of Natural History is a bit of a surprise.
Tucked away in a residential neighborhood in Hays, Kansas, the museum is unprepossessing from the outside. It grew out of the local fossils collections originally housed at the Kansas State Normal School, founded in 1902, which later became Ft. Hayes State University.
George F. Sternberg was in charge of gathering all the exhibits together into a museum that could share this wealth of specimens and knowledge. Sternberg found his first major fossil, a complete plesiosaur, in 1892. He was 9 years old at the time.
Here are the FreshPlans guys at the museum that bears Sternberg’s name. They’re feeling uncertain about this field trip.
Once inside, they see that the museum is definitely worth a visit. Here’s Mr. Sternberg himself — or at least a model of him — showing how archaeologists and paleontologists work. All dirt and dust has to be cleaned away from the fossil very carefully so there’s no damage. Fossils tell us more all that we can know about what life was like before human beings were around to see and record the world. Being very careful and accurate is super important!
There are a number of permanent exhibits that show what Kansas looked like long before people came to see it. The “Titans of the Ice Age” exhibit shows the prehistoric animals that lived here during the last Ice Age, along with some modern animals that are similar to them.
The modern lion, for example, is similar to the ancient lion which we know only from fossils.
Before the Ice Age, dinosaurs roamed what would later become Kansas. Pteranodons are a special focus at the Sternberg, which has an exceptional collection of materials relating to these flying dinosaurs, the forerunners of modern birds.
You can also play video games designed to help visitors understand what like would have been like for the dinosaurs, and to get a sense of these large animals as animals, rather than cartoon monsters. Using joysticks, visitors can make decisions based on the environment and the sensory information available to the dinosaurs.
Traveling back even further in time, we come to the days when Kansas was under the sea.
It can be hard for kids to imagine that the places where they live were once covered by oceans, but the Sternberg has extensive interpretive materials which help visitors understand this more fully.
There are also temporary exhibits. When FreshPlans visited, there was an exhibit about rattlesnakes.
There were live snakes as well as interpretive exhibits that explained about the morphology, habitat, and habits of the rattlesnake, as well as their relationships with humans.
There were quite a few more live animals, and it was nice to see the modern animals along with those that are extinct. The sheer variety of exhibits kept the interest level high.
The Discovery Room is a great hands-on area with lots to see and do. There are many educational programs, from guided hikes to sleepovers, for schools and for families.
If you find yourself in Hays, do not fail to visit the Sternberg.
The post FreshPlans Visits the Sternberg Museum of Natural History appeared first on FreshPlans.
By: FreshPlans,
on 2/11/2014
Blog:
My Fresh Plans
(
Login to Add to MyJacketFlap)
JacketFlap tags:
Add a tag
Gazpacho for Nacho by Tracey Kyle with illustrations by Carolina Farias is a charming book filled with teachable moments.
The name of this tiny muchacho was Nacho
and all he would eat was a soup called gazpacho.
This pretty well sums up the story: Nacho won’t eat anything else. At last his mother teaches him to make gazpacho (and the recipe is included in the book) and in the last line, he says, “I’m trying new recipes.”
This could be a book for picky eaters, but the story really isn’t the point. The illustrations include wonderful giant vegetables and a silly burro at the kitchen table, and young students should enjoy it as a read-aloud.
There are also dozens of Spanish vocabulary words woven into the story in such a way that the meanings are clear — and if there are any uncertainties, there’s a glossary.
Spanish language
Use the glossary to create word cards for the Spanish language words and their English counterparts. Most are foods, so you can sort them into foods and not-foods, match the two languages, alphabetize them (the glossary is in alphabetical order, so students can use it to check their work), and identify rhymes.
Bring vegetables or pictures of vegetables into the class and practice naming them. Admire the pictures of people hugging the giant veggies and challenge students to create their own pictures of themselves hugging their favorite vegetable, labeled in Spanish.
Nutrition charts
Use government data to identify the nutritional value of the vegetables in the story. Students can click through on the names of the vegetables and create a chart showing the vitamins and minerals associated with the vegetables in the story. If your students are too young to do their own clicking or reading, you can use the USDA nutrient database to identify a few top vitamins, and create a chart as a class project.
Use a pocket chart to create a table with vitamins A, B, C, and D, and help students place the vegetable word cards (made for the Spanish language activities) into the right columns on the pocket chart. You’ll discover that you need multiples of some word cards, so ask students to help write them out.
Bring a few veggies into class to taste — or make gazpacho! Chart how well the class likes the items they taste.
Sequencing
This book contains several different sequences:
- the meals and snacks throughout the day, at which Nacho refuses to try any dishes but gazpacho
- the shopping trip, when Nacho and his mami choose the vegetables they need to cook gazpacho
- the process of cooking the gazpacho
- the process Nacho goes through in order to change his mind and become open to the idea of eating — or at least cooking — other dishes
Act out the steps for each process. Then write out the steps for the recipe. Number the steps and illustrate them.
Finally, ask students to write out their own recipes, step by step, for foods they like. Create a bulletin board of their recipes.
The post Gazpacho for Nacho Classroom Activities appeared first on FreshPlans.
By: admin,
on 2/11/2014
Blog:
My Fresh Plans
(
Login to Add to MyJacketFlap)
JacketFlap tags:
Add a tag

Gazpacho for Nacho by Tracey Kyle with illustrations by Carolina Farias is a charming book filled with teachable moments.
The name of this tiny muchacho was Nacho
and all he would eat was a soup called gazpacho.
This pretty well sums up the story: Nacho won’t eat anything else. At last his mother teaches him to make gazpacho (and the recipe is included in the book) and in the last line, he says, “I’m trying new recipes.”
This could be a book for picky eaters, but the story really isn’t the point. The illustrations include wonderful giant vegetables and a silly burro at the kitchen table, and young students should enjoy it as a read-aloud.
There are also dozens of Spanish vocabulary words woven into the story in such a way that the meanings are clear — and if there are any uncertainties, there’s a glossary.
Spanish language
Use the glossary to create word cards for the Spanish language words and their English counterparts. Most are foods, so you can sort them into foods and not-foods, match the two languages, alphabetize them (the glossary is in alphabetical order, so students can use it to check their work), and identify rhymes.
Bring vegetables or pictures of vegetables into the class and practice naming them. Admire the pictures of people hugging the giant veggies and challenge students to create their own pictures of themselves hugging their favorite vegetable, labeled in Spanish.
Nutrition charts
Use government data to identify the nutritional value of the vegetables in the story. Students can click through on the names of the vegetables and create a chart showing the vitamins and minerals associated with the vegetables in the story. If your students are too young to do their own clicking or reading, you can use the USDA nutrient database to identify a few top vitamins, and create a chart as a class project.
Use a pocket chart to create a table with vitamins A, B, C, and D, and help students place the vegetable word cards (made for the Spanish language activities) into the right columns on the pocket chart. You’ll discover that you need multiples of some word cards, so ask students to help write them out.
Bring a few veggies into class to taste — or make gazpacho! Chart how well the class likes the items they taste.
Sequencing
This book contains several different sequences:
- the meals and snacks throughout the day, at which Nacho refuses to try any dishes but gazpacho
- the shopping trip, when Nacho and his mami choose the vegetables they need to cook gazpacho
- the process of cooking the gazpacho
- the process Nacho goes through in order to change his mind and become open to the idea of eating — or at least cooking — other dishes
Act out the steps for each process. Then write out the steps for the recipe. Number the steps and illustrate them.
Finally, ask students to write out their own recipes, step by step, for foods they like. Create a bulletin board of their recipes.
By: FreshPlans,
on 2/11/2014
Blog:
My Fresh Plans
(
Login to Add to MyJacketFlap)
JacketFlap tags:
Add a tag
Gazpacho for Nacho by Tracey Kyle with illustrations by Carolina Farias is a charming book filled with teachable moments.
The name of this tiny muchacho was Nacho
and all he would eat was a soup called gazpacho.
This pretty well sums up the story: Nacho won’t eat anything else. At last his mother teaches him to make gazpacho (and the recipe is included in the book) and in the last line, he says, “I’m trying new recipes.”
This could be a book for picky eaters, but the story really isn’t the point. The illustrations include wonderful giant vegetables and a silly burro at the kitchen table, and young students should enjoy it as a read-aloud.
There are also dozens of Spanish vocabulary words woven into the story in such a way that the meanings are clear — and if there are any uncertainties, there’s a glossary.
Spanish language
Use the glossary to create word cards for the Spanish language words and their English counterparts. Most are foods, so you can sort them into foods and not-foods, match the two languages, alphabetize them (the glossary is in alphabetical order, so students can use it to check their work), and identify rhymes.
Bring vegetables or pictures of vegetables into the class and practice naming them. Admire the pictures of people hugging the giant veggies and challenge students to create their own pictures of themselves hugging their favorite vegetable, labeled in Spanish.
Nutrition charts
Use government data to identify the nutritional value of the vegetables in the story. Students can click through on the names of the vegetables and create a chart showing the vitamins and minerals associated with the vegetables in the story. If your students are too young to do their own clicking or reading, you can use the USDA nutrient database to identify a few top vitamins, and create a chart as a class project.
Use a pocket chart to create a table with vitamins A, B, C, and D, and help students place the vegetable word cards (made for the Spanish language activities) into the right columns on the pocket chart. You’ll discover that you need multiples of some word cards, so ask students to help write them out.
Bring a few veggies into class to taste — or make gazpacho! Chart how well the class likes the items they taste.
Sequencing
This book contains several different sequences:
- the meals and snacks throughout the day, at which Nacho refuses to try any dishes but gazpacho
- the shopping trip, when Nacho and his mami choose the vegetables they need to cook gazpacho
- the process of cooking the gazpacho
- the process Nacho goes through in order to change his mind and become open to the idea of eating — or at least cooking — other dishes
Act out the steps for each process. Then write out the steps for the recipe. Number the steps and illustrate them.
Finally, ask students to write out their own recipes, step by step, for foods they like. Create a bulletin board of their recipes.
By: RebeccaHaden,
on 12/16/2013
Blog:
My Fresh Plans
(
Login to Add to MyJacketFlap)
JacketFlap tags:
Add a tag
Christmas in Spain begins on December 8th, the Feast of the Immaculate Conception, and continues through Epiphany, of Three Kings Day, in January. A few days before Christmas the national lottery drawing takes place, and 75% of Spaniards participate in it — including schoolchildren, who sing the winning numbers as they’re drawn.
On Christmas Eve, families prepare a great feast and sing Christmas carols before going to Midnight Mass or “La Misa Del Gallo.” The mass is followed by a parade through the streets with guitars and tambourines and singing. “Esta noche es Noche-Buena,” the old saying goes, “Y no es noche de dormir.” (“It’s Christmas Eve, not a night for sleeping.”) On Christmas day, most people go to church and then continue celebrating with their families. December 28th, the Feast of the Innocents, is observed much as we observe April Fool’s Day in the U.S., with practical jokes and harmless tricks. Children receive gifts on January 6th from the Three Kings.
Here are some fun holiday connections:
- One Spanish custom that works well in the classroom is Amigo Invisible (Invisible Friend), much like Secret Santa in the U.S. Put all the students’ names into a hat and let everyone draw a name. Students will be the Amigo Invisible for the names they draw, offering secret acts of kindness. This can offset pre-holiday rambunctiousness.
- With nearly 30 million Spanish speakers in the U.S., chances are good that you will have Spanish speakers in your classroom. Instead of translating common U.S. holiday songs into Spanish, why not enjoy a traditional Spanish carol like “A Belén pastores“? Work together as a class to translate the words. If you don’t have Spanish speakers in the class, take this opportunity to learn to use Google translate.
- Different customs are found in different parts of Spain, just as is the case in the U.S. One of the most intriguing for Americans is the custom of jumping over a bonfire on the winter solstice, which is found in Granada and Jaen. Another is the custom of setting up swings in town squares. Young people swing in time to music. A bonfire in the playground probably won’t be allowed, but you could use jump ropes instead and let everyone jump over the “bonfire,” and follow that with time on the swings. Using up a bit of excess energy will help everyone concentrate better in the classroom!
The post Christmas in Spain Lesson Plans appeared first on FreshPlans.
By: Rebecca Haden,
on 12/16/2013
Blog:
My Fresh Plans
(
Login to Add to MyJacketFlap)
JacketFlap tags:
Add a tag

Christmas in Spain begins on December 8th, the Feast of the Immaculate Conception, and continues through Epiphany, of Three Kings Day, in January. A few days before Christmas the national lottery drawing takes place, and 75% of Spaniards participate in it — including schoolchildren, who sing the winning numbers as they’re drawn.
On Christmas Eve, families prepare a great feast and sing Christmas carols before going to Midnight Mass or “La Misa Del Gallo.” The mass is followed by a parade through the streets with guitars and tambourines and singing. “Esta noche es Noche-Buena,” the old saying goes, “Y no es noche de dormir.” (“It’s Christmas Eve, not a night for sleeping.”) On Christmas day, most people go to church and then continue celebrating with their families. December 28th, the Feast of the Innocents, is observed much as we observe April Fool’s Day in the U.S., with practical jokes and harmless tricks. Children receive gifts on January 6th from the Three Kings.
Here are some fun holiday connections:
- One Spanish custom that works well in the classroom is Amigo Invisible (Invisible Friend), much like Secret Santa in the U.S. Put all the students’ names into a hat and let everyone draw a name. Students will be the Amigo Invisible for the names they draw, offering secret acts of kindness. This can offset pre-holiday rambunctiousness.
- With nearly 30 million Spanish speakers in the U.S., chances are good that you will have Spanish speakers in your classroom. Instead of translating common U.S. holiday songs into Spanish, why not enjoy a traditional Spanish carol like “A Belén pastores“? Work together as a class to translate the words. If you don’t have Spanish speakers in the class, take this opportunity to learn to use Google translate.
- Different customs are found in different parts of Spain, just as is the case in the U.S. One of the most intriguing for Americans is the custom of jumping over a bonfire on the winter solstice, which is found in Granada and Jaen. Another is the custom of setting up swings in town squares. Young people swing in time to music. A bonfire in the playground probably won’t be allowed, but you could use jump ropes instead and let everyone jump over the “bonfire,” and follow that with time on the swings. Using up a bit of excess energy will help everyone concentrate better in the classroom!
By: RebeccaHaden,
on 12/16/2013
Blog:
My Fresh Plans
(
Login to Add to MyJacketFlap)
JacketFlap tags:
Add a tag
Christmas in Spain begins on December 8th, the Feast of the Immaculate Conception, and continues through Epiphany, of Three Kings Day, in January. A few days before Christmas the national lottery drawing takes place, and 75% of Spaniards participate in it — including schoolchildren, who sing the winning numbers as they’re drawn.
On Christmas Eve, families prepare a great feast and sing Christmas carols before going to Midnight Mass or “La Misa Del Gallo.” The mass is followed by a parade through the streets with guitars and tambourines and singing. “Esta noche es Noche-Buena,” the old saying goes, “Y no es noche de dormir.” (“It’s Christmas Eve, not a night for sleeping.”) On Christmas day, most people go to church and then continue celebrating with their families. December 28th, the Feast of the Innocents, is observed much as we observe April Fool’s Day in the U.S., with practical jokes and harmless tricks. Children receive gifts on January 6th from the Three Kings.
Here are some fun holiday connections:
- One Spanish custom that works well in the classroom is Amigo Invisible (Invisible Friend), much like Secret Santa in the U.S. Put all the students’ names into a hat and let everyone draw a name. Students will be the Amigo Invisible for the names they draw, offering secret acts of kindness. This can offset pre-holiday rambunctiousness.
- With nearly 30 million Spanish speakers in the U.S., chances are good that you will have Spanish speakers in your classroom. Instead of translating common U.S. holiday songs into Spanish, why not enjoy a traditional Spanish carol like “A Belén pastores“? Work together as a class to translate the words. If you don’t have Spanish speakers in the class, take this opportunity to learn to use Google translate.
- Different customs are found in different parts of Spain, just as is the case in the U.S. One of the most intriguing for Americans is the custom of jumping over a bonfire on the winter solstice, which is found in Granada and Jaen. Another is the custom of setting up swings in town squares. Young people swing in time to music. A bonfire in the playground probably won’t be allowed, but you could use jump ropes instead and let everyone jump over the “bonfire,” and follow that with time on the swings. Using up a bit of excess energy will help everyone concentrate better in the classroom!
By: Rebecca Haden,
on 12/11/2013
Blog:
My Fresh Plans
(
Login to Add to MyJacketFlap)
JacketFlap tags:
Add a tag

Bring some holiday spirit to your classroom with these fun tech lessons!
Google’s Santa Tracker
Google’s Santa Tracker has a game for every day till Christmas. Students can choose the clothing colors for Santa’s elves, share a texting conversation between Santa and his reindeer, prepare and send a phone message from Santa to a friend, play games of skill, and explore Santa’s village. On Christmas Eve, Santa will unveil the dashboard of Santa’s sleigh.
This is a super fun center for your classroom computer, and it gives practice with basic keyboard and mouse use. Most activities do not require reading, and there are no Santa spoilers, so you can enjoy this with kids of all ages. Santa lets “big kids” create mp3 greetings for friends, and offers a nice collection of things to celebrate, from la Navidad and Kwanzaa to Winter and the Season.
Journey North
On the way to the solstice (that’s a holiday, too!), track seasonal changes with Journey North. There are ideas and activities that won’t require every student to have a computer, which is nice if you don’t have the ideal level of access, but students can still see how data can be collected, organized, and shared through the use of modern technology. You can communicate with other observers of seasonal signs, add information to the sum of knowledge, and use live cams to observe a number of different animals.
Joining the Citizen Scientists who support Journey North, whether you make a class project of it with a Seasonal Showcase or just set up a computer center and let kids explore on their own, can provide deeper understanding of the seasons as well as real world opportunities to use technology for science.
Interactive Reindeer Orchestra
Care2′s Reindeer Orchestra is pretty silly, but it offers some intensive keyboard and mouse practice, number recognition, and a bit of musical fun, too. Set it up as a center at your classroom computer. Challenge students to make their own tunes. Have students write them out on paper as a series of numbers and leave them for others to play.
If you teach music, let students use the reindeer with sheet music. Ask them which key works best!
By: RebeccaHaden,
on 12/11/2013
Blog:
My Fresh Plans
(
Login to Add to MyJacketFlap)
JacketFlap tags:
Add a tag
Bring some holiday spirit to your classroom with these fun tech lessons!
Google’s Santa Tracker
Google’s Santa Tracker has a game for every day till Christmas. Students can choose the clothing colors for Santa’s elves, share a texting conversation between Santa and his reindeer, prepare and send a phone message from Santa to a friend, play games of skill, and explore Santa’s village. On Christmas Eve, Santa will unveil the dashboard of Santa’s sleigh.
This is a super fun center for your classroom computer, and it gives practice with basic keyboard and mouse use. Most activities do not require reading, and there are no Santa spoilers, so you can enjoy this with kids of all ages. Santa lets “big kids” create mp3 greetings for friends, and offers a nice collection of things to celebrate, from la Navidad and Kwanzaa to Winter and the Season.
Journey North
On the way to the solstice (that’s a holiday, too!), track seasonal changes with Journey North. There are ideas and activities that won’t require every student to have a computer, which is nice if you don’t have the ideal level of access, but students can still see how data can be collected, organized, and shared through the use of modern technology. You can communicate with other observers of seasonal signs, add information to the sum of knowledge, and use live cams to observe a number of different animals.
Joining the Citizen Scientists who support Journey North, whether you make a class project of it with a Seasonal Showcase or just set up a computer center and let kids explore on their own, can provide deeper understanding of the seasons as well as real world opportunities to use technology for science.
Interactive Reindeer Orchestra
Care2’s Reindeer Orchestra is pretty silly, but it offers some intensive keyboard and mouse practice, number recognition, and a bit of musical fun, too. Set it up as a center at your classroom computer. Challenge students to make their own tunes. Have students write them out on paper as a series of numbers and leave them for others to play.
If you teach music, let students use the reindeer with sheet music. Ask them which key works best!
The post Holiday Tech Lessons appeared first on FreshPlans.
By: RebeccaHaden,
on 12/11/2013
Blog:
My Fresh Plans
(
Login to Add to MyJacketFlap)
JacketFlap tags:
Add a tag
Bring some holiday spirit to your classroom with these fun tech lessons!
Google’s Santa Tracker
Google’s Santa Tracker has a game for every day till Christmas. Students can choose the clothing colors for Santa’s elves, share a texting conversation between Santa and his reindeer, prepare and send a phone message from Santa to a friend, play games of skill, and explore Santa’s village. On Christmas Eve, Santa will unveil the dashboard of Santa’s sleigh.
This is a super fun center for your classroom computer, and it gives practice with basic keyboard and mouse use. Most activities do not require reading, and there are no Santa spoilers, so you can enjoy this with kids of all ages. Santa lets “big kids” create mp3 greetings for friends, and offers a nice collection of things to celebrate, from la Navidad and Kwanzaa to Winter and the Season.
Journey North
On the way to the solstice (that’s a holiday, too!), track seasonal changes with Journey North. There are ideas and activities that won’t require every student to have a computer, which is nice if you don’t have the ideal level of access, but students can still see how data can be collected, organized, and shared through the use of modern technology. You can communicate with other observers of seasonal signs, add information to the sum of knowledge, and use live cams to observe a number of different animals.
Joining the Citizen Scientists who support Journey North, whether you make a class project of it with a Seasonal Showcase or just set up a computer center and let kids explore on their own, can provide deeper understanding of the seasons as well as real world opportunities to use technology for science.
Interactive Reindeer Orchestra
Care2′s Reindeer Orchestra is pretty silly, but it offers some intensive keyboard and mouse practice, number recognition, and a bit of musical fun, too. Set it up as a center at your classroom computer. Challenge students to make their own tunes. Have students write them out on paper as a series of numbers and leave them for others to play.
If you teach music, let students use the reindeer with sheet music. Ask them which key works best!
By: FreshPlans,
on 12/6/2013
Blog:
My Fresh Plans
(
Login to Add to MyJacketFlap)
JacketFlap tags:
Add a tag
Winter is a perfect time to teach lessons about heating and cooling. Even if your students are just learning basic scientific concepts, heating and cooling lessons are a fun way to make science engaging. Try this lesson activity to teach students about Arctic and Antarctic wildlife and and entropy.
- Teach studens basic concepts of heating and cooling by thinking about how energy is transferred from one object to another. Look at photos of animals in cold conditions, such as a polar bear in the Arctic, penguins in the Antarctic, and whales in frozen water. Ask students how these different animals stay warm. Polar bears have hollow fur that insulates them with air. Penguins create a warm layer with downy feathers and thick feathers. Whales (and most animals living in cold climates) have a thick layer of fat called blubber. All these strategies help them keep warmth around their bodies the way a jacket helps students keep a layer of warm air around their bodies.
- Have students look up the average temperatures for different areas where these three animals live and determine the coldest temperatures each animal might experience.
- Ask students which technique they think is the most effective—hollow fur, layers of feathers, or a layer of fat?
- Next, talk about what humans do to keep warm in cold temperatures and ask students for examples of what humans do. Some human techniques for staying warm are using clothing, using a heat source, or creating a wind-breaking structure.
- Tell students that they are going to travel to the Antarctic and need to prepare for the cold temperatures. Divide the class into teams and tell your students the object of the experiment is to keep one team member’s hand warm in a bucket of ice water. Set out supplies for teams to use, including bubble wrap (to represent hollow fur); feathers; shortening (for whale fat); fabrics like cotton, wool, and fleece; and plastic bags. Tell students that they need to keep the team member’s hand dry and at 50 degrees after two minutes of submersion in the ice water. They can use any and all the materials to create an insulating device for their team.
- Students will prepare their insulating contraptions and prepare the team member’s hand for the test. When all teams are ready, place a thermometer in the contraption with the team member’s hand.
- Place the team member’s hand in a bucket of ice water for two minutes and watch the thermometer. After two minutes, check the thermometer and write down the temperature on the board of each team. The team with the highest temperature wins.
- Have the winning team explain how they built their insulation and why they think it worked best.
Students will learn in this activity that different combinations of trapped air, fat, and fabrics work better than others and that insulation prevents the transfer of heat from the team member’s hand to the cold water. They’ll also get a good chance to practice problem solving and experimental design.
The post Heating and Cooling Lesson Plans appeared first on FreshPlans.
By: admin,
on 12/6/2013
Blog:
My Fresh Plans
(
Login to Add to MyJacketFlap)
JacketFlap tags:
Add a tag

Winter is a perfect time to teach lessons about heating and cooling. Even if your students are just learning basic scientific concepts, heating and cooling lessons are a fun way to make science engaging. Try this lesson activity to teach students about Arctic and Antarctic wildlife and and entropy.
- Teach studens basic concepts of heating and cooling by thinking about how energy is transferred from one object to another. Look at photos of animals in cold conditions, such as a polar bear in the Arctic, penguins in the Antarctic, and whales in frozen water. Ask students how these different animals stay warm. Polar bears have hollow fur that insulates them with air. Penguins create a warm layer with downy feathers and thick feathers. Whales (and most animals living in cold climates) have a thick layer of fat called blubber. All these strategies help them keep warmth around their bodies the way a jacket helps students keep a layer of warm air around their bodies.
- Have students look up the average temperatures for different areas where these three animals live and determine the coldest temperatures each animal might experience.
- Ask students which technique they think is the most effective—hollow fur, layers of feathers, or a layer of fat?
- Next, talk about what humans do to keep warm in cold temperatures and ask students for examples of what humans do. Some human techniques for staying warm are using clothing, using a heat source, or creating a wind-breaking structure.
- Tell students that they are going to travel to the Antarctic and need to prepare for the cold temperatures. Divide the class into teams and tell your students the object of the experiment is to keep one team member’s hand warm in a bucket of ice water. Set out supplies for teams to use, including bubble wrap (to represent hollow fur); feathers; shortening (for whale fat); fabrics like cotton, wool, and fleece; and plastic bags. Tell students that they need to keep the team member’s hand dry and at 50 degrees after two minutes of submersion in the ice water. They can use any and all the materials to create an insulating device for their team.
- Students will prepare their insulating contraptions and prepare the team member’s hand for the test. When all teams are ready, place a thermometer in the contraption with the team member’s hand.
- Place the team member’s hand in a bucket of ice water for two minutes and watch the thermometer. After two minutes, check the thermometer and write down the temperature on the board of each team. The team with the highest temperature wins.
- Have the winning team explain how they built their insulation and why they think it worked best.
Students will learn in this activity that different combinations of trapped air, fat, and fabrics work better than others and that insulation prevents the transfer of heat from the team member’s hand to the cold water. They’ll also get a good chance to practice problem solving and experimental design.
By: FreshPlans,
on 12/6/2013
Blog:
My Fresh Plans
(
Login to Add to MyJacketFlap)
JacketFlap tags:
Add a tag
Winter is a perfect time to teach lessons about heating and cooling. Even if your students are just learning basic scientific concepts, heating and cooling lessons are a fun way to make science engaging. Try this lesson activity to teach students about Arctic and Antarctic wildlife and and entropy.
- Teach studens basic concepts of heating and cooling by thinking about how energy is transferred from one object to another. Look at photos of animals in cold conditions, such as a polar bear in the Arctic, penguins in the Antarctic, and whales in frozen water. Ask students how these different animals stay warm. Polar bears have hollow fur that insulates them with air. Penguins create a warm layer with downy feathers and thick feathers. Whales (and most animals living in cold climates) have a thick layer of fat called blubber. All these strategies help them keep warmth around their bodies the way a jacket helps students keep a layer of warm air around their bodies.
- Have students look up the average temperatures for different areas where these three animals live and determine the coldest temperatures each animal might experience.
- Ask students which technique they think is the most effective—hollow fur, layers of feathers, or a layer of fat?
- Next, talk about what humans do to keep warm in cold temperatures and ask students for examples of what humans do. Some human techniques for staying warm are using clothing, using a heat source, or creating a wind-breaking structure.
- Tell students that they are going to travel to the Antarctic and need to prepare for the cold temperatures. Divide the class into teams and tell your students the object of the experiment is to keep one team member’s hand warm in a bucket of ice water. Set out supplies for teams to use, including bubble wrap (to represent hollow fur); feathers; shortening (for whale fat); fabrics like cotton, wool, and fleece; and plastic bags. Tell students that they need to keep the team member’s hand dry and at 50 degrees after two minutes of submersion in the ice water. They can use any and all the materials to create an insulating device for their team.
- Students will prepare their insulating contraptions and prepare the team member’s hand for the test. When all teams are ready, place a thermometer in the contraption with the team member’s hand.
- Place the team member’s hand in a bucket of ice water for two minutes and watch the thermometer. After two minutes, check the thermometer and write down the temperature on the board of each team. The team with the highest temperature wins.
- Have the winning team explain how they built their insulation and why they think it worked best.
Students will learn in this activity that different combinations of trapped air, fat, and fabrics work better than others and that insulation prevents the transfer of heat from the team member’s hand to the cold water. They’ll also get a good chance to practice problem solving and experimental design.
By: hadensites,
on 12/4/2013
Blog:
My Fresh Plans
(
Login to Add to MyJacketFlap)
JacketFlap tags:
Add a tag

Enjoy the season while learning about art history!
Art History with Snowmen
One way to use snowmen in your art lesson plans is to ask students to look at snowmen as famous artists might have and create their own versions of snowmen in the style of a famous artist. This lesson in art history is a good way to help students understand different artists and art styles in art history because the basic shape of a snowman can be the same for everyone—three balls of snow stacked on top of one another with black eyes and a carrot nose, plus sticks for arms. To do this activity, give students art supplies such as different colors of paper, water colors, markers, glue, and scissors.
- Show students four examples of art from different artists with very different techniques. Explain the history of each artist and the technique the artist used to interpret the world around around them, including any terms that the artist helped to define.
- Ask students to pretend to be the famous artists and create a snowman in each style as the artist might have.
- Let students be creative and create their interpretation with whatever tools are available to them in the allotted time.
- After all four snowmen are completed, ask students to choose their favorite and ask some students to explain why they chose to represent the snowman in the way they did.
Some of our favorite artists to include in this exercise include Picasso, Andy Warhol, Paul Cezane, and Henri Rousseau. You can use the following paintings to help students see the differences among these four artists.
Picasso – Three Musicians
Andy Warhol – Marilyn Diptych
Paul Cezane – Boy in Red Waistcoat
Henri Rousseau – Fight Between a Tiger and a Buffalo
Ask students to look at the different paintings and compare and contrast the differences. How are colors used? What about shadows? How do the artists use perspective? Do artists use thick lines or do lines blend together?
This activity is a fun one for a day after a snow day when students have had fun building snowmen and enjoying the wintery weather.
The post A Snowman Art History Lesson appeared first on FreshPlans.
By: Kim Herrington,
on 12/4/2013
Blog:
My Fresh Plans
(
Login to Add to MyJacketFlap)
JacketFlap tags:
Add a tag

Enjoy the season while learning about art history!
Art History with Snowmen
One way to use snowmen in your art lesson plans is to ask students to look at snowmen as famous artists might have and create their own versions of snowmen in the style of a famous artist. This lesson in art history is a good way to help students understand different artists and art styles in art history because the basic shape of a snowman can be the same for everyone—three balls of snow stacked on top of one another with black eyes and a carrot nose, plus sticks for arms. To do this activity, give students art supplies such as different colors of paper, water colors, markers, glue, and scissors.
- Show students four examples of art from different artists with very different techniques. Explain the history of each artist and the technique the artist used to interpret the world around around them, including any terms that the artist helped to define.
- Ask students to pretend to be the famous artists and create a snowman in each style as the artist might have.
- Let students be creative and create their interpretation with whatever tools are available to them in the allotted time.
- After all four snowmen are completed, ask students to choose their favorite and ask some students to explain why they chose to represent the snowman in the way they did.
Some of our favorite artists to include in this exercise include Picasso, Andy Warhol, Paul Cezane, and Henri Rousseau. You can use the following paintings to help students see the differences among these four artists.
Picasso – Three Musicians
Andy Warhol - Marilyn Diptych
Paul Cezane – Boy in Red Waistcoat
Henri Rousseau - Fight Between a Tiger and a Buffalo
Ask students to look at the different paintings and compare and contrast the differences. How are colors used? What about shadows? How do the artists use perspective? Do artists use thick lines or do lines blend together?
This activity is a fun one for a day after a snow day when students have had fun building snowmen and enjoying the wintery weather.
By: hadensites,
on 12/4/2013
Blog:
My Fresh Plans
(
Login to Add to MyJacketFlap)
JacketFlap tags:
Add a tag
Enjoy the season while learning about art history!
Art History with Snowmen
One way to use snowmen in your art lesson plans is to ask students to look at snowmen as famous artists might have and create their own versions of snowmen in the style of a famous artist. This lesson in art history is a good way to help students understand different artists and art styles in art history because the basic shape of a snowman can be the same for everyone—three balls of snow stacked on top of one another with black eyes and a carrot nose, plus sticks for arms. To do this activity, give students art supplies such as different colors of paper, water colors, markers, glue, and scissors.
- Show students four examples of art from different artists with very different techniques. Explain the history of each artist and the technique the artist used to interpret the world around around them, including any terms that the artist helped to define.
- Ask students to pretend to be the famous artists and create a snowman in each style as the artist might have.
- Let students be creative and create their interpretation with whatever tools are available to them in the allotted time.
- After all four snowmen are completed, ask students to choose their favorite and ask some students to explain why they chose to represent the snowman in the way they did.
Some of our favorite artists to include in this exercise include Picasso, Andy Warhol, Paul Cezane, and Henri Rousseau. You can use the following paintings to help students see the differences among these four artists.
Picasso – Three Musicians
Andy Warhol - Marilyn Diptych
Paul Cezane – Boy in Red Waistcoat
Henri Rousseau - Fight Between a Tiger and a Buffalo
Ask students to look at the different paintings and compare and contrast the differences. How are colors used? What about shadows? How do the artists use perspective? Do artists use thick lines or do lines blend together?
This activity is a fun one for a day after a snow day when students have had fun building snowmen and enjoying the wintery weather.
View Next 25 Posts


