


Last spring I did some accordion book-making with kids as part of a writing workshop I taught at the Kamloops Young Authors Conference. We talked about how each story is a “hero’s journey” (with a quest and obstacles to overcome along the journey), then we created accordion book plot diagrams (with participants plotting out their own hero’s journeys). The books are also meant to look old and mysterious ─part treasure map and part talisman. The kids’ books turned out great!

Before the workshop, I set out my supplies to photograph the directions for making a simple accordion book. Of course, the first picture was photo-bombed by my cat (aptly named Curious, she always has to check out everything).
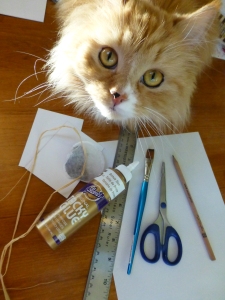
Accordion book supplies:
- two rectangle pieces of cardboard for book covers (cardboard from cereal boxes works well). (For the “Hero’s Journey” book project, I cut the cardboard 2 1/2 inches x 3 1/2 inches).
- two rectangle pieces of decorative paper for book covers (the pieces should be larger than the cardboard by about 1/4 inch or so all around). (For the “Hero’s Journey” book project, I cut the cover paper to 3 1/2 x 4 1/2 inches and used kraft packing paper, which I “aged” by crumpling up the paper, then smoothing it out and adding brown ink & tea bag staining).
- a strip of paper that will be accordion folded to make the book “pages.” When folded, the pages should be slightly smaller than the book covers (for the “Hero’s Journey project, I cut the paper strip 3 x 16 inches, which fit nicely inside the book covers when accordion folded into 2 x 3 sections –also, three of these strips could be cut from a 11 x 17 sheet of paper).
- ribbon or raffia string (my first thought was to use the natural coloured raffia for an antique look, but my cat tried to eat it, so I switched to fabric ribbon). The ribbon should be long enough to wrap around the finished book and tie (I used a 16 inch piece for the “Hero’s Journey” book).
- scissors, glue
- optional: tea bag & brown ink stamp pad for “aging” the covers and inside pages, small pieces of decorative paper to glue inside the covers (we used antique map images for this project), craft jewels & collage items for decorating the covers
Directions (the following photos are from a different accordion book project, using Japanese paper):
1. Once your two pieces of cardboard and two cover papers are cut, place your first piece of cardboard on top of the back of a piece of cover paper (ie on top the side you don’t want showing). Centre it, so that there is an equal overlap of paper around the cardboard.


2. Cut the corners off the cover paper at the corners of the cardboard.
3. Fold the edges of the cover paper, so that they wrap tightly over the sides of the cardboard. Glue. (Do this with both covers).

4. Glue ribbon to centre of inside back cover (with equal amount of ribbon on either side).

5. Fold long strip of paper in accordion fashion, so that it divides into equal rectangles sized slightly smaller than the covers. Glue end rectangle “page” of accordion folded strip onto centre of back cover (over the ribbon). Glue the first rectangle page over the inside of the remaining cover, so that when the accordion folds are folded together, the covers come together.

6. wrap the ribbon around the front of the book and tie a bow.

looks like a great project, and i love the photo of your cat, what a beauty she is!
Juliet
http://craftygreenpoet.blogspot.com
Thanks, Juliet!
This must be a fun project – and I guess you can be quite creative with it too. And my cat would love it!
Thanks!
Great workshop idea! And the books are almost as cute as the cat.
Yes, I don’t know about your cat, but mine is always curled up out of the way somewhere until I pull out some papers and supplies and start to work on something :) . I’m also enjoying the book-making because it’s a way of combining an art activity (something I haven’t had much time for lately) with writing.
Thanks, Tanya! :)