new posts in all blogs
Viewing Blog: doodles and noodles, Most Recent at Top
Results 51 - 75 of 94

Thoughts and sketches on kids, books, and art.
Statistics for doodles and noodles
Number of Readers that added this blog to their MyJacketFlap: 3
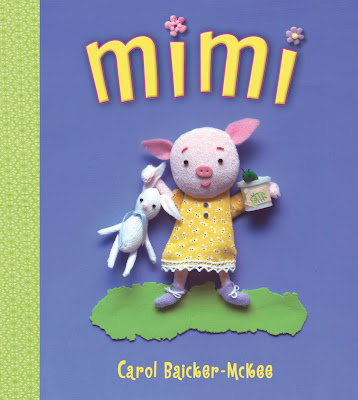 My Mimi is about to become an outlaw. Or maybe just disappear from the bookshelves and the hands of children.
Huh, you say? Well, let me explain.
The Consumer Product Safety Improvement Act, scheduled to go into effect on February 10th, will make outlaws of millions of children's books, toys, clothing, school supplies, furnishings, and more, unless someone shells out big bucks to get each one tested and labeled and thus make them legal again. The CPSIA, enacted with good intentions of protecting children 12 and under from lead and pthalate exposure, will instead cause ripples of harm throughout the lives of children and adults. It is a prime example of regulation run amok.
The CSPIA mandates expensive independent testing of every component of nearly any product made for children. The law as written (and interpreted so far) threatens handcrafters, small toy manufacturers, and children's clothing makers. If not amended in the next two weeks, it will compel booksellers and publishers to destroy millions of children's books in stores and warehouses, and force schools and libraries to remove all books intended for kids under 13 (including text books) from their shelves or else bar kids from the premises to protect them. It would force resale store owners to stop selling kids' items (thereby also hurting those shoppers who benefit from their lower priced goods) or risk liability if any component of any item they sell turns out to exceed the stringent limits on lead. In the long run, the law will hurt everyone, as consumer choice in products of all sorts will be greatly limited, small businesses will fold and their employees (and suppliers) lose their jobs, and taxpayers will have to absorb additional burdens to enforce the over-reaching law and support those left jobless.
Sound crazy? Wonder why you haven't heard of this law before now? Can't imagine a law like this will actually go into effect or be enforced?
Well, those are all reactions I had too, but I'm becoming convinced that although this law is crazy and although it's been largely under the radar of most consumers, it is very real and it's looming. Check out this
article in Forbes Magazine and this
letter from the American Library Association if you think no one's worried. You can read some more bloggers' excellent comments
here,
here and
here. And you can watch (if you don't mind gritting your teeth) the condescending and unhelpful comments of a CPS commission spokesperson
here. (Apparently the spokesperson has since left her position.)
And then write to your congressman and senator - you can find contact information for them
here and
here. Let them know you'd like at a minimum to have the enactment date pushed back until unintended consequences can be identified and reasonable exemptions made.
Time is running out. February 10th has already been designated
National Bankruptcy Day. Please don't let that name become a reality.

Happy New Year!
This was my holiday card a few years ago, and I've decided to use the proverb as my new year's resolution this year - I'm giving up on my usual ones to lose 10 pounds and get organized, seeing as the 10 pounds have been joined by a a bunch of friends and my level of disorganization has also grown incrementally. Instead, this year I'm going to concentrate on hoping, chewing, breathing, saying and loving more. (Okay, I'm hoping I magically lose 20 pounds and get organized in the process). I'm sticking a copy of this picture on my fridge this year, and you can too by downloading the high-res pdf
here. (It's not a
great image, because I gave away the original and this scan was made from a copy I had - sorry.)
I love making this type of papercut, although I haven't done any for a couple years. To make one, I do a soft pencil drawing, indicating all the black areas on high quality tracing paper, and then transfer the areas that will be black to the back of a piece of silhouette paper (which you can buy from Dick Blick Art Supply
here). (I use a wooden tool with a point to rub over the penciled areas.) Next I cut away all the parts I don't want to be black with a craft knife, starting with the thinnest/smallest places. I then use the tracing paper drawing again to transfer the shapes of the non-black sections onto the backs of colored papers and cut those shapes out. Finally, I carefully glue the colored papers to the wrong side of the silhouette paper. I use a toothpick to apply the glue very carefully to the black areas, which can be very thin so it's a bit painstaking; other artists glue the colored papers in position and then add the black on top. Some paper artists call this technique "paper applique,"and it's known in Japan as
kiri-e.
One of my favorite illustrators/fine artists, Aki Sogabe uses this technique with greater skill than I can muster. You can visit a website with samples of her art and a discussion of her technique
here.
Here's one more example of my applique cut paper art. This picture was a sample of final art for a picture book I've never sold (But I Won't Share My Bear). All the black areas are connected, except the eyes, nose and the circle things on the baseball cap. My oldest son, Kyle, posed for the drawings; he turned 21 yesterday. Can't believe how quickly the years have gone!
Wishing all of you fun experimenting with new crafts and ideas, the thrill of discovering more wonderful books, and the pleasures of sharing time (and those wonderful books) with young children in 2009!
 When my kids were small I saw a cute idea in a magazine (maybe Family Fun?)for kids to send a Valentine to distant relatives. We've since used the "hug card" to send thank you notes, get well soon cards, and simply "I miss you" notes. Have your kid lie down and spread out his arms on a long sheet of paper. (We used the rolls we had for easel painting, but you can also just tape sheets of paper together.) Trace around your kid's hands, arms, head and neck, then cut out the shape. Your kid can add hair and facial features with crayons or markers, and then dictate a note for you to print across the "hug." It takes a lot of folding to fit in an envelope and it's kind of a pain to cut out, but I've never known a grandparent who wasn't ga-ga for a note like this.

And speaking of cute mail, don't let your kid forget to send a little thank you note to Santa! After all, I bet Santa went to a lot of trouble in his workshop or hanging out in those long lines at the mall, not to mention the late night on Christmas Eve and all. Standard mail delivery to the North Pole is a bit iffy after December 25th, but you can rely on Elf Mail to get a miniature note to Kris Kringle promptly. You can get a pdf to print a template for a make-your-own Elf mailbox, plus a cute little Elf-sized greeting card and envelope
here. My sample, above, is just assembled from the paper print out, but it does look (and work) even better if you print it on cardstock. You can choose your own color scheme and add whatever decorations/embellishments you prefer.
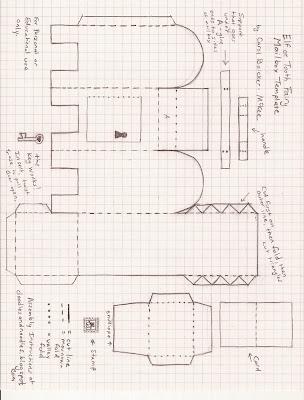
Assembly is fairly straight forward, but it's definitely a job for grown ups or skilled older kids.
Supplies
- Cardstock, white paper
- Craft-quality glue stick or tacky glue and toothpick; repositionable glue stick
- Scissors, craft knife, chopstick, scoring tool (like inkless ballpoint pen)
- Markers, stickers, whatever for embellishing the mailbox and cards
I also have some tips to make assembly easier.
- You can print and cut out the template on cardstock and trace it onto whatever paper or card you want - or make life a little easier by printing a copy on paper, cutting loosely around the mailbox and extra parts (the support piece, the door handle, and the key) and lightly gluing them to your cardstock with a repositionable glue stick or spray adhesive. Then carefully cut out along the dark solid lines and score and fold along the dashed and dotted lines with the template still in place. (If you've glued the template to the right side, just follow the mountain versus valley fold lines as marked - but reverse them if you glue it to the wrong side.) Don't forget to use a craft knife to cut out 3 sides of the lower door (the one for the elf mailman to use to remove the mail) and cut out the keyhole too, because it does kind of work with the key.
- Remove the template, and assemble the mailbox, using a glue stick or tacky glue applied with a toothpick. First, glue the support piece to the underside of the shelf that connects to the pull-down door (A in my template). The tabs will fold up next to the door (you'll glue them to the inner sides in a minute). Glue the handle to the door.
- Cut out the little triangle-y parts around the part that curves over the top if you haven't already done so. (It's easier to do the folds before you cut them out.)
- Fold the main part into a box shape, and secure by gluing the long tab to the edge it meets. You may have to reach inside from both the top and bottom to pinch it or use your chopstick to get it to stick well. Then fold the shelf and door into position and glue the little tabs of the support piece just in front of the pull-down door - this isn't absolutely necessary, but it does make everything more stable when you open and close the door to drop the letters in.
- Fold up the bottom and glue its tabs in place. You may need to use a chopstick or something to reach in and rub the surfaces together.
- Rub glue on the triangle tabs on both sides of the curved top piece and position them carefully. This is a bit tricky. Again, a chopstick is useful for reaching inside for the gluing.
- Cut out some cards and envelopes. Have your kid dictate notes and maybe decorate the fronts with mini artwork or tiny stickers. (You can also enlarge the notes 200%, write them and then reduce 50% to make it easier if you're at the reading glasses stage of life like I am.) Then let your kid post his mail!
The mailbox is also excellent for sending letters to the Tooth Fairy or any other tiny creatures who frequent your home.
Here's a
link for some more printable miniature envelopes at
Jim's Dollhouse Pages (which also has tons of other printable cool miniatures in different scales).
If you like the idea of the mailbox, but can't muster the energy to make another craft after the holiday season, you can buy a lovely little metal one here from Hearthsong, one of my favorite catalog/online toy stores. Or you can hunt for a vintage one like this that makes me feel utterly nostalgic and sentimental - I used to buy very similar ones for like 35 cents at the Williamsburg Pharmacy in Arlington, VA when I was a kid. I think I had about a dozen of them, but none survived our various moves. Sigh. Maybe I'll have to buy myself a holiday letdown gift... Tomorrow (or soon) the templates and tutorial for the mushroom glitter house!
 Merry Christmas!
I, um, got behind even more with the advent, but I have some good things saved up for next year, and that will have to do.
My daughter Sara and I made these little mushroom glitter house scenes for the grandmas this year. Here's what one looks like inside a stemless wine glass, which we used for display.

I'll include directions and templates for making your own shortly, so you can get a head start for next year's Christmas gifts (which is what I should do). Or you could make some for New Year's gifts. (After all, the mushrooms are a symbol of good luck, which works equally well for Christmas or New Year's good wishes.) Sara and I are making some more as New Year's gifts for some special folks since we liked making these so much. (And that's amazing because I have kind of a love-hate relationship with glitter. I love it because it looks so pretty and, well,
glittery, but I hate how it ends up
everywhere. Forever.)
I'll be back tomorrow too, with some ideas for crafting creative and heartfelt thank yous. And I have some ideas for New Year's greetings, which I'm hoping to send this year, since I never managed to finish my Christmas card.
Hope this finds all of you snug and cozy with your loved ones, whether or not you celebrate Christmas. Thank you all for reading my blog this year, and for your kind notes and the inspiration you've given me. I feel truly blessed.
Best to all,
Carol
 Now that I'm a parent, I have a real fondness for holidays that involve kids bringing me breakfast in bed, which is why I insist that St. Lucia Day is an important element of my Scandinavian heritage that my family must celebrate (even though we never celebrated it when I was a kid).
St. Lucia was a Roman girl who refused to renounce her devotion to God and marry some guy she didn't love, so she was sentenced to be burned and her eyes poked out and whatnot - but because she was a good Christian the fire wouldn't burn her. That's why the poor oldest girl in the family who brings mom and dad special saffron buns (called lussekatter, or cat's eyes) and coffee in bed on the morning of December 13th is supposed to wear a wreath decorated with flaming candles - while balancing a tray with hot coffee and wearing a long white dress. Maybe the custom was intended as a form of population control....
Mimi, above, is wearing a battery operated wreath, (which I could not find for sale online anywhere!), and the coffee cup is empty. Also because she is a bit clumsy at times, it's a plastic cup, as is the plate. But Daddy is being a good Daddy and bringing the real deal for Mommy on a separate tray. That's the most important part of the tradition. Plus, they've all let Mommy sleep in a bit.
I can fantasize.
Anyway, the buns are good. (I think especially good if you substitute some chunks of high quality dark chocolate for the raisins, but you can be all healthy and dried fruit-ish if you prefer.) This recipe is not from my Norwegian mom, but from a friend and neighbor who's a really attractive Hispanic/African-American/Polish mix and an outstanding cook. (Here's a link to a very similar recipe using metric units: saffron buns.)
Helena's Lussekatter
Ingredients
1/3 cup milk
¼ cup butter
¼ cup lukewarm water
1 pkg dry yeast
¼ cup sugar
2 eggs (1 for the dough, 1 for the “wash” before baking)
½ tsp salt
¼ tsp saffron (or just cheat and add a little yellow food coloring)
2 ¾ cups flour
1 T cooking oil (I use canola)
Extra 1 T water
2-3 dozen raisins or chocolate chunks
Preparation
Heat the milk in the microwave or a small saucepan to about 115 degrees. Add the butter (cut in small pieces) and stir until it dissolves.
Pour the warm water into a large mixing bowl. Stir in the yeast and set aside for 5 minutes. (Note: I add a little of the sugar to the water and yeast, so the yeast has some food while it proofs.)
Add the milk and butter mixture to the water and yeast. Then stir in the sugar, one egg, salt, and saffron. Gradually add the flour, stirring until it forms a smooth ball (you will probably have some flour left at this point). Sprinkle flour on a board and put the ball of dough on it to rest, covered with the bowl, for 15 minutes.
Knead the dough for 10 minutes, gradually working in the remaining flour (and more if needed) until it’s very smooth and elastic. Wash the bowl and oil it well with the canola oil. Place the ball of dough in the bowl and turn it over several times until it’s coated well all over.
Cover the bowl with a clean dishtowel and place it in a warm place to rise until doubled in bulk, about 45 minutes to an hour.
Punch down the dough and turn it out on a lightly floured board. Divide it into 12 parts. Roll each piece into a long rope, then coil the ends in opposite directions so it makes sort of a tight “S” shape. Place the rolls 2” apart on greased cookie sheets (I spray mine with Pam). Cover the rolls with a towel and place in a warm place again. Let them rise for 30-45 minutes until doubled in bulk.
Preheat the oven to 350 degrees. Beat the remaining egg and T of water with a fork and brush over the tops of each bun. Decorate the buns with raisins or chocolate chunks.
Bake for 15 to 20 minutes until golden brown. Cool on a rack and then serve to Mommy in bed on December 13th, along with some really good coffee, a little OJ or grapefruit juice. Oh, and bring a copy of the paper. And then go away for an hour or so.
One final note: my drawing of Mimi's wreath is wrong - I should only have put 7 candles on it. Also, I'm big into recycling these days, which is why I did this sketch on the back of a piece of paper with the corrections for my husband's law text (which you can order here if you need an extra (expensive) booster seat for young visitors during the holidays, or if you're really, really hoping to get some light reading on Federal Civil Procedure for Christmas). So those weird little squiggly things that show through aren't really intentional - you don't need to hunt for white fabric with a faint strange pattern if you want to make a St. Lucia dress.
 Um, I know, I'm falling a bit behind with the daily advent stuff. Well, maybe I'll catch up with some double posts soon...
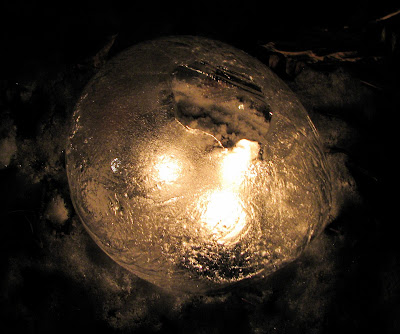
Anyway, today's idea is a cheaper, greener - and I think more beautiful - alternative to running up your electric bill with a zillion strands of outdoor lights. Ice luminaria. They do work best in cold weather, but we've largely had that in spades this year in Pittsburgh (not today though - 50 degrees! And all my lanterns melted shortly after I took the photo below. Oh well, I can make them again. Back to snow tomorrow.)

You can find even more details about these in this month's issue of
Nick Jr Magazine - I wrote up a bunch of the activities in the parenting pull-out, and there's lots more to like there (like a recipe for figgy pudding, plus the customs that go with it. Yes, that figgy pudding from the song. Turns out it's tasty, and even kind of good for you. Who knew?). As usual with Nick Jr, all the activities are super easy, super good, mostly "green" and fun to do with kids.
Okay, so not only are ice lanterns pretty to look at, they're a blast to make - kind of a cross between a water balloon adventure and a science experiment. All you do is fill up heavy duty latex balloons with water, let them freeze outdoors or in your freezer (but if you have room in your freezer for a bunch of BIG water balloons I am mega impressed), crack a hole in the top, pour out the unfrozen water, put a candle in the middle and light it. Voila!
More details:
Step One I used 9" heavy duty helium balloons and filled them medium full. Kids with water balloon fight experience are good helpers for this step. You want a little air space left - the water will expand as it freezes, and the space creates a little indentation to chip away for the opening.
Step Two Put the balloons some place really, really cold and wait for the water to freeze. I put the balloons inside roundish bowls to help them keep their shape and to keep them from making my deck an icy mess if they popped, but it's not really essential.
Waiting may sound easy, but this is really the hardest part of all. I am impatient, and it simply does take hours. Sometimes many, many hours, especially if you put them on the deck right above the vent for the dryer and then proceed to do several loads of laundry. In my freezer, it usually takes about 6 hours; outside it took overnight (at about 25 degrees). You and your child will learn (if you didn't already know) that a container of ice freezes from the outside in. This is good, at least for this project. Wait until the ice shell is at least an inch thick - but do not wait until the whole thing is frozen solid or you will have to start over. You should be able to see and feel the water sloshing about inside, but it should be kind of hard to see it, if you've gotten it frozen enough.
Step Three Don gloves to keep your fingers warm. Put the balloon in the sink (or leave it outside somewhere that can get wet) and pop the balloon with a knife or pair of scissors. The latex will pull away; make sure to discard it carefully because it's a choking hazard for kids and animals. At this point, if you decide the lantern is not adequately frozen after all, no problem - just stick it outside or in the freezer again. But if it's ready, you'll need to chip away the ice in the indentation part. This is a grown-up's job but the kids can watch and make "helpful" suggestions. I just use a slotted screwdriver and hammer; an ice pick works well too. If it has gotten too thick, you can try drizzling hot water strategically where you want the opening; I've rescued several over-frozen lanterns/ice balls this way in the past.
When you've got a nice hole opened up, tip the ball and pour out the remaining water.
Carry the lantern outside, drop in a tealight or two or short pillar candle (I use tongs to position the candles) and light them. Use a lighter with a long handle or a piece of dried spaghetti as a long match substitute (Martha Stewart tip - and a good one).
These look beautiful lining a path or even just individually by the front door, sort of jack o' lantern style.
I got lots of nice tips from Jennifer Shea Hedberg at this
site when I was writing the piece for Nick Jr. And
here's an idea for a slightly different ice lanterns from Better Homes and Gardens that uses buckets instead of balloons and adds pretty things like greens and fruit slices to the ice. Finally, these sites
here and
here have some interesting history on the use of ice lanterns in China and pictures of the super cool and breathtaking ice festival in the northern China city of Harbin.

 I know it's a bit late in the day for St. Nick to be stuffing little gifts into your cyber-shoes, but better late than never, right?
One of your gifts is a page of printable gift tags with images of the chicks who star in my book Merry Christmas, Cheeps! (or if you live in the UK, Merry Christmas, Little Cheeps!) written by Julie Stiegemeyer (Bloomsbury, 2007). The images aren't actually from the book, but do show the Cheeps doing various wintry and festive things, like the guy sledding or baking. Plus there's a penguin with a copy of the book and a nice big chocolate bar - what else do you need for a cold, winter's night?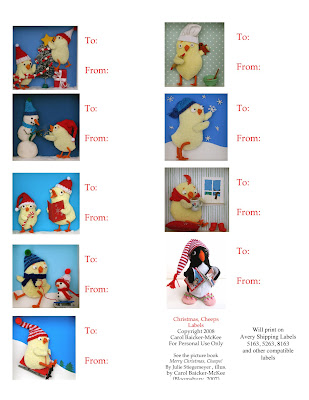 These can be printed with Avery labels (#s 5163, 5263, or 8163) to be self-sticking. Print all the labels you need (available as a pdf here), but please don't sell them. (Just click on the button that says iPaper to get to print options.)
I also have another page of color-your-own paper dolls, this time featuring the two littlest Cheeps. They don't have much in the way of clothing, but they do come with plenty of little accessories. You can access the pdf here.
One of these days, I'll get my act together enough to offer some color versions, with the 3-D art I use in my books.
Sorry I couldn't figure out a way to give you free chocolates - but happy St. Nicholas Day anyway!
 I promise not to be completely obsessed with mushrooms all month, but I can't help how much I love them. The one above is courtesy of Myra at my little mochi, who has an excellent tutorial here for a super cute felt mushroom. I bought the supplies yesterday to make a few of my own this weekend. (And don't you just love that perky frog?)

These gift tags are just mushroom prints. Cut a white or small portobella mushroom in half and use small paintbrushes to coat the top half in red paint and the stem in white (leave a little space between the colors so they don't bleed when you press the mushroom down). When you print with it, press carefully all over the mushroom so that you don't have high spots leaving unprinted areas. (I also am not above a little "touching up" with the paintbrush.) I added the dots with the non-pointy end of a bamboo skewer dipped in white paint, and the black lines are from a fine-tip Sharpie marker. I printed the grass around the shipping tag example with a slice of potato.

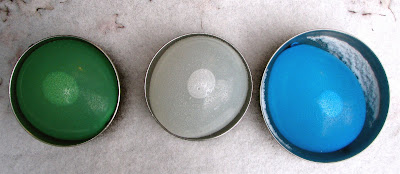
And now onto my super simple, nearly free, but still really beautiful decorating idea: a little food coloring added to water in a clear glass container. The ones above have a mix of red (which looks orange in my bad photo - you need lots of food coloring to get a good red) and green (not even one drop each of food coloring - I poured some water out after adding the food coloring and added even more water).
It's been exceptionally cloudy and gloomy here in Pittsburgh this year, but you can see that with even a smidge of light the effect is pretty magical. Even with my dirty, dirty windows. At night, the glasses look beautiful seen from outside, lit by the house lights.

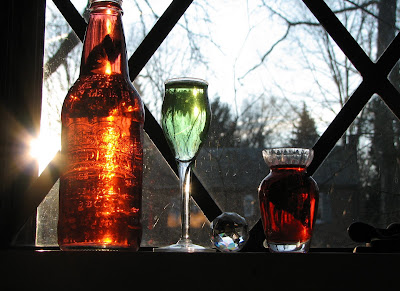
One of my family's weird traditions is to have Coke in small glass bottles on Christmas. (Santa brings a six-pack, which is a problem because there are five of us. So one of the other quirky traditions is trying to be the first one to "forget" you already had yours and drink the extra.) These Coke bottles were reproductions of ones made in the 1890s, and they're filled with different shades of green. You could add sprigs of greens to look extra festive.
I got the idea for this from the little jars of "potions" my boys used to make in baby food jars and various other containers and require me to store out of reach of their little sister, which meant the jars got relegated to the windowsill. And since the main ingredient in most of the potions was food coloring, they actually looked kind of nice. Since then I nearly always have jars or bottles of colored water in my kitchen windows. I vary the color scheme with the season. I'll do blues and purples in January, pinks and reds in February, and so on through the fall when we have oranges, yellows and reds.

My final suggestion for the colored water theme is an activity/inexpensive gift suggestion for preschoolers. This was a project I discovered when I taught toddler daycare many years ago, and it was hands down the most frequently requested rainy day activities when my kids were small. (I also did it with the kids' kindergarten classes each year as part of science program I taught.) You need:
- Mini ice cube trays, which you can order here if you can't find them in a local store. (You can use regular ice cube trays, but they're more limited and so kids tire of the activity faster.)
- A few yogurt containers or something similar
- An eyedropper or, even better, a pipette like the one in the photo above (we buy ours at Holcombs, a teacher supply store, but they sometimes come with packaged craft or science kits too.)
- Food coloring
- Water
- Soothing music
- A cup of tea and book for mom
Partially fill the cubes with water and provide two (or more) yogurt cups with water and food coloring mixtues, plus one with just water . (The reason to stick with two colors for younger kids is that otherwise pretty soon all you have is lots of shades of brown.) Show the kid how to operate the eyedropper. ("Hold it and squeeze out all the air. Keep squeezing, dip it in the water, and let go so it will suck up lots of water. Then hold it over the cubes and squeeze out little drops. Isn't that cool?")
Demonstrate how adding a little of each color or a little extra water to a color makes things change! They can suck up colored water from the little squares as well as from the yogurt cups and just kind of move things around. Encourage them to experiment with different approaches, like starting with a strong color at the beginning of a row, and diluting it a little more and a little more all the way down.
Then put on the quiet music and relax with your tea and book. You could easily have 45 minutes of peace. I'm not kidding.
This really does make an excellent gift for 2 to 5 year olds (just be sure to include instructions or the kid's parent will question your sanity). And I guarantee NO ONE else will give the kid the same thing.
I have lots more ideas like this in my first parenting book, FussBusters at Home, in case you're desperate for ways to keep your kids occupied so you can wrap and bake without "help."
 You have just three more days to get ready! December 6th is the feast day for St. Nicholas, the historical figure many believe is the model for Santa Claus. In some parts of the world, including the Netherlands, St. Nicholas Eve, rather than Christmas, is the big gift-exchanging day. Children put out their shoes (or in some places, put out their boots or hang their stockings), perhaps filled with some hay for St. Nicholas's white horse, and in the morning find their shoes filled instead with candies and small gifts. You can read about St. Nicholas Day customs in many countries here.
 While I generally favor any holiday involving chocolate - and in the Netherlands, one of the big customs involves giving children large chocolate initials like these - I celebrated it somewhat inconsistently with my own kids. Keeping track of the advent goodies, gifts for family, friends, and teachers, gratuities for the various helpers in our lives, etc. seemed like more than enough.
But I do wish now that I'd celebrated it after all, a change of heart largely due to reading my friend Julie Stiegemeyer's informative and touching book about the saint, Saint Nicholas: The Real Story of the Christmas Legend.
And today I came up with the perfect way for families to get involved in this shoe-centered holiday: giving shoes to people who need them. You can get in touch with local charities that distribute clothing to needy kids and donate new shoes (or gently used ones if you can't afford to buy new ones) for a child near the age of your own. Winter boots are often badly needed this time of year as well. Make the gift extra appealing by removing the pesky tissue paper that some parents (who shall remain nameless) might accidentally forget about, thereby forcing their child to have painfully cramped toes. And then fill the shoes with small wrapped goodies before you drop them off. Most kids like shoe shopping, even if they balk at other errands, and what kid will object to a trip to the toy store or Dollar Tree? Especially if you remind them that St. Nick is watching and is sure to be pleased with how cooperative and generous they are.
Alternatively, you can donate money, your old shoes, or new shoes to this great organization, Soles4Souls, that distributes footwear to the estimated 300 million kids around the world that don't have any shoes. You can read all about the organization
here.
In honor of St. Nicholas, I'm pledging to donate $5 (up to $300) to the organization for every comment on my blog between now and midnight December 6th.
Ha, ha, ha, ha, ha! That's me laughing hysterically about the idea of getting 60 comments in two days.
Thanks.


Two projects today - both tasty, and both for making those red mushrooms seen so often at Christmas. The how-to for both in a second, but first a few words about why mushrooms at Christmas?
I love these mushrooms, don't get me wrong. I have a number of mushroom ornaments for our Christmas tree as well as other cute little mushroom decorations, some of which I leave out year round. But I've always been curious about their relationship to the holiday (just not curious enough to research it until today).
And it turns out, no one really knows for sure. But Sheila Brown in
this interesting article on the Christmas mushroom details some of the theories. First, the
amanita Muscaria or "fly agaric" mushroom (aren't those both unappealing names? especially the common one?) is considered a sign of luck, which is why it's often included on Christmas cards. Second, it's associated with the evergreens used to decorate at Christmas. Basically, the fungi grow around evergreens and have an interdependent relationship with them, so they've become associated with each other. Some people think, probably wrongly, that Santa dresses in red and white because of these guys. Oh, and one more interesting bit of trivia: this type of mushroom is called the "fly" agaric because flies are attracted to it. (Not sure what the agaric part means except maybe it's the gagging sound people make because of all those gross flies.) Folks used to put bits of the mushrooms in bowls of milk; the flies would drink the milk and mushroom mixture, get drunk, and fly into things and die. Doesn't that sound nice and Christmas-y?
One last crucial piece of information. Mushrooms in the amanita family are poisonous - ranging from moderately bad news like these ones to extremely/fatally toxic - so better to avoid nibbling on them, especially because they all look pretty much alike. Unless they're these sugary amanitas that I'll tell you how to make.
First, because they're so simple, the gumdrop ones. Basically all you need is a red gumdrop, a white gumdrop, a knife, and a high tolerance for sticky fingers. First, carve a stem shape out of the white gumdrop, making sure to cut the sugary part off the bottom (so the mushroom will stick to whatever surface you put it on and remain more or less upright) and the top (so the red part will stick to it). Save the extra white parts because you need them to make the little white dots. Next, cut the bottom off the red gumdrop. Then chop and mush little bits of the leftover white gumdrop to make tiny dots. Carefully peel the dots off your fingers (easier said than done) and stick them to the red gumdrop in a pleasing, mushroom-y pattern. (On real mushrooms, those white dots are little bits of the stem still sticking to the cap from before the cap emerged.)
Then stick the red top on the white bottom, squish it around a bit until it sits nicely, and you're done. You can eat it right away, but if you let it sit out in the air for a few days, it gets hard and looks pleasantly translucent and decorative sitting on a shelf or hanging from the Christmas tree (just be sure to stick the hook in before it gets totally hard if you're going to hang it).
Next up: the no-bake mint mushrooms. I found this recipe, which my daughter and I used many years ago to make little snowmen, on a scrap of paper tucked in a cookbook. I think but was unable to confirm, that we originally got it from American Girl magazine. At any rate, it works equally well for snowmen or mushrooms, as you please.
You need:
1 tablespoon butter, softened
1 tablespoon light corn syrup
1/2 teaspoon mint extract
1/8 teaspoon salt1 cup confectioner's sugar
A few drops red food coloring
White nonpareil candies (if you can find a jar of just the white ones you're lucky. Otherwise you'll have to pick the white ones out of the mix of a zillion colors. Or you could go buy a box of the tasty Sno-Cap candies, brush the white balls off into a bowl and eat the chocolate so it doesn't go to waste.)
Directions: In a small bowl, combine the butter, corn syrup, extract and salt. Gradually stir in confectioners' sugar. Knead by hand for 1-2 minutes or until mixture becomes pliable. Depending on the weather conditions, you may need to add more confectioner's sugar. The dough should be pretty stiff (or the mushrooms will tend to "melt" and collapse in a most disturbing way) - but you don't want it to get crumbly.
Divide the dough in half and place in separate bowls. Leave one half white, and add a few generous glops of the red food coloring to the other, stirring and kneading to combine well. You may need to add a little extra sugar at this point to keep it firm enough.
After accidentally smushing a few of my early attempts, I hit on this method for forming the mushrooms. (I made teeny tiny ones, which appeal to my love of all things miniature, as well as to my limited tolerance for candy that doesn't involve chocolate - why waste the calories? - but you could always make bigger ones; the process would be the same.) Tear off a piece of waxed paper for a work surface. Pinch off some white dough and roll a log to whatever width you desire. Cut off the length you want. Shape the stem some more, so that it's wide at the base and tapers toward the top. Tap both ends against the waxed paper to flatten and leave to air dry a bit. Make a whole bunch more stems. (You may want to cover the bowls of dough with a damp paper towel while you're working so the dough doesn't dry out too much.)
Next, form the caps by roll a small ball and flattening a bit. Experiment with different shapes. (I like variety in my mushrooms, but you could always strive for uniformity if you prefer). Pour a small quantity of nonpareils in a shallow bowl. Then press your fingertip against a damp paper towel and use it to chase around and pick up individual white nonpareils. It's a bit painstaking at first, but you'll get better. Gently press them over the cap. After you've made a bunch of caps like this, dampen the top of the stem with a wet fingertip, and carefully pick the caps up and place them on the stems, pushing them down slightly so they'll adhere well. Allow to air dry for a few hours, and then they're good to eat!
These make a very pretty gift in a small tin - just make sure the get-ee realizes they're food. We had someone preserve her little snowmen for several years thinking they were decorations (and wondering why they had that odd minty freshness).
I apologize for the lousy photos, and I couldn't get my pdf template to work (with luck I'll add it tomorrow) - but I hope you can make everything out enough to follow the instructions.
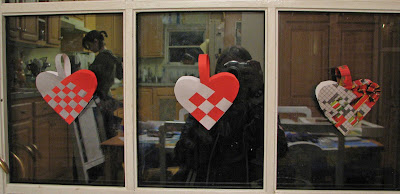
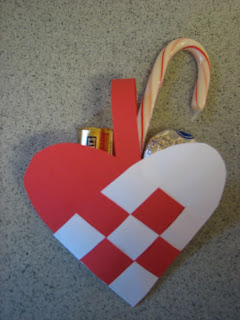
These heart baskets are a traditional Scandinavian Christmas craft; they make beautiful decorations for your tree or windows (as in the above photo - with my relatively tidy kitchen showing in the background) and they also make interesting holders for candy or a small gift.
This is a fairly simple craft for a school aged child, and a preschooler may also enjoy helping.
To make one you'll need:
- 2 pieces of contrasting papers, each at least 2 1/2 inches by 8 inches, plus an extra strip about 1/2 inch wide and 5 inches long or so. (Red and white are traditional colors, but I also made two of the above from recycled papers - newspaper, a page from a catalog, and the inside of a security envelope)
- Scissors
- A little glue or tape
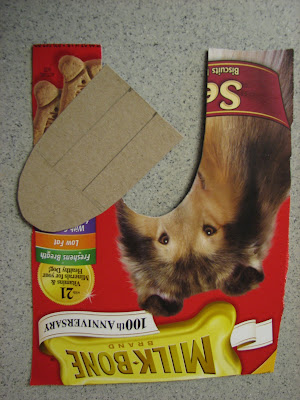
To start, you should cut a template from cardboard or cardstock (I used a box from dog biscuits, as you can see in the photo below, which I forgot to rotate.) My template is 2 1/2 inches wide and 4 inches tall. The lines marked on it show you where to make the cuts so that you'll have 3 strips to weave. I hope tomorrow I'll have a printable template for you, but you can certainly fudge it - I did. It helps to cut the strips fairly long, so you have room to fiddle, especially until you've had some practice.
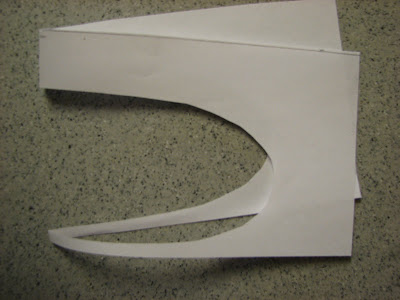
Next fold your papers in half. Place the flat end of the template against the fold and trace around it. Mark the positions of the interior cuts, and then cut around the outside, as well as along the two interior lines. (Sorry for the blurry photos.)
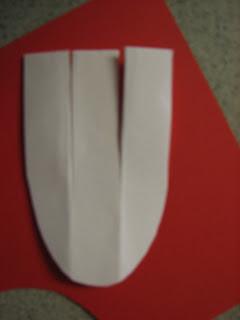
Next comes the tricky part: the weaving. Start by scunching open the uppermost strip on the white half and sliding the upper red strip through it.
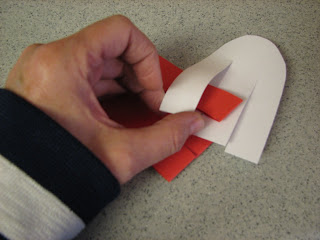
Then scunch the second red one open, pinch the first white strip closed again, and slide it through the middle of the red strip.
Finally, open the first white strip again and slide the third red strip in. At this point, you've finished the first row of weaving!
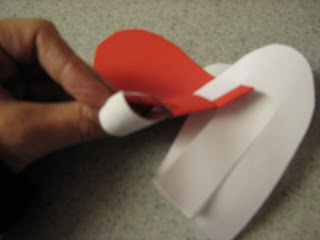
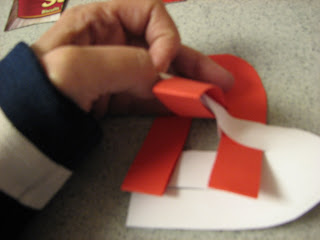
Okay, here's where the how-to photos end - but the rest is more of the same, except for weaving in the second white strip you'll reverse the scunching order. First scunch the first red strip open and slide the second white one through it, then red through white and white through red again. (Sometimes the last top strip will pop out - just work it back into place. It will stay when the basket is done.)
Repeat the order of the first white strip for the third one, and you're about done. Just tape or glue the extra long strip inside to form a handle, add some goodies, and give it to a friend!
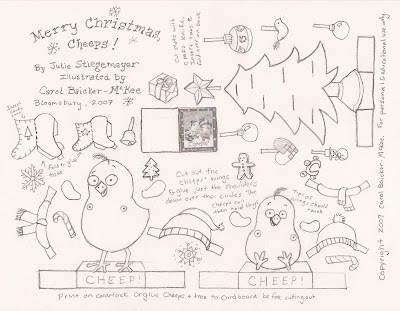
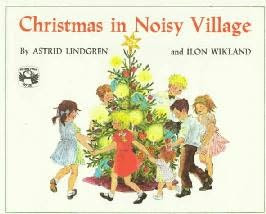
In my
Merry Christmas, Cheeps! book, the littlest chick can be seen hanging one of these on the tree on the page for "Reach to hang an ornament/Shiny, shiny bright." You can also see one hanging on the tree in the excellent classic book
Christmas in Noisy Village by Astrid Lindgren (who wrote the Pippi Longstocking books).
If you get good at these hearts and want to try some more elaborate ones (you can get pretty fancy if you vary the number and shape of the strips, check out this sites for ideas and instructions:
- This interesting Danish site which has both the basic and very advanced directions (but beware, it plays electronic-ish Christmas music)
- Margita Mentorp's papirklip blog (I think I have her name right - but the site's in a language I don't speak). It has lots of cool templates for unusual woven hearts, as well as some little house templates to cut out and assemble and other Christmas decorations to make.
Happy Advent! This is a very ambitious plan for someone like me who some months can't manage even a single post, but my pledge is that for the next 24 days, I'll do one post per day with:
- holiday craft tutorials (for kids and adults - some with a book tie-in)
- recipes
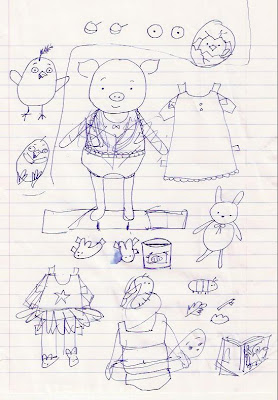
- printables (including gift tags, a bookplate and more outfits for the Mimi paper doll)
- thrifty decorating ideas
- suggestions for cheap, high appeal gifts for kids
- descriptions of "quirky" holiday traditions
- and a give-away or two (including a personalized copy of my holiday book for toddlers, Merry Christmas, Cheeps! by Julie Stiegemeyer). Send me an email by December 15, 2008 at baickermckee [at] gmail [dot] com with your name and contact info to register for the give-aways, and I'll pick the winner(s) at random and (I hope) mail the treat(s) out in time for Christmas.

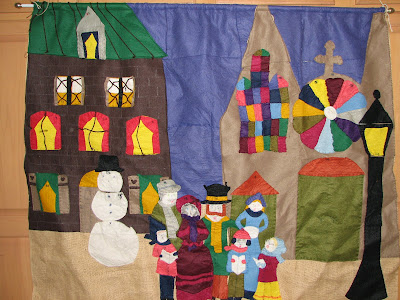
The photo at the top of this post is of the felt (over burlap) advent calendar my sister Anna made for my family more than 20 years ago. It's a bit faded, not to mention falling apart a bit now, thanks to some enthusiastic gift retrieval by the youngsters in my house, but it's still beloved by us all. It has two features my kids consider essential: the pockets are cleverly disguised as pictorial elements (like the balls and hat of the snowman, the top of the lamppost, the windows in the house and church), and the numbers are scattered randomly, so you have to hunt for the right one when it's your turn. (Sometimes you have to hunt rather hard because the numbers were just printed with a sharpie marker and they've gotten blurry over time).
Unless you're planning to stay up very late, and you're well-stocked in the craft and sewing supply department, you probably won't manage to add an elaborate calendar like this one this year (but you could always start planning for next year). But here are some links for crafting advent calendars, many much simpler than this one:
- A compilation of TONS of different advent calendars from bella dia at the Crafty Crow
- 3 clever ideas using common objects like matchboxes, assembled by Domestika
- a funny calendar using Altoid tins at craftzine
The way the advent tradition works at my house is that the Advent Elf sneaks in during the night and leaves one little something (a candy cane, a small toy, something practical-ish like chapstick) in the correct pocket. Sometimes the Advent Elf is delayed by bad weather, traffic, etc. and has to slip in during the day when no one's looking. Also sometimes the Advent Elf gets the pockets mixed up, but it's not nice to make fun of him, especially during Christmas season. My 3 kids take turns getting the gifts, and we have an elaborate rotation system of who goes last (for some reason the most coveted position). This tradition is still going on, even though two of the "youngsters" are now in college. (The Advent Elf is not above using the U.S. Mail.) My husband thinks the Advent Elf is insane, and he might be right.
My sister-in-law has taken the Advent Elf tradition to a whole 'nother level. She shares it with another family, and the Elf surprises one family or the other throughout the month with rather more elaborate goodies, like whole batches of home-baked cookies or a jigsaw puzzle to assemble, or something else that makes me tired just thinking about it. But it does seem to be fun for all of them.
 It has been positively wintry here for the last couple weeks, with several snows that have accumulated (well, at least more than a dusting). It's snowing now with 2-4 inches predicted today, more tomorrow and still more on Thanksgiving.
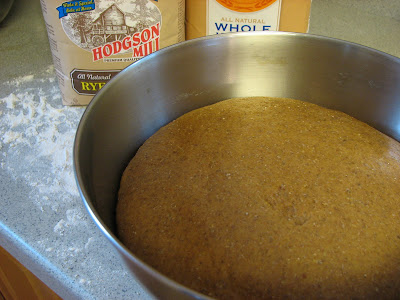
On the whole, I am not a big fan of premature winter. I am already yearning for a Caribbean island. The only good thing about this weather is that it does put me in a cozy baking mood. The other day I decided to make some bread by hand, something I have not done since getting a breadmaker about 10 years ago. And oh my God, I'd forgotten how homemade bread is even better than breadmaker bread (which I do think is pretty tasty too). And especially I'd forgotten how wonderful this bread is, though it was my favorite as a teen, the first wholegrain bread I ever liked and the the first bread I learned to make myself (because my mother didn't bake it often enough to satisfy my cravings). I love this so much I made my mother bake dozens of loaves to serve at my wedding reception.
 I do not recall exactly where the recipe is from, though I'd guess from one of my mom's old Scandinavian cookbooks. (My mom's dad was Norwegian.) It's a bit of a bother, as any homemade bread is, but it's completely worth the trouble, even just for the way it makes the kitchen smell heavenly. And feel nice and warm.
Swedish Sour Rye Bread
This makes 2 loaves, which is never enough. If you have a big enough bowl, maybe you should double the recipe.
2 cups thick sour milk
2/3 cup dark molasses
¼ cup salad oil (I use canola)
1 cake compressed yeast (OR 3 packets active dry yeast)
2 cups white flour
2 cups whole wheat flour
2 cups rye flour
2 tsp. salt
Extra flour for kneading
If you don’t have teens to help you make thick sour milk the old fashioned way (by leaving it on the counter all day after fixing their breakfast cereal), you can cheat by adding a few tablespoons of vinegar to the milk and letting it sit for 15 minutes – it should separate and look kind of nasty.) Heat the sour milk to lukewarm. I just beep it in the microwave, checking the temperature every 45 seconds or so. (All the liquid ingredients should be 110 to 115 degrees to activate the yeast, which means you'll want the milk to be a bit warmer than that, if you're the precise measure-y sort.) Pour the milk into a large bowl, and stir in the molasses, oil, and yeast. Put it aside to let the yeast get bubbly and gross-looking.
Sift the flours and salt together into a medium-size bowl. Stir the flour mixture into the milk mixture gradually, beating well after each addition. Turn the dough out onto a well-floured board and allow to rest 10 minutes or more.
Then put on some nice music or, my current favorite, podcasts of old episodes of NPR’s Wait, Wait, Don’t Tell Me and knead the dough until very smooth and elastic (10 minutes or more). You can sing loudly and annoy your children while you do this. Shape the dough into a ball and place in a large, well-greased bowl (I use olive oil to grease it). Turn the ball so it’s coated all over. Cover the bowl with a clean dishcloth and place it in a warm spot to rise until the dough is doubled in bulk (about 2 hours).
Punch down well and turn out on a lightly floured board. Divide the dough in half and shape into 2 loaves. Spray the loaf pans with Pam and put the loaves in them. Place them back in the warm spot, cover with the dishcloth again, and allow to rise until nearly doubled in bulk (2 hours). Bake at 350 degrees for 40-60 minutes until nicely browned and the edges are pulling away from the pan. (The loaves should also sound hollow when thumped.)
Try to let it cool a bit, but go ahead and have some while it's still warm. I'll happily eat it plain, but it's extra incredible with some real butter or a little honey. Or made into sandwiches with your Thanksgiving turkey leftovers. Or with cold turkey meatloaf, which I'll give you the recipe for later, when you're no longer sick of the bird. My family knows to grab some quickly, otherwise, I'll eat it all while they're off at work or school.
 This is really a test for me. I'm trying to see if I've figured out a way to add a printable pdf file to a blog posting. If it works, I have some more goodies to add soon!
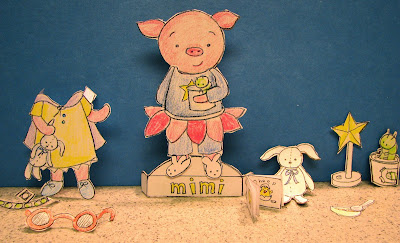
 Click on this link here (I hope) to take you to a black and white paper doll of Mimi and friends that you can print out, color, and play with, if you're so inclined. (To print the pdf file, click on the iPaper button on the toolbar and select print.)
You're free to use this image for non-commercial purposes, including printing it out for a class or library storytime. The picture above is of some of the pieces colored with colored pencils, cut out, glued to cereal box cardboard where applicable (i.e., Mimi, Bunny, and Frank), and assembled where necessary (i.e., the book). I'm working on making a full color, 3-D Mimi paper doll to post on my website too, and I'll link to it here as well once I finish it.
I have been ga-ga for paper dolls as long as I can remember. When we were young, my mom used to let me and my sisters pick them out at the five and dime if we'd been good on long shopping outings. My favorites were the ones that came with lots of accessories, like a crib to put the baby in, or little bowls of food with tiny spoons, etc. My grandmother also used to save the Betsy McCall paper dolls that came in her copies of
McCall's Magazine for us to play with when we came to visit. (You can find printables of these old paper doll pages at Janie's The Bleu Door site
here, as well as links to other paper doll sites.)
I really credit a lot of my skill with scissors to years of practice cutting out paper dolls and clothing. I remember too, my mom showing me how to make my own paper dolls by drawing a doll figure, taping it to the window, taping another piece of paper over it, and then drawing clothes that would fit. I made zillions of my own dolls, figuring out the engineering of accessory furniture and other items as well. And then I spent hours and hours pretending with my dolls. All those skills have served me well in my writing and illustrating!
For using paper dolls with very young children, I recommend using the Scotch Repositionable glue sticks rather than the tabs for putting clothes on - much less frustrating for tiny hands. The repositionable glue stick has a bond roughly equivalent to a Post-It Note, so it's easy to attach and remove and won't leave a huge permanent mess all over your kitchen table. Because the print outs are close to free (just the cost of paper and ink) you can let the little ones have a go at cutting them out themselves, which they'll probably do badly. One thing that makes it easier is to first cut around each piece so the paper is easier to manipulate.

My friend and collaborator Julie Stiegemeyer has a new picture book out!
Gobble, Gobble Crash! A Barnyard Counting Bash, illustrated by Valerie Gorbachev (Dutton, 2008) will delight 3 to 7 year olds from start to finish. And even though you might think it was a Thanksgiving tale, what with all those gobbles in the title and the turkeys on the cover, it's really an any-season bedtime/counting story, so go ahead and add it to your holiday or birthday shopping lists.
There are so many things to love about this book. First, there's the plot, which is a variation on one of my favorite themes: putting one over on a too-stern grownup. A quartet of rambunctious turkeys gobble and tumble and crash into the barnyard one evening just as the farm animals - and the cranky farmer - are settling down for the night. The turkeys rouse the animals, prompting the little ones to giggle and squeal and join in the fun. The barnyard mamas are as annoyed as the farmer - until they overhear his plan for taking care of those turkeys once and for all. The scheme the animals devise to protect the silly turkeys will have young listeners snickering in collusion.
Second, there's the language. The story is told in rhythmic rhyming couplets that are a pleasure to read aloud, with a fun "gobble, gobble, crash" refrain for little ones to repeat with gusto. It's a book that works well both one-on-one
and with a large group. Julie uses strong verbs too, making this a good choice for teachers to use as an example in writing workshops in the early grades.
Finally, there are fun counting and searching elements, some of which are extra challenging and enjoyable in this book. In some of the illustrations, the animals are neatly lined up for beginning counters to note easily, but in others, the animals are scattered throughout a complex illustration, making for a more advanced task that stretches early math skills. A couple times Mr. Gorbachev makes the counter's job particularly complicated and interesting, thereby encouraging kids to devise new, more sophisticated counting strategies; this aspect adds to the appeal for slightly older audiences. For example, the reader can't simply count noses to confirm that Mama Mouse has seven babies; she's got them huddled so tightly in her arms that the reader has to search for seven tiny
pairs of ears. Sharp-eyed little ones will also have fun figuring out what the farmer can't, namely what has become of those noisy turkeys.
The illustrations are lovely too, with the story beginning visually in the front matter even before the text starts. Gorbachev has a loose energetic feel to his watercolor and pen and ink pictures, and adds lots of interesting details to examine. The colors are muted, as befits a night-time tale, but with spots of bright yellows and reds to draw the reader's attention to the important parts of the action.
You can gobble, gobble up this book at
amazon,
barnes and noble (where you can read the excellent professional reviews the book has received), and
powell's.
Sigh. I struggle so much to blog regularly, even though I always enjoy posting. My biggest problem, aside from being over-extended in almost every area of my life, is that blogging makes me feel
guilty. I shouldn't be doing something frivolous like writing about kids' books or crafts or whatever, when there are important things to be doing like meeting deadlines or dragging my daughter to visit colleges. And laundry. (I'm not sure why guilt is so effective in preventing me from blogging when it definitely doesn't stop me from eating chocolate or sprawling on the sofa to watch old episodes of
House or
Battlestar Gallactica - but maybe it's just easier to hide the evidence of those things.) Anyhow, I have a possible solution for my guilt: blunching, or blogging at lunch (instead of doing a sudoku and the word scramble thing). We'll see if this works...
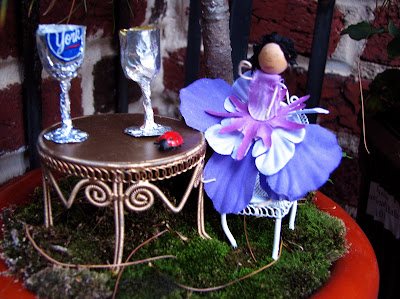
Today I have instructions for making sweet (and functional!) drinking goblets for fairies. Or G.I. Joes, if your kid's tastes run more that way. My mother-in-law taught my kids how to make these (who in turn taught me); she learned from her grandmother. They're easy to craft, make a good prop for imaginative play or a gift to leave for the tooth fairy - and best of all, give you a good excuse for eating a chocolate that comes in a pretty foil wrapper. So feel free to raid your kids' remaining Halloween stash.
OKAY! Blogger's formatting drives me insane sometimes! I cannot get anything to go where it's supposed to. ARGH. Hope you can follow the steps anyhow because lunchtime is OVER and I must stop. SORRY!
Step 1 Unwrap a candy and smooth the foil wrapper with your thumbnail. This one is a York peppermint patty, which has a nearly perfect wrapper for this purpose. Plus, if you hold the peppermint to your ear and snap it in two, it makes a really cool sound.
Eat the candy yourself, explaining to your young child that candy isn't good for her teeth, so you're doing her a big favor.
Step 2 
Curl the wrapper around the tip of your finger with the pretty shiny side out.
Step 3
Pinch and twist the wrapper just past your fingertip. The part left on your finger becomes the bowl of the goblet; the part you're twisting is the stem. Stop a few centimeters from the bottom. (Pretty fancy of me being all metric, huh?)
Step 4
Shape those last couple centimeters into the base of the goblet by folding and squishing them into a circle. This is a little tricky and may take some practice. Smash the bottom agains the table to make sure it's flat and the goblet is stable.
Step Ta-Da!

Admire your elegant goblet.
Then unwrap a few more chocolates and let your kid make a complete set for a large fairy dinner party. Then set her (or him) up with some fairy dolls or other little guys, a child-sized teapot or small pitcher filled with a little lemonade or watered down apple juice. If the weather permits, these are nice for kids to play with in a mossy spot under a tree. Otherwise, opt for some mess-proofish place, like on a tray at the kitchen table or in the bathroom. You get to curl up nearby with a cup of tea and read your novel, while patting yourself on the back for encouraging your child's imagination.
 I hope you'll support my guy -- but either way, make your voice heard! And then afterwards let's all work together to make this country an even better place for our children and grandchildren. Thanks!
P.S. I'm ready to resume posting. I promise!
P.P.S. These polling hours are for Pennsylvania -- check your own state's hours.


The first photo is of me at age five, back when I planned on being Mary Poppins when I grew up, and the second is of Mimi with her bunny. (Hmm. I hadn't realized how much alike we look until I saw these two pictures together.) At any rate, if you want to learn how I shifted my career aspirations from "magical nanny" to "children's book author-illustrator," you can read Susan VanHecke's
interview with me for the August children's market column at Authorlink. (It's available free until August 10th). You can also learn about stuff like my
slow path to publishing success and get a peek at my anxiety-and-chocolate driven work process. And if you want to see some pix of the original Mimi, the Mimi "bible" I referred to while working on the book, and the lovely cover of the very first book I wrote and illustrated (at age 7), you can visit Susan VanHecke's
blog.
Susan, by the way, is the talented author of my upcoming book,
An Apple Pie for Dinner, due out from Marshall-Cavendish in fall, 2009. And Susan is not only talented, she is positively prolific: She has
three - yes,
3 - books for young people coming out in 2009. (
Flak Jacket Rock and
Strike Up the Band, in addition to our pie book). And in her spare time, she does a little other writing (like being an Authorlink columnist and writing books for adults) and some gardening (serious enough to get her lovely and productive garden featured on
Good Morning America this year. Wow.)
I like the Authorlink interview very much, though I can't get over how they let me run at the mouth (or, more precisely, fingers) when I answered Susan's great questions. My only regret is that I didn't think to work in thank yous to all the people who made
Mimi come to life. In addition to my parents and Melanie Cecka, my editor at
Bloomsbury, I should have mentioned the important roles of people like my agent,
Steven Chudney, who not only got me the contract in the first place, but guided me through the early development of the story and character. Steven really is an exceptional agent, in that he not only knows the children's market well and has a high success rate in placing manuscripts, but he is a good editor, good friend, and able and willing to help his clients develop their whole careers.
I also owe much thanks to my writers' critique group, run by
Pat Easton, and including some truly remarkable writers and skilled critiquers like
Kitty Griffin,
Judy Press,
Cynthia Light Brown, David Amaditz,
Andrea Perry, Marcy Collier and others (and moved-away-but-still-in-touch members
Julie Stiegemeyer (my Cheeps author), Susan Chapek, and
Cynthia Cotten. They all patiently listened through a zillion drafts of various Mimi plotlines, oohed politely at my sketches and early attempts at final artwork, and urged me on by offering to take me out for chocolate desserts
afterI finished.
And finally (well, not finally, since I really am only scratching the surface of the thank-ees - this is starting to look like the credits at the end of an epic film, which seems a bit much for 400 word picture book...), I owe a debt of gratitude that I can never repay to my supportive and endlessly tolerant husband Steve, who not only didn't whine about having to make dinner every night
but didn't even fuss about not having a table to eat dinner off of, because for months every flat surface in our house was covered in pig, bunny, and roly-poly parts. He is a good, good Webbis, that guy. (If you don't know what a Webbis is, then you must read Shirley Jackson's hilarious slightly fictionalized memoir,
Life Among the Savages.)
One more little thing: see! I managed to put a picture in the banner place for my blog! Of course I didn't do it quite right or anything (the size is a bit off and it's awfully hard to read the text), but it's better than the bland green stuff that came with the template I used before, right?). The picture is of my play house writing studio at night - I just got the lamp at an estate sale this weekend, so now I can hang out and listen to the crickets while I work after dark. I love my play house.
Now I just have to get busy updating my lists of blogs and favorite illustrators, adding in pix of my book covers, etc. to the layout...
I got cybersquatted.
And it made me cranky. Very, very, very cranky - but it all worked out in the end. Phew!
So here's what happened. I finally decided to get working on my website that is actually listed on the jacket flap of my book but doesn't exist yet. Oops.
To be fair to myself, this was a crazy busy year, the kind where I didn't have time to do frivolous things like: going to the bathroom (at least not until I was doing the pee dance), sleeping, grocery shopping, cooking meals for my family, shaving my legs, doing laundry, buying new underwear which I desperately needed since I wasn't doing laundry, posting on my blog, learning how to create a website, etc.
But anyway, I went to bluehost.com to buy my domain name and have them host my site, carolbaickermckee.com, which my lawyer husband had assured me could not be used by anyone else as my name is utterly unique, thanks to some Ellis Island goofy spelling plus the magic of marital hyphenation. (I think there are only about 30 people in the entire world with "Baicker" in their name, all related to us, and I'm certain there are only 5 Baicker-McKees and they all live in my house.) And it's against the law to buy someone else's name that you have no legitimate connection to. But someone had already bought my name anyhow! And put up a horrible website that was all links to commercial websites, including from the homepage some porn-ish sights about cheating wives and Russian girls.
I about had a heart attack. Then I called my husband and told him he was in BIG trouble. (Not that I have much leverage as an Angry Woman anymore, not since I gave up stuff like grocery shopping, shaving my legs, and washing the family's underwear. What could I threaten to do? Lose the number of our favorite take out pizza place? Convince Kmart to stop selling him new Fruit of the Looms?)
So then I didn't know what to do! But now I've figured it out, and I'll tell you, in case it happens to you. First, go to a whois site, like betterwhois.com and it will tell you who has registered your domain name and who owns the website. And then use the contact info to visit the owners' websites, in my case a giant buy-lots-of-domain-sites company. And then write them a fierce letter telling them they are violating Section 43(d) of the Lanham Act (read about it here), and that you'd like them to immediately shut down the website and un-register the domain name. Next, get your husband to take out all the inflammatory language so that the email is merely firm but polite. Then wait a few hours for an email that says, "Don't know what you're talking about. We don't own that domain name." And then check and discover your name is now magically available and the horrid website has disappeared and no one has to sue anyone! And your husband isn't it deep doo-doo anymore! Finally, quick, quick, quick, register the name, get someone to host it, and start working away on your site (more on the adventures of that soon).
In more fun news, I'm working on content for my website, including a printable Mimi paperdoll. This is because I have always loved paperdolls. My plan is to have one page to print on cardstock that will have Mimi, Bunny and Frank dolls, as well as other things that work well on stiffer paper, like a yogurt cup that Frank can be inserted into after assembly, a book cover or two, a bowl of cereal with a separate teeny tiny spoon and a banana, complete with smidge, maybe a twinkle star night light, some forks - stuff like that. And then another page that can be printed on regular paper (or maybe a lightweight photo paper - that might be nice) with outfits for Mimi and Bunny (and maybe a collar and leash for Frank?), and interior pages that can be assembled with the book covers on the previous page to make little miniature books, which I also love. Any other great ideas/requests for cool features?
Off to my tree house to work on revisions to my parenting book!
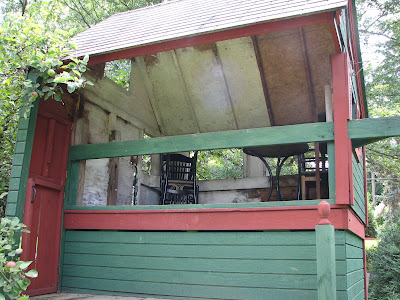 I have always been a sucker for playhouses, beginning with some serious coveting of a cardboard house my older sister got for her birthday when we were little. (To be fair, she was very gracious and let me play in it nearly any time I wanted, but I wanted to own it myself. I'm not sure I'd have been as welcoming to her, if I'd been landlord.) From then on, I was the queen of forts and hidey-holes - under my bed, with piles of sofa cushions and sheets in the living room, in the little hollowed out place in the middle of the forsythia bushes - any place I could squeeze into.
I also think one of my secret motivations for becoming a mother was to have another shot at having a really cool playhouse, which is how I came to force my handy husband to build the one above in our backyard. I think the kids did love it as much as I did. In its heyday, it was well furnished with a little kitchen center thingie, a child-sized table and chairs, and comfy cushions - and outfitted with essential features like a basket attached to a pulley for hauling up snacks, a secret exit to the monkey bars, a double dutch door, and slide.
The years unfortunately, have not been entirely kind to it; it's full of cobwebs, half-painted as the result of an overly ambitious project undertaken by my daughter and her buddies right about the time they lost interest in make-believe and helping with chores (age 11, for those of you at that stage). I can no longer entice anyone to play in it, not even by offering to bring them a super nice snack or promising to leave them alone and not eavesdrop even a little bit. (Okay, not surprising since they're now 20, 18 and 16. But still.) Now it stores the lawn furniture over the winter and shelters chipmunks and squirrels and far too many spiders, but I always feel wistful when I catch a glimpse of it out the window.
So yesterday, when I was moping around after yet another rainstorm (with still another threatening) and fishing around for a way to avoid some little projects I needed to work on, I decided to do what I've been threatening to do for years: I fixed it up as a playhouse for me!
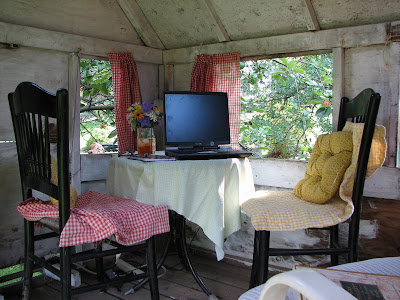 Pretty nice, huh! I rehung the curtains, even though they're very faded, brushed ALL the cobwebs away and asked the spiders and buzzy bees very nicely to relocate, and spruced up the furniture (nearly all scrounged from the garbage back when I could sometimes persuade my tweens to hang out in the house), and added my grown up necessities, like a snack, citronella candles, a small rug, a jam jar of flowers, and a LONG extension cord with a surge protector to plug my laptop into. (I've even managed to get intermittent internet reception, something I can't even get reliably on my crappy laptop when I'm sitting right next to my wireless router. Grr.) And then I was a good girl and worked out there the rest of the afternoon. And in the evening had my glass of wine up there in the rocking chair I lugged up (barely visible in the lower right hand corner). I had to read my book while I sipped my shiraz since I couldn't quite persuade my husband to join me. He had "more important" things to do.
By the way, I'm reading Ken Follett's The Pillars of the Earth (for my book club), and I'm enjoying it very much, even though I find the writing style and some of the characterization painfully clumsy at times. (Why do writers of adult fiction always seem to get away with faux pas that would brand someone attempting to write for kids as a rank amateur?)
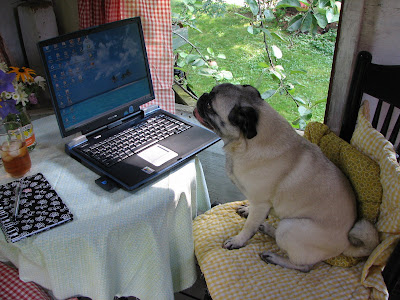 There are still some glitches I need to iron out, such as the dog above, who not only insists on joining me (which means I have to carry her up and down the rickety ramp that is the only access I can remotely manage) but also refuses to vacate the best seat for working. And her attention span is annoying short, plus she drank some of my iced tea when I put it on the floor so I wouldn't risk spilling it on my laptop. And the half-painted look is already getting to me so I'm likely to end up hunting down the rollers and leftover house paint before long. And I need a fan. And some Off! because the citronella candles weren't really adequate. But on the whole, so satisfying. Maybe it will be enough to inspire me to finish the novel I started more than a year ago.
If you're craving a playhouse too, check out this book with lots of cool ideas. I'm already trying to plot how to convince my husband to just "update" my playhouse with a few little things, like real wiring, glass windows, maybe some heating for the winter...
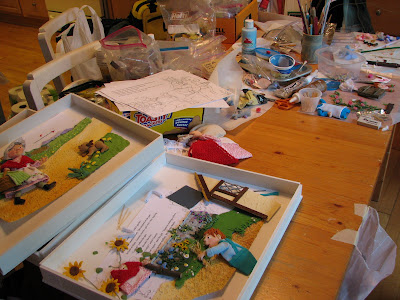

Things get a little "untidy" around here when I'm finishing up a big project. The two pieces and all the "stuff" are from illustrations for
An Apple Pie for Dinner by
Susan VanHecke. Actually the "before" picture looks better than it might, as there's about a square foot of table there with nothing on it -- rare that you can see any actual table when I'm working frantically. The really sad thing is I do have a studio space upstairs, but it's always such a disaster before I even reach the halfway point of a book that I have to branch out to my favorite spot, which just is the kitchen table. Much closer to the chocolate supply.
Guess how I got the table so clean? Yep, that's right. I just threw everything in a box and carted it upstairs where it's still sitting, waiting for me to sort it all out. Soon.
See the "trays" holding illustrations? I made those for this book, one per page, from foamcore scraps left over from my last book. Best organizational strategy I've used yet. They were perfect for holding all the little bits in progress, they stacked easily, and were light and easy to tote from place to place. I also put together a binder "Bible" that held a couple copies of my dummy and all my checklists, notes, and reminders (I think it was on the chair, just out of view). I promise to show all this organizational stuff better in another post soon. Oh, and see the little wax paper bag taped to the edge of the table? After battling zillions of little thread scraps around the sewing machine and little scraps of paper and smidges of clay everywhere else, I suddenly remembered that my junior high sewing teacher used to make us tape waxed paper lunch bags to our workstations to corral all the snippets. And I had this box of pretty little waxed bags I bought one day in a fit of nostalgia and "green" urges, but which my kids totally rejected as uncool, plus no good at keeping their sandwiches from going stale. So I taped up little bags everywhere I worked, and voila! No more scraps all over the floor! Well, fewer scraps...
One thing that was constant between both scenes (even though you can't see outside in the upper photo) was RAIN! I cannot believe how much it has rained this year in Pittsburgh. Pretty much every weekend. Plus lots of the week days. And naturally it' s raining here for the 4th, and supposed to keep it up Saturday and Sunday too. Sigh. I miss the sunshine we had on vacation.
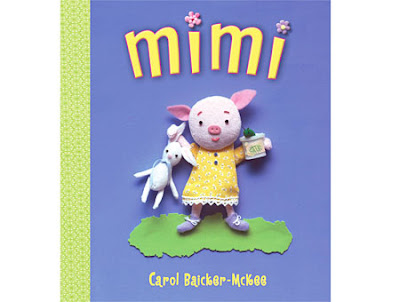
Here's Mimi! She made her official debut last Wednesday, and I'm as excited as a new mommy. Well, probably even more excited since she's very well behaved and doesn't keep me up all night like my human children did or make a colossal mess of the house. (Though now that I think about it, she did make me lose a lot of sleep last summer when I was slaving over the illustrations. And the mess! It was truly epic. Just ask my family - or anyone foolish enough to stop by my house during those last weeks.)
Like any new mom, I'm having a lovely time wallowing in compliments about how cute my little one is. And checking her amazon ranking obsessively - but I figure that's the author equivalent of checking every five minutes to make sure your newborn is still breathing. My favorite review so far is this very sweet one by five year old Kaya Wheatley on cnn.com, who likes the book because it's weird and happy. Okay, in the interest of full disclosure, she also said it had "bad stuff" because Mimi wants her pet bug Frank to get some kisses and you shouldn't kiss bugs because they've been in dirt. And I also got a nice review from someone at Kirkus, who apparently didn't notice about the dirt, but who did say stuff like this that makes me blush and squirm in a happy, embarrassed way: "A satisfying plot, whimsical illustrations and a beguiling main character add up to a delightful treat that even younger preschoolers will enjoy. Baicker-McKee is an author-illustrator to watch.” And there were other nothing-but-nice reviews like this and this and this, (geez, I hope these links work -- scroll down if you don't see Mimi at first and you're actually reading them...) and Parenting Magazine has a nice write-up in the July issue and is giving away 100 free copies (you can register here).
I don't really know any great way to sign copies that people buy (or win). I'm going to see if I can find an independent bookseller that will stock some for me to sign on an as-bought basis and then ship them (man, do I miss the children's bookstore that used to be just up the street from here). But meanwhile, if anyone's interested I'll be happy to personalize a bookplate and mail that to you.
Oh, and I had a request from a blog reader for a Mimi doll. I wish I had some to send you! But the Mimi in the book isn't really quite a doll-- I made each one individually (yes, there were an awful lot of them. The number of limbs was quite staggering) in an insanely time consuming process that involves wrapping fabric around illustration board and pipecleaners, and stuffing it and sewing little clothes and making features from polymer clay, beads and felt, and so on. I am thinking about making a handful of stuffed animal Mimis, if I can figure out how, for gifts (stop reading this Melanie. And Deb.) If I get good at it, I'll make an extra and have a contest for it -- but at this point it's the best Ican do!
Well, enough avoiding the apologies. Sorry I've been away from blogging for so long. I've been struggling to finish a book (yes, that SAME book about the apple pie and Granny) and it's finally nearly done! And dealing with the many obligations of a son graduating from high school, and um, a vacation last week (ah! It was paradise.) But now I'm back. Really and truly. No more excuses. My new theme this year is "Balance." Last year it was "Risk." (I picked that theme after the fact when I realized I kept putting myself in situations where I was over my head...) At any rate, my plan is to set the timer several times a week and just put something down. No more mammoth essays like, well, this one. Short and sweet -- and pictures. Now just pray at least some of my techno stuff keeps working so I can do it.
I leave you with this lovely picture of my messy, messy studio, aka the kitchen table. (I cleaned it up today! There's a tablecloth! And flowers! And already little piles of clutter!) Oops. I'll have to add the photo later. Just remembered it's on my husband's laptop and I forgot to email it here...
 Well, I've broken every one of my New Year's resolutions, with the exception of the one about eating more chocolate. Sigh. I know it's been a long time since I've posted, but I'm drowning in work and family stuff, and there's really no end in sight. But I knocked off a couple big items on my to-do list this morning, so I'm rewarding myself by spending my lunch break with a quick post.
Every weekend for the last month (maybe more, I've lost track) we've had crappy weather here. Snow, rain, freezing rain, sleet, hail, thunderstorms, you name it -- but none of it nice. So this weekend, I decided to cheer myself up with food (only a little chocolate though) and a bunch of my other favorite things. The table above, waiting for my sleepy family (though how they can sleep through so many delicious smells is beyond me), is set with lots of things that always make me chipper: a torn but super soft vintage tablecloth from a yard sale, embroidered napkins my parents brought back from a trip to Eastern Europe, an antique bowl that was obviously well loved even before it ended up in my hands, my sunny yellow teapot from my friend Julie, the oh-so-thin teacups that belonged to my husband's grandmother "Big" (and given to me by my kind mother-in-law Macky), cheery orange clementines in a turquoise glass bowl I got for $3 at Marshalls (the color combo makes me shiver, it's that beautiful, plus knowing what a great bargain I got on the bowl is so satisfying), and the banana nut oatmeal muffins I'm going to give you the recipe for! These muffins are fantastic, even though I vary the recipe a bit each time, depending on whether I actually have the ingredients I should and whether I remember how I've made them before (they're based on a mishmosh of several different muffin recipes). In fact, part of the reason I'm putting this up today was that they came out particularly well this week, and I still remember how I made them - so I thought I'd get the recipe on the internet for posterity so I can duplicate them when my memory deserts me again.
Banana Nut Oatmeal Chocolate Chip Muffins
Preheat the oven to 375 degrees and grease 12 muffin cups (or prepare paper and foil cups)
1 1/4 cups flour (whole wheat white flour works great -- can substitute oat bran for the 1/4 cup)
1 cup old-fashioned rolled oats
1/2 cup sugar (I've used brown sugar on occasion and that's good too, but the texture's different)
2 tsp. baking powder
1/2 tsp baking soda
1/2 tsp salt
1 tsp cinnamon (try one of the excellent cinnamons from Penzey's Spices)
1 cup mashed bananas (could probably substitute apple sauce or canned pumpkin too)
1 egg
1/3 cup canola oil (or other vegetable oil)
1/3 cup milk
1/2 cup chopped or ground walnuts
1/2 cup (or maybe a little more...) dark chocolate chips and/or dried cranberries or raisins (yuck, I say, especially compared to chocolate chips)
Combine the first 7 dry ingredients in a medium bowl. Mix the bananas, egg, oil and milk in another. Make a well in the middle of the dry ingredients and stir in the wet ones, mixing just until combined. Fold in the nuts and chocolate chips (or whatever), divide among the muffin cups (sometimes I stretch to make a few extras I can hide away for my elevenses on another day). Bake at 375 for 18 to 20 minutes until the muffins are golden brown and smell heavenly.
While they're baking make up some special coffee or tea and set the table with things that make you happy. Maybe some flowers too. Then share the muffins while they're still warm with nice people who won't mind if you whine a bit about the weather and how much you have to doooooo! (But first hide the ones you're saving - because any left on the table will get eaten.)

 Happy Valentine's Day, belatedly! And even more importantly, a belated but no less sincere and gigantic thank you to Roz for giving me this great award! It made my day - and the last couple weeks too. I've been swamped with work, travel (for pleasure and work), kid stuff, snow days, and now a miserable virus too (probably inevitable after spending a full day with a class of snuffling kindergartners plus about 7 hours on planes at the beginning of the week, not to mention all the time I've spent standing in snow and slush this week, scraping and chipping to clear paths and vehicles).
Anyhow, to pass on the award, here are the details:
1. Write a post with links to 5 blogs that make me think and/or make my day.
2. Acknowledge the post of the award giver.
3. Display the “You Make my Day Award” logo
4. Tell the award winners that they have won by commenting on their blogs with the news.
It's hard to pick just five (kind of like choosing just five chocolates from the mega-assortment box), so I'm glad I don't have to count Roz's excellent blog as one of them (but make sure you check it out too, if you haven't already, especially if like me you adore fabric illustration). Anyhow, here are five blogs that spark my muse, all on different subject matter:
1. Julie Stiegemeyer of Jottings and Such (Julie introduced me to blogging and is the author of my Cheep books as well as tons of other charming children's books, and an incredibly dear friend and all around kind person).
2. Amy Karol of the much-read craft/mothering/interesting stuff blog Angry Chicken and author of the useful book Break-the-Rules Sewing. She's probably already received this award a zillion times, but it is one of my favorite blogs.
3. Danny Evans of the father-parenting blog, Dad Gone Mad. I recently discovered this blog, and I've been completely enjoying his male take on little people and parenting adventures. Warning for those with sensitive ears (eyes?) - he's a master of the irreverent phrase and creative use of four-letter words.
4. Kitty Griffin of Chocolate Ferrets and Writing for Kids which is a brand new blog (so it doesn't have many entries yet). Kitty is an amazing children's book writer (for all ages) as well as a screenwriter and some-time writing instructor in the MFA program in writing for kids at Chatham College in Pittsburgh. She's an outstanding teacher and mentor -- and she should consider this a gentle nag to post more! We want more! (says the, um, procrastinator/overwhelmed person who hasn't posted in more than 2 weeks....)
5. Susan vanHecke who's the talented author of the folktale I'm currently illustrating. I just discovered her blog recently too (I'm just plain embarrassed to say it didn't occur to me to look her up when I started working on her book), and I've really been enjoying it.
I also owe Susan a big apology (and some chocolate too) because I'm late with the art for her book (but I'm working hard on it! Really! It's just very complex and detailed!), so the pub date will have to be pushed back. I've been late with artwork before - I'm still new enough to book illustration that it's hard for me to gauge how much time I need - but this is the first time (and I hope only time) I've been so late that I screwed up a pub date. I feel terrible - but that just means I'll have to make sure the final art is as near to perfect as I can get it and thus worth the wait.
Okay, back to the drawing table. Well, to the kitchen table, where the sewing machine is parked and calling to me, snuffly nose and all.
View Next 18 Posts


 My Mimi is about to become an outlaw. Or maybe just disappear from the bookshelves and the hands of children.


Oooooh! I simply adore this. I can't wait to find out how to make one!
Hope you had a very merry Christmas!