JacketFlap connects you to the work of more than 200,000 authors, illustrators, publishers and other creators of books for Children and Young Adults. The site is updated daily with information about every book, author, illustrator, and publisher in the children's / young adult book industry. Members include published authors and illustrators, librarians, agents, editors, publicists, booksellers, publishers and fans. Join now (it's free).
Login or Register for free to create your own customized page of blog posts from your favorite blogs. You can also add blogs by clicking the "Add to MyJacketFlap" links next to the blog name in each post.
Blog Posts by Tag
In the past 7 days
Blog Posts by Date
Click days in this calendar to see posts by day or month
Viewing: Blog Posts Tagged with: how to draw, Most Recent at Top [Help]
Results 1 - 18 of 18
How to use this Page
You are viewing the most recent posts tagged with the words: how to draw in the JacketFlap blog reader. What is a tag? Think of a tag as a keyword or category label. Tags can both help you find posts on JacketFlap.com as well as provide an easy way for you to "remember" and classify posts for later recall. Try adding a tag yourself by clicking "Add a tag" below a post's header. Scroll down through the list of Recent Posts in the left column and click on a post title that sounds interesting. You can view all posts from a specific blog by clicking the Blog name in the right column, or you can click a 'More Posts from this Blog' link in any individual post.
Ah, my gosh. Somebody please run my blog! I just will do just about anything but do it.
I make myself so mad sometimes. I frustrate the hell out of myself.
Anyways, I'm going to endeavour to update it with some of the things I've been doing whilst I've been away. I can only but try.
COLOURING BOOKS?! I have made colouring in books. It was not something I'd ever intended doing. It all felt a bit, well, you know, done. But when my printers started a new range of colouring books it got me thinking about some of my drawings that may be cool to colour in. And I tried thinking of ways of putting a twist on the whole colouring book phenomena.
I'm calling it 'advanced colouring' but really it's for any ability. But, if you're already used to wielding the pen then I've added tips to take your colouring to the next level.
There are two sizes of book, you can find them HERE.
See you back here in about six months time!
*I will blog more often. I will. I will. I will....*
0 Comments on advanced procrastination as of 1/1/1900
Here's a post from the archives. It's from July 2010. The first thing that goes through my head is how things have changed! I would never use this method these days. My drawing is so much more instinctual now, but back then I was learning. I was teaching myself to draw. And, for me, that makes it a valid exercise, but then any sort of drawing that you do is valid. It's all about practice, and no matter how much we'd love magic pens the fact is that if you want to get to a place where you're confident enough to become instinctual you need to put the learning in first. And, what I have found also is that drawing is all about looking, seeing, and that is something else I was teaching myself to do here. Look. See.
The other thing that has changed is an obsession with drawing shoes - where did that come from??!Anyway, here's
How To Draw a Shoe by Andrea Joseph 2010
Over the past few years I have worked through many different processes, when drawing from still life, to get to the one that I am happy with. As I'm self taught it's been a process of elimination to find the ways that work best for me. I have narrowed it down to a couple of methods actually. I'll show you both in the next two posts, and demonstrate with my favourite subject matter; shoes.
Above are the tools I have used. They are; a cartridge paper sketch book; tracing paper; pencil; rubber (I believe that means something different in the US?!); three blue ballpoints; one red ballpoint. I want to stress at this point, because I'm asked so frequently, I use ANY kind of ballpoint pen. No special makes or brands. Any. As long as they aren't blotchy I'll use them.
Step 1. I am pretty obsessive about getting the shape 'right', so if I'm sketching something, for eaxmple an Adidas trainer, I will do the sketching stage on tracing paper. I realised, a while back, that I do not have any 'sketchy' books as such. I only ever produce finished drawings. I do, however, have huge amounts of roughs on tracing paper. Doing things this way means I can work on the shape I want to achieve and then transfer it easily to paper. It also means that, if I should want to, I can reproduce the same image (in different mediums). Which is something I do quite often.
Step 2. When I've got shape I want I transfer it to paper. In the image above you can see the ballpoint outline. I would obviously start with a pencil outline, but the scan I did for that was rubbish - you couldn't see anything. So when the pencil outline is put down on the paper, I go over it faintly with a ballpoint.
Step 3. I have started to add some shading (values?) to some areas. I work out where this shading should be by observing the shoe and where the shadows and light fall. Excuse me if all this sounds really patronising, it's not meant to. It's just how I have learnt to draw. Step by step.
Step 4. Here comes the cross hatching. This is the part where I feel I can really get into the zone with this drawing. I love this bit. The shoe is starting to come alive, and more texture is being added through the hatching.
Step 5. A continuation of the last step. More building, more hatching, more texture. Also at this point I'm starting to add the detail. That's another bit I love doing.
Step 6. The finishing touches. My most favourite bit. Details, a bit of extra hatching and a splash of red. In this drawing the final finishing touch was to outline the shoe with a bolder line, using a ballpoint that has a bigger nib.
And that's it!
That's how I did things back then. Actually, this is the way I'd work these days for an editorial or book illustration job or for something that needed planning and page layout. So, I learnt quite a lot from that period. Mostly, I learned about seeing. And, funnily enough, I went on to teach a Sketchbook Skool course of that very name ('Seeing') five or so years later.
More demonstrations and things from the archives all month, here, on my blog.
But for now, that's all folks!
0 Comments on how to draw a show revisited as of 1/5/2016 9:46:00 AM
Amongst all the other illustration work I do, I also co-run Dr Sketchy Sheffield and, so, being the sketching half of the team (my co-running partner is from the performance arts), I create the poster artwork. It's one of my favourite things to illustrate. Because it makes me feel closer to the poster artists, from days gone by, who's work I adore. I wish there were more call for poster artists. These days it's all done digitally so I like to buck that trend with purely illustrated posters (and I wouldn't have a clue how to do it digitally).
Now once we've set our theme for our Dr Sketchy event the idea for the poster image pretty much comes to me straight away. Sometimes without even having to think about it. Really, it's just there. I see it - the whole poster - fully formed. I then just need to put it onto paper.
Our next event (next Saturday, at the Greystones, Sheffield!) will be a celebration of dance. We have performers from different genres of dance modelling and, erm, dancing for us. We have a belly dancer, a breakdancer, a bhangra dancer amongst others. So, already I knew I had to get that info into the drawing. The first and original thought was of the kind of drawing in the image above. I think it's important to go with that initial idea if it has presented itself to you. I love those 'consequences' drawings. I've heard them called other things and somebody once told me that they were known as 'exquisite cadaver' drawings. I think that's such a great name, which conjures up all sorts of weird and wonderful images, so I'll be sticking with that.
I made a few exquisite cadaver sketches, like the one above, to try it out. To see if it worked. I'll be honest with you, I think the trial run above is still my favourite. I guess that's because it was the most spontaneous. Then when I'd got one that I felt would work as a poster image I sketched it out onto a 'proper' bit of paper. I always add the image first, leaving room for the text. Sometimes I will play around with where I want to place the image. I did with this one - I tried her on both sides of the page and central before settling on this composition.
For the text I always quickly research (Google) posters or fonts until I find something that fits. For example, I'll Google 'Bollywood poster fonts' or some such thing. This one was a combination of various fonts because of the variety of dance genres. When I find a font I like I loosely copy it. I don't measure out the letters, nothing technical happens, I just copy it by eye (is that even a saying? It looks odd now it's typed out). I don't want it to look exactly like the fonts I find. I want it to be my own version of them.
Anyway, that's a little (ish) explanation of how I create my posters. Now anyone want a poster illustration? I'm for hire. I'm always for hire.
0 Comments on a bit about creating poster artwork as of 3/21/2015 4:42:00 PM
This week my class, at Sketchbook Skool, has come around again. The course is called 'Seeing' and is about, well, seeing. Really looking at your subject and perhaps seeing all those details that, if you weren't drawing, you'd never notice. I try to demonstrate this through one of my collection drawings.
Here are a couple of my drawings of one collection - my friend's collection of keys to be precise. They belonged to her father who had all sorts of collections. Most of these, I believe, were from model railways and clocks. I love keys. I love the symbolism of them and all the stories they could tell and doors the could unlock. I'm particularly happy with the drawing below. Don't know why. I just like it.
If you're interested, you can find out more about becoming a student at Sketchbook Skool HERE.
0 Comments on a strange dust lands on your hands as of 2/22/2015 1:27:00 PM
Calling all creative folks, with something they want to promote/advertise/flog. Ever advertised your new book/project/blog/Page in a newspaper or magazine? Of course you haven't. You're a creative - you'd never have the money for that. And anyway, why advertise in a big corporate glossy magazines with huge numbers of readers who, quite frankly, do not deserve to see (ignore) your ad? No, what you want is to be seen by a lot fewer people, but the right people. What you want is to advertise in a small self published, cutting edge, do-it-yourself ethos zine.
What you get; a small (tiny - this is my tiniest zine yet) unique hand drawn advertisement. The space is approximately an inch squared. Just enough room for a logo, a web address, and a few of words. All for five British pounds. Above is a couple of pages from my How To Draw Like a Loon zine. Your ads will be similar even though the zine layout is totally different.
Spaces are very limited, and as I'm hoping to get this zine to the press on Monday, time is limited too. Take advantage of this offer now. Interested? Get in touch.
Support self publishing. Support a fellow creative to keep on creating.
0 Comments on hot off the press as of 2/6/2015 9:52:00 AM
Over the last few years I’ve created a few posts on using or working with watercolor. They each focus on something different but can all help you with creating watercolor illustrations. I’ve also added some of my favorite go to watercolor videos.
This video shows how you can use watercolors to create fun dragon effects. It goes through some watercolor basics and then shows how to use them to paint a dragon.
This tutorial along with the next one show things you can do on top of your watercolor. This demo shows one way you can use colored pencils on top of a watercolor painting.
B for bonus. This post doesn’t actually talk about watercolors much but it does talk about line quality and show an example of how you can use ink line with watercolor
These next two youtube videos are from a show called Put SomeColour In your Life. I watch them over and over and learn new stuff about watercolor every time.
7
The first is a demo by Joseph Zbukvic
8
This second is a demo by Alvaro Castagnet
Do you have any favorite go to watercolor youtube videos? Comment below and let me know what they are. I’d love to see them.
My latest short story Midnight Ghost (it’s being released Oct 24th) required me to draw a glowing ghost. This is something you can struggle with if you don’t know the rules but once you do, drawing and painting glow is very easy.
It’s impossible to get anything lighter than the paper or white paint you are using, so how to make something look like its lit up? The secret is in the contrast. If you want something to look like light you need to put dark around it. The contrast between light and dark is what makes it look like it’s glowing.
Here is the image I did of the Ghost in my new story. She needed to look like she was glowing so I added the dark area to the background and ta-daa! Glowing ghost. This image was all done with pencil. Since there is no color you can see the contrast in values easier, but it works with color too.
Here’s video of me doing the same thing with watercolor so you can see it in action.
Color can blind us. Sometimes we try to make something look like light by adding yellow, after all, the sun is yellow so it should work right? Nope. Next time approach the problem as something that needs to be lighter or darker rather than a different color. I bet you’ll be pleased with the results.
I’m thrilled to welcome Steve Barr today with an idea that will touch the hearts of many…
As a professional cartoonist and the author of 13 “How to Draw” books, I’ve spent my entire life trying to make other people laugh and smile. While this has been an extremely satisfying endeavor over the years, it’s not exactly a get-rich-quick scheme! My path along the way has had many ups and downs, triumphs and failures. But the rewards—those smiles on other people’s faces—have always made me feel like the roller-coaster ride we know as freelancing was worth it.
However, lately I’ve found myself longing to do something with a much more profound, longer-lasting impact. I’ve begun to feel drawn (no pun intended!) to begin working with pediatric patients and their families. Art activities, as well as music therapy, has been shown to substantially reduce stress in young children who are battling really difficult diseases. Drawing and painting has even been proven to have fairly long-lasting effects involving pain reduction.
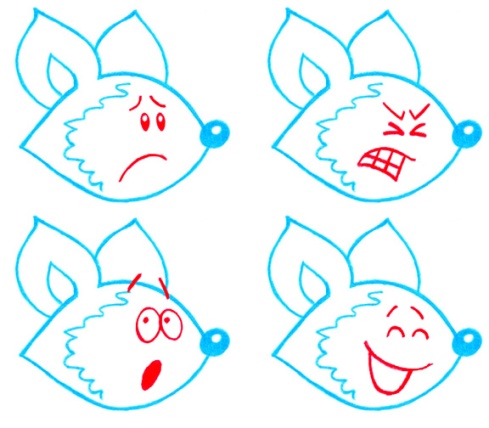
I can’t think of a better type of art therapy than teaching children to draw cartoons! It’s easy to do, entertaining and distracting. When kids are in the hospital, they have very little control over anything in their life. They’re expected to follow orders, and do whatever they are told. But when they’re drawing cartoons, there are NO RULES! Cartooning is one of the only art forms I know of where someone’s art is not expected to look exactly like someone else’s. Every successful cartoonist I know has a very distinct style that is easily recognizable as their own.
That’s why I’ll be teaching the children to experiment, to try different techniques, explore options and just have fun with their creations. Their drawings will begin with simple lines and shapes, and we’ll build on that to come up with characters that they can bring to life! The lessons are so easy to follow, I’ve had five year-olds grasp them immediately and amaze me with their natural talent.
Click image for full page, printable version.
Once the patients and their families feel comfortable with the cartoons they’ve drawn, they’ll be encouraged to experiment by making slight alterations to their creation to change them into other characters. That will let them have hours of fun on their own after I’ve left.
I want to provide these services completely free of charge to the hospitals, patients, their families and the art therapy groups that serve the facilities where they’re being treated. I’m dreaming of also sharing them with the surrounding communities and bringing more attention to the lingering benefits these classes will have.
But I can’t do this alone. I need help. I’ve begun researching grant opportunities and funding possibilities, but those can be very difficult for individuals to qualify for. With that in mind, I decided to set up a “Go Fund Me” page and seek funding from other people who would like to help me make this happen. If you’d like to take a peek at that campaign, here’s a link: http://www.gofundme.com/e9oahg
When children are hospitalized and fighting diseases like cancer, they often have a difficult time expressing how they are feeling. Art therapy can often help them open up and share their emotions. When they’re drawing cartoons, they can do that simply and easily with just a few shapes and lines. This can help both the medical staff and their therapists determine where the kids are in the process, and address any problems they’re having in dealing with their treatments.
I am hoping that this idea will continue to grow. If it really takes off, I would love to involve other cartoonists and illustrators in the effort. It has already become quite a time-consuming process, but I know the rewards will be fantastic.
I honestly cannot think of a better way to spend the next few years of my life. And perhaps even longer than that!
Note: Please feel free to use the drawing lessons I’ve included in this blog if you are an Art Therapist, Child Life Specialist, Teacher or Nurse who works with children. Parents and guardians are also welcome to share the lessons with their kids. It’s not to be republished commercially without permission, but I’d be quite happy if it was shared personally with kids who would enjoy it.
9 Comments on Laughter Really is the Best Medicine: How to Draw a Fox and Heal a Child with Illustrator Steve Barr, last added: 9/30/2014
Hi Tara, Can they provide an address for mailing a check? Thanks.
Alicia minor
Tara Lazar said, on 9/29/2014 4:41:00 AM
I’ll get Steve to provide that info. Thanks, Alicia!
Pat Miller said, on 9/29/2014 5:42:00 AM
Done! Thanks for the opportunity, Tara.
Steve Barr said, on 9/29/2014 6:49:00 AM
Thank you for your support, everyone! If you’d like to contribute directly, my address is: Steve Barr, 77 Blue Diamond Lane, Columbus, NC 28722
Steve Barr said, on 9/29/2014 6:53:00 AM
I am seeking grants for this as well, but they are difficult for individuals to get. Due to the fact that many pediatric patients have compromised immune systems, all art supplies taken into the hospitals have to be brand new and unopened. I’m hoping to raise enough funds to be able to provide an art packet for each child, which will include new pencils, a 50 sheet drawing pad, a pencil sharpener that catches its own shavings (no messes in hospital rooms!), a non-toxic marker for inking and a box of 12 colored pencils. If I buy in bulk, I can put each kit together for around 10 dollars, and the children can keep their pack after the lessons are done. That way, they can continue drawing cartoons and smiling long after I’m gone! :)
Joanne Sher said, on 9/29/2014 7:34:00 AM
This is a FABULOUS, and wonderful, idea. I get paid Wednesday, and will definitely be contributing (a pittance unfortunately – but SOMETHING for sure) for this cause. Thank you for this – and praying you get all the funding you need!
Rosi Hollinbeck said, on 9/29/2014 12:18:00 PM
This sounds like a terrific project. I will be donating soon. Thanks for posting this, Tara, and thanks for doing this for the kids, Steve.
erikaviktor said, on 9/29/2014 2:39:00 PM
This is such a wonderful cause! As a person who loves drawing and has spent some time with ill children in the past, I applaud your service here. What a sweet thing to do!
Lots of people tell me that when they buy a new sketchbook (especially something like a Moleskine) they get new sketchbook nerves; the fear of the blank sketchbook. I'm quite the opposite. I can hardly wait to get it home before unwrapping it and laying my pen on the paper - that is why I have a hundred unfinished sketchbooks, though.
So, with those of you in mind, and for all of you guys who are starting the new semester of Sketchbook Skool and getting your school bags ready, here's a little video that'll take away the fear. See starting your sketchbook as an exercise too. Hope this helps!
0 Comments on How To Write Your Name as of 6/11/2014 2:19:00 AM
This is a little cartooning tutorial I wrote a few years back about creating an illustration using Adobe Illustrator and Photoshop. You’ll notice I begin my drawing in pencil, then move to illustrator for line work and finally Photoshop for color. Although the tutorial is a little old and the programs have advanced since then it’s still pretty useful and works just as well now as when I wrote it (assuming the you’re familiar with the basic functions of both programs). For more advanced students you may want to try adding actions to speed things up a bit.
If this tutorial is beyond your skill level take heart I’m working on a new series that will delve a little deeper focusing on individual tools, how they work and more importantly how to get them to work for you. Many of my first time students are tentative about using these programs to their full potential because they sometimes feel overwhelmed. My advice is always the same. Don’t let your inexperience dictate the scope of your project. Try things that are slightly out of reach and a little ABOVE your skill level. Step outside of your comfort zone and allow yourself to learn some of the tools you’ve been avoiding. If you get stuck don’t panic there are tons of resources available everywhere. The best places I’ve found for quick easy answers (in no particular order) are:
Using the help button built into the program
Posting a question on Twitter, Facebook, or LinkedIn
YouTube
Google
Adobe website
Lynda.com (if you have an account)
On the other hand if you’re just not the adventurous type and you really want to learn the program once and for all consider taking a course. It will cut your learning time in half. There are few substitutes for having a knowledgable instructor to help you gain a clear understanding and get you through those areas you don’t understand.
Bob Ostrom is a children’s book illustrator and instructor of Adobe Illustrator, InDesign and Photoshop at Wake Tech Community College and the State Personnel Development Center in Raleigh NC.
I just finished my latest video shoot and will have a bunch of new free videos coming out very soon. I can’t wait to share them with you. In the meantime here’s a little video tutorial I did a while back about drawing a dog. Have fun. When you are done with your drawing and would like to see it on the fan art page just send me a copy.
For this lesson you will need:
Some paper
A marker or a pencil
Optional- markers, crayons, or paint to color in you dog.
It takes restraint not to re-post everything Jillian writes on her blog over here. But take a moment to check out her advice on drawing animals in this post – “There is no formula to trick to drawing animals, or anything else for that matter. Only observation (ideally from life) and practice will give you a fundamental understanding of structure and form.”
Check Jillian’s illustration gallery here to see how uses animals in her illustrations regularly to evoke motion and emotion to great effect.
This was a video I shot last summer at Burning Oak Studios. I posted a link to it earlier but I don’t think I ever actually posted the video itself…. so in case you missed it here you go. Have fun.
You’re probably thinking… Hey, what’s this guy know about hair, he has less hair then a naked mole rat . Well that may be true but you don’t have to have great hair to draw great hair. In this lesson I’ll show you some simple ways to make the hair on your cartoon really shine…. okay enough bad hair puns for one article. Here’s another free art lesson from Bob Ostrom Studio, Burning Oaks Studio and Jerry’s Artarama.


 By: Gerald Hawksley,
on 12/19/2016
By: Gerald Hawksley,
on 12/19/2016

.jpg?picon=572) By: andrea joseph,
on 6/3/2016
By: andrea joseph,
on 6/3/2016


 By: Manelle Oliphant,
on 11/11/2014
By: Manelle Oliphant,
on 11/11/2014
 Over the last few years I’ve created a few posts on using or working with watercolor. They each focus on something different but can all help you with creating watercolor illustrations. I’ve also added some of my favorite go to watercolor videos.
 My latest short story Midnight Ghost (it’s being released Oct 24th) required me to draw a glowing ghost. This is something you can struggle with if you don’t know the rules but once you do, drawing and painting glow is very easy.
 By: Tara Lazar,
on 9/29/2014
By: Tara Lazar,
on 9/29/2014


 By: BobOstrom,
on 1/28/2013
By: BobOstrom,
on 1/28/2013
 By: Hazel Mitchell,
on 3/26/2012
By: Hazel Mitchell,
on 3/26/2012


 By: John,
on 3/16/2010
By: John,
on 3/16/2010


Hi Tara, Can they provide an address for mailing a check? Thanks.
Alicia minor
I’ll get Steve to provide that info. Thanks, Alicia!
Done! Thanks for the opportunity, Tara.
Thank you for your support, everyone! If you’d like to contribute directly, my address is: Steve Barr, 77 Blue Diamond Lane, Columbus, NC 28722
I am seeking grants for this as well, but they are difficult for individuals to get. Due to the fact that many pediatric patients have compromised immune systems, all art supplies taken into the hospitals have to be brand new and unopened. I’m hoping to raise enough funds to be able to provide an art packet for each child, which will include new pencils, a 50 sheet drawing pad, a pencil sharpener that catches its own shavings (no messes in hospital rooms!), a non-toxic marker for inking and a box of 12 colored pencils. If I buy in bulk, I can put each kit together for around 10 dollars, and the children can keep their pack after the lessons are done. That way, they can continue drawing cartoons and smiling long after I’m gone! :)
This is a FABULOUS, and wonderful, idea. I get paid Wednesday, and will definitely be contributing (a pittance unfortunately – but SOMETHING for sure) for this cause. Thank you for this – and praying you get all the funding you need!
This sounds like a terrific project. I will be donating soon. Thanks for posting this, Tara, and thanks for doing this for the kids, Steve.
This is such a wonderful cause! As a person who loves drawing and has spent some time with ill children in the past, I applaud your service here. What a sweet thing to do!
This sounds AMAZING! I love this! :D