new posts in all blogs
Viewing: Blog Posts Tagged with: Fiber Arts, Most Recent at Top [Help]
Results 1 - 25 of 26
How to use this Page
You are viewing the most recent posts tagged with the words: Fiber Arts in the JacketFlap blog reader. What is a tag? Think of a tag as a keyword or category label. Tags can both help you find posts on JacketFlap.com as well as provide an easy way for you to "remember" and classify posts for later recall. Try adding a tag yourself by clicking "Add a tag" below a post's header. Scroll down through the list of Recent Posts in the left column and click on a post title that sounds interesting. You can view all posts from a specific blog by clicking the Blog name in the right column, or you can click a 'More Posts from this Blog' link in any individual post.
April in a nutshell:
*Tea to celebrate the Queen's 90th birthday, complete with fancy hats, delectables and the host's delightful collection of royal memorabilia.
*More stitching/painting in between deadlines. I'm planning a shop update next month (more, later).
* A trip to the
Isabella Stewart Gardner Museum with friends. Despite the relative proximity, I never make it down to Boston (confession: I'm terrified of city driving). But thanks to the commuter rail out of Newburyport, the Green Line and traveling companions with a better navigational sense than my own, the trip was all smooth sailing.
* New episodes of
Grantchester!
* And a visit from a brand new nephew. Which makes all in all for a pretty solid thirty days.
If you made it to
Salmon Falls Open Studios this weekend, it was swell to meet and chat. Thanks for coming by! In between visitors, the above embroidery is something I spent some time stitching. Speaking of which, my mother and I are organizing a beginner embroidery class for after the holidays. If you're in the area and interested, feel free to
drop me a line for more information.
And before I forget, Happy (almost) Thanksgiving!
I finally finished up the 2016 tea towel calendar I've been working on! I'm excited to get stitching on these in the coming weeks.
Current likes and/or loves:
* Fabric printing.
*Above freezing temperatures. High five, Mother Nature.
A fat quarter turned out to be enough for a detachable Peter Pan collar. And now I feel like I'm ready to go out and solve a mystery or two myself. Move over, Nancy Drew.
Things I am painting/stitching lately. I'm also dusting things off and getting ready to pop a few new prints up on Etsy. That should be all good to go the day after Thanksgiving, cross my heart.
What else, what else?
*I saw
Murder on the Homefront the other night and it ain't half bad. Granted the plot's a little thin, but oh goodness, the costumes. Seriously. Hats, wraps, teetering heels, even down to the acid yellow knit vest Lennox Collins sports, it's all a visual treat.
*I'm on pie duty again this year, which begs the very important question: what's your go to Thanksgiving dessert?
Happy weekends!
A test swatch of the
terrarium themed fabric I designed a few weeks back just came in the mail. I'm 110% certain I need to sew a skirt from said fabric, pronto.
I'm ignoring the snow, choosing to paint poppies instead. I tried growing Icelandic poppies last year and it was a spectacular failure, but I'm going to give it another go this year.
So in the meantime, I'm making
prints (and pillows) while I wait for the real thing.

By: Emily Smith Pearce,
on 1/22/2014
Blog:
Emily Smith Pearce
(
Login to Add to MyJacketFlap)
JacketFlap tags:
embroidery,
Gift,
Fiber Arts,
wedding,
Sewing,
photography,
Crafts,
portrait,
craft,
digital art,
Add a tag
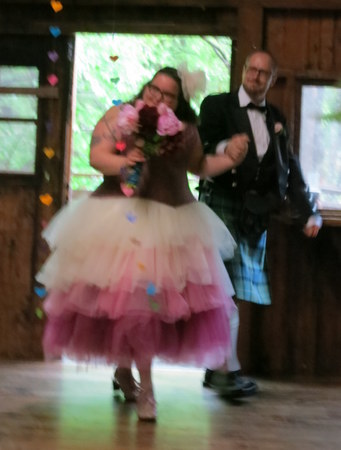
This is the story of a wedding gift (my contribution to it, anyway) for a dear friend. I thought you might like to see the process. The picture is of my friend Jamie and her husband, who got married last June. As a surprise to the couple, her mother asked friends and family each to complete a design on a muslin square. She collected the squares and then had them made into a patchwork quilt as a gift to Jamie and her husband.
Jamie and I go way back, and a big part of our friendship has been about shared words. Books, movies, music, poetry, television. We have a lot of inside jokes about obscure quotes. So I sifted through our collective “library” of shared references, looking for the perfect quote to decorate the wedding square. Nothing seemed quite right.
When I saw the bride and groom, though, I knew nothing could be more Jamie and Jon than their fabulous wedding outfits.
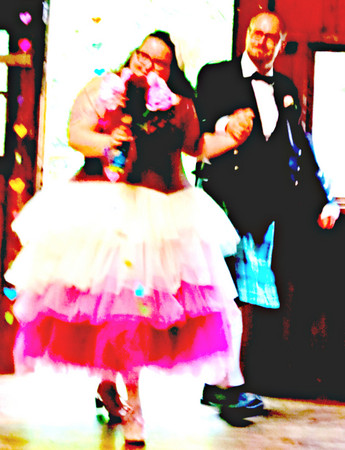
I decided to make an embroidered picture and started with the best photo I had of the event. It’s blurry but gave me a good pose to work with. I used Picasa to play with the colors and then used the “posterize” effect to get the lines of the image to show up more clearly.
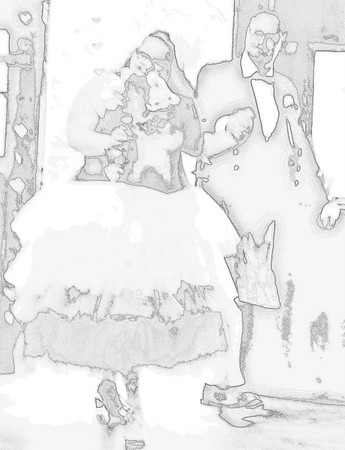
I printed the picture, traced over the lines with a Sharpie, and then transferred these to the fabric with a temporary fabric marking pen.
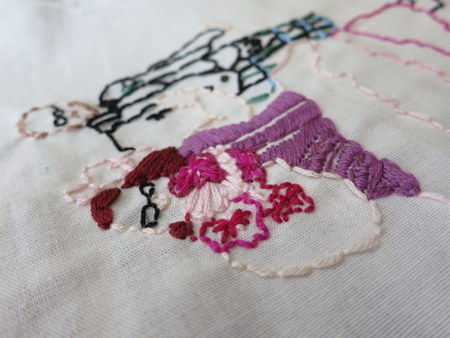
I like the back almost as well as the front:
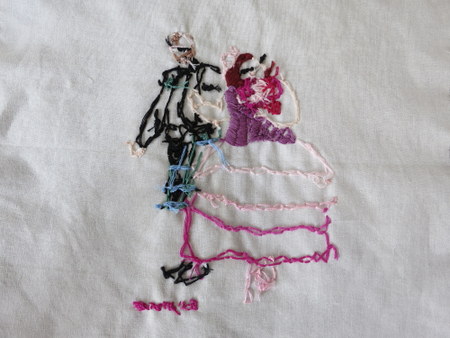
Here’s the final:
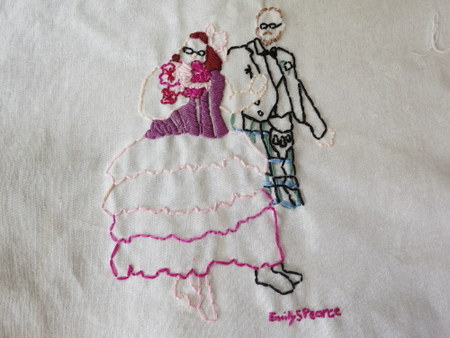
If you’re interested in seeing more of Jamie and Jon’s wedding, click here.
Meanwhile, I’m hard at work on my nonfiction project and just got some excellent notes on my novel from an old friend. A little sewing going on, which hopefully I can show you soon. Back to writing now!


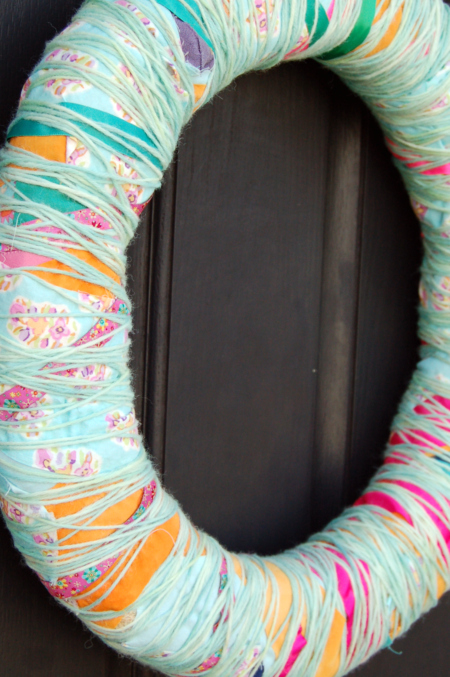
The front door needed something, something that was NOT the red berry wreath that has seen better days. I wanted to make a wreath that wasn’t permanent, not too fussy or prim, but would give us a burst of spring color.
Also, it had to be easy and quick. I pictured something along the lines of the ribbon wreath my daughter made last year. Or maybe a little like the Anthropologie thread-wrapped bricks I saw on Pinterest. Or the yarn-and-fiber wrapped rabbit I’d seen at the Ackland Museum Store in Chapel Hill. For the life of me, I can’t find the name of that artist or a link to her work, so let me know if you know what I’m talking about.
I bought a straw wreath form at Michaels and pulled out a bunch of spring-colored scraps: leftover strips from this quilt, scraps from this dress and this one, and Kool-Aid dyed yarns.
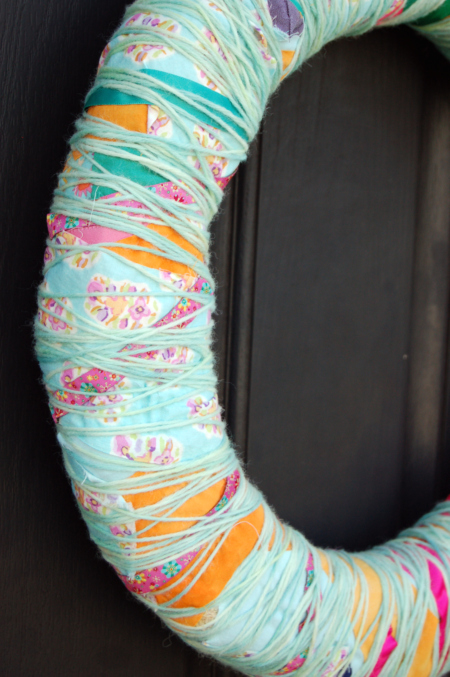
I started wrapping and pinning on the darker color strips, hoping a little dark poking through from the bottom layer would keep the color scheme from getting too saccharine. Though in the end there’s actually very few darks to be seen.
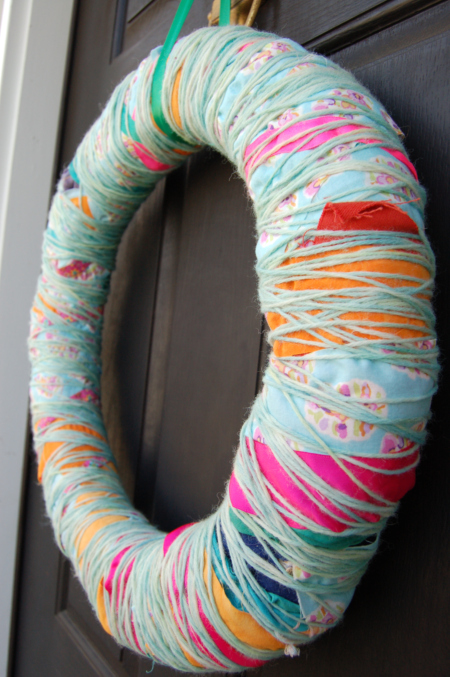
Next came the lighter and brighter strips, then the ribbons. Last, I started wrapping the yarn, but my five-year-old was really into that part, so I let him wrap until the whole thing had a good spreading of yarn.
In the end, I’m fairly happy with the results. It hit all my requirements, though it didn’t quite match up to my vision. Hubs wasn’t so sure about it at first, but it’s grown on him, he says. Either that or he just wants to make sure I make his favorite chicken salad this week.
For more of my posts about crafts, click here.
Is it spring where you are? We had lovely weather over the weekend, and things are sprouting up in the garden.
Meanwhile, I’m still inching along with the revision on my novel. I’m remembering something Katherine Paterson once said/ wrote….something to the effect that she had to sculpt her plot out of granite, using straight pins. My process is feeling something like that. I keep making headway but then realizing there’s so much more to do. What are you up to?


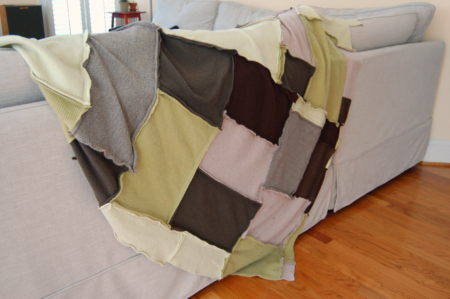
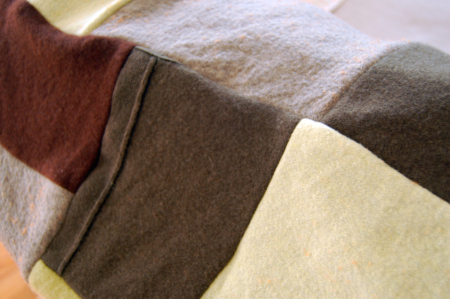
Sometime in the last few months I got it in my head that I wanted a cashmere blanket. Like, really wanted one. I think maybe I started obsessing when I was paging through Handmade Home and saw all the cozy, cozy stacks of blankets. I just wanted to curl up with them. I didn’t want to fork over the money for cashmere, though, so I started scheming. Could I possibly find enough thrifted cashmere to make a blanket?
Sometimes it’s hard to come by, but lo and behold, there was a bumper crop of cashmere at Goodwill this fall. Some of it was in perfect condition, in my size, with classic lines. What?! I washed those and put them in my closet.
The rest of it, the out-of-fashion, the holey, the wrong sizes, I cut into rectangles (excluding the holey bits) after washing it. I added in a few washed and shrunken merino sweaters, too, to round things out and make the blanket a little bigger.
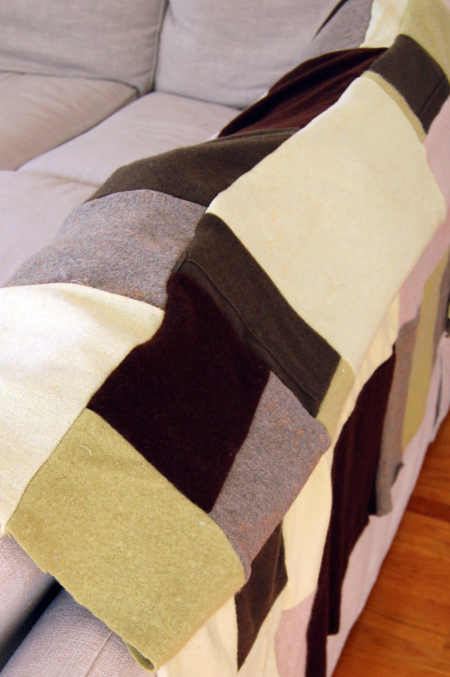
In all I used six sweaters for the blanket. It went together pretty quickly, and the kids were very excited to help place the pieces. Everyone was already fighting over it before it was even done.
I had planned to lap the edges, but kind of forgot that plan until midway through. Oh well. Next blanket, maybe. I already have some cashmere pieces waiting.

Personally I like all the little weirdnesses of sweater pieces, the rolled edges, the seams and ribbing here and there. And it’s kind of nice to have a “smooth” side and a “wrong side.” I like them both.
For sewing the pieces together, I used (I think) a regular machine needle and upped the stitch length a bit. I had no problems with it. If you want specific instructions for sewing a cashmere sweater blanket, check out Betz White’s book Warm Fuzzies.
Random: love loved this fire and ice birthday party over at elsie marley. Almost makes me want to live in a frozen place again.
Also, has anyone been watching Parade’s End on HBO? I can’t fully follow the storyline, but wow, the clothes are incredible!
And lastly, next week I’ll be introducing you to a friend of mine, artist/ photographer Dawn Hanna. So excited! Her work is drop-dead gorgeous.
Okay, folks. Have a great weekend.


By: Emily Smith Pearce,
on 12/22/2012
Blog:
Emily Smith Pearce
(
Login to Add to MyJacketFlap)
JacketFlap tags:
Tutorials,
Crafts,
craft,
fabric,
ornament,
Christmas craft,
Fiber Arts,
kid craft,
easy craft,
Add a tag
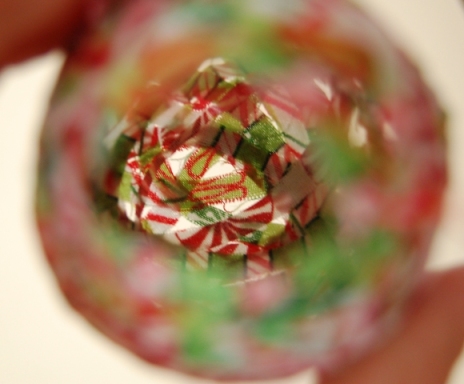
This is one of those last-minute inspirations that happened to work out. I was trimming bits from a Christmas sewing project (to be pictured later) and had all these great strips of cheery prints. It seemed a shame to waste them.
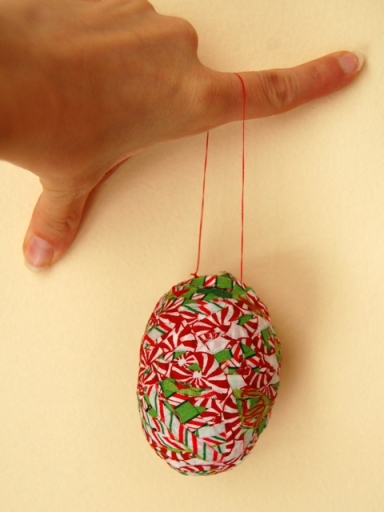
I grabbed a balloon, blew it up just a little (you could do a bigger version if you wanted) and tied it off. Then I made a water-and-Elmer’s-glue mixture, dipped the strips, and wrapped them around the balloon, just like papier mache—-only one layer of strips, though. I left a few holes here and there, but if I had to do it again, I’d leave more holes for effect.
This would be a great quick craft to do with older children, though of course you have to be able to stomach glue mess. Not a problem in my case.
Family members who shall remain nameless were skeptical, but in the morning, when the glue was dry and the balloon popped, it DID actually detach from the cloth and leave this little egg-shaped vessel. It could’ve dried a bit more, though. Make sure it’s dried ALL the way for best results.
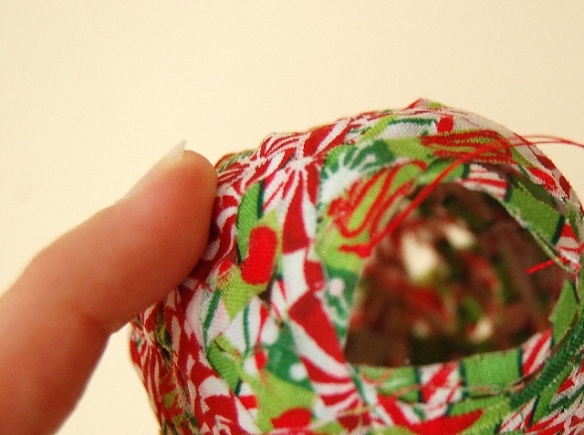
Then you just make a thread hoop/hanger thingy and presto! change-o! You’re done.


Dyeing things gives me such a rush. It feels like magic, and also like haha! I got what I wanted for next to nothing!
A sewing friend who was moving away (a long time ago now) gave me some silk (crepe de chine?) from her fabric stash. Silk! I’ve never sewed with silk before. But I was stumped. The colors are all very, very pale, and I just couldn’t imagine myself wearing them. Paleness tends to wash me out. Months later I had a brainflash. What if I dyed the silk? But silk. Silk! It took me a long time to work up my nerve.
Finally, months after that, I started with a small piece and used the old Easter egg/ Kool Aid dye technique.

Initially I was going to try some embroidery or resist or something to give it some more interest, but then decided to keep it simple. I ended up really liking the color. Warning, though—-this was German Easter egg dye. PAAS will work the same, but I find their colors to be a bit, well, Easter eggy—whereas this green was nice and grassy. You can always mix your PAAS or Kool-Aid colors to get something a bit more nuanced. I think there are even tutorials out there on mixing Kool-Aid colors—-usually with regards to yarn dyeing.
On to silk batch #2. I was a little bolder this time with several larger pieces of pale blue, and decided for an indigo color using two shades of Deka fabric dye.

I didn’t use a full load of dye, but the fabric didn’t take the color as deeply as I’d expected. The blue I ended up with was beautiful but dried a good bit lighter than I wanted:

I really liked the mottled effect I got in this first dye job:

I dyed it one more time to get a deeper color. It doesn’t show up quite true in this photo (below), but I really like the way it turned out–it’s just a tiny bit deeper than the middle tone. The mottled effect is gone, though. I’m planning to make another Anda dress out of the fabric. Wish me luck! My most recent sewing projects have not been going very well.

For tips on overdyeing, check out this previous post. For more of my adventures in fiber art, click here.
3 Comments on Overdyeing Silk, last added: 3/16/2012
 I first read about these looms in an issue of Craft magazine, back in the good ol’ days when they still had a print edition. With the article, there was a pattern to make your own loom with cardboard, and although I’m sure that works fine, it wasn’t until I found out the author of the article was making hard plastic looms for sale on etsy that I decided I had to try it. Oops! Looks like his store is currently closed, but hopefully he is just on vacation or something.
I got the loom for Christmas and tried it out a few weeks ago using some wool sock yarn I found at the thrift store for 2 euros. Score! Actually, I think it was like 1 euro 60 because they were having a funny promotion where you had to roll the dice to see if you could get a discount. I did. Yay me!
Anyway, the video the loom maker (Travis Meinolf) provides on youtube is very helpful, though I found doing the setup to be a little trickier than I thought it would be. I guess practice will make it easier. I also had grand ideas of the weaving being so fast—like, faster than my snail-like knitting—but because I chose such a skinny yarn, it hasn’t been all that fast.
The good news is, the weaving itself is pretty fun, and the kids and even my husband had to get in on the action. I’ll admit the kids’ weaving isn’t as neat as I might like, but they had a good time, and the labor was free.

The edges, as you see, are pretty uneven. I’m not sure if this is something I would get better at with practice, or if I should just view it as charming and deal with it. Or, another option, to cover it with some kind of (silk?) bias binding, like the professional weaver downstairs does with her gorgeous blankets.


I love this shot of Cinderella (below) at the loom. It’s somehow totally right for Cinderella to be weaving, don’t you think? People in fairy tales do stuff like that.

Next we’ll be spinning wool and warning against pricking fingers on spindles.
I seem to be stuck in an almost-finished project mode. The Haiku sweater is done except for blocking. A dress like this is almost done, but I’m so frustrated that it’s not turning out the way I want it to.
Meanwhile, I’ve been writing and researching on my book projects. I’m reading another great writing book called

This was a fairly simple and oh-so-satisfying project. I bought the pashmina (silk and cashmere) for a few dollars at a thrift store and used it as a sort of throw in my son’s room when he was a baby. It was just the right color at the time, but after it outlived its usefulness, I felt obligated to wear it.
The problem was, it just wasn’t my color, so I never did. It seemed too luxurious to get rid of, so finally I decided to overdye it. I had to choose a color that was in the same vein but deeper. This coral color (Deka calls it “Hibiscus”) seemed just right, and I’m really happy with how it turned out. The color is very slightly uneven, but to me that’s just part of the charm of hand-dyeing.

I have to confess, though, that I’m still a little lost as to how to wear a pashmina shawl—maybe I should look for an online tute? The beading is also a little fancy for my taste. I could remove it, but that feels a little drastic. In the meantime, the shawl is keeping me warm at home.
For tips on overdyeing, see my post How to Overdye. If you’re in the US, I recommend dharma trading for supplies and directions. Remember: only try this with natural fibers, and please not with anything precious, because you never know what your results will be.
I threw in a few other things while the dye was ready, including this tablecloth from the thrift store here:

You may remember it from this earlier post. I love the dipped-in-Kool-Aid look it has here—so much more interesting than the brown on white. I’m planning to make some travel sacks for my daughter to pack her shoes and dirty laundry in. This always seems to be an issue when we travel, and it’s nice to have something handy and cute to use.
Speaking of fiber arts, the haiku sweater is off the needles (woowoo!) and Amy Karol had this great post on knitting attitudes the other day. And by the way she seems to have found a similar cookie thing like ours (where you can print letters) at Williams Sonoma. She’s a much more patient mommy than I am because she let the kids do a bajillion different words. I’m inspired.
Also, regarding fiber arts, I was totally happy to see the return of annekata. She had quit blogging for awhile, but she’s back!

 2 Comments on Overdyed Pashmina Shawl, last added: 1/27/2012


 1 Comments on Frühlingsfieber/ Patchwork Sneak Peek, last added: 2/10/2011


 4 Comments on Adventures in Thrifting: Germany Edition, last added: 1/21/2011


 1 Comments on Getting Started with Dyes, Part I: Animal Fibers, last added: 1/14/2011


that is wonderful! I love it.
And I’m really looking forward to learning more about this nonfiction project! : )
Thank you! Miss you! You know about this nonfiction project and I’d be happy to chat with you about it some more.
Oh, I love it! You are too talented for words…
You obviously but a lot of time and effort in this project and it will likely be an heirloom for them
GD Bob
Cool! And the wedding – that was pretty amazing too.
Thanks!
Glad you enjoyed both!
*Blush* Thank you!