<!--[if gte mso 9]>
Normal 0 false false false EN-GB JA X-NONE <![endif]-->
My friend had a pedal-free “balance bicycle” that her toddler used. The kid could barely walk but she would scoot around like a mini Dale Earnhardt. Apparently balance bikes are all the rage in Germany. The beauty, my friend explained, is that having learned to balance on their behinds, the kids effortlessly transition to two wheel bicycles avoiding the whole troublesome training wheel stage. This is the best way to learn how to ride a bike. Just not for my kids.
To make a pedal-free bike, you can just temporarily remove the pedals from a regular child’s bike. However, to give my child the utmost advantage, I splurged on a beautiful, European, wooden, spoke-free, pedal-free balance bike for my daughter. She wasn’t interested. Well, that’s not entirely accurate. She was excited for about 2 minutes, until she tried it and couldn’t balance on it. Then she actively disliked it. Many tears, months and arguments later, I bought her a bike with training wheels.
“What’s the hardest thing about learning to ride a bike?”
“The pavement.” That’s the punch line I learned as a kid, but it turns out there is something harder.
Not cars, those would be harder, but I was smart enough to avoid them. I took my daughter to the Rails to Trails bike path, which is free of motor vehicles and relatively empty mid-morning on a weekday. I helped my daughter into her helmet and kneepads. My daughter got on her bike and immediately she was off. It was going great. I could feel the joy radiating from her. She looked back at me with a huge grin, and before I could say, “watch where,” her bike veered off the path. It was like a roadrunner cartoon. She bounced down the rocks, (harder than pavement), and landed in a sticker bush. This is not the best way to learn how to ride a bike.
Fast forward several years. We now have a second child who is very athletic yet still completely uninterested in riding the balance bike. She wants a bike with training wheels like her sister’s. We give her her sister’s bike. With helmet, padding and lots of warnings to look where she is going, she’s off riding up and down the bike trail. She loves her bike with training wheels and wants to ride it all the time. Feeling badly for older sister, we buy a second bike with training wheels and try to encourage her to try again. Very reluctantly older sister is biking with training wheels again, though slightly slower than a typical 80-year-old woman walks. Is the training wheels step useful? Not really. They learned the pedalling motion from their tricycles so all it maybe gained them was some familiarity.
By now, my eldest daughter is 7 and all the kids her age are riding around on two wheelers. When I asked mine to try without training wheels she looks at me like I’m crazy. I make her try anyway, on a pink hand-me-down bicycle given to us by a neighbor. We start on the sidewalk, with me holding the handlebar of the bike. I run beside her, to her nonstop chorus of, “Don’t you dare let go! Don’t you dare let go!” Her hips sway like Shakira’s as she pedals and I struggle to keep the bike up right and straight. I strain as I do the work of the training wheels she has come to depend on. There is no question, if I were to let go, my daughter would veer off or into the sidewalk. This isn’t working. I tell my daughter to practice scooting and see how far she can glide. She practices for exactly as long as I make her. Eventually, I give up.
So my girls do not learn how to ride a bike. I don’t push my younger daughter worried about the psychological effect on the eldest should the youngest succeed. My girls learn to ride a scooter. My eldest takes to rollerblading. “Rollerblading is harder then biking,” I tell her. “Not for me,” she said. A year goes by. “You are eight now. Why don’t you try biking again?” I ask. “I prefer rollerblading.” My youngest daughter is now 5. Finally, I decide she deserved a chance to learn to properly ride a bicycle.
On Friday October 18th I have my 5-year-old push with her feet and scoot along the sidewalk. I realize she’s ready. Then I take her to a cul-de-sac. Finding a wide, open space is one thing I finally did right for learning to bicycle. It was so much better than a bike path or side walk, because she can wobble and snake without falling off. I steady her as she starts, run a few steps beside her and let go. “I’m doing it! I’m doing it!” Sometimes she swerves but there is space for her to right herself. Before long she is even able to kick off from stationary. “Mommy, let go, I can do it!” she says. Saturday she can’t wait to go riding again and to show off to her sister and father. She gets on with confidence and bikes to the end. Not content with stopping to about face, she wants to master the turn and is frustrated. “Calm down, you are doing great,” her father tells her. “Honey,” I say, “you just learned how to ride yesterday. It is going to take time to learn moving turns.” It did, about two minutes. Then she was riding and turning like a pro. “You’re so good, I’m going to faint!” her older sister said, “Can I try?” So this was the psychological effect! It finally got her willing to try. “You’re rollerblading,” her younger sister answered.
That afternoon, on Saturday October 19th, while her younger sister was at a play date, I took my willing and determined eight-year-old to the cul-de-sac. Riding wasn’t easy, but it wasn’t nearly as hard as she thought it would be either, at least once she got moving “Go, go, go!” I’d encourage, “Angular momentum is your friend!”
“Gravity is a harsh mistress,” she would answer back. In less than half an hour she could do it. I needed to steady her while she put her feet on the pedals, but once she got going, she was riding on her own. We fetched her father who was amazed and proud. She went back and forth between us. When she’d reach one of us, we’d help turn her around until she too said, “don’t, I can turn around myself.” Then she realized her turn was too wide and added, “Sometimes,” before crashing into the curb and overturning. Kudos to her though, she got right back on and kept practicing.
She came inside just before her sister’s play date ended. “Don’t tell her that I learned to ride,” she said. “I’ll pretend to get on for the first time and just start riding and my sister will be amazed!” We played along as she timidly got on the bike and then told us to let go and took off. Her little sister said, “it’s still my bike, right?” We removed the training wheels off of the other bike and the 8-year-old happily took this smaller bike, while the 5-year-old stuck with the bigger pink one. I suggested the reverse, but they’re both happy, so I am too. After our tough journey, I’m so proud of my two bicycle riders!
By Cara Eisenberg
It was getting out of hand. My daughter's nose was bleeding several times a day. At school, on the bus, even in the middle of the night when she was fast asleep, my daughter was painting the town red. As much as I appreciate Oxyclean, I wanted a solution that got to the source.
I spoke with a pediatrician who recommended cauterization. I was told that these days cauterization is nothing, a two second, in-office procedure that doesn't even hurt. The ENT touches the troubling blood vessel with a tiny bit of a chemical and zap, no more trouble. I scheduled an appointment. However, during the office visit with the ENT, he explained that he does not find the chemical cauterization of singular blood vessels effective.
"I recommend you try other options first," he said, "If you still elected to do cauterization, I will perform a liquid nitrogen cauterization that destroys all the blood vessels in one side of the nose. Since this does hurt, it is done under general anesthesia. The downside is that blood vessels are supposed to supply the central nose membrane. Without them, the membrane can develop a hole. This will whistle. Furthermore, the nose can eventually collapse."
"You had me at general anesthesia," I told the ENT. "I want other options."
I explained to the ENT that for a time I had been using petroleum jelly. It had helped but my daughter had started tasting it in her throat and we had stopped. He informed me that petroleum based products were NOT good for the nose. Instead he recommended water based, KY Jelly. I went out immediately and purchased my daughter some personal lubricant.
I took the personal lubricant and the petroleum jelly and compared the two labels. For the first time, I unfolded the one on the Petroleum jelly to read all the hidden instructions. "Warning," it read, "do not ingest. If swallowed get immediate medical attention." If I had read that before I probably wouldn't have been putting it up my daughter's nose. On the label of the personal lubricant there was nothing against ingestion. It simply said, "Warning, does not contain spermicide." I can live with that.
It has been several months. Each night, I put a drop of KY Jelly on both sides of a q-tip and let my daughter apply to each nostril. She now rarely gets nose bleeds. I never expected to be so thankful to personal lubricant this way!
A few more preventing nose bleed tips:
1. Make sure you keep your child's nails cut short. Even if children never pick their nose, when the nose is healing from a nose bleed it can be itchy. A scratch in their sleep can derail the healing.
2. Use a cold mist humidifier, if their room is dry.
3. Check with doctor to rule out underlying condition, such as a sinus infection.
By Cara Eisenberg
Please visit
www.caraaboutyou.com for information about Cara's children's books.
One of the down sides of a child's natural curiosity is that they tend, at some point in their early life, to try to stick something up their nose. "Hmm, a hole. Let's see what happens if I fill it. Hey, it disappeared!" Raisins, rocks, beans, beads, buttons, cereal, the list is almost endless. In my daughter's case, it wasn't her fault.
My husband had plugged her nose bleed with a tight wad of tissue and she inhaled it. Then she came to us. My husband thought she was kidding; it was too big to fit into her nose. She swore she hadn't removed it. I believed her but it was clearly gone. What was I going to do?
The prevailing advice is if they can't blow it out, go to the doctor because trying to remove the object with a cotton swab or tweezers could push the object in deeper. However, when the wad of tissue disappeared up my daughter's nose, I came up with a new tool to avoid a dreaded trip to the emergency room: the
NeilMed Sinus Rinse. Found in most drug stores, this is a squeeze bottle that lets you shoot saline water up one side of the nose, forcing it and anything in it's path, out the other side. Snot, allergens and, as it turns out, foreign objects stuff up the nose, all easily come shooting out. It worked like a charm.
If you try this, please make absolutely sure that you flush the nose starting from the NOT plugged side, so that there is no possibility of moving the object deeper into the nose.
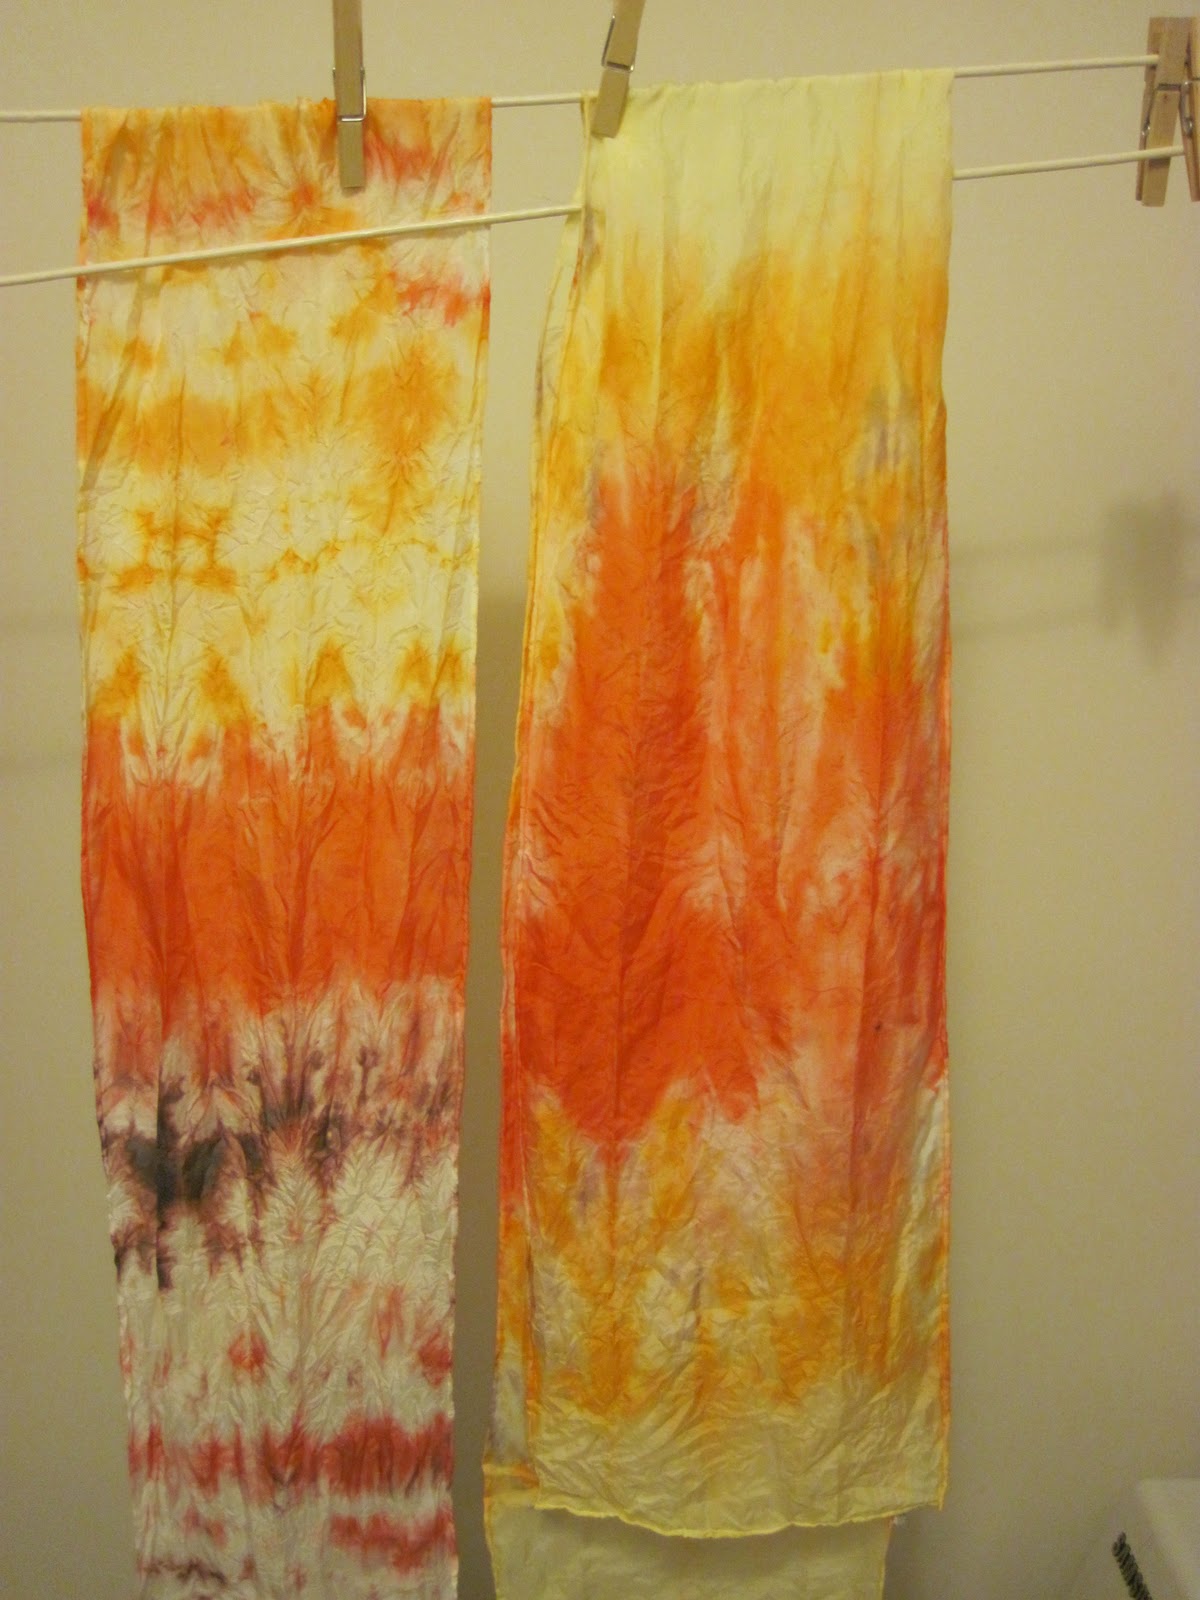
I can think of only one good use for Kool-Aid but it's to dye for – beautifully colorful silks and other natural fibers. After some experimenting with various methods I read about online, here's my take on the best way to dye silk with Kool-Aid:
How to Dye Silk - Soak your silk in a bowl of warm water. I learned the hard way that it is important to give it a good soaking. I add a touch of vinegar to the water just to make sure the PH is low enough for the dye to stick. I read this isn't strictly necessary since Kool-Aid is already acidic, but why take chances.
- Cover your work counter with plastic wrap unless you want it multi-colored for good.
- All the methods I read about would have you dip your silk in containers full of the Kool-Aid mixed with water. However, what I found worked more easily and neatly, was to lay my silk on the covered work surface and apply the Kool-Aid with a paintbrush. You can dip your paintbrush right into the Kool-Aid and it will dissolve on the silk, or you can add just enough water to make the Kool-Aid liquid. An added bonus is that this concentration helps produce more vibrant colors. Be prepared that the colors will spread and run into each other to some extent but that is part of the beauty.
- For the tie-dye look, scrunch the silk with elastics before painting.
- For your own design, lay the silk flat and use it as your canvas.
- For a repeating pattern, fold the silk before painting.
- Set the color with steam. The method I chose was to put the silk in a partly closed zip lock bag and microwave it for 2 minutes. The key here is to not catch your silk on fire. (I did this once .) This is why a good soaking is so important in step 1. I also now use a reduced power setting and only do 15 second intervals, watching continually. Be careful when removing the bag. Like when you microwave popcorn, stay clear of the bag opening or you can burn your hand with the steam. (I did this too.) (A nice alternative to using the microwave is leaving the zip-lock bag in the sunshine to steam; too bad that just works in the heat of the summer.)
- Rinse in cold water. I was amazed at how the water immediately runs perfectly clear after the steaming. All the color is absorbed by the silk.
- Hang to dry.
Kool-Aid Colors
Orange is a bright favorite. Lemonade's a mellow yellow. Twists is azure blue.&
We've started our 5-year-old on a weekly allowance. We explained the rules to her yesterday. She'll have to do her chores and in exchange she'll get money - 1/3 to put towards college, 1/3 to give to a charity of her choice, and 1/3 to use as she likes. I've copied the system from a friend who said having an allowance has made her kids able to equate "toy I want" = "x weeks of allowance".
My 5-year-olds chores are:
1) Make her bed
2) Put her dirty laundry in the hamper
3) Dress herself
4) Clear her dishes
5) Participate in our family's weekend house clean-up
They are the same chores she has had to do anyway, but she sure does have more enthusiasm now!
This morning she rushed into my bedroom.
"Mommy, I've done all my morning chores," she said. "I'm dressed, my pajamas are in the hamper, and I've made my bed!"
"That's great sweetheart," I said, "but it is three in the morning. Go back to sleep!"
Last Sunday my daughters were in a talent show at the library. What a fabulous way to get kids used to being in front of a crowd. My children enjoyed watching the other acts too - even the girl who preformed 23 numbers on the recorder. I learned a great tip for teaching kids how to hold a microphone so that it is in range but not "in mouth".
Tell them, "Put the microphone as close to your CHIN as possible." Smart.
My 2-year-old, a.k.a. Shirley Temple, chose as her costume a lovely soft pink dress that once was mine. My mother had sewn the dress for a contest and won first prize. The dress's gauzey material is adorned with dozens of light pink flowers. Although this is my second daughter to wear the dress, it is safe to say, that the last time the dress was ironed was when I wore it at age 2. Now the flowers, attached only in their centers, were closed snugly around their stigmas as if for a long sleep. My eldest daughter, age 5, informed me that this wouldn't do.
"Mommy, you need to iron it." I must have given her a look for she added, "Sometimes we have to do things we don't like. Even I do."
To say ironing is not my forte is an understatement. My ironing adds wrinkles. I had to admit though that this favorite dressed couldn't get much worse.
"I'll try," I told my 5-year-old.
"That's all I'm asking," she replied.
I uncovered the ironing board and iron and did my best. I'd smooth a flower open, move onto the next one, to find the first one had floated closed. After 15 minutes I had done the dress's collar. My daughter had disappeared temporarily into her room, but she came back, her arms full of clothes.
"I've never worn these because they need ironing," she told me. I get all my children's clothes passed down and my daughter has never complained. I put the "costume" aside and ironed my eldest's pile. It was easier than those blooming flowers. Then I went back to the "costume". My 5-year-old watched carefully.
"Mommy," she said encouragingly, "you are doing a very good job for someone your age." This set me laughing. I called my mother. "You need spray starch," she told me.
www.caraaboutyou.com
We all know that a refrigerator box makes a wonderful toy, but what about the small packages we throw daily into our recycling?
I was at a friends house on a play date when she excitedly took out new cardboard "blocks". "Forty dollars from Melissa and Doug", she told me. They are terrific; the kids loved them – but I couldn't help noticing that they look and feel like the cardboard packaging for butter. That gave me the idea to "make" my own.
I started filling a garbage bag with cereal boxes, cracker boxes, and other rectangular packaging that usually ends up in recycling. I was amazed at how fast my collection grew. My reused boxes have several advantages over the $40 (plus shipping & handling) counterpart. They are stronger, since they must be sturdy enough to protect food on its often long journey to consumers. They already came in the proper box shape (versus the blocks from Melissa & Doug which need to be assembled). They are several sizes for building versatility. And for course, they are free.
The kids may paint over them for an additional activity at some point, but for now it's fun seeing the original labels and watching yesterdays food packaging turn into today's creation.
Cara
Cara'bout You Books™
www.caraaboutyou.com
Thursday morning a hawk appeared inside our screened-in porch. What on earth? It was annoying that stink bugs manage to somehow get inside, but this was ridiculous! I called the kids to come see.
“That’s a hawk” my four-year-old informed me.
“Are you sure it isn’t a giant pigeon?” I asked.
“I’m sure.”
“How did it get in there?” Then I saw it had used the door – knocking out the top panel. I would think the hawk was too big to fit through. Clearly the hawk felt the same way. He was smashing from one screen to the next, never quite finding the exit it had created through the door.
“It should find it’s way out.” I commented. I started making the kids breakfast. My four-year-old sat down at the table while my two-year-old stayed by the glass sliding door watching the hawk.
“I’ll go around and open the porch door from the outside if we have time before school, but we need to be really careful. Birds of prey are dangerous.”
“Then shut the door, mommy," says my two-year-old. I look up and realize that she is talking not about the porch door, but about the sliding door connecting the kitchen to the porch. There is now nothing blocking the hawk from my baby girl. Without any of us noticing, she had silently slid the glass door ajar. What was she thinking? A good way to get the hawk off the porch was to let him into the kitchen? Now she is reconsidering and tugging at the sliding door trying to get it closed but she is only two and having trouble. I dash over and pull the door shut.
I need to get my older daughter to school and stop for groceries before the major storm expected tomorrow. When I return home the hawk is still there, dive bombing my screens. There is a reason for the term bird brains, I think with frustration. I'm expected for lunch and a play date with friends near Warrington and it is already time to pick up my daughter from school. Surely the hawk will find its own way back out.
Late that afternoon, my husband returns home from a week working in England. He finds no family in the house but a hawk on the porch. Wisely he calls his sister who has worked for an animal rescue center and also volunteers at the National zoo.
"Put on a baseball cap and don't look the hawk in the eye." My sister-in-law advised. "When you look a bird of prey in the eye, it signals a challenge. One of the workers at the rescue center forgot this rule once when she was taking out an owl. She looked the owl in the eye and it clawed her face."
With this reassuring advice my husband set out to free the bird. Our wonderful neighbors from across the street were outside and agreed to come over and help. My husband opened the door and our neighbor clapped her hands from the opposite end behind the screen. Out the hawk flew.
This is probably not as useful information as most of the other advice you find on this blog, but I like to file away this kind of knowledge. For example, years ago a diver who enjoyed swimming with sharks told me, "you always want to be laying parallel to the ocean floor when swimming with sharks. Sharks judge how large you are by your height, imagining that like other types of fish, your breadth from that height must also extend out behind you. Therefore, the diver warned, do not stand up tall or the sharks will think you are huge and be frightened away. From this I stored the advice: stand up tall if near
Healthy and yummy recipes that the whole family will enjoy are sometimes hard to find. Some friends who enjoy this cooking challenge have started a blog to share these treasures and I have agreed to contribute. Check out what's cooking at www.fortheloveoffoodandfamily.blogspot.com
After Opening Hundreds, Here's my Findings on the Best Way to Open PomegranatesNutritious, delicious, and seemingly exotic, pomegranate is my daughter's favorite fruit. In the fall and winter when pomegranates are available fresh from California for as little as $1.50, we indulge, and like mixed-up squirrels with zip-lock bags and a freezer, we also pack the seeds away for summer and spring. I have hence
opened hundreds of pomegranates and after much experimenting, am sharing my findings with you on the best way to eat this exceptional fruit.
Opening the pomegranate: Score to Score
The pomegranate is full of hundreds of luscious, vitamin and antioxidant packed, deep burgundy, yummy, fruit-covered seeds called "arils". When you split an aril the juice goes flying. In your mouth this is joyful burst, on your clothes it is an "oy" full bust. Since we all have enough laundry, I recommend the former. This means not cutting through the arils, which in turn means not cutting through the pomegranate.
Step 1.
With a sharp knife tip, score the pomegranate in a circle 1/2 inch from the crown. Only go deep enough to cut the peel - do not slice through or you'll end up with a pool of juice and wasted arils.
Step 2
With your fingers, pry off the 1/2 inch of peel towards the crown. You will now be able to see the four to six sections of the pomegranate. (Much like an orange or grapefruit.)
Step 3.
With a sharp knife tip, score the skin at each section.
Step 4.
With your fingers, pull off a section. Peel back any white membranes covering the arils.
Step 5
Now the arils are exposed and ready to eat! You can either pluck out the arils with your fingertips or let your child do this part. When I'm not bagging and freezing, I let my children pull out their own. My older daughter is already an expert and my "self, self, self" almost 2-year old wouldn't have it any other way.
Though nothing like the spill caused by cutting through an entire pomegranate, this last step can end up in an occasional burst aril. You can therefore choose to do this step underwater in a bowl. An added plus is that the arils sink while the membranes float to the top making separation easy. Still, I've found that using a bowl of water is more time and trouble than it is worth. But this reminds me of a key step I almost forgot: the bib!
Especially if your children are plucking the arils out themselves, but even if they are eating from a bowl, bibs are a good idea. And be sure to check the floor around the highchair and pick up promptly. From first hand experience I can tell you that stepping on arils makes colorful socks.
Cara
Cara'bout You Books
www.caraaboutyou.com
Fighting the Common Cold
It’s back. (Insert horror music). Inevitably, with the return to school, my daughter brings home the dreaded snotty, stuffy, green gook cold. One frustrating aspect of this common virus is that it seems there isn’t much you can do, especially for children who can't even get relief from decongestants anymore. Here’s my checklist of the ways we fight colds in our family. (Tip: If you're in a hurry skip to way #8)
Check:
- Suck a zinc tablet once a day on a full stomach. Zinc has been proven to significantly reduce the duration and severity of colds. We use Nature’s Plus Animal Parade Kid Zinc for the kids and Cold Eeze for the adults, but any suckable, appropriately dosed supplement should do. Zinc can be hard on an empty stomach, so I always give it after a meal. It works best when sucked slowly, giving the zinc ions time to bind with the respiratory lining, thus inhibiting the virus from doing the same.
- Drink lots of (non-cow milk) fluids such as herbal teas, water and juice, warm lemon and honey, (honey only for children over 1-year-old), and, of course, chicken soup. Cow milk increases phlegm so I try to limit it; breast milk does not, so I increase my nursing when my baby has a cold.
- Use a cold mist humidifier in room for sleeping.
- Flannel burp clothes make wonderful handkerchiefs that are easier on little noses than even the softest of tissues, (which I've found to be Puffs). I think this is because burp clothes don't have any chemical irritants. You will want a separate bucket for used ones that eventually dumps into a sanitize wash cycle.
- Watch Elmo how to sneeze video. Link: http://www.youtube.com/watch?v=NxBAvKYCUpU This is purely an effort to protect the rest of the family, friends and humanity.
- Use Vitamin C for the others in the family. It won’t hurt the person with the cold, but it won’t help them much either. Vitamin C though is a helpful cold preventative, so stock up on those strawberries, oranges and grapefruits for the rest of the gang.
- Adults only: to build my own immune system, I also use Cold FX, which I get at Costco. It is hard to be the caregiver when you are sick too. My mother turned me onto it when I was continually catching whatever the kids brought home. It has made a difference. Cold FX is expensive though so I’d only recommend ifyour resistance is low. And while I'm talking adults, I'll throw in my favorite adult relief medicines – Nyquil for bedtime and Advile cold and sinus for day.
- For immediate relief for you and your child so you can all get a good nights sleep, I’ve found that nothing works better than salt cheap – saline solution. Combine it with a neti pot to blow that cold away.
How to make your own saline solutionMix:
One cup drinkable tap water at body temperature. (If your tap water is not drinkable boil it for 5 minutes and then cool it to body temperature.) When you stick your finger in it, the temperature should be such that you don’t feel it.
With:
One half of a teaspoon sea salt.* You can usually find sea salt at your local grocery store in the baking section since it’s great for cooking too. You can also use ordinary non iodized kosher salt. Table salt will work but it often has unnecessary additives and you need to make sure it isn’t iodized which is sometimes harder to find than just sea salt.
That it. Make sure you g
Wasp Stings
I never expected I'd want to pull down my pants in public. Motherhood is full of surprises.
We had taken some friends and our daughters to the beautiful new outdoor pool facility at Ida Lee Recreation Center. Soon into our visit, one of my friends was reprimanded by a lifeguard for changing her four-year-old into her bathing suit on the pool deck. Even knowing this, when it was time to go, I was not in the mood to gather all the kids and all the stuff just to slip into something dry in the changing room.
Let me explain here that I am an expert undercover dresser. As a child I attended a school for the arts. If you didn't want to be late to math class or attend it in a tutu, you had to learn the skill of discrete and rapid changing in the hallway. So in full view of the lifeguard who was offended by a four-year-old tuckus, I wrapped my towel around me and quickly got changed. I was feeling quite proud, folding up my towel, when I realized my thigh was on fire.
I felt my pants for something sharp but didn't find anything. What I really wanted to do was pull my pants down, but I realized this wouldn't be entirely appropriate, given the lifeguard and all. Instead I
complained to my husband.
"Steve, something has pricked me and it is really hurting!"
"Sounds like you got stung," he said
"Through these pants?"
"It's possible"
I looked around. I didn't see anything.
"Did you see anything?" I asked him.
"No, but-" I don't know what else he answered because at this point my butt caught fire. I reached inside my pants and pulled out a yellow jacket wasp.
"Now I see something," my husband added helpfully.
At this point I decided I was in the mood to head to the changing room after all. The only mirror I could find was by a double sink near the washrooms. I pulled off my pants and took a good look as the poor woman putting on makeup beside me pretended not to notice. I had 6 wasp stings.
For treatment of the wasp stings I followed standard procedure for non-systemic reactions. I used an antiseptic wipe and applied ice, both of which they had at the lifeguard station. Then from my first-aid kit I used a Benadryl spray, which really brought down the swelling and provide some relief. (You can instead take Benadryl orally, but I don't react well to it that way.) Finally I took some ibuprofin for pain and applied some antibiotic ointment as a safeguard against rare bacterial infections.
The next day I was recounting what happened to another mother and she said, "The same thing happened to me when I was a kid. It really scarred me. For the longest time I would shake out my pants before putting them on." Apparently wasps like hiding in pants!
As I write this, my thigh is much better though it still itches. I had no issue getting dressed this morning but I think shaking out pants when you are outdoors is a very smart idea.
Cara
Cara'bout you Books
www.caraaboutyou.com
Effective Do-it-Yourself Home Remedy for Cradle Cap
Cradle cap is called a "cosmetic" problem. By cosmetic, they mean that it should not hurt your baby and it is usually safe not to treat. Thus, although my first child had sever cradle cap as a baby, after discussing options with my doctor, I decided to just accept her scaly head. I noticed, however, that when I would rub her scalp with olive or grape seed oil when giving her infant massages, some of the scales would come off temporarily, though they would always return. I mentioned this observation to my doctor. She told me that I should NEVER use a food base oil on my baby's scalp because these oils can feed yeast and, she explained, cradle cap can be caused by yeast. Oops.
I am all too familiar with yeast, unfortunately not just from baking bread. The plus side to this experience, is that I am adapt in using the yeast fighting active cultures that come naturally in yogurt. I figured, why not try putting yogurt on my baby's head? After all, this would just be a more thorough version of what she does with her food most meals anyway.
At dinner I liberally coated my baby's scalp with plain yogurt. By bath time, a little over an hour later, the yogurt had hardened. I washed the yogurt out. Next, I dipped a Q-tip, (cotton swab), in mineral oil, (also called baby oil.) Mineral oil is not food based and can not feed yeast. I gently rubbed the Q-tip circularly over a small area of my baby's scalp. The flakes lifted off, revealing a beautiful smooth, slightly pink scalp underneath. The first time, I only did a small patch to test. The next day, when the cradle cap didn't return to the test patch and there were no ill effects, I did a little more. (I don't like the idea of coating too much of the head with mineral oil at once.) Before the end of the week, her whole scalp was done. When it was done, so was the cradle cap, never to return.
My cradle cap treatment has now worked amazingly well to promptly and painlessly cure my children's cradle cap and that of several friends' babies with no ill effects. It has never not worked - which probably means there is not a broad enough sample size! If you try it, (after of course discussing it with your doctor), please let me know how it goes.
Sincerely,
Cara
Children's Author
Cara'about You(tm)Books
www.caraaboutyou.com
A Journey of Discovery About Tick Removal
I took my 3-year-old to be tested for Lyme disease today. Last year Whole Child Pediatrics in Ashburn, VA, gave me a sheet on a wonderful, 100% successful, easy way to remove ticks:
Soak a cotton ball in liquid soap. Place the cotton ball on the tick. Rotate counter-clockwise. The tick comes off whole. This is much better than the usual tweezers way because there is no chance of leaving some of the tick behind. "Everyone should know this," I thought. I considered putting it on my blog, but although it came from my children's pediatrician's office, I hadn't tried it myself, so I felt I needed to do further research. I was glad I did - at least at first.
Snopes has a compelling argument that this method is an old wives tale. See: http://www.snopes.com/oldwives/tick.asp
Moreover, both the center for disease control and the US Food and Drug Administration say the best way to remove a tick is with tweezers.
With all this information, I knew exactly what do to when I realized that the miniscule scab on my daughter's thigh had legs: panic. Now I can tell you from personal experience: searching madly through the house while yelling at your husband for not having long nose and ear hair so you'd have a decent pair of tweezers, is not an effective way of removing ticks.
After doing the best I could at pulling the tick out with our lousy set of tweezers, it still looked like some remained. I called Whole Child Pediatrics to speak with the nurse. She told me, "next time use liquid soap on a cotton ball twisting counter clockwise."
"That doesn't work," I told her, "I looked it up online."
"Well, it has worked for me on all my patients - even recently for a tiny embedded tick that I thought for sure we wouldn't get out. Plus I use it all the time on my dogs."
So now I don't know who to believe. I wrote to Snopes to ask if they've actually had experience with this rotating liquid soap method not working. I suppose it is possible that experts ruled out this method without testing scientifically because there are so many wives tales that do not work. I'll let you know if I hear back. In the mean time please let me know if anyone else has success or failure removing ticks with liquid soap on a cotton ball rotating counter clockwise.
June 11, 2009 - conversation with doctor and Snopes follow-up
Today we took my daughter to her pediatrician, Dr. Chamberlain at Whole Child Pediatrics[1]. As opposed to Snopes and others, she DOES recommend using liquid soap on a cotton ball, rotating counter clockwise (CCW) on the tick. I asked her about her personal experience using this method. Dr. Chamberlain said that so far this year, she has removed 6 ticks off of her patients. Five she removed successfully with CCW motion of a soapy cotton ball. One time it did not work but, Dr. Chamberlain noted, the soap had no ill effect and it may have worked if she had more time. (She had to move on to the next appointment so the parent chose to have her remove that tick with tweezers. ) Dr. Chamberlain also told me that parents are continually thanking her for teaching them this soap method.
"Has anyone complained to you that it hasn't worked for them?" I asked. They have not.
Dr. Chamberlain informed me that she learned this method from Dr. Laura Pasternak, the wonderful doctor who founded Whole Child Pediatrics. Dr. Pasternak was the one who prepared the sheet that I had been given describing the method - not some evil prankster as I had feared on reading Snoops!
Although Dr. Chamberlain has heard the warning that stressing the tick may produce more saliva or regurgitation, she questions whether soap creates more stress than tweezers. Although tweezers are usually quicker, pinching is intense, moreover, the tick sometimes breaks. Having had the experience of picking out parts with a needle, she is sticking with the tear-free soap method for her patients,
Keeping Poop off the Playset
Our backyard playset used to be continually covered in bird droppings. Everyday I was using wipes before putting our kids on the swings or letting them down the slide. Two years ago my uncle offered an inexpensive, easy, environmentally friendly solution.
Attach pinwheels over the swings and slides. It looks pretty and it stops the birds from perching and pooping over the playset. I have been amazed at how well it works. I've had to replace the pinwheels each year, but at a dollar a pinwheel and a few bucks for some waterproof medical tape to attach, it cost less than I was spending on wipes. I consider it money well spent.
Pinwheels over our playset have completely eliminated the problem – or almost. "Yucky" my littlest says as she purposefully puts her hand in the bird poop on our porch stairs. Hmm, guess I need to figure out how to hang some more pinwheels.
Cara
www.CaraAboutYou.com
Words to consider: consider words too
If you thought that story books for children age 4 through 6 should have simpler word choices than age 7 through 9, think again. As parents we're always trying to do what is best for our children. Sometimes it can be confusing. Think of the Baby Einstein videos that ironically, research now indicates, lead to LESS vocabulary development. In the same way, many people - even some authors, literary agents, and editors at publishing houses who consider words very carefully, operate under the misguided assumption that books we read to our kids should only contain the most commonly used words. However, research suggests just the opposite.
Before your children can read is the ideal time to be building their vocabulary through stories. There are several reasons:
1.) This is the time you are reading stories to them, so you are there to immediately explain and answer their questions. Moreover, the same book is often read again and again. Usually by the second or third time, no explanation is needed but the vocabulary in contexts is still being reinforced. When children get older and are reading on their own, books with too many words they don't understand could confuse them or make them less motivated to read that story.
2.) Pre-literacy is a time of maximum impact. Scientific studies show that early vocabulary development leads to better vocabulary in later school years. According to the article "The Developing Child", by Elizabeth Gudrais, Harvard Magazine, "Children's vocabulary at age five very reliably predicts the number of words they know in sixth grade."
3) Research on the way children learn shows that introducing vocabulary through stories is more effective then memorization. And of course we all know, stories are more fun!
As parents this is just one more thing to keep an eye out for when making our book buying selection. As children book authors and others in the industry, we should consider this vocabulary challenge. Yes, our stories should be fun, captivating, and layered enough to endure reading over and over. Yes, they must also be concise – too many words without pictures will lose our young audience. But the words we choose should be the best words, not necessarily or even preferable the most common.
The Best Way To Cut My Baby's Nails
When my baby daughter removed one of my moles with her fingernails, I realized I was losing the nail clipping battle. This, despite the fact that I could have opened a salon with my assortment of nail cutting options.
There are all kinds of clippers and nail scissors designed especially for babies and children. I was given several as shower gifts, more as new baby gifts, and we had already bought some ourselves as overexcited parents to be. Personally, I didn't like any of them, and it showed. I never got close enough to her nail beds because I was always worried that I would cut my baby's precious finger, made more likely by her squirming. Who ever knew babies were so strong? I tried to use a nail file but the baby nails were too soft to make the emery board effective. I tried biting her nails off but that was uneven and encouraged my baby to be always trying to stick her fingers in my mouth. Then a friend told me this trick that he was so thrilled with he was telling everyone he knew:
Use nippers. This is not a brand name. It is what manufacturers call cuticle cutters. They are a real precision tool so you can very easily see that they are positioned under the babies nail so that only the nail will be snipped.
I tried it with my baby and was so excited by the ease of use that I called up a friend who is a doctor with young children who is always giving me great advise. "How do you cut your baby's nails?" I asked her, excited to be imparting some wisdom for a change. "Oh, I do something weird," she replied, "I use cuticle cutters."
Most nippers that you'll find have a pointy tip so you still have to use caution. (You are responsible for your baby's safety so don't use if you're not comfortable.) However, I find nippers so quick, easy and unobtrusive that I can do it without disturbing my baby while she's engaged in watching something, or even breast feeding or sleeping. I still prefer them for my 3 year old. I still don't much like cutting my kids' nails but thanks to nippers, I now leave my moles for the dermatologist.
For information on Cara'bout You books(TM) for kids please visit www.caraaboutyou.com
Part 1: Think outside the Bag – try some less usual vegetables
That bag of frozen peas, carrots and beans has its place but your family may be wishing you'd leave it there. Here's some more uncommon choices that are packed with nutrients.
• NORI SEAWEED
Your child eats toilet paper but refuses their vegetables? Here's a great one for you: try seaweed, the kind that people use to wrap up sushi. It is paper thin, just like toilet paper, but it is so green it is almost black and so full of nutrients and antioxidants that many call it a "superfood". Some vitamins and minerals it contains include vitamin C, beta-carotene, calcium and iron.
My baby will eat this seaweed when she's turning down everything else and she doesn't even like toilet paper. Evalynn, the one who used to eat toilet paper, still gobbles it up plain, although she now also loves going out for sushi. It stores in the closet and is an easy thing to throw in the lunch box.
A side story on toilet paper eating. Evalynn was toilet trained at 3 months. This was a problem in that she still liked to eat toilet paper. I decided it was time to teach a lesson. Instead of grabbing the toilet paper out of Evalynn's hand like I usually did, I just let her eat it while I watched. To my surprise she continued to eat it and eat it and eat it. As could be expected, her system did not like this, so she threw up, all over herself, the floor, me. Then she grabbed some more toilet paper and put it in her mouth. A lesson was learned, just not by Evalynn. From then on toilet paper was kept out of reach.
How to serve: Just break seaweed up into little pieces and put them on your baby's tray. As they get older they can rip the sheet themselves with their hands or teeth.
Where to find: Many supermarkets carry Nori Seaweed in their international section. I've found it at Wegman's, Safeway, our local health food store. and sometimes at Giant supermarket.
Recipes: For the rest of your family make your own little packages. Avocado, cucumber, bit of smoke salmon, get creative - smear it on and wrap it up.
• ARTICHOKE
Artichoke is another of those "superfoods" for all its nutrients and antioxidants. As soon as kids get their first front teeth, top or bottom, they can have fun scraping off the bottom (part connected to heart of artichoke) of the cooked leaves. The artichoke heart can be blended or mashed for babies with no teeth. You can eat the artichoke stem too though part of it may be stringy.
How to prepare: I do it really simply. I chop of the very tip of the stem, which is usually dried out, and quite a bit off the top of the artichoke (opposite the stem), to get off the prickles. You only eat the heart, stem and the bottom most part of the leaf anyway. Then I stick the artichoke in the steamer for 45 minutes to 1 hour depending on the size of the artichoke. When it is ready I cut it in half and scoop out the prickly part inside the heart. Let it cool and it is ready to serve.
Marinated artichoke hearts are another delicious way to eat artichokes. I rinse them off before giving them to the children.
Recipe: Simple artichoke dip. Combine marinated artichoke hearts, real mayonnaise and parmesan cheese in a dish that can go in the oven. Heat it up until the cheese melts.
Where to find: You can find fresh artichokes in the produce section of most supermarkets. Marinated artichoke hearts are usually with jarred food.
• EDAMAME
This one's in the bag. Usual bar snack food in Japan, edamame is also getting quite popular now in the US and Canada. This unprocessed soy bean is both a green and good source of protein. Yummy and super easy to have on hand in your freezer. Kids enjoy popping the beans out of their pods into their mouths. For babies, take off the pod and fine skin and either blend,