new posts in all blogs
Viewing: Blog Posts Tagged with: stir fry, Most Recent at Top [Help]
Results 1 - 7 of 7
How to use this Page
You are viewing the most recent posts tagged with the words: stir fry in the JacketFlap blog reader. What is a tag? Think of a tag as a keyword or category label. Tags can both help you find posts on JacketFlap.com as well as provide an easy way for you to "remember" and classify posts for later recall. Try adding a tag yourself by clicking "Add a tag" below a post's header. Scroll down through the list of Recent Posts in the left column and click on a post title that sounds interesting. You can view all posts from a specific blog by clicking the Blog name in the right column, or you can click a 'More Posts from this Blog' link in any individual post.

I used to make fried rice with stir-fried vegetables on a fairly regular basis. Everyone liked to eat it, but no one liked to help clean up. Also, by the time I was done cooking, I was exhausted. After one too many complaints about the mess it made (from someone who will remain nameless) I vowed never to make stir fry again! Take that!
I stuck to my promise for several months, but I missed the flavors. So I tried to find a way to simplify the process.
Step one: I found a great recipe for baked fried rice. Yes, it involves less oil, and that’s nice and all, but even better, I don’t have to tend to it, and I still get that yummy chewy texture. So much less work! I don’t add the Sriracha that the recipe calls for at this stage since the kids wouldn’t touch it if I did. And I’d love to try the pineapple and cashews she uses—they look so yummy—but so far I’ve just stuck to whatever “usual suspect” veggies I have on hand. Broccoli, cauliflower, carrots, onions, that kind of thing.
Step two: I pared down my list of vegetables to cut out some of the chopping. I usually feel like I have to put in a little of everything, but really, I don’t.
Step three: I roast veggies instead of stir-frying. Nope, it’s not just the same, but the veggies are still delicious. I cooked everything at about the same temp as the rice until the rice was done, and then I think I turned up the heat a bit.
I let the kids choose the veggies they want before we mix them all together for us. If I have time, I like to make this peanut sauce and of course, the grown ups always get Sriracha.
Now I’d be lying if I said this version isn’t messy or time-consuming. It still requires a fair amount of prep and cleanup. But somehow being able to cook it unattended, all at the same time (rather than in batches) makes it less of a pain to make. Works for me, anyway.
Finished My Berlin Kitchen by Luisa Weiss. Sigh. I miss it now. Are you reading anything good? I need something to curl up with. The weather here has been horrible this week, and I’m sorry, friends in northern climes, because your weather must be ten times worse. It’s starting to feel like that Ray Bradbury story where the people live on a planet where the sun comes out only once every seven years (All Summer in a Day). We can make it to spring, right?
The school’s book character parade was this morning and as usual was pretty much the cutest thing all year. Hope I can show you a pic of our little Marco Polo soon. The costume is pretty sweet. Marie Antoinette also looked great, though her costume was just a fancy dress we found at the thrift store.
Have a great weekend! And now, back to novel writing….


By:
David Billings,
on 2/28/2014
Blog:
Sparky Firepants Art Blog
(
Login to Add to MyJacketFlap)
JacketFlap tags:
broccoli,
stir fry,
Vegan,
Hey, look. Art.,
Sparky Comic Pants,
steam room,
steamed,
tofu,
Add a tag
For all you tofu fans out there.


Jim and Sylvia
What's most exciting about a potluck?
You never know who'll pop in and what they'll bring!
Some of you may remember my half-sister Sylvia, gourmet chef to the stars. For the alphabet soup Cookie Party in December, she shared a couple of red carpet recipes.
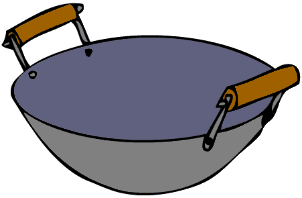
Today, Sylvia and her husband, Jim, have wokked all the way from Bend, Oregon, just to share a favorite stir fry recipe with all of us. Chinese cooking is Sylvia's specialty, so be sure to give this sumptuous dish a try. Syl is also an accomplished musician who once gave Martin Sheen guitar lessons. Best listen to some favorite tunes during the preparation and consumption of this dish, to make the flavors really sing!
BAY SCALLOPS WITH LEMON SAUCE
1/4 lb. bay scallops
snow peas, thinly julienned
fresh shiitake mushrooms, sliced thin
red bell pepper, thinly julienned
green onion, thinly sliced into long strips
(These are just suggestions for veggies you can use. Be sure to compliment the scallops, both flavor-wise and texture-wise. Also, color should be a consideration. You may substitute chicken slices, shrimp, or even deep fried pieces of fish. If you use the latter, stir fry your veggies first, then add sauce, and then carefully combine the pieces of fish with the rest.)
Seasonings: 1 T finely minced fresh ginger
Sauce:
4 T lemon juice
3 T sugar
2 T chicken stock
1 T light soy
1/2 tsp salt
2 tsp lemon zest cut into fine shreds
1. Heat wok or fry pan to high and add about 1 T oil and roll around to cover.
2. Add seafood or meat. Do not be tempted to add more or your ingredient will not seal properly and wil let off too much liquid. If necessary, do it in two batches. Stir fry until your ingredient turns opaque. Remove from heat to a platter.
3. Return wok to high heat. Add 1 T oil and roll to cover. Add seasoning and saute a few seconds.
4. Add veggies and stir fry until al dente. Add sauce. Return meat or seafood to the dish.
5. If you prefer, add small amount of cornstarch mixed with water or chicken broth. Add a little oil to the mix to avoid lumping and add enough broth to make a sauce with a little body, but not too much. Taste and adjust seasonings.

THANKS SYL!

By:
Claire Louise Milne,
on 12/13/2007
Blog:
Needle Book
(
Login to Add to MyJacketFlap)
JacketFlap tags:
plumbing,
renovation,
bathroom,
kitchen,
tiles,
flooring,
kitchen,
renovation,
bathroom,
tiles,
flooring,
plumbing,
Add a tag
 We moved back into our house last weekend and had nothing but the toilet in the bathroom. We used the shut-off valves from the sink to get water. It was like camping in our own home. But I needed to be home to be able to meet an illustration deadline and get ready for the craft sale - I had odds and ends for that tucked all over the place. Our furniture was crammed all over the place so that we had to climb over things to move around or find things. The bedroom had the watertank in the doorway so we couldn't even close the door.
So you can imagine how thrilled we were when the plumber turned up and quickly put back the water tank (hot water! hurray!) and tub (bathing! I missed it!) and sink (heaven). The best part was finally seeing our new bathroom floors with the furnishings in the room, because without them I was wondering if the tile was too small - it looked a bit busy. But with the furnishings in there it's just right. The traditional style of hexagonal tile makes it look like those floors could have always been there and they work perfectly with the old clawfoot tub, and in short, I think they're beautiful. The porcelain also feels lovely, it's hard to describe but it's just very nice.
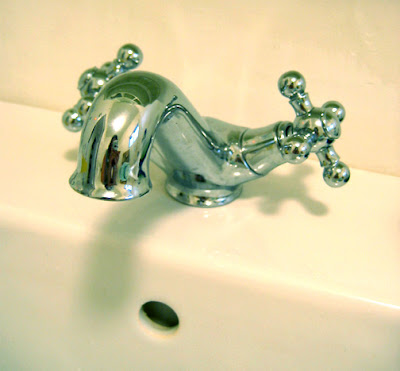
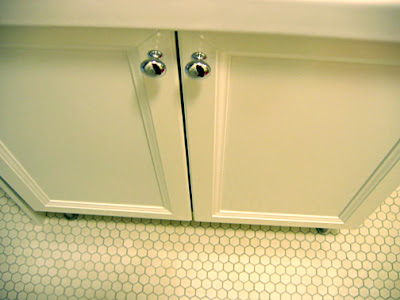
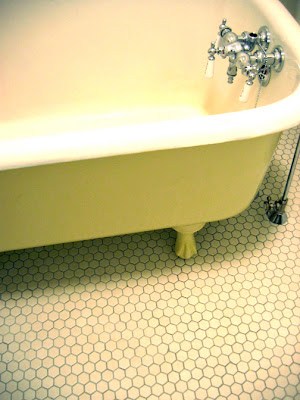 Also I was very happy with how the cream paint on the tub looked with the new floor - there aren't a lot of colour choices with Tremclad but the cream really works (it's not quite as yellow as the picture above). And finally the new IKEA vanity/sink is also beautiful and soooo much better than the old one. It's a bit taller which I find more comfortable and I even love the shiny chrome knobs we picked to match the rest of our fixtures.
 There are still a few small problems, our new faucet was bought out of the box and there was a small part missing. So for now we have a different stopper in there and it doesn't close all the way and isn't the right one. Also, the new flooring is higher than the old one, due to the Ditra and porcelain tile being thicker than vinyl tile. The plumber had no trouble adjusting the drain length, but the offset supply lines are too short (and it looks like they got a bit bent). So we need to buy new ones because for now the tub is installed on a bit of an angle in order to make it fit. Soon I'll be painting the walls, and once that's done I can do a full reveal.
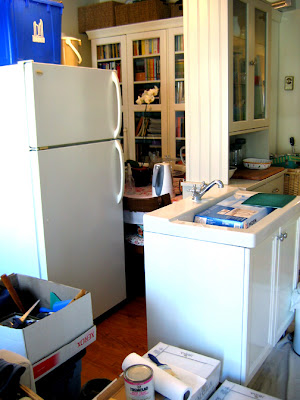
Our kitchen is looking very empty. When a room is bare you can really see it's qualities and it's really a nice space. The big window and sliding doors let in so much sunlight - I've been tempted to live without cabinets and turn it into an airy studio. But I guess I have to be practical. Anyway, now the walls are smooth and I can paint those too, and our cabinets are ready for pick-up at IKEA. Yesterday we put back our appliances and a little table, so we've created a kitchenette area that is all we need for now.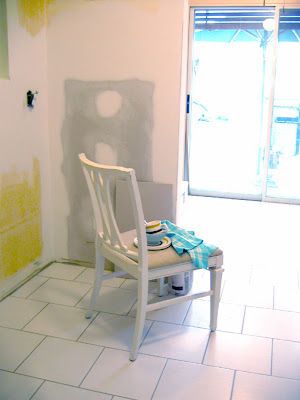 The dishes get washed in the bathroom so of course I had to buy this cute vintage mug for the scrubbie...
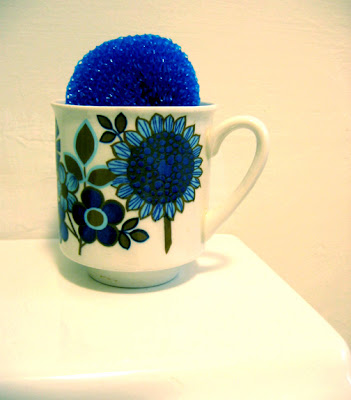 For the wall colours, I've been so inspired by the January Martha Stewart Living. I noticed a lot of pale blue and yellow, including mustard yellow which created a really fresh (but almost vintage style) colour scheme that appeals to me so much. You can even see it in our dishes on the chair in the kitchen photo, we have a pale blue Denby stoneware set, and a brown and mustard yellow striped vintage set of dishes that's more casual.
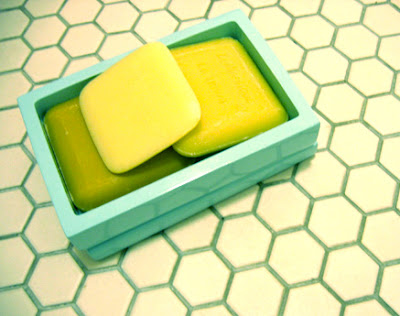 The bathroom isn't as sunny as the kitchen, there's a window but it faces a wall. So the white walls are too stark and it needs a bit of colour. I've been wanting pale blue walls, but I was wondering how pale blue would go with the cream floor and tub then realized this was the colour scheme I was seeing in the magazine and loving. It was even already there in my favourite soaps in my Jonathan Adler soap dish. So I've picked up a big can of Benjamin Moore's "ocean air" and I can't wait to see it on the walls!
 Well I'm sorry to say it's the same old boring story, a snowballing renovation. We started out planning to fix our bathroom floor which had holes from replacing the dysfunctional clawfoot tub plumbing. It had vinyl tiles that were permanently stained and missing in some places. And we've ended by essentially gutting our bathroom and kitchen.
Given the asbestos tile underneath and the general bad condition of the floor in the kitchen we realized it would make sense to do both kitchen and bathroom floors at the same time. This was confirmed when we moved the old chest freezer left behind by the previous owner out of our closet and found mold, rust and a badly damaged patch of floor.
Our tiler had an opening in his schedule, so we hurried around and removed our old vanity from the bathroom and put the washing machine onto our deck. Then we emptied the lower kitchen cabinets which needed to come out, put the stove on the deck and our fridge in the living room.
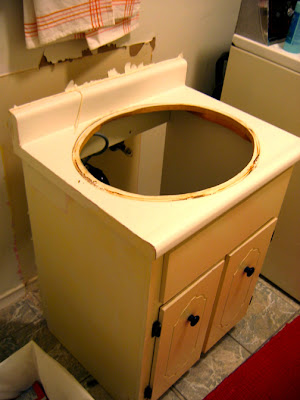 We were so glad to see the old vanity go. And the best part is we left it outside with its old sink and faucet and someone took it - so we don't even have extra creating-more-garbage guilt.
So this is what our hallway looks like now. I love the look of the greyed floorboards, but they're not in great condition and there's tons of nailheads sticking up!
 And this is what our bathroom floor looks like now. On Friday we found out that we'll need to have an extra material installed on top due to the poor condition of the floorboards.
(After ripping out and rebuilding the floor - the corner is really unstable and that's where we had the washing machine jumping around! We're now having Ditra installed throughout the kitchen and bathroom)
 And this is now our kitchen:
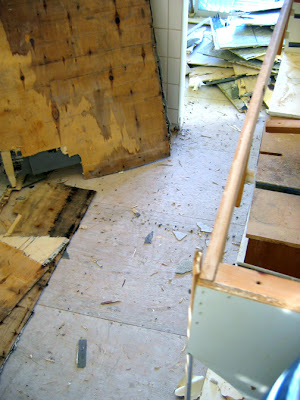 As you can see above, the cabinet didn't survive after all, as it was adhered with spray foam. Oddly enough. I guess they thought that fake-wood-plastic-laminate-particleboard cabinets would last forever! So we are now planning on buying new kitchen cabinets sooner than expected. The good news is pretty new cabinets, the bad news is of course the cost.
 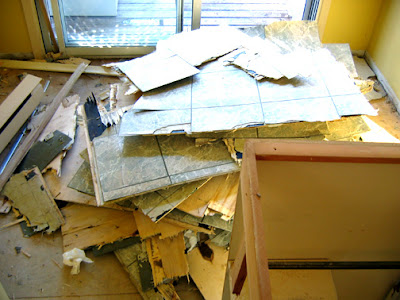 Today we painted our clawfoot tub - since it was sitting in the hallway and finally accessible from all sides. This is the tub "before", rusty with a few layers of paint on two sides, in brown, blue, Pepto-Bismol pink and finally Big Bird yellow (this picture really doesn't do it justice):
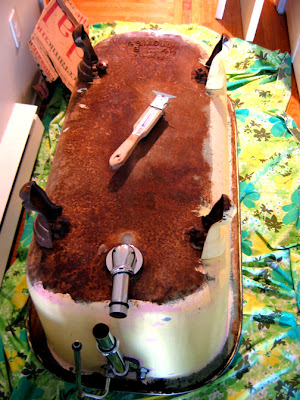 Luckily it is quite sound, the rust was superficial and the legs are still nice and sturdy. So I spent two hours sanding the tub, and finally started adding the cream-coloured Tremclad. This is a picture of the first exciting moment of covering this old uncared-for tub with glossy new paint:
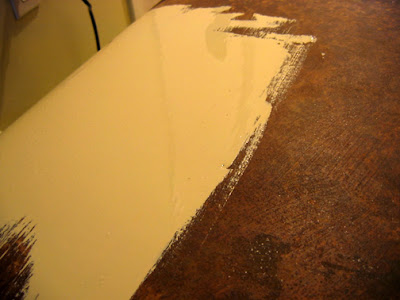 And finally, a lovely freshly painted tub:
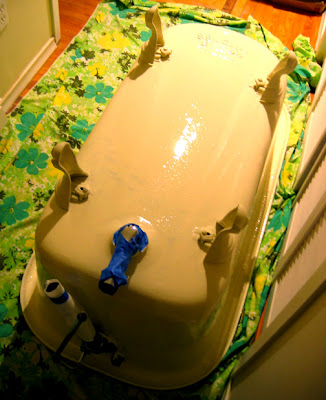 For some reason I love the raised letter label on the bottom of the tub:
 Transformations like this are so satisfying and remind us that it's worth all the work and expense. Well we think so anyway.
 Finally a non-communal front door so we can have a wreath! I have some berries I can add later to make it more festive in December
Things have been so busy lately. I have three deadlines for work, and we have lots still going on with the home. I am still obsessed with fixing up our house, and while doing things I figured out some useful things, so I thought I would write about it.
 If you want to see how this looked before, it's in a previous post
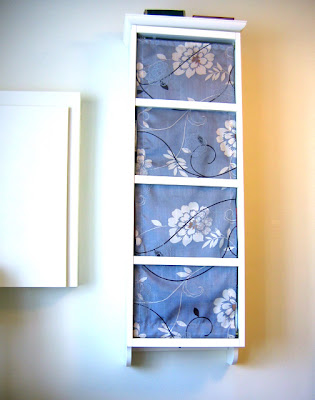
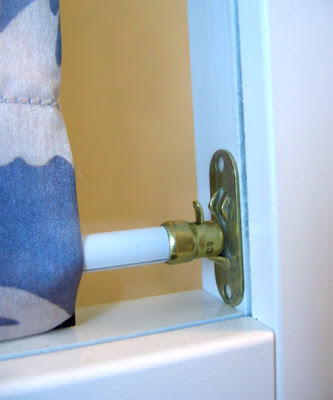
Our front room has so many things in it that I've been trying to simplify the decor a bit and make it look less cluttered. I've been wanting to add fabric to the inside of the cd case but as usual I have these ideas then no idea how to do them. So I spent a long time looking for hardware to do this, or possibly small tension rods. I finally found some simple white curtain rods with little brass attachments, and believe it or not they stay on with double-sided tape which means I didn't have to drill any holes which I didn't want to do. So now there's a pretty grey floral panel of fabric inside the glass door. Here's a detail:
To improve the lighting in the room, I've added sheer curtains to the front window. The big find there was a bay window rod from Umbra. I found it at their new shop on John St. just up from Queen West. I didn't even know these existed until recently, but they're brilliant - each side telescopes so you can adjust the size, and the corners are bendy so you can match the rod to the curve of your window. This way you don't lose the extra space in a bay window and you don't have several rods and hooks cluttering up your window. The next step is to paint out that dreary wood!
Then I went to IKEA and found some plain white linen lampshades for two new lamps that we have at the corners of the sofa. This extra lighting has made the room much cosier and well lit. The lampshades were from Goodwill and had terrible shades, which it turns out are harder to find replacements for than you might think. A lot of stores only sell the lamps and shades together. Also these called for an "uno" shade style which most stores d0n't have at all (uno describes the way the shades are attached to the lamp).
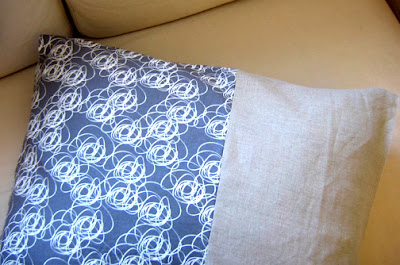
Anyway while I was at IKEA picking up my $8 shades I found some great fabric in the "as is" room. This inspired me to make matching cushions that go with the grey in the cd box fabric panel and the beige of our couch. All these little changes have created a nice soft colour scheme in the room: cream, white, and grey. Still working on those cushions (the right side is tan coloured linen):
So the other big reason we're so busy is that we were planning to retile the bathroom - I had picked out a lovely porcelain white hexagonal 1" mosaic tile (it has that vintage look, and it's nice and fresh and light.) But what we realized when we considered how we could install them is that we have vinyl tiles with older tiles underneath, and it turns out those older tiles have asbestos in them.
Apparently this is very common, we have an old 1930s house and it seems that decades ago they put asbestos into everything - stucco ceilings, tiles, insulation. But the asbestos in tiles is not too much to worry about because it isn't something that will get into the air unless you try to sand the tiles or break them up a lot. But suffice it to say it became a job for a professional. They're planning to take out the entire old subfloor.
Anyway our tiler had a cancellation and is available to do the work starting next week which is sooner than we expected (but nice to get it done) so we've had to hop to it and clear things out. The whole kitchen area has the old tiles, as does two closets, so we decided to redo the whole area at once. This means making all that floor space clear so that the work can be done. They are even planning to move the kitchen cabinets to do the floor underneath. In a tiny home there aren't a lot of places to put things but I think we can work it out. A fridge in our living room, the stove on the deck - ahhh renovating..


.jpg?picon=910)


I always feel stir fry is really quick and easy. I cook my rice separately (love having a rice steamer.) Saute some veggies and voila! I do want to make that peanut sauce though!!
Hi Joyce. You must be a faster chopper than I am! Also I like to cook each veggie separately to ensure even cooking temps, which may be obsessive. Roasting means I obsess less. A steamer is great for steamed rice, but it’s quite a different result than fried rice. To each her own, right?