


Filed under: Friday Fun, Funny
0 Comments on Oppression Can Be Good as of 1/3/2014 11:22:00 AM
Add a Comment

 By: Karen Maxwell,
on 1/3/2014
By: Karen Maxwell,
on 1/3/2014
.jpeg?picon=3075) By: Fleur Bradley,
on 9/6/2013
By: Fleur Bradley,
on 9/6/2013
It's September! I thought this month would never get here... Here in southern Mississippi, each fall month gets us closer to humanly tolerable temps. Currently we're battling the nineties with umptienthousand percent humidity, but we're getting closer to November, when we can go outside and breathe again... :-)
But enough about the weather already. This week on the Twitterz, it was a short week with a hodge-podge of news, like that there will be a new Agatha Christie novel (not sure I'm cool with that, but I'll keep an open mind). For my fellow crime writers: Crime and Science Radio will be hosting webcasts on various crimey topics, starting Saturday with Hollywood Storytelling: Science Fact or Make Believe? This looks like a promising resource...
If you're interested in starting a book club for kids, read my author pal Caroline Starr Rose's blog for a step-by-step guide. Great advice there.
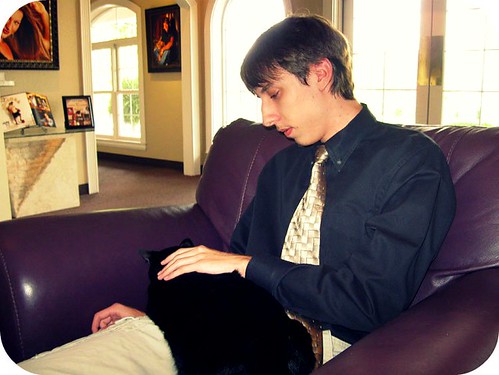
And for some Friday fun, here's a picture of kitten ChuChu, trying to get my attention when I'm editing, but the food bowl is also empty:
 By: Karen Maxwell,
on 1/25/2013
By: Karen Maxwell,
on 1/25/2013
So I haven’t posted any crafting posts lately, and they seem to be popular, judging by my stats (not that I keep track of my stats but they are fun to look at once in a while).
Please note – I’m simply sharing the crafts that have caught my eye and ones I would totally do if I were one: not lazy and two: had small children again. Since I AM lazy and I DON’T have small children anymore, all I can do is browse through the various crafts and share the ones I like the most with you.
Just because I don’t actually DO these crafts doesn’t mean I can’t appreciate the creativity, right?
At any rate, please enjoy. And you can find so much more at Spoonful.com.
Merida’s Celtic Heart Necklace
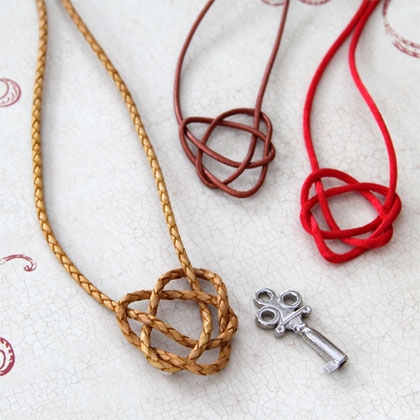
Merida’s three suitors never stood a chance at winning her affection with their pitiful archery skills. But, had any of them presented the feisty Scottish princess with one of these lovely heart-shaped pendants, there’s no telling where the story may have led.
What you’ll need
40-inch length of colored beading cord
Pliers
Pair of crimp-style end clasp clips and O-rings
Necklace clasp
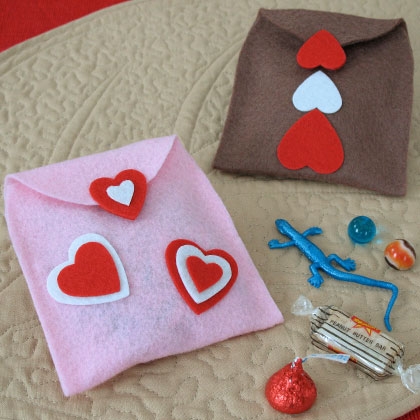
Right before Tinkerbell accompanies the other fairies to the mainland, Terrance hands her a little pouch filled with magic Pixie Dust to tide her over while she’s gone. Decorated with stick-on felt hearts, one of these enchanting pouches makes a sweet gift for your child to give to a special friend — it’s the perfect size for packing valentine candies and trinkets.
What you’ll need
Heart-felt Fairy Pouch template
Scissors
Felt
Pins
Low-temperature glue gun
Small sticky-back felt hearts (sold in craft stores) or small hearts cut from regular felt
Small adhesive-back Velcro fastener

This Valentine’s Day, your little princess can serenade her valentine with a sweet songbird made of paper hearts.
What you’ll need
Sweetheart Songbirds template
Scissors
Scrapbook paper
Glue stick or glue dots
Ruler
Jeweler’s wire or thin craft wire (flexible enough to bend without pliers)
Googly eyes
Colored pencils and/or glitter glue (optional)
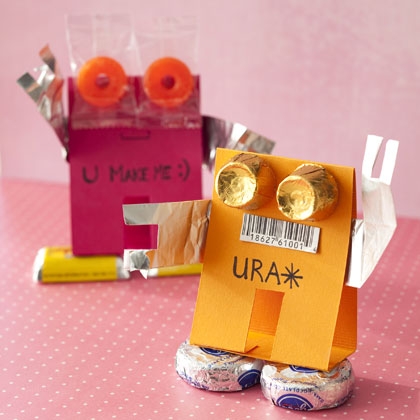
Personal robots may do our bidding in the future. But these adorable little inventions are already on the job, programmed to transmit Valentine’s Day messages.
What you’ll need
Template
Card stock
Double-sided tape
Aluminum foil
Candy
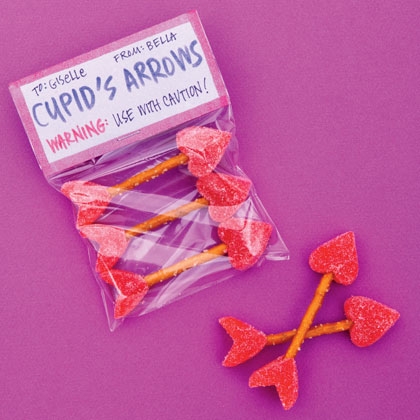
These arrows from Cupid’s quiver may not have any supernatural effects, but that doesn’t make them any less fun to share.
What you’ll need
pretzel sticks
heart-shaped gumdrops
TO ASSEMBLE
toothpicks
cellophane bags
card stock
stapler

Your kid will be a hero when he hands out these supertreats.
What you’ll need
template
card stock
hole punch
paper
glue stick
lollipop
black marker
tape
By: Fleur Bradley,
on 12/14/2012
 By: Karen Maxwell,
on 8/10/2012
By: Karen Maxwell,
on 8/10/2012
I don’t know if it’s because I’m on a diet (sort of) and haven’t been eating the junk food like I used to, or if I’m just hungry (actually, when am I NOT hungry?), or what, but I saw these cookies on Family Fun and my mouth started drooling.
Can’t you just SMELL these??

Here’s a sweet activity to brighten up a rainy day — bake a batch of these cookie pops, then let your kids decorate them with a rainbow of frosting colors.
Ingredients
Sugar cookie dough, store-bought or try our Easy Sugar Cookie Dough
Cookie sticks (available at craft supply stores)
Frosting
Food coloring
Tube of white icing
Bendable straws
Instructions
Roll out the cookie dough into a 1/4-inch-thick disk. Use a plastic cup or round cookie cutter to cut out dough circles.
With a knife, cut each circle in half, then scallop the straight edge. Cut raindrop shapes from the dough scraps.
Lay cookie sticks on an ungreased cookie sheet and gently press a half-circle of dough on top of each. Place the raindrops on the sheet and bake the cookies according to the recipe directions.
Once the cookies have cooled, frost them. Pipe on icing lines and make vertical grooves by dragging a toothpick up to make one groove and down for the next.
For a special presentation, add a colorful handle by trimming a bendable straw and sliding it over the stick.

Delicious bite-sized cookies are sure to make you feel luck or at least really happy.
Ingredients
2 1/4 cups all-purpose flour
2 teaspoons baking soda
1 teaspoon ground cinnamon
1 teaspoon ground ginger
1/4 teaspoon ground nutmeg
1/4 teaspoon ground cloves
1/4 teaspoon salt
3/4 cup unsalted butter, softened
1 cup firmly packed brown sugar
1/4 cup molasses
1 large egg
Granulated sugar (for coating cookies)
Instructions
In a large mixing bowl, stir together the flour, baking soda, cinnamon, ginger, nutmeg, cloves, and salt. In a separate large bowl, use a wooden spoon to cream the butter and brown sugar until smooth.
Stir in the molasses and egg and mix until well blended. Gradually stir in the flour mixture until combined.
Cover the dough and refrigerate it for at least 1 to 2 hours or until firm enough to roll into balls. Heat the oven to 375.
Use a tiny spoon (we used one from a child’s tea set) to scoop the dough out of the bowl, then roll it with your fingertips into balls that are about 1/2 inch in diameter. Roll the balls in a shallow bowl of granulated sugar.
Place the balls on an ungreased baking sheet, leaving 2 inches between the cookies. Bake for 7 to 9 minutes or until the cookies are crinkled and set.
Cool the cookies on the baking sheets for about 5 minutes. Using a metal spatula, transfer them to a wire rack to cool completely. Repeat until all the dough is used.
The cookies can be stored in an airtight container in the freezer for up to 1 month and at room temperature for up to 1 week. Makes about 10 dozen Lucky Pennies.
KIDS’ STEPS: Kids can mix up the dough, shape it into balls, and roll the balls in sugar.
0 Comments on Family Fun: Classic Cookies Never Go Out of Style as of 8/10/2012 7:47:00 AM
By: Karen Maxwell,
on 5/25/2012
On a diet and losing weight.
I’d tell you, but not yet.
My clothes are much less snug.
Internally, I feel clean and healthy.
My hunger pangs are subsiding.
I’m going to look freaking hot.
I live in a fantasy land.
Don’t you even agree with me.


 By: Karen Maxwell,
on 5/4/2012
By: Karen Maxwell,
on 5/4/2012
I do not, I repeat, I DO NOT have a green thumb.
I can’t grow stuff to save my life. And I confess, the thought of putting my hands into the dirt and, well, getting dirty, is not very appealing to me.
However, I like plants, I love flowers and I think it’s uber cool that people grow gardens … you just won’t find me doing it.
But here are some fun ideas if you ARE into gardening …

These helpful row-marking insects appear to be standing guard above your tender seedlings.
Materials
Plastic jug
Scissors
Plastic cap
Pushpin
Flora wire
Hole punch
Black craft foam
White craft foam
White duct tape
Permanent marker
Instructions
For each, cut a set of heart-shaped wings out of a plastic jug. Hold the wings in place on top of a plastic cap and use a pushpin to make two holes through both. Fold an 18-inch length of floral wire in half and thread the ends through the holes as shown, twisting the wire to secure.
For the eyes, use a hole punch to make black craft-foam pupils, and use scissors to cut larger circles from white craft foam. Attach the eyes to the cap with a 4-inch length of floral wire as you did with the wings, then trim any excess.
For the tag, stick two pieces of white duct tape together, then cut out a word-balloon shape. Write the name of your plant on the tag with permanent marker, then use more duct tape to secure the tag to the floral wire.

Even if your little gardener can’t write his name yet, he’ll still enjoy watching it grow with this project from the book Toad Cottages and Shooting Stars: Grandma’s Bag of Tricks, by Sharon Lovejoy. Keep the grass watered in a sunny spot, and it will last for weeks. The bonus? Your child can practice his scissor skills trimming the grass.*
Materials
Wheat berry seeds (available at natural food stores)
Bowl of water
Shallow, rimmed tray or baking pan
Potting soil, moistened
Letter cookie cutters (optional)
Instructions
Soak the wheat berry seeds in the bowl of water overnight.
Fill the tray with about an inch of moist potting soil. Help your child arrange the seeds in the shape of her name, then have her gently press them into the soil with her fingertip (we set alphabet cookie cutters on the soil to use as a guide, then removed them after the seeds were pressed in place).
Mist the soil around the seeds to keep them moist, but don’t pour water directly on them until the roots are established. Place the tray in a sunny window, and the seeds should sprout within a few days.
Variations:
Grass Letters Instead of growing your child’s name in a tray, you can use cookie cutters to create a letter-shaped topiary with visible roots. Set the cookie cutters in a tray, fill them almost to the top with potting soil, then cover the surface with wheat berry seeds that have been soaked in water overnight. Gently push the seeds into the soil. Pour a thin puddle of water into the tray to keep the soil moist, and set the tray in a sunny window. Once the seeds have sprouted and the roots are established, pick up the cookie cutters and gently pop out the letters.
0 Comments on Friday Craft – Watch Your Garden Grow as of 5/4/2012 7:16:00 AM
Add a Comment
By: Karen Maxwell,
on 3/30/2012

Got a single glove and no hope of finding its match? Some easy sewing will transform it into a four-legged octopus.
Materials
Single glove
Needle and thread
Dry rice
Hot glue
Large pom-pom
Buttons
Wire
Ribbon
Felt
Instructions
First, tuck the thumb inside the glove and use a needle and thread (an embroidery needle works fine) to sew it shut. Fill the glove with dry rice, then tuck the cuff inside.
Stitch all along the cuff’s edge, then pull the thread tightly to close the top. Knot the thread.
Sew or hot-glue a large pom-pom to the top of the glove. At the base of the quadropus — where the glove’s fingers attach to the palm — pinch the sides together and sew a few stitches to hold them. This will help make the body rounder.
To make the tentacles, attach buttons to the undersides of the four fingers with hot glue. Sew or hot-glue on button eyes and a felt mouth. Make earrings by threading stacks of buttons onto pieces of wire; tie ribbon around the pom-pom for a head scarf, or add a felt brim to the pom-pom for a hat.


 By: Karen Maxwell,
on 3/23/2012
By: Karen Maxwell,
on 3/23/2012

Turn gloves into palm-size pals.
Materials
Knit glove
Needle
Thread
Yarn
Scissors
Rubber ball
Buttons
Mini pom-pom
Rice
Instructions
Tuck the ring finger of the glove into the palm and stitch the hole closed.
Fill the glove (all but the cuff) with rice and tie it off tightly with a piece of yarn.
For the doll’s head, fit a small rubber ball (or a Ping-Pong ball) into the cuff. Then, sew the glove closed to hold the ball in.
Make a wig by loosely wrapping yarn around your hand about fifty times to create a think hank.
Tie the strands together at one end of the hank, then cut the loop opposite the tie.
Stitch the tied portion to the top of the doll’s head.
Finish up by stitching on button eyes and a tiny pom-pom nose.


 By: Karen Maxwell,
on 3/16/2012
By: Karen Maxwell,
on 3/16/2012

This funky scarf has a pocket for your MP3 player, letting you rock out to cool tunes while keeping warm.
Materials
Polar fleece
Embroidery needle
Embroidery floss
Pom-pom balls
Fabric glue
Instructions
Cut a piece of polar fleece into a long rectangle (ours is 7 inches by 38 inches).
For the pocket, cut a polar fleece rectangle that’s about an inch wider than your music player (our pocket is 3 3/4 by 4 1/2 inches).
Thread an embroidery needle with embroidery floss.
Use a running stitch to sew three sides of the rectangle to the scarf..
Attach pom-pom ball trimto the ends of the scarf with fabric glue.


 By: Karen Maxwell,
on 3/2/2012
By: Karen Maxwell,
on 3/2/2012
How freaking cute is this?!

This soft and cozy cap is just the gift to give for fighting brisk winter weather.
Materials
Tape measure
1/2 yard fleece fabric
Scissors
Needle and thread
Buttons, appliqués, or felt pieces for decoration
1 yard decorative cord
Instructions
First, determine the size of the hat. (To avoid ruining the surprise, measure the head of someone who is similar in size to the recipient.) Now cut a piece of fleece that´s 16 inches wide and as long as the measurement you took plus 2 inches.
Fold the fleece in half, right side in so the 16-inch edges match up. Sew a 1/2-inch-wide seam along this edge, stopping 5 inches from the bottom. Just below the last stitch, make a 1/2-inch cut in from the side. Turn the material right side out. Now sew a seam along the last 5 inches of unsewn fleece.
Roll the bottom of the hat up two turns, so the cuff conceals the bottom part of the seam. To keep the cuff from unrolling, sew on a decorative button, an appliqué, or a felt cutout.
Finally, gather the top 3 inches of the hat and tie a colorful cord around it.


 By: Karen Maxwell,
on 10/28/2011
By: Karen Maxwell,
on 10/28/2011
Okay. Maybe not the best, but I certainly like them. I know these ideas are last minute, but maybe you’ll get some ideas for next year. Unless you’re really crafty and can whip them up in no time flat and if that’s the case? I’M JEALOUS OF YOU.
Here are some of my favorite costumes from Family Fun:
Girl Costumes
Paper Doll (*squee!*)

Our cute paper doll costume can hold its own against Halloween ghouls, ghosts, and goblins.
Materials
diagrams and templates
poster board
paint
black marker
headband
duct tape
foam core
hot glue (an adult’s job)
elastic and Velcro straps
white t-shirt and shorts (concealed by the costume)
frilly socks and Mary Janes
Instructions
Clothing and accessories: Measure your child, then on poster board, draw a shirt, skirt with bloomers, and accessories to fit. (Download our free purse and bow templates, and shirt and skirt diagrams.)
Cut out the pieces and cut several 2- by 4-inch tabs from the scraps. Paint the pieces and let them dry.
Use black marker to outline the tabs with dotted lines and to add details to the clothing and accessories. Attach the tabs to the pieces and the bow to a headband with duct tape.
Reinforcements: Strengthen the shirt by attaching a roughly 7- by 8-inch piece of foam core to its back with hot glue (an adult’s job). Cut a strip of foam core to fit the skirt waist and hot-glue it on as well.
If the bottom of the skirt seems unstable when worn, add a strip of foam core along each leg.
Straps: Have your child hold the bottom of the shirt in front of her, then cut two lengths of wide elastic that can each reach from the top of the shirt, across your child’s back, and to the bottom of the opposite side of the shirt.
For strength, staple a rectangular scrap of poster board to both ends of each strap, then tape one end of each to the top of the shirt (the foam core, not the poster board).
Horizontally attach two strips of adhesive-backed Velcro at the bottom of the shirt and the matching strips to the foam core on the free end of each strap.
Use the same method to attach a single horizontal strap at the skirt waist.
Face Book (hahahahaha!!!)

This friendly costume will have people wanting to add candy to your bag Halloween night.
Materials
12- to 15-ounce cereal box
glue stick
wrapping and white paper
marker
thin elastic
duct tape
baseball cap
Instructions
Book cover: Cut off the top and bottom flaps and one narrow side of a 12- to 15-ounce cereal box so that you’re left with three panels. Apply a glue stick all over the printed side of the cardboard, then cover it with wrapping paper that’s an inch wider than the box on all sides. Fold down the edges of the wrapping paper and glue them in place. Glue an 11- by 17-inch sheet of white paper on top.
Inside pages: Beginning at a short end, accordion-fold two sheets of 11- by 17-inch white paper. The folds should be 1 inch wide.
Glue an end flap of each of the folded sheets along a short edge of another 11- by 17-inch sheet, creating a table shape. Glue the bottom flaps of the accordioned
By: Karen Maxwell,
on 10/14/2011
Thinking of having a Halloween party for your monsters?
Maybe Family Fun can help.
Your children can probably imagine what actual goblin feet would taste like. (Dirty socks stuffed with cheese? Moldy tapioca pudding?) Luckily, these cookies are infinitely more tasty.

Ingredients
Half package (7 ounces) green meltable candy wafers
peanut butter cookies, such as Nutter Butter brand
cashew halves
Instructions
Follow the instructions on the candy wafer package to melt the wafers in a wide bowl. For each goblin foot, hold the edge of a cookie and dip it in the melted candy.
Place the cookie on a sheet of waxed paper and use a spoon to smooth the candy over the spot your fingers covered.
Place three cashew halves on the cookie for claws. (The candy may need to cool a minute or two for it to be stiff enough to hold the nuts in place.) Let the cookies set at room temperature.
These scary-good Halloween treats, prepared and eaten on the same fork, begin with a doughnut hole dunked in white chocolate.

Ingredients
2 (11-ounce) bags white chocolate chips
12 doughnut holes
Semisweet chocolate chips
Tube of red decorator frosting
2 tablespoons vegetable oil
Instructions
To coat a dozen doughnut holes, melt the white chocolate chips with the oil over low heat (and keep the chocolate warm while you work). With a fork, spear each doughnut hole and submerge it in the melted chocolate to coat it, then gently tap off any excess.
Stick a semisweet chocolate chip with its point cut off onto each doughnut hole, cut end first. Place the forks (handle side down) in a mug and allow the chocolate coating to harden.
Use a tube of red decorator frosting to add squiggly veins radiating out from the pupils.
Bleached white bones never tasted so delicious. This recipe originally appeared in Ghoulish Goodies, by Sharon Bowers.

Ingredients
half package (7 ounces) white meltable candy wafers
36 pretzel sticks and thin rods of various lengths
72 mini marshmallows (about 1 cup)
Instructions
Follow the instructions on the candy wafers package to melt the candy in a wide bowl. For each bone, press marshmallows onto both ends of a pretzel stick or rod, with the marshmallows’ flat sides parallel to the pretzel.
Dip each pretzel into the melted candy to coat it. Lift it out with a fork, letting the excess drip back into the bowl. Place the bone onto a sheet of waxed paper to set at room temperature.
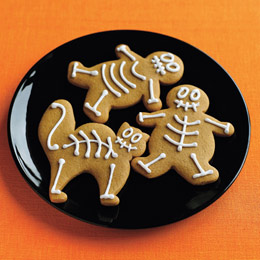
What’s the hot costume this year for gingerbread people? Skeletons, of course!
By: Karen Maxwell,
on 9/23/2011
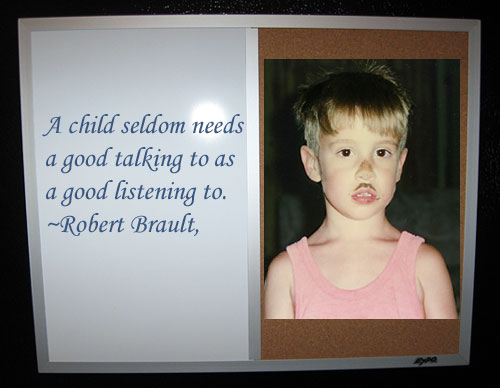
I wish I had branded this quote into my brain when the boys were growing up because I did WAY too much nagging/yelling/berating and not NEARLY enough listening.
Shh. Hear that? It’s your child talking to you.
Can you hear him/her?
(BTW, I didn’t draw that Hitler mustache on Dude. He came in from playing and looked like this. I thought it was so funny that I had to take a picture. I don’t Hitler is funny, I thought him coming with a dirt mustache that looked like Hitler was funny. Just setting the facts straight because you KNOW there are those few people out there that will make nothing into something).


 By: Karen Maxwell,
on 7/22/2011
By: Karen Maxwell,
on 7/22/2011
Hey ya’ll – Family Fun just emailed me some more creative cake ideas and I thought I’d pass on my favorites to you. (Family Fun didn’t email me specifically, it was a mass email – I didn’t want you to think I was someone special or anything. HA!)

This rockin’ cake makes the perfect accompaniment to any party.
Ingredients
2 baked loaf cakes
3 cups yellow frosting
2 large mint patties (speakers)
Fruit leather (tape and CD players)
Assorted candies, such as Pez, Spree, sour rings, Good & Plenty, and Jujubes (various knobs, controls, and handles)
2 long, thin candles (antennae)
shoestring licorice (trim)
Instructions
For the boom box shape, cut off one of the long edges from one loaf cake at a slight angle. Use frosting to stick the 2 pieces to the second cake, as shown. Ice the entire cake with yellow frosting.
For the speakers, use a toothpick to score a criss-cross pattern on the 2 large mint patties.
Cut 2 squares of fruit leather for the tape and CD players and use a variety of small candies for the control buttons. Next, add 2 long, thin candles for antennae and outline the cake with shoestring licorice.

The budding artists at your child’s party can paint their cake and eat it too. Make sure to have extra “brushes” on hand for party guests.
Ingredients
1 baked 9-inch round cake
2 cups white frosting
Gel icing, assorted colors
Fruit leather
1 licorice twist
Instructions
Trim the edges of the cake as shown and cover it with white frosting. Using a 1 1/2-inch round cookie cutter, cut out a thumbhole in the palette and frost the insides.
Next, use the cutter to lightly mark the circles in the frosting, then fill with gel icing “paints.”
To make the brush, wrap the fruit leather around the base of the licorice twist and fringe the ends.

Make this cake and we guarantee your guests won’t hesitate to plunge right in.
Ingredients
1/2 gallon quality ice cream (any flavor)
1 1/3 8.5-oz. pkgs. fudge sticks (chocolate or peanut butter)
2 cups heavy cream
1/4 cup sugar
1/2 tsp. vanilla extract
Blue food coloring
Gummy rings
Gobstoppers
Paper umbrellas
Plastic figures
Licorice
Decorators’ frosting
Instructions
Begin by making the ice-cream base of the pool cake. Let the ice cream soften at room temperature for 15 to 20 minutes, then ask your kids to help you spoon it into an 8-inch round springform pan, souffle dish, or plastic container. Pack the ice cream into the mold and smooth out the top. Cover with plastic wrap and freeze for at least 4 hours or overnight.
After the ice cream has frozen solid, unmold it by dipping the container quickly into a pan of hot
By: Karen Maxwell,
on 5/6/2011

Aloha! Kailani is the brain-child behind this fun Friday meme. If you feel inclined to answer my question, please post your answer in the comment section. Sound fun? Of course it does! Want to answer more questions? Hop over to An Island Life and play along!
(Please feel free to answer the question below, even if you’re not playing Aloha Friday!)
My question:
Will you ever go back to school? Why or why not?
Is college a ripoff? I’ve written about this subject before and wow, I just don’t know. I suppose it depends on the person and what his/her personal goals are.
For me, I definitely plan on going back to college to earn my Master’s degree in writing. Since I plan on paying for it as I go, as opposed to taking out loans, it’ll be slow going and I won’t be able to start until our current financial situation evens out a bit. (Gotta love this economic “recovery,” right?) I personally love learning and I have to reiterate that old saying, “knowledge is power.”
Because it is. It truly is.


 By: Karen Maxwell,
on 5/6/2011
By: Karen Maxwell,
on 5/6/2011
Did you guys see these cute cards on Family Fun?
Well, let me tell ya …
I love this first one. So cute. And how many moms love tea?? This would be a great chance for mom to try that new tea she’s been wanting to try. (There are always new teas to try. Am I right?)

With its soothing, tucked-in treat, this greeting is brimming with thoughtfulness.
Materials
* 8½- by 11-inch sheet of card stock
* Pencil
* Scissors
* Tape
* String
* Stapler
* Glue
* Tea bag
* Printable template
Instructions
1. Fold an 8½- by 11-inch sheet of card stock in half widthwise. Draw a teacup along the bottom (download our template) with the handle touching the fold (right). Cut out the cup, leaving the fold at the handle uncut.
2. Open the cup. Add a tag by taping a 2-inch piece of string to the left half of the card. Write a message on a small piece of card stock, then staple it to the other end of the string.
3. To form a pocket for the tea bag, trace the cup on the remaining card stock and cut out the shape. Glue the bottom and sides of this cup to the inside of the card (right). Add your message.
4. When the glue is dry, tuck a tea bag in the pocket.

This fold-open bouquet card is a standout for almost any occasion.
Materials
* Card stock (assorted colors)
* Decorative Scissors
* Glue
* Stapler (optional)
* Envelopes
Instructions
1. To make the base, fold and cut an 8½- by 11-inch sheet of card stock in half lengthwise (we used decorative scissors for our scalloped look).
2. On a short end of one strip, fold over a ½-inch tab. Fold the resulting rectangle in half widthwise, then fold it in half again. Unfold the card stock. Glue the tab to the opposite end of the rectangle, forming a box.
3. Make the center flower support by cutting a 3¼-inch-wide section from the other strip of card stock. Fold a ¼-inch tab on each long end, as shown.
4. Cut flower centers, petals, stems, and leaves from card stock, trimming the stems to fit inside your envelope. Glue the flower parts together. Glue or staple the stems to the back of the support, placing them on either side of the center line so that the card will easily fold in half later.
5. Glue the support’s flaps inside the center of the box. Write a message on a colorful piece of card stock, then glue it onto the panel. (If you prefer to write message directly on the panel, do so after you unfold the card stock in step 2.)
6. When the glue is dry, flatten the box along two of its creases.
7. Fold it in half along the remaining crease and insert it into an envelope.
This fancy, one-of-a-kind handbag holds just what Mom needs this Mother’s Day o
By: Karen Maxwell,
on 2/25/2011

Aloha! Kailani is the brain-child behind this fun Friday meme. If you feel inclined to answer my question, please post your answer in the comment section. Sound fun? Of course it does! Want to answer more questions? Hop over to An Island Life and play along!
(Please feel free to answer the question below, even if you’re not playing Aloha Friday!)
My question:
Which is harder: Wife or Mother? Why?.
I plan on blogging about this subject this next week. In the meantime, I’d love to hear your thoughts on it.
And if you’d rather not comment, but would like to voice your opinion, please participate in the poll below:
View This Poll(Sorry RSS readers – I accidentally hit publish before I was ready to. So if this appears twice in your reader – my apologizes!)


 By: Karen Maxwell,
on 2/18/2011
By: Karen Maxwell,
on 2/18/2011
Now THESE are cute! And the best part? The kids can help decorate their own! I’m thinking getting dressed for school might not be quite SO hard with these fun fashions from Family Fun.

Here, the stain-removing power of bleach is used to create a negative-image design that subtracts color and adds fun. Bleach is strong stuff, so while working on this project, wear old clothes and rubber gloves, follow safety precautions on the label, supervise kids closely, and work in a well-ventilated area.
Materials
* Solid-color T-shirt
* Waxed paper
* Chalk
* Bleach pen (we used Clorox brand)
* Paper towel
Instructions
1. Wash and dry the shirt, then slip a piece of waxed paper inside it to prevent bleed-through.
2. Sketch your design on the shirt with chalk. Because the bleach can spread, keep the design simple, and draw with lines and dots, as shown, rather than try to fill in large areas.
3. Shake the bleach pen and give it a few test squeezes on a paper towel to make sure it’s flowing well. Trace over your chalk lines with the bleach pen. Leave the bleach on the shirt until the fabric has clearly changed color. This can take anywhere from 10 minutes to 2 hours, depending on the shirt. Wash the shirt by itself in the washing machine, then dry it.

We’ve seen a lot of custom T-shirt projects, but none that allow kids to customize their shirts on a daily basis. This shirt’s clear plastic pocket lets kids display their obsession du jour.
Materials
* T-shirt
* Clear plastic trading card page (available at hobby or office supply stores)
* Scissors
* Masking tape
* Embroidery needle
* Embroidery floss
* Flattish object to place in pocket, such as a photo, iron-on appliqué, artificial flower, etc.
Instructions
1. Cut 1 pocket from the center of a trading card page, leaving a 1/4-inch margin around the seams.
2. Secure the pocket’s top and bottom in place with masking tape.
3. Thread the needle with the floss, knot the end, and use a simple whipstitch to attach one side of the pocket to the shirt. Remove the bottom tape and continue stitching, leaving the top open.
4. Remove the remaining tape. Place an object in the pocket.
Tips:
When drying the T-shirt, always hang-dry to protect the plastic pocket.
Thumbprint Garden T-Shirt (Watch the how-to video)

These personalized T-shirts — the girls can put their own signature flower on one
By: Karen Maxwell,
on 12/10/2010

Aloha! Kailani is the brain-child behind this fun Friday meme. If you feel inclined to answer my question, please post your answer in the comment section. Sound fun? Of course it does! Want to answer more questions? Hop over to An Island Life and play along!
(Please feel free to answer the question below, even if you’re not playing Aloha Friday!)
My question:
Vent! What’s going on in your life right now that’s driving you nuts? (Come on, you can tell us. It won’t go any further than this here blog).


 By: Karen Maxwell,
on 12/10/2010
By: Karen Maxwell,
on 12/10/2010
Time to decorate your tree!
I’m sure it looks FABULOUS darling, but wouldn’t it be fun to add a few new items to your fabulous tree?
Of course!
Here are some cute homemade ornaments that caught my eye from Family Fun:

These curious ornaments will make a purr-fect addition to your Christmas tree this season.
Materials
* Wooden craft spoons
* Acrylic paint
* White card stock
* Glue
* Pipe cleaners
* Seed beads
* Fine-point permanent marker
* Green tissue paper
* Red beads or glitter
* String
Instructions
1. To make each one, first coat a wooden craft spoon with acrylic paint. Paint a patch of the same shade onto a piece of white card stock and let the paints dry.
2. Cut a 1⁄2-inch square from the card stock, then cut the square in half diagonally and glue the 2 triangles to the top of the spoon for ears. For a tail, curl a 6-inch piece of pipe cleaner and glue it to the back of the spoon.
3. Glue on black seed beads for eyes and draw a face with a fine-point permanent marker. Add a holly collar by twisting two or three 1-inch squares of green tissue paper around the tip of a pencil, then glue them in place, adding a few tiny red beads or glitter for berries. Glue on more beads for buttons.
4. Make a hanger by tying a piece of string into a loop and gluing the knot to the back of the spoon. Let all the glue dry completely before hanging.

Sometimes a simple idea, like shaping strands of beads into ornaments, is all it takes to check off most of the people on your child’s gift list.
Materials
* Pipe cleaners
* Transparent craft beads (5- to 10-millimeter diameters)
Instructions
1. Bend an end of a pipe cleaner into a 90-degree angle. Have your child thread on beads from the opposite end, stopping a half inch from the tip.
2. Twist together the two ends, and the strand is ready to shape into a star, a candy cane, or another festive object.
Variations:
Twist together the ends of two pipe cleaners for a longer strand, or attach short beaded lengths to add a striker to a bell or holly berries to a wreath.

Here’s a real treat for your tree: a candy cane-like ornament that points the way to Santa’s place.
Materials
* Large craft stick (ours was 4 ½ inches long)
* Acrylic paint: white, green and red
* Craft knife
By: Karen Maxwell,
on 12/3/2010
STOP!
Don’t mail those boring store-bought Christmas cards, make your own! Friends and family will appreciate the effort and it’ll keep the kids busy (for about an hour, but STILL!)
Here are a few of my favorites from Family Fun:

Package five or 10 cards with envelopes, and you’ve got a great gift for doting grandparents and other relatives.
Materials
* Ruler and pencil
* Card stock or construction paper
* Scissors
* Glue stick
* Artwork
Instructions
1. The following directions are for a 4 1/4-by-6-inch card (which fits nicely into a store-bought envelope), but obviously you can adjust the dimensions to any size you like. Using the ruler and pencil, trace a 12 3/4-by-6-inch rectangle onto your card stock or paper and cut it out.
2. Fold the rectangle in thirds, accordion style. From the top third, cut out a window that will fit your artwork, leaving at least a 1/2-inch border around the edges.
3. Slip the artwork behind the window so that it’s centered. Now, glue the back of the artwork and the frame around the artwork to the paper behind them. Place the finished card under a book for about an hour to set.
Tips:
If you don’t want to part with your child’s original artwork or want to use a very large piece of artwork, you can make reduced copies with a color copier.

Let the folks on your list have some fun with this greeting that moonlights as a DIY ornament. And don’t worry, your friends and family don’t need to be craft experts to assemble it!
Materials
* 8 1/2- by 11-inch sheet of card stock or heavy paper
* Craft knife and scissors
* Glue stick
* Card stock in white, black, and orange
* 7- by 1/2-inch piece of red felt
* 6-inch piece of embroidery floss or string
* 6 large black seed beads
* Snack-size ziplock bag
* Clear tape
* A9 or 6- by 9-inch envelope
Instructions
1. Fold the 8 1/2- by 11-inch sheet of card stock in half width wise. Open the card and use a craft knife to cut a 6- by 3-inch rectangle from the front of the card (leaving a 1 1/4-inch border). If you like, glue the cutout inside the card, opposite the window, as we did below.
2. Cut 3 white circles, a hat (ours is 1 1/2 inches wide at the brim), and a 3/4-inch-long carrot from the card stock. (For easier cutting, use our templates.) Fringe the ends of the red felt strip and tie the floss or string into a loop.
3. Place all these parts plus the beads into the ziplock bag, seal it, and tape it behind the window. Finally, add a message letting recipients know that a little glue is all it takes to put together their ornament.
By: Karen Maxwell,
on 10/29/2010

Aloha! Kailani is the brain-child behind this fun Friday meme. If you feel inclined to answer my question, please post your answer in the comment section. Sound fun? Of course it does! Want to answer more questions? Hop over to An Island Life and play along!
(Please feel free to answer the question below, even if you’re not playing Aloha Friday!)
My question:
Are you an optimist, a pessimist, or something else?


 By: Karen Maxwell,
on 10/29/2010
By: Karen Maxwell,
on 10/29/2010
This post might be a little too late to effect this year’s Halloween, but if you’re stuck for a costume idea maybe these can help. If nothing else, you have some ideas for next year. ![]()

The Dog-Lovers in the crowd were looking for a costume truly fit for the leader of the pack. We knew we’d hit the mark with this box full of puppies when five-year-old Bryce’s eyes lit up. “I’m going to take all of my dog buddies with me!” he exclaimed. “And I’ll bark when I walk!” chimed in his classmate, Michaela, age five.
Materials
* White and brown faux fur (sold in packages at discount stores or by the yard at fabric stores)
* Scissors
* White hooded sweatshirt
* Double-sided carpet tape
* Safety pins
* White tights and fiberfill
* Velcro Sticky-Back strips
* Red belt webbing or ribbon, 19 inches long
* Cardboard circle, 2 1/2 inches wide
* Aluminum foil
* Hole punch
* Embroidery or dental floss
* Cardboard box
* Utility knife
* Two 45-inch lengths of rope
* Masking tape
* Newspaper strips
* Pipe cleaners
* Stuffed dogs
Instructions
The Dog Sweatshirt:
Cut a large piece of faux fur for a chest patch and several smaller patches for the arms, back, and hood. Attach them to the sweatshirt with double-sided carpet tape.
For dog ears, cut long rounded fur shapes and safety-pin them to the hood as shown (A).
The Tail:
Cut off one leg from the tights and loosely stuff it with fiberfill. Safety-pin the open end to the back of the sweatshirt. Cut a few more patches of fur and tape them to the tail.
A Dog Collar:
Attach Velcro strips to the ends of the belt webbing or ribbon. For a tag, wrap the cardboard circle in aluminum foil, punch a hole through it, and loop a piece of floss through the hole. Safety-pin the loop to the inside of the collar.
Pick of the Litter:
Select a box that your child will easily fit into and still be able to walk comfortably in. With the utility knife, cut the box where indicated (B).
Poke holes through the box for the rope suspenders and attach the rope, as shown. You may have to adjust the lengths to fit your child. Masking-tape newspaper strips around the top of the box as shown (C).
Finally, use pipe cleaners to attach the stuffed dogs to the box and each other, as needed.
 0 Comments on Friday Craft: More Fun Halloween Costumes as of 1/1/1900
By: Karen Maxwell,
on 9/17/2010
{this moment} – A Friday ritual hosted by SouleMama. A single photo – no words – capturing a moment from the week. A simple, special, extraordinary moment. A moment I want to pause, savor and remember. If you’re inspired to do the same, leave a link to your ‘moment’ in the comments for all to find and see.
More from Write From Karen
[archives]


Megan is having the best time in Oxford despite the temps. I think Oxford is as lively as NY. Last night she had dinner with a Faulkner relative.
So glad to hear she likes it there!
Though I haven't been up to Oxford, I think it's a whole different world from down here near the coast. I plan to go to Jackson at the end of January; maybe I'll make a detour to Oxford :-)
Glad my cat isn't the only one who likes to interrupt writing/editing.
I'm not sure about the new "Christie" book either. The article makes it sound like the heirs aren't happy with the current royalties and are looking for a way to bump that. I'll try to keep an open mind, but PD James' new "Austen novel had made me skittish. It was dreadful.
Yeah, I don't get it. Didn't she leave enough great books already? Seems like the only reason to do this is $$$... Let's hope they prove me wrong :-)