new posts in all blogs
Viewing Blog: Carol Creech Illustration - Sketches and News, Most Recent at Top
Results 1 - 25 of 279
Hand-drawn, custom house portraits, pet portraits, wildlife art and botanical art by Carol F. Creech.
Statistics for Carol Creech Illustration - Sketches and News
Number of Readers that added this blog to their MyJacketFlap: 1
Hello and Happy New Year!
I am working on consolidating my sites and have created a new blog! All of my old posts will be there, but you can now access my blog and website all at:
Please come on over and take a look! The site is on WordPress so you can follow the blog and keep up to date on new posts from there.
Have a great and creative 2016! Hope to see you over there!
So I recently discovered a little time-lapse video option on my phone. I thought this would be a great opportunity to start a series of short, instructional videos showing how I approach different subjects.
I have been observing a beautiful dahlia blooming in a local flowerbed and thought that would be a great place to start.
I recorded myself beginning to sketch this gorgeous blossom. I am working from a reference photo, which although not ideal for botanical subjects, is a great place to start, particularly if you are intimidated by the whole process or just beginning! It doesn't wilt or die and you can focus on the shapes, proportions and training your eye and hand to render on the page.
Check out the video and let me know what you think! I am sure my video editing skills need some work, but one has to start somewhere! I plan to continue creating short videos of my process as I work on this dahlia blossom drawing, so stay tuned.
By:
Carol Creech,
on 9/4/2015
Blog:
Carol Creech Illustration - Sketches and News
(
Login to Add to MyJacketFlap)
JacketFlap tags:
fabric,
Etsy,
poppies,
spoonflower,
crepe myrtle,
salamander,
studio update,
mini journals,
pumpkinblossoms,
Add a tag
Things have been ramping up here at CCreech Studio! The kids are back to school and my time is opening up a bit more.
As you saw from a previous post, I have been working to add more mini journals to the Etsy shop. I had a chance to get some new colors of scrap leather this week, so the process continues! Keep an eye out for more, including these in a landscape orientation:
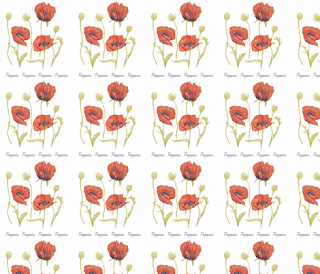
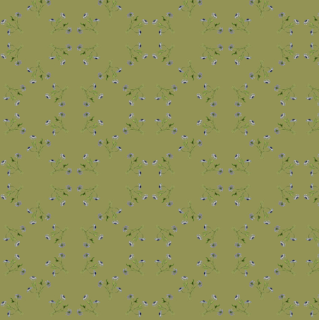
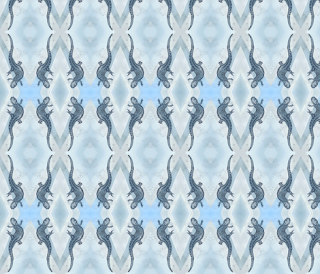
In addition to journals, I have been getting back to my fabric designs on Spoonflower! A recent contest there on botanical sketchbook designs started the creative wheels rolling. Having just completed an international sketchbook exchange earlier this year, I had plenty of material to inspire new designs. I have created a number of botanical designs as well as some coordinates.I am currently waiting to proof 15 of these new designs to make sure they print up properly. Once those are ready and approved, they will be available for sale as fabric, wallpaper and gift wrap. Here is a sneak peek of six:Another collection will include designs and coordinates based on my red poppies drawing. Some of these will be for sale in this round of proofs while others will be proofed at a later date. And finally, I have a collection based on my small-mouth salamander drawing in various shades of blues and grays. These have yet to be proofed, but I love how they are coming together!
These designs would be fantastic for various home decorating projects, but also for scarves or other accent pieces. Spoonflower just recently brought back their Poly Crepe de Chine fabric, which works really well for scarves and more. Also, keep these in mind for gift wrapping for the upcoming holiday season! If you don't see something for sale or have a question about scale, just ask! I am happy to work with you to refine a design to a different scale and get it proofed and ready to order.I will continue to work on and refine fabric designs, but will also be starting another round of the international sketchbook exchange so stay tuned for new drawings, new items in the shops and new designs!
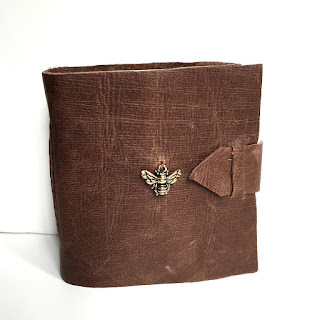
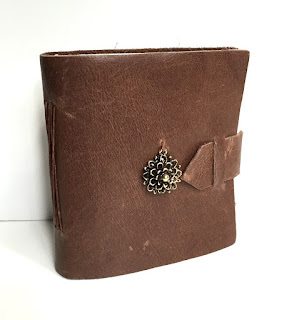
I have added four new mini journals to my Etsy shop!
I love portable little leather journals. They travel well, keeping any notes or drawings nicely protected, and make wonderful and affordable unique gifts.
I have been wanting to add more to the shop for some time. I finally had a chance to work on these over the weekend and love how they have turned out!
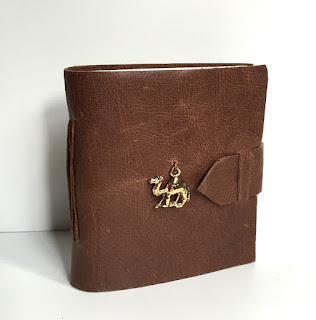
The structure is simple, but solid. These journals are approximately 3.5" x 3.25" (nearly square) and contain three, hand-sewn signatures of 70lb, acid-free, blank Strathmore drawing paper for a total of 96 pages in each. Bee Charm Mini JournalFor a finishing touch, I added a charm to the front of each journal. This gives them a little personality and makes for great gift-giving for you or someone special. Camel Charm Mini Journal
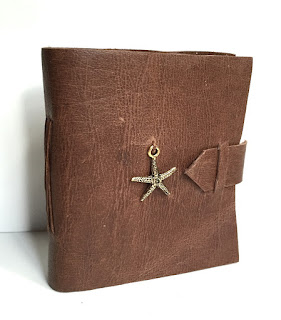
Starfish Charm Mini Journal
I will be adding more like this, and in other color leather as well, so stay tuned for updates!
Mum Flower Charm Mini Journal
After relocating homes this summer, I am finally getting back to work on my other creative outlets, including my Spoonflower fabric! Designs are also available as wallpaper and gift wrap.
I am working on a number of new designs based on my sketchbook exchange drawings. These would be fantastic for a number of projects including tea towels, pillows, bags, and more.
Here is a preview of a some of my favorites:
Poppies
African Daisies on Olive
Small-Mouth Salamander
You can keep an eye on new designs by heading to my Spoonflower page, going to the left-hand side menu and choosing Designs not for sale to see the latest. I have to proof designs by ordering a swatch before they are released for sale, so please let me know if you see anything that you like!
So I have been posting mostly finished drawings lately, but I want to remind folks where it usually starts - sketching!
With a recent move to a new house and summertime activities with kids at home, my drawing time has been limited. But even if there is no major project or deadline looming, it is easy to find a few minutes (maybe 20 or 30?) to do a quick study or sketch of something that inspires you.
Yesterday evening, after a walk to the park with my older daughter, I wandered around our new yard for a few minutes, pulling weeds here and there. One plant with very broad, green leaves had popped up by itself in the muddy patch of the yard where some utility work had been done last winter.
Deciding that it must be a weed, I pulled it out. I was surprised, however, to see a long tap root emerge rather than a clump of weedy roots. Pale yellow/orange, the root smelled a bit like a vegetable, furthering the mystery. The stem of the plant was a deep purple red towards the root, fading into green towards the top of the leaves.
Whatever it is, I was intrigued and decided to grab some good paper and my pencils and start a little study. I wanted to do it life size to better document my puzzling find. This is a 12x18 inch sheet of Fabriano Artistico 140 lb hot press watercolor paper.

I added a bit of shading here and there and a few notes about the plant and that was it! Very satisfying to have some time to observe and document what, to me, is a mystery plant.
It can be easy to forget how important sketching and quick studies are, but they are a great opportunity to keep drawing on a regular basis and also to have a visual record of plants and other finds. These can be used at a later date to inform finished pieces. So whether you have a regular sketchbook or just some sheets of drawing paper to use when you get inspired, grab those pencils or pens and get started!
I am making plans to update my inventory in the CCreech Studio Etsy shop and need your help! What do you want to see there? More artwork? More bracelets or earrings? Certain stones? Or, less of something? Let me know what you think! Check out my current offerings here: https://www.etsy.com/shop/ccreechstudio
Comment with your suggestions and receive a surprise discount coupon code to use on anything in the shop as a thank you!
By:
Carol Creech,
on 7/19/2015
Blog:
Carol Creech Illustration - Sketches and News
(
Login to Add to MyJacketFlap)
JacketFlap tags:
drawing,
ink,
graphite,
iris,
colored pencil,
sketchbook exchange,
chives,
botanical illustration,
botanical art,
hosta,
hyacinth seed pods,
Add a tag
It has been a busy time! I last posted in March and we are now to mid-July! In those four months, I have completed the final two drawings for the sketchbook exchange project that I have been a part of for the past year.
I also moved houses and went on vacation, so I was thrilled, upon my return, to find my own sketchbook back from its last stop in Singapore, filled with amazing artwork from around the world!
Here is a peek at some pictures of the gorgeous pieces that fill my sketchbook from seven amazing artists. From left to right (starting in the top left corner): Linda Trella, Giulia Canevari, Elaine Moore Mackey, Beryl Prout (two pages), Mischa (two pages), Sevil Medhi, and Teo Nam Siang.
Previous to getting my own book back, I finished up drawings for Giulia's and Linda's books.
For Guilia's, I did some ink and colored pencil drawings of the beautiful chive blossoms that were popping up in my old garden. I also found some neat seed hyacinth seed pods to round out the other page (graphite, ink and ink/colored pencil.) I was anxious to get this mailed out before our move and was glad to get it finished.
Linda's book was carefully packed in my bag so I wouldn't lose it. Once we were settled in a bit at the new place, I was able to do some drawings of iris buds that I had from my old garden and then found the perfect finishing touch at the new place once my hostas started blooming. I used ink and colored pencil on the hostas, colored pencil alone on the one iris bud and graphite alone on the other iris bud. Happily, I was able to mail this out to Linda before vacation.
A modified group of us (depending on availability, etc.) plan to continue the exchange for a second round starting in August, so stay tuned!
Over the holidays, I saw a beautiful helleborus plant and decided to bring it home. Despite being called the Christmas Rose or Lenten Rose, hellebores are not closely related to the rose family. Instead, they are an evergreen perennial flowering plant in the family Ranunculaceae.
This particular plant had beautiful, creamy white blossoms with a tight cluster of stamens in the center that open up as the bud flowers. With thick stems that have a red/brown markings and large, serrated leaves, they make a striking addition to the table. I thought it would make a great subject for my next sketchbook entry.
I started with some rough graphite sketches to get a sense of the shapes of both open petals and buds. I did a little bit of sketching of the leaves as well. The biggest challenge, though, was the center of each blossom with up to 150 stamen surrounding the pistil.
I took many reference photos, especially close-ups of the open blossoms. This proved fortuitous as I inadvertently over-watered my beautiful plant and it did not survive! So, between my sketches and photos, I was able to create this sketchbook entry:

I still love the combination of ink and colored pencil, so I went over my initial pencil sketches with a 3x0 (.25) technical pen, adding some details here and there. Then I also used my Faber-Castell Polychromos colored pencils to add color to the page on the left. I think the page turned out well.
I am currently looking for a subject for the sketchbook that I have on my desk. Wish me luck!
It has been quite a while since I have last posted! The fall season leading into the holidays became quite busy and next thing you know, we are here in February!
Just before things ramped up in late fall, I did finish drawing #5 for the sketchbook exchange. I was not sure what to draw since plant life outside was disappearing due to colder weather. Happily, one cool, rainy fall day, my older daughter spotted a very rare find right in our driveway! We had arrived home after school and the kids ran outside for a few minutes to play in the rain. My daughter came in to tell me she found a lizard. I really thought she must be mistaken, but followed outside to take a closer look. What I thought was a clump of wet leaves was actually a salamander!
It was very patient (trying to hide, no doubt, by staying still) while we looked at it for nearly 10 minutes. I took a number of reference photos with my cell phone so we could look it up later. Finally, it scurried up the driveway and burrowed down into the mulch of our flower bed.
We went back inside, and I started to do some research based on the markings it had. It was about 6-7 inches long, dark gray in color with white/light gray markings along the side. What I thought was a rare enough find (first salamander we had seen in our yard in 7 years) was even more rare - this was a small-mouthed salamander (Ambystoma texanum), which is endangered here in Michigan!
Needless to say, I decided that I *had* to draw this for the sketchbook! With the color, I debated doing this just in graphite, but finally decided to choose a range of colored pencils, including cold grey I, V and VI as well as some dark indigo for a little more depth in the darker areas (all Faber-Castell Polychromos.)

Since it took me a while to find something I wanted to draw, I was a bit behind in shipping this out to the next participant. I had wanted to include some autumn leaves, but didn't have time to draw them properly. Then I remembered some leaves I had drawn last year. I dug around and found the ones I wanted and cut them out to include on the opposite page from the salamander. Done!
I love the challenge that each sketchbook presents, depending on what season it is when it arrives, what my personal schedule will allow, what inspires me. I really enjoy that moment when I find something that speaks to me and compels me to just open the book and get started! Art in action :)
By:
Carol Creech,
on 9/25/2014
Blog:
Carol Creech Illustration - Sketches and News
(
Login to Add to MyJacketFlap)
JacketFlap tags:
pen and ink,
stippling,
colored pencil,
leaves,
magnolia,
sketchbook exchange,
crepe myrtle,
blossoms,
pumpkin blossoms,
seed pods,
Add a tag
So, it has been a busy summer...and a busy start to the school year! I am finally getting around to posting my next two sketchbook exchange entries. I have had the pleasure of drawing in 3 other fabulous artists' books, and I have the next one on my desk, waiting to be filled.
DRAWING #3 - August 2014
To catch you up: I decided to do my third sketchbook entry on some of the gorgeous botanicals that I see when we go to Myrtle Beach, SC: the crepe myrtle tree and the magnolia tree.
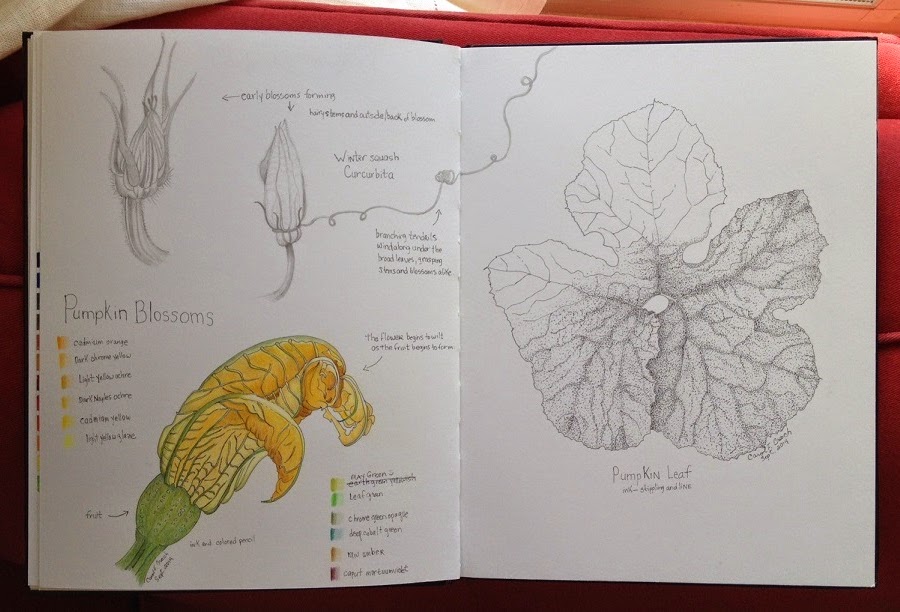
I was very pleased to have been able to cover both of these in the spread, and I kept with my favorite media, ink or ink and colored pencil. On the upper left, you can see a close-up of the crepe myrtle (Lagerstroemia.) This is a close-up of the small, round buds that form before opening up into the frilly, tissue-paper-like blossoms. This particular tree had white blossoms, but we saw many with gorgeous, deep pink blossoms as well. Below the blossom is a sketch of the side and top views of the crepe myrtle seed pods. These dried brown pods contain six segments and look like little stars.On the right side of the spread, I was able to include some drawings of the beautiful Magnolia grandiflorium that are so prevalent in the southern U.S. The upper right shows a cross-section of the immature magnolia seed pod. What a fun find! This has a soft, fluffy white outer covering with a velvety, dark brown stem. The lower right of the page shows the seed pod as it sits among the glossy, dark green leaves. I love the rusty brown underside of the magnolia leaves and tried my best to capture it with colored pencil. DRAWING #4 - September 2014For my next drawing in the sketchbook that arrived in September, I had an easy choice of subject. Upon our return from Myrtle Beach in July, I made a happy discovery in our front flower bed: a pumpkin vine was growing! This was the most inadvertent, yet successful, gardening I have ever done. I had left a large pumpkin to decay in the flower bed last winter (too lazy to get a garbage bag to put it in...) After the hard winter we had, it emerged in the spring, frozen white and starting to decay. The local squirrels had a ball tearing it apart and must have put some seeds in a good spot, since we now have a lovely pumpkin plant there!I loved seeing the bright, orange/yellow blossoms popping up. They also shrivel beautifully as they shrink, curling into wonderful shapes. Once I saw how the pumpkins begin forming under the shriveling blossom, I decided that would be a great way to show both the fruit (in a stage not typically seen) and blossom. I also included some sketches (in graphite) of the blossoms as they begin to form, with hairy stems and beautiful, structural ribbing. These are on the right-side of the spread.
This particular journal was a bit bigger than the others so I wanted to think of something to include on the opposite page of the spread. I love the large, lobed leaves of the pumpkin plant, especially since that is mostly what you see as it grows. They start out tiny and spread into a wonderful, large green canopy covering the blossoms and fruits. This particular leaf is life-size on the page, but in life would grow to nearly twice this size.I initially started with a graphite drawing, but decided to switch to pen using a stippling technique that allows for delicate gradations of shading. Stippling is wonderfully meditative, but it does take some time. As I was a bit behind on my timing to finish the book, I left the leaf half-completed which works well since this is a sketchbook, after all, and not a finished piece.Finally, I added the curling tendril at the top of the page, connecting the spread. These tendrils are found all over underneath the pumpkin leaf canopy, extending from blossoms to stems and wrapping around all of the parts of the plant. I am so excited that we are about halfway through the exchange now! I look forward to working on my next entry so stay tuned!
The sketchbook exchange is off to a wonderful start! I posted about my own sketchbook a few weeks ago. After mailing mine out to the next artist, I waited for the one being sent to me from our fellow participant in Singapore.
It arrived and contained a stunning painting of the nutmeg, both the nut and the leaves, along with wonderful notes about the plant. Now I had to think of something to add to this beautiful book!
I decided to go with a study of a wild gladiolus that I happened to find in my front flower bed. I did not plant it myself, so my guess is that a squirrel or chipmunk may have transplanted it for me from elsewhere? Regardless, it was a beautiful find. I loved the curve of the stems, leaves and purple/pink blossoms.
 I started with some sketches on a separate sheet to get a sense of the plant and what I wanted to emphasize. I also took a lot of reference photos from every angle.
Eventually, the plant left in the flower bed also produced gnarly little seed pods where the blossoms had been, so I was able to take one off and dissect it to include in the sketchbook. I decided to go with my favorite combination of media for the sketchbook - ink and colored pencil.

I am excited to be preparing three pieces for an upcoming exhibit called Fourth Coast Illuminated. This exhibit of art by GNSI artists from the Great Lakes region will feature flora, fauna, and archaeological artifacts of the area.
The exhibit will be held in the Glen Vista Gallery of the Kalamazoo Nature Center from July 1 - August 30, 2014 . Kalamazoo Nature Center is one of the most highly regarded nature centers in the country and is considered a leader in the field.
I will be including three botanical works in the exhibit:
Spring Beauties - ink and colored pencil. White Trillium Bud - ink and colored pencil.
Wildflower Leaf Survey - graphite pencil.
If you are local to the area or find yourself in Kalamazoo this summer, stop by and see the wonderful work that will be on display!
It has been forever since I posted last! Happily, I have been busy with some different projects and finally have something to post about.
I belong to two fantastic groups on Facebook for botanical artists: Botanical Art for Beginners and Botanical Artists. Both contain artists from all over the world who share a common interest in and passion for botanical art and illustration.
Earlier this year, a subset of artists decided to start an international sketchbook exchange, inspired by a similar endeavor by other artists in the group last year. I was thrilled to be invited to participate!
There are 9 of us total, spanning the globe from here in the U.S. to Ireland, Italy, the UK, Austria, Turkey, and Singapore. We all agreed to purchase the same type of sketchbook, Stillman and Birn's hardbound sketchbook from the Zeta series in A5 size (approx. 5.5 x 8.5 inches.) The Zeta series contains 180lb paper suitable for both wet and dry media, but most importantly, it opens up to lay flat, so one can work on a spread of two pages fairly easily.

I began working on the sketchbook during the frenzy of spring wildflower season, so I did a two-page spread of graphite sketches of the nodding trillium and bloodroot, two species that I had specifically hunted for in the woods this season.  I saved the second two-page spread for a wildflower that I have wanted to draw for several years: the yellow trout-lily. The mottled leaves, resembling trout, and graceful, curving blossoms are a treat to find all over the forest floor in early spring.
I mailed my sketchbook out for our first round of exchange last week. We are mailing east, and I am excitedly awaiting the arrival of our Singapore artist's book soon!
Each of us will then have about a month to do a sketch in the book we received and mail it on in the exchange. It should take roughly a year to complete all the books, and we will have a wonderful treasure filled with beautiful artwork from artists around the world! Stay tuned for posts on my latest sketchbook entries!
By:
Carol Creech,
on 3/3/2014
Blog:
Carol Creech Illustration - Sketches and News
(
Login to Add to MyJacketFlap)
JacketFlap tags:
drawing,
ink,
sketching,
colored pencil,
wildflower,
botanical art,
graphite pencil,
African violet,
botanical sketches,
Spring beauty,
Add a tag
Happy March! It's been a long, cold winter, to say the least! I know we are not quite done with it yet here in Michigan, but it helps to be starting a new month, that much closer to spring.
Although I have not done any great quantities of drawing or big projects this winter, I have been keeping my pencils warmed up with sketches here and there.
Below are some studies of a pretty little African violet that I picked up at the store a few weeks ago. The petals are a beautiful purple/violet color with frilled, white edges. I started with pencil sketches using my 4H pencil for a lighter touch:

Such graceful, curving stems! Then I moved on to a more detailed study in ink and colored pencil. I enjoyed rendering the overlapping petals and you can see the variety of blues and violets I chose to layer to get the correct color. The view from behind the flower (on the right) allowed the light to shine through the petals more, so the coloring was slightly brighter and lighter. All of the stems and buds are covered with tiny, fine hairs which I indicated in pen.Finally, I have started to work on new piece, which I hope will be a finished one, probably in ink and colored pencil. This will be the Spring Beauty wildflower that I have sketched and photographed in detail before. I am trying to decide on composition, but definitely want to include the opened flowers as well as the clustered buds that hang gracefully off of the main stem.
I actually like this simple composition below, but may want to include some overlapping elements as these tiny flowers intertwine and carpet the forest floor each spring. Stay tuned for more on this one!
Happy New Year, all!
We have had a bit of an extended winter/holiday break from school since the polar vortex arrived here in Michigan. However, things are starting to thaw out and we will be back on schedule soon.
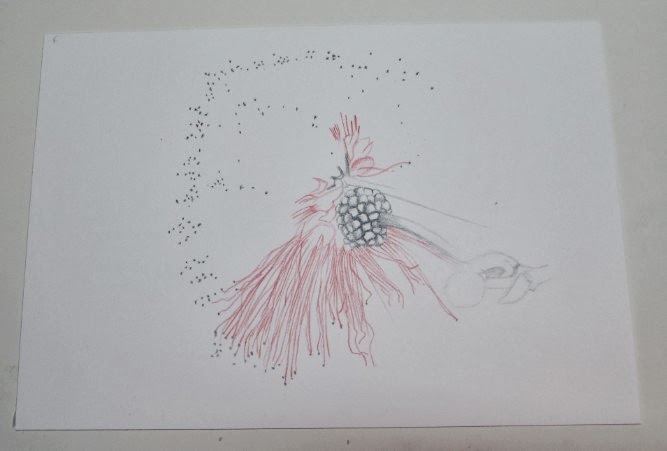
One bonus of the extra time was having the opportunity to get back into drawing after the holidays. Right before our most recent snowstorm and cold snap, we had a chance to get up to our local botanical garden (Matthaei Botanical Gardens in Ann Arbor.) Lots of wonderful plants blooming in the conservatory and my husband was able to take a number of great photos. I was thinking "reference photos!" for my files. Although not ideal, working from photos is still an opportunity to study a plant and practice rendering techniques, especially after a lull in creative activity during the holidays.One of the things we saw really caught my eye, the Powder Puff Tree (Calliandra haematocephala.) It has beautiful, fluffy, bright red/pink blossoms and gorgeous buds right before they bloom. A challenging subject, but one I was really intrigued to figure out. All of those filamentous bits on the flower!!So, I broke out the colored pencils and worked on a study of a blossom. I use Faber-Castell Polychromos pencils and chose a piece of 5 x 7 inch, 140 lb Fabriano Artistico Extra White, hot press watercolor paper. It has a nice weight and takes many layers of pencil well.I started by using Payne's Grey to sketch out the flower bud and dark ends of the filaments. This gave me a bit of confidence by mapping out where I was headed with all of the individual "fluff" of the blossom. Some botanical art friends suggested using different shades of red, so I did just that. I began with Deep Scarlet Red, following the shape of the filaments.
I continued layering with Middle Cadmium Red, Dark Red, and Madder, adding some brighter Geranium Lake at the end. I was careful to leave some white space (shading in light pink) that occurs at the base of the flower where the bloom first opens up. I finished up shading the unopened blossom and branch by adding in some May Green and Olive Green Yellowish. Here is the finished study:I think it turned out rather well for an intimidating subject! As one of my artist friends stated, it is a great start! I would love to do additional studies of the buds, leaves and branches and put them together into a more finished piece.
What projects have you started on or would you like to begin in this new year?
I just want to take a moment to wish all of you who follow along on my creative adventures a very Merry Christmas and Happy New Year! I really appreciate all of your support.
I have not updated this blog as often as I might and am not sure how it will evolve moving forward. I hope to post at least once a month. If you find certain types of posts useful or more interesting, please let me know! I would love to hear from you.
Meanwhile, enjoy the holiday season in whatever way you like best, and I look forward to a productive and creative 2014!
Happy Small Business Saturday!
I am currently offering several different promtions my Etsy shop for your holiday shopping pleasure!- SALE ITEMS: Type sale in the search box to find discounts on regularly priced items.
- 15% off of all purchases made this weekend! (Sat., Nov. 30 - Mon., Dec. 2) Use Code:
SMALLBIZSAT13 at checkout. - FREE GIFT with every purchase made this weekend! (Sat., Nov. 30 - Mon., Dec. 2)
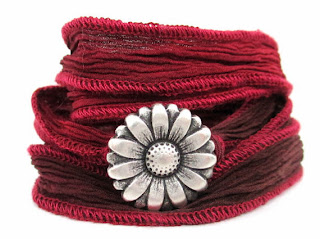
Botanical Silk Wrap Bracelet: Silver Morning Flower on Red
100% silk, hand-dyed ribbon. This one has a beautiful focal button, others have natural stone beads. See the shop for the full selection!
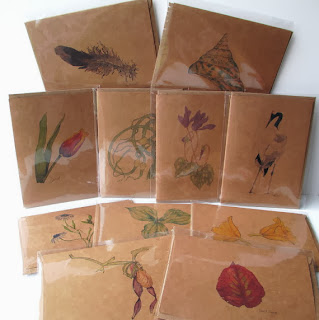
Note Card Sets - choose 6 per set
These feature my original botanical and nature artwork and are printed and packaged for gift-giving.
I also have leather wrap bracelets, adjustable natural stone pendants, earrings, original art and more!I will continue to add new items to the shop each week, so check back often to see what is new! Also, feel free to contact me directly if you have any specific requests for stones, colors, etc. Please keep me in mind as you go about your gifting this holiday season!
Update 10/11/13: Auction Site for Legacy of the Land Through Art is up! Visit the site to view, bid on and/or purchase artwork from the exhibit!
And here is Part II! Wildflower Leaf Survey in graphite pencil. How did I end up deciding to do a piece like this? Why not another plant portrait? Well, as I mentioned in my previous post (see details on my plant portrait of the Jack in the Pulpit,) I inadvertently missed the peak blooming of the wildflowers at Creekshead Preserve (oops!) so I actually spent a lot of time walking the trails, looking at leaves and plants and wondering what they were! I grabbed my trusty Wildflowers of Michigan Field Guide and along with many, many reference photos, identified a number of species that I encountered there either in a few, blooming plants or by leaves, including: - Spring beauty
- Trout lily
- Great white trillium
- False Solomon’s seal
- Bloodroot
- Jack in the Pulpit
- Wild geranium
- Cut-leaved toothwort
- Hanging or nodding trillium
- Ferns (not sure what type)
- White baneberry
- Blue cohosh
- Mayapple
I am sure there are even more that I missed, but I was thrilled to realize that I encountered and was able to identify so many different species in my few outings.Using my reference photos, I did do a few sketches of different plants (see my post from May 28), and initially I thought I would like to do another plant portrait for my second piece. Although I was able to capture some beautiful mayapple blossoms, saw a couple of gorgeous nodding trillium (new to me) as well as pretty purple wild geranium with wonderful, fuzzy buds, I kept coming back to the idea of leaves. Doing a portrait of just one other plant seemed to shortchange the variety that are present in Creekshead Preserve. What if I wasn’t the only one who wanted to explore this area, but happened to miss the 1-2 week period when everything was in full bloom? So, I decided that a survey of 4-6 leaves found in the preserve would best represent it for my second piece. As this exhibits focus is awareness of local land resources and conservation of those, educating an audience about what can be found there might be helpful.What to include? I wanted to make sure I represented some of the plants with broad, umbrella-like leaves that conceal flowers or seed pods, such as mayapple and bloodroot. I also wanted to include more popular ones like trillium with its deeply veined set of three leaves. I first took just four plants and put them into an evenly-spaced layout.Here is a quick, rough sketch:It looked OK, but I kept thinking I wanted to add more and include different-shaped leaves that I found intriguing, such as the False Solomon’s seal and cut-leaved toothwort. With the helpful advice of my husband (my go-to second set of eyes on these things!), I decided to go with six different species and put them in a vertical format. I think this allowed for more visual interest and gave me more flexibility on where to place which leaves. For example, I love the way the False Solomon’s Seal leaves droop gracefully forward on the stem. Placing this in the upper left corner of the piece worked well compositionally, pointing the eye towards the rest of the leaves on the page.I spent a lot of time working out the composition and making sure my line drawings were accurate. I liked it so much that I decided to do the final piece entirely in graphite pencil. I wanted to eliminate any distractions and emphasize the shape and veining patterns on each of the leaves. I added a light grid around each leaf so that the leaves could slightly overlap it and pop out of the "frame" a bit, and it also allowed me to create space under each for a simple, printed label.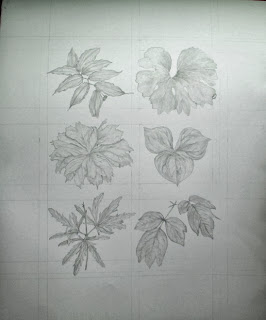 I started out with clear line drawings of the leaf perimeters as well as major veins, using my Faber-Castell 4H pencil. I ended up using a fine-tipped embossing tool to do much of the veining, especially on the bloodroot and trillium as the veins appear lighter than the surrounding leaf. I also did all of my initial shading with the 4H as it allowed me to map out the shading on each leaf, maintaining a consistent, light layer. I continued layering graphite with a softer 2H and sometimes HB, darkening shadow areas and overlaps, giving more depth to each leaf. After setting the piece aside, I took one more look and lightened some areas with my trusty, kneaded eraser.
Once I was satisfied with the shading (and at the point where I did not want to start overworking it!), I darkened the grid lines, erased any extra guidelines and added labels for each leaf, printing in graphite along the bottom of each row.
The final touch, of course, was to have the finished piece framed. The kind and talented staff at Dexter Picture Frame Company really completed the piece, helping me to choose a double mat with a light gray interior that really highlighted the graphite work. I also chose to use the same, clear cherry wood frame that I used for the Jack in the Pulpit piece. The wood is from Paul Hickman (Urban Ashes) who uses urban salvaged or deconstructed wood from right here in Michigan. I delivered both pieces to Matthaei Botanical Gardens today, along with all of the other 40+ artists in the show. The show opens next Saturday, October 12 and runs through November 10 and will be on display in the Botanical Gardens building at at 1800 North Dixboro Road in Ann Arbor. The exhibit will be available in an online art auction as well, which I will update here when I get the details.All pieces will be for sale, with part of the proceeds going to the artist and part going to Legacy Land Conservancy. After November 10, the exhibit will be stored again until spring when it will be exhibited again at the Sandhill Crane Vineyards in Jackson, MI. Be sure to stop by!
Update 11/8/13: SOLD! Thank you to the purchaser!
Update 10/11/13: Auction Site for Legacy of the Land Through Art is up! Visit the site to view, bid on and/or purchase artwork from the exhibit!
It has been quite some time since I updated you on my pieces for the Legacy of the Land Through Art Exhibit (via
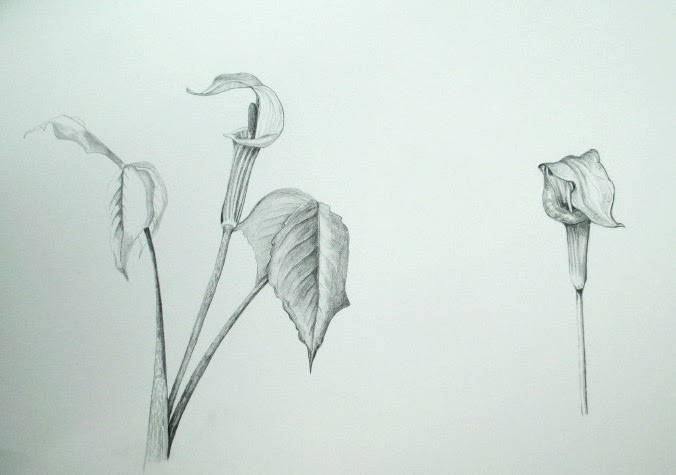
Legacy Land Conservancy) coming up next month. I spent a good deal of time working on sketches this summer and ended up with two final pieces for the exhibit by the September 9th deadline. This post covers the process for finishing the first of the two, my Jack in the Pulpit portrait in ink and colored pencil.
Jack in the Pulpit is a woodland perennial that I encountered quite a bit in my forays to
Creekshead Nature Preserve, my assigned project property. Creekshead is known for its spring wildflower display, and I made a number of trips out there in April, May and June to explore the area.
Ironically, due to some tight scheduling in the spring and weather-related delays, I actually missed peak bloom! Luckily, my focus is on plant portraits and details. There were still a number of individual plants blooming during my explorations that I was able to get a broad picture of what species were in the preserve and which I might want to depict on paper. Jack in the pulpit was one of the species that was present in great numbers, right alongside the trail, each time I went to the preserve. Its distinctive flower, a large, cylindrical, hooded flower with beautiful maroon/brown stripes, made it top on my list for a plant portrait.
I was able to observe and photograph the jack in the pulpit through early spring when the leaves were just starting to form and unfurl through mid-late summer when the berries were present in green, before the fall turn to bright red. I worked mainly from my photographs as my time in the field was very limited.
Studies and SketchesHere are some of my initial sketches and studies as I began to get a feel for the plant:
Field study - sketches and notes. Graphite study from reference photos.
Color study - using Faber-Castell Polychromos colored pencils.
Composition I struggled with what exactly to show in my finished piece. I wanted to depict the different stages of the plant as I observed it, but also wanted to show both the male and female of the species, the former with one set of three leaves, the latter with two sets of three leaves, each with one of the unique, pitcher-like flowers. I played around with sketches on tracing paper and also printed and cut out sketches so that I could move them around, trying out different layouts.

I played with the idea of making more of a composed floral piece vs. showing the plants in a more linear fashion in order to better see the features of the striping on the flower and hood as well as the mottling on the stems.
Above is a test composition that I liked as it shows the broad, mature, umbrella-like leaves above the flower, as well as the female plant and some of the early spring versions of the plant with leaves unfurling. However, I felt like the composition was hiding some of the details of each of those and I also thought that if I rendered them all in color, they might blend together too much.

Here is another composition that I felt showed the plants more clearly, but it seemed to be a bit too busy, without a clear path for the eye. I also started running out of time and with the level of detail I wanted to give each plant, I wasn't sure I could complete it by the deadline!
Ultimately, I decided on a more linear composition with fewer plants - just one male and one female. In one of my last trips to the preserve, I did get a chance to photograph the fruit directly, so I used that to fill in the last bit of the portrait, showing more of the life cycle of the plant, which is what I wanted to achieve.
I worked with a local gallery,
Dexter Picture Frame Company, to get both this and the other piece framed professionally for the exhibit. I chose to go with a natural wood frame, in keeping with the organic nature of the piece. I also kept the ties local by choosing a Paul Hickman frame from his
Urban Ashes line which uses salvaged or deconstructed wood from here in Michigan. This is the clear cherry wood, and I thought it complimented the colors in the stem very well.
Stay tuned for Part II for details on the second piece that I completed for the exhibit!
It's been awhile since I have posted! Summer is flying by and I am still plugging away on my drawing project for Legacy Land Conservancy.
I did get a chance for some travel this month with a trip to Myrtle Beach, SC. In addition to our usual beach trips, we made a brief visit to my favorite Brookgreen Gardens. I really must try to get there when it isn't blazing hot! Though I didn't do much sketching, I did get some photos:
Captured a dragonfly sitting still in one of the beautiful fountains.
Lilies in the children's garden.
Live Oak Allee with gorgeous, colorful caladiums underneath. And, of course, lots of magnolias, some with their fruits forming.
I loved this curly plant, also in the children's garden. No idea what it is, but it is wonderfully whimsical!We also had a chance to visit Alligator Adventure, which had quite a lot to see! Alligators, crocodiles, birds, and other reptiles. We even saw them do an alligator feeding. Baby alligator sunning on some roots.
Lots of young alligators hanging out in the hot weather.
We even saw albino alligators!It was another great trip, and I look forward to going again! Now, back to the drawing board... :)
By:
Carol Creech,
on 5/28/2013
Blog:
Carol Creech Illustration - Sketches and News
(
Login to Add to MyJacketFlap)
JacketFlap tags:
ink,
graphite,
colored pencil,
art project,
exhibit,
wildflowers,
botanical art,
land conservation,
Legacy Land Conservancy,
Add a tag
I am excited to be one of approximately 40 artists chosen to participate in the "Legacy of the Land Through Art" mixed-media art exhibit to be on display later this year.
The exhibit is being hosted by Legacy Land Conservancy, in association with the University of Michigan, Matthaei Botanical Gardens, and the Nichols Arboretum. The first exhibit will be at Matthaei Botanical Gardens this fall and a second exhibit will be at Sandhill Crane Vineyards in the spring of 2014. Fostering recognition of the connection between land and people is a key component of Legacy’s mission, so this exhibit is one way to bring this connection to the public.
Each participating artist is given a land assignment in Washtenaw or Jackson counties to explore. Some are assigned to a preserve managed by Legacy Land Conservancy, while others are assigned to private properties of interest in those two southeastern Michigan counties. The artist is to experience the land directly and create 1 to 3 pieces of art inspired by their interaction.
I have been assigned to Creekshead Nature Preserve, a 27 acre mature beech-maple-basswood forest with spectacular spring wildflower blooms. I have made about 4 or 5 trips out to Creekshead this spring. Ironically, due to a scheduling problem of my own right at the peak, I missed the height of the spring wildflower blooms. Yikes! I nearly panicked, but in my trips to the preserve, I did manage to see and identify a number of species of wildflowers, including:
- jack-in-the-pulpit
- large white trillium
- nodding trillium
- baneberry
- cut-leaved toothwort
- bloodroot
- mayapple
- trout lily
- wild geranium
My trips out were sometimes brief and other times with my husband and young kids, so I only did a few field sketches. I took nearly 250 reference photos, though, and am currently working on more detailed studies from my photos. Some of these preliminary studies are below:Jack-in-the-pulpit field sketches and notes.
Jack-in-the-pulpit study in graphite. This was done in my sketchbook which is Stonehenge paper, so it has a slightly rough texture.
This is a study of wild geranium that I just started. It's in graphite (apologies for the quick photo, rather than a scan). The lower right corner has a small color study (ink and colored pencil) of the flower buds. This was done on Fabriano Artistico Extra White Hot Press watercolor paper. It takes layers of pencil well and also has a nice, smooth texture for blending.

This is a graphite study of a mayapple blossom done in my Stonehenge sketchbook. And here is an experiment on tan, toned paper. This is a white trillium (Trillium grandiflorium) study. I used graphite and then layered some colored pencil on top. The paper did not take the layers of pencil well, so I only did a partial study. Still, interesting to get a feel for the subject.I am looking forward to doing additional studies and then deciding on what my final pieces will contain. I found it very intriguing to be in the preserve past-peak, wondering what the different plants were without an identifying blossom attached, so I am considering doing a piece of just leaves from different plants. What do you think might make a compelling piece? What would you be curious to see in an exhibit like this?I will keep posting with my progress as I continue drawing and making composition decisions. I do also post updated sketches on my Facebook page and Flickr account, so feel free to check those more frequently.
I have some gorgeous red and yellow tulips in a vase this week. One of my very favorite flowers, I have always wanted to draw them, but get intimidated by the feathery red that blends into the yellow on the petals. I tend to use colored pencil and sometimes get too heavy-handed with it. I often end up with a muddy mix, rather than a delicate layering.
Clearly, I could practice just using a lighter touch and sharper pencils! However, today I wanted to try out a little mixed media technique and lay down a watercolor wash to give me some background on top of which to add pencil.
One of my retreat friends used this technique beautifully this weekend while painting a skunk cabbage in all of its maroon and cream glory. It reminded me that although I have not done much painting with watercolor, I could definitely use it as a base for a detailed colored pencil drawing, especially when layering very light colors with darker ones.
I started out with a light graphite pencil sketch to get the shapes. I have a small Windsor & Newton travel watercolor kit and used one of my travel watercolor brushes to grab a little bit of yellow and do a light wash on the petals. I also did the same with a light wash of green on the stem and leaves.
I painted on Fabriano Artistico Extra White hot press watercolor paper. I took some quick snapshots to show the process, but apologize for the poor quality of the photos! It should give you an idea of how I worked through the study, at least.Next, I started adding in layers of colored pencil. I use Faber-Castell Polychromos pencils. For this particular study, I used dark red for the deepest shadows in the petals and layered deep scarlet red and pale geranium lake on top for the red sections. For the yellow, I added some shadows with light yellow ochre and dark naples ochre. I kept layering, attempting to capture the subtle texture of these silky petals.  I used light green, permanent green, may green, and pine green for the leaves and stem. As you can see below in the photo of my whole page, I did some test patches for each pencil before I used them to make sure I had the right colors. I need to do a color chart of all of my pencils to use as a reference! Those can be fun to make and good pencil practice - perhaps another blog post?
When I finished, I set the drawing aside for a few minutes and came back to it, darkening some shadows for definition and adding some highlights with my kneaded eraser. Here is the final. It's a photo (couldn't get the scan to look right) and even this doesn't quite show the darker reds as much as the actual. Overall, I really liked using a watercolor wash as a base. I have more practicing to do, but look forward to using this technique again.
Do you use mixed media in your work? What combinations do you like and why?
By:
Carol Creech,
on 4/28/2013
Blog:
Carol Creech Illustration - Sketches and News
(
Login to Add to MyJacketFlap)
JacketFlap tags:
wildflowers,
art retreat,
skunk cabbage,
Pierce Cedar Creek Institute,
hepatica,
trout lily,
spring beauties,
graphite,
snake,
sketching,
hiking,
colored pencil,
Add a tag
If you have been following along, you know that I had the opportunity to spend a wonderful day at Pierce Cedar Creek Institute yesterday at an art retreat. I, along with about 8 other nature artists, spent time together catching up and creating some new artwork. We had a fantastic introductory class in etching with PCCI's first artist-in-residence, Doet Boersma. Read about it in my previous post.
After our etching class and a tasty lunch, we all spent the afternoon hiking the many trails at PCCI, sketching and painting whatever caught our attention. After such a long winter, it was a pleasure to have temperatures in the 60s and lots of sun! The woods are just starting to bud and spring plants are beginning to bloom.
I decided to hike one of the easier trails so I had plenty of time for drawing as I spotted wildflowers or other interesting subjects.
Three of us headed down toward the boardwalk behind the visitor's center, passing many, pretty little spring beauties (Claytonia virginica) along the trail. These delicate, pink-striped flowers are among the first to pop up through the leaf litter each spring.

 As we headed onto the boardwalk, I spotted a few blooming marsh marigolds (Caltha palustris). I missed the chance to sketch them last time I was here, so I set my gear down and decided to do a little drawing.
 Marsh marigold sketches are in graphite at the top of the page. Another plant that we saw everywhere was s
kunk cabbage (
Symplocarpus foetidus). They have some really interesting shapes and colors, so I had to stop and capture those, too. I ended up doing graphite and added colored pencil on top. Not the best combo, since it gets muddy and smears. But I wanted to add some color to indicate the deep maroon next to the light yellow-green in the same plant. In the swampy area near the rest of the skunk cabbage, I did a quick sketch of a tree with bright green moss growing by the roots. I chose to use gray toned paper for this one. Tree with skunk cabbage growing all around.
My quick sketch on toned paper. I didn't do a great amount of detail, but really wanted to capture a bit of the moss.
I made my way up the blue trail to the Maple and Beech forest next. This is one of my favorite spots and one I visited before. The beech trees look so beautiful and delicate, especially the smaller ones, with their papery white leaves rustling in the breeze.  Along this whole area, the forest floor is covered in leaf litter and other winter debris, but up throughout all of those leaves, sometimes growing right through them, are the spring wildflowers. I saw trout lily (Erythronium americanum) leaves everywhere, but only one blossom so far. My guess is that in the next week or two, that area will be bright with the curling stems and yellow blossoms.
  I also spotted more spring beauties and some clumps of light purple flowers that are slightly bigger than spring beauties. They also have a wonderful, hairy white stem. I believe these are hepatica.
I found one with its three-lobed leaves intact and did some sketching on the same toned gray paper as the tree I did earlier.
After I finished this study, I simply enjoyed walking the rest of the trail, looking for more flowers and listening to the birds singing. My last interesting find was right at the edge of the trail as it came out of the maple and beech forest into the prairie section. It was sunny on the path and I had my walking stick with me, as usual. I was studying the left side of the trail for wildflowers and heard a rustling off to my right. I stopped and saw a thick snake, about 14 inches long, with light tan and brown markings. It blended in perfectly with the surrounding leaf litter. It has stopped and was waiting for me to move on. Can you see it in the photo above? Its head is toward the top of the photo, right in between the sideways "V"-shaped tree branches and has two black patches on either side.I took my camera out and captured a few photos before moving on. It flared its head out as it waited for me to leave, reminding me of a cobra. I thought it might be the elusive Massasauga rattlesnake, Michigan's only venomous snake. However, further research when I returned home revealed this to actually be an eastern hog-nosed snake. It is often mistaken for the Massasauga rattlesnake. Those dark head markings really clarified it for me - in any photos you see, the Massasauga has more of a striped appearance. Also, I read that the hog-nosed snake tends to flare its head when disturbed. Either way, a rare and beautiful sighting!
We finished the day by gathering in Doet's studio again to pick up our etching prints that we created earlier in the day and exchange business cards and contact information. I am so glad to have had the chance to visit PCCI and my artist friends, even if just for one day. I look forward to returning again!
I had an opportunity to return to Pierce Cedar Creek Institute (PCCI) in Hastings, MI yesterday for an artist's retreat. I had a terrific time and met a great group of artists two years ago when we went.
Many of the same folks and a few new ones gathered again this weekend. I was only able to go for the day, but it was a gorgeous day. Temperatures were in the high 60s and the sun was shining. Fabulous after this long, cold winter! I managed to get some good sketching done and also had a surprise workshop from the first PCCI artist-in-residence, Doet Boersma.
I arrived to PCCI at 9 a.m. and the day simply flew by. We started the day by heading to Doet's studio. She is an amazing artist and so generous to share her knowledge, time and equipment with us. A gracious host, she made sure we had our coffee or tea before we started! Then she proceeded to give us a quick class on etching. We each chose a drawing or photo - either something from our sketchbook or a photo of our own from online that we printed out. I chose to work with one of my magnolia photos that I took last summer in South Carolina.
From there, we each cut a small piece of plastic binding cover material and chose an etching tool, which could be anything from a screwdriver to a scratchboard point or whatever hard-tipped scratching tool you prefer, as long as you can scratch your design into the plastic. The focus is on scratching the dark areas of the design as the print will be done in reverse, e.g., whatever you scratch the most will retain the most ink and print the darkest.

print. You can reuse the pla
te again and again, applying more ink, different colors, choosing to darken or lighten areas depending on how your print comes out.My first print included mainly some green ink and turned out alright, but I wanted to tweak it some more.First of 3 "magnolia" prints.
For my second print, I added some brown ink to the background and darker areas, but clearly did not incorporate it as well! Second of 3 "magnolia" prints.
My final print turned out the best, I think. I incorporated some reddish-brown ink and pulled out some highlights in the flower and bud a bit more. The sepia tones really compliment the magnolia as the back of the actual leaves is a rich, red-brown color.
Final of 3 "magnolia" prints.
It was such a fun process! Once we all did our first print, you could feel the creative energy rising in the room as people started thinking of how they wanted to tweak their prints, bustling about for more paint, wiping their plates to get the right amount of ink and "dirt" in the background. Everyone did at least 3, some 4 or 5. It was a productive few hours! Great to learn more about this traditional craft.We left the prints to dry while we took a lunch break and spent the afternoon outdoors. Stay tuned for my next post with photos and sketches from the afternoon hike!
View Next 25 Posts


Hi Carol, your land conservation project sounds fun. Congrats on being invited to take part.I'll be watching to see what more you discover as the seasons pass by out there. Yesterday I found two morel mushrooms, seems a little late in the season for them, but maybe not, considering the slow warming we've had this spring in our area. Glad you're keeping yourself outdoors and drawing.
Sounds like a fun project and your sketches look wonderful!
Thanks, Anita and Janene! Yes, I look forward to exploring the preserve this summer and fall. Hope you are both able to get out and about to do some drawing of all the great spring plants!
Carol